常用LVM命令总结: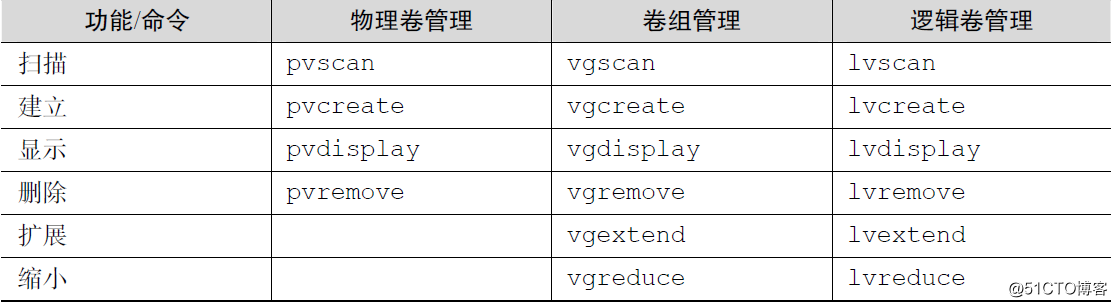
注: 以下案例均采用的系统版本是Oracle linux 7.3
LVM案例:
部署案例:
第 1 步:让新添加的两块硬盘设备支持LVM 技术。
[root@linuxprobe ~]# pvcreate /dev/sdb /dev/sdc
Physical volume "/dev/sdb" successfully created
Physical volume "/dev/sdc" successfully created
第 2 步:把两块硬盘设备加入到vgoracle卷组中,然后查看卷组的状态。卷组名称可以根据实际情况自定义
[root@oelora ~]# vgcreate vgoracle /dev/sdb /dev/sdc
  Volume group "vgoracle" successfully created
[root@oelora ~]# vgdisplay vgoracle
  --- Volume group ---
  VG Name               vgoracle
  System ID
  Format                lvm2
  Metadata Areas        2
  Metadata Sequence No  1
  VG Access             read/write
  VG Status             resizable
  MAX LV                0
  Cur LV                0
  Open LV               0
  Max PV                0
  Cur PV                2
  Act PV                2
  VG Size               39.99 GiB
  PE Size               4.00 MiB
  Total PE              10238
  Alloc PE / Size       0 / 0
  Free  PE / Size       10238 / 39.99 GiB
  VG UUID               fFAto3-gIjc-ArFU-N69J-4LU5-G1iq-969tec
第3 步:切割出一个约为150MB 的逻辑卷设备。
说明:
这里需要注意切割单位的问题。在对逻辑卷进行切割时有两种计量单位。第一种是以容
量为单位,所使用的参数为-L。例如,使用-L 150M 生成一个大小为150MB 的逻辑卷。另外
一种是以基本单元的个数为单位,所使用的参数为-l。每个基本单元的大小默认为4MB。例
如,使用-l 37 可以生成一个大小为37×4MB=148MB 的逻辑卷。
[root@oelora ~]# lvcreate -n vo -l 37 vgoracle
  Logical volume "vo" created.
[root@oelora ~]# lvdisplay
  --- Logical volume ---
  LV Path                /dev/vgoracle/vo
  LV Name                vo
  VG Name                vgoracle
  LV UUID                T9wwib-tClT-TUMz-RJBV-QHTu-dc0E-wF33fS
  LV Write Access        read/write
  LV Creation host, time oelora, 2019-01-10 10:47:15 +0800
  LV Status              available
  \# open                 0
  LV Size                148.00 MiB
  Current LE             37
  Segments               1
  Allocation             inherit
  Read ahead sectors     auto
  \- currently set to     8192
  Block device           251:0
第 4 步:把生成好的逻辑卷进行格式化,然后挂载使用。
[root@oelora ~]# mkfs.ext4 /dev/vgoracle/vo
mke2fs 1.42.9 (28-Dec-2013)
Filesystem label=
OS type: Linux
Block size=1024 (log=0)
Fragment size=1024 (log=0)
Stride=0 blocks, Stripe width=0 blocks
38000 inodes, 151552 blocks
7577 blocks (5.00%) reserved for the super user
First data block=1
Maximum filesystem blocks=33816576
19 block groups
8192 blocks per group, 8192 fragments per group
2000 inodes per group
Superblock backups stored on blocks:
        8193, 24577, 40961, 57345, 73729

Allocating group tables: done
Writing inode tables: done
Creating journal (4096 blocks): done
Writing superblocks and filesystem accounting information: done

[root@oelora ~]# mkdir /oracle
[root@oelora ~]# mount /dev/vgoracle/vo /oracle
第5 步:查看挂载状态,并写入到配置文件,使其永久生效。
[root@oelora ~]# df -h
Filesystem               Size  Used Avail Use% Mounted on
devtmpfs                 2.0G     0  2.0G   0% /dev
tmpfs                    2.0G   84K  2.0G   1% /dev/shm
tmpfs                    2.0G  8.9M  2.0G   1% /run
tmpfs                    2.0G     0  2.0G   0% /sys/fs/cgroup
/dev/sda3                 42G  5.3G   37G  13% /
/dev/sda1                497M  183M  315M  37% /boot
tmpfs                    396M   16K  396M   1% /run/user/42
tmpfs                    396M     0  396M   0% /run/user/0
/dev/mapper/vgoracle-vo  140M  1.6M  128M   2% /oracle
[root@oelora ~]# echo "/dev/vgoracle/vo /oracle ext4 defaults 0 0" >> /etc/fstab
[root@oelora ~]# more /etc/fstab

#
# /etc/fstab
# Created by anaconda on Thu Jan 10 08:27:01 2019
#
# Accessible filesystems, by reference, are maintained under '/dev/disk'
# See man pages fstab(5), findfs(8), mount(8) and/or blkid(8) for more info
#
UUID=788f2c24-2f34-4616-a170-4074dee2b669 /                       xfs     defaults        0 0
UUID=64a8f3f5-d8b2-42cf-9c8e-a5d57725f527 /boot                   xfs     defaults        0 0
UUID=95c524ac-5b49-49ac-958b-bf4d2b756ca1 swap                    swap    defaults        0 0
/dev/vgoracle/vo /oracle ext4 defaults 0 0
LVM部署完成
LVM扩容案例:
首先取消挂载上一个案例中的磁盘目录[root@oelora ~]# umount /oracle
第 1 步:把上一个实验中的逻辑卷vo 扩展至290MB。
[root@oelora ~]# lvextend -L 290M /dev/vgoracle/vo
  Rounding size to boundary between physical extents: 292.00 MiB.
  Size of logical volume vgoracle/vo changed from 148.00 MiB (37 extents) to 292.00 MiB (73 extents).
  Logical volume vgoracle/vo successfully resized.
第 2 步:检查硬盘完整性,并重置硬盘容量。(如果发现容量未增加则重启系统在重置容量)
[root@oelora ~]# lvextend -L 290M /dev/vgoracle/vo
  Rounding size to boundary between physical extents: 292.00 MiB.
  Size of logical volume vgoracle/vo changed from 148.00 MiB (37 extents) to 292.00 MiB (73 extents).
  Logical volume vgoracle/vo successfully resized.
[root@oelora ~]# e2fsck -f /dev/vgoracle/vo
e2fsck 1.42.9 (28-Dec-2013)
Pass 1: Checking inodes, blocks, and sizes
Pass 2: Checking directory structure
Pass 3: Checking directory connectivity
Pass 4: Checking reference counts
Pass 5: Checking group summary information
/dev/vgoracle/vo: 11/38000 files (0.0% non-contiguous), 10453/151552 blocks
第 3 步:重新挂载硬盘设备并查看挂载状态。
[root@oelora ~]# mount -a
[root@oelora ~]# df -h
Filesystem               Size  Used Avail Use% Mounted on
devtmpfs                 2.0G     0  2.0G   0% /dev
tmpfs                    2.0G   84K  2.0G   1% /dev/shm
tmpfs                    2.0G  8.9M  2.0G   1% /run
tmpfs                    2.0G     0  2.0G   0% /sys/fs/cgroup
/dev/sda3                 42G  5.3G   37G  13% /
/dev/sda1                497M  183M  315M  37% /boot
tmpfs                    396M   12K  396M   1% /run/user/42
tmpfs                    396M     0  396M   0% /run/user/0
/dev/mapper/vgoracle-vo  279M  2.1M  259M   1% /oracle
扩容LVM完成
缩小LVM:
取消上面案例中挂载的磁盘目录[root@oelora ~]# umount /oracle
第 1 步:检查文件系统的完整性。
[root@oelora ~]# e2fsck -f /dev/vgoracle/vo
e2fsck 1.42.9 (28-Dec-2013)
Pass 1: Checking inodes, blocks, and sizes
Pass 2: Checking directory structure
Pass 3: Checking directory connectivity
Pass 4: Checking reference counts
Pass 5: Checking group summary information
/dev/vgoracle/vo: 11/74000 files (0.0% non-contiguous), 15507/299008 blocks
第 2 步:把逻辑卷vo 的容量减小到120MB。
[root@oelora ~]# resize2fs /dev/vgoracle/vo 120M
resize2fs 1.42.9 (28-Dec-2013)
Resizing the filesystem on /dev/vgoracle/vo to 122880 (1k) blocks.
The filesystem on /dev/vgoracle/vo is now 122880 blocks long.

[root@oelora ~]# lvreduce -L 120M /dev/vgoracle/vo
  WARNING: Reducing active logical volume to 120.00 MiB.
  THIS MAY DESTROY YOUR DATA (filesystem etc.)
Do you really want to reduce vgoracle/vo? [y/n]: y
  Size of logical volume vgoracle/vo changed from 292.00 MiB (73 extents) to 120.00 MiB (30 extents).
  Logical volume vgoracle/vo successfully resized.
第 3 步:重新挂载文件系统并查看系统状态。
[root@oelora ~]# mount -a
[root@oelora ~]# df -h
Filesystem               Size  Used Avail Use% Mounted on
devtmpfs                 2.0G     0  2.0G   0% /dev
tmpfs                    2.0G   84K  2.0G   1% /dev/shm
tmpfs                    2.0G  8.9M  2.0G   1% /run
tmpfs                    2.0G     0  2.0G   0% /sys/fs/cgroup
/dev/sda3                 42G  5.3G   37G  13% /
/dev/sda1                497M  183M  315M  37% /boot
tmpfs                    396M   16K  396M   1% /run/user/42
tmpfs                    396M     0  396M   0% /run/user/0
/dev/mapper/vgoracle-vo  113M  1.6M  103M   2% /oracle
缩容LVM完成
逻辑卷快照:
注:
快照卷的容量必须等同于逻辑卷的容量;
快照卷仅一次有效,一旦执行还原操作后则会被立即自动删除。
首先查看卷组信息
[root@oelora ~]# vgdisplay
  --- Volume group ---
  VG Name               vgoracle
  System ID
  Format                lvm2
  Metadata Areas        2
  Metadata Sequence No  4
  VG Access             read/write
  VG Status             resizable
  MAX LV                0
  Cur LV                1
  Open LV               1
  Max PV                0
  Cur PV                2
  Act PV                2
  VG Size               39.99 GiB
  PE Size               4.00 MiB
  Total PE              10238
  Alloc PE / Size       30 / 120.00 MiB
  Free  PE / Size       10208 / 39.88 GiB
  VG UUID               fFAto3-gIjc-ArFU-N69J-4LU5-G1iq-969tec
第 1 步:使用-s 参数生成一个快照卷,使用-L 参数指定切割的大小。另外,还需要在命令后面写上是针对哪个逻辑卷执行的快照操作。
[root@oelora ~]# lvcreate -L 120M -s -n SNAP /dev/vgoracle/vo
  Using default stripesize 64.00 KiB.
  Logical volume "SNAP" created.

[root@oelora ~]# lvdisplay
  --- Logical volume ---
  LV Path                /dev/vgoracle/vo
  LV Name                vo
  VG Name                vgoracle
  LV UUID                T9wwib-tClT-TUMz-RJBV-QHTu-dc0E-wF33fS
  LV Write Access        read/write
  LV Creation host, time oelora, 2019-01-10 10:47:15 +0800
  LV snapshot status     source of
                         SNAP [active]
  LV Status              available
  # open                 1
  LV Size                120.00 MiB
  Current LE             30
  Segments               1
  Allocation             inherit
  Read ahead sectors     auto
  - currently set to     8192
  Block device           251:0

  --- Logical volume ---
  LV Path                /dev/vgoracle/SNAP
  LV Name                SNAP
  VG Name                vgoracle
  LV UUID                JAu30I-CrqR-il0W-fYS8-REhm-w5gx-u0dFo7
  LV Write Access        read/write
  LV Creation host, time oelora, 2019-01-10 11:13:21 +0800
  LV snapshot status     active destination for vo
  LV Status              available
  # open                 0
  LV Size                120.00 MiB
  Current LE             30
  COW-table size         120.00 MiB
  COW-table LE           30
  Allocated to snapshot  0.01%
  Snapshot chunk size    4.00 KiB
  Segments               1
  Allocation             inherit
  Read ahead sectors     auto
  - currently set to     8192
  Block device           251:3
第 2 步:在逻辑卷所挂载的目录中创建一个100MB 的垃圾文件,然后再查看快照卷的状态。可以发现存储空间占的用量上升了。
[root@oelora ~]# dd if=/dev/zero of=/oracle/files count=1 bs=100M
1+0 records in
1+0 records out
104857600 bytes (105 MB) copied, 3.36023 s, 31.2 MB/s

[root@oelora ~]# lvdisplay
  --- Logical volume ---
  LV Path                /dev/vgoracle/vo
  LV Name                vo
  VG Name                vgoracle
  LV UUID                T9wwib-tClT-TUMz-RJBV-QHTu-dc0E-wF33fS
  LV Write Access        read/write
  LV Creation host, time oelora, 2019-01-10 10:47:15 +0800
  LV snapshot status     source of
                         SNAP [active]
  LV Status              available
  # open                 1
  LV Size                120.00 MiB
  Current LE             30
  Segments               1
  Allocation             inherit
  Read ahead sectors     auto
  - currently set to     8192
  Block device           251:0

  --- Logical volume ---
  LV Path                /dev/vgoracle/SNAP
  LV Name                SNAP
  VG Name                vgoracle
  LV UUID                JAu30I-CrqR-il0W-fYS8-REhm-w5gx-u0dFo7
  LV Write Access        read/write
  LV Creation host, time oelora, 2019-01-10 11:13:21 +0800
  LV snapshot status     active destination for vo
  LV Status              available
  # open                 0
  LV Size                120.00 MiB
  Current LE             30
  COW-table size         120.00 MiB
  COW-table LE           30
  Allocated to snapshot  81.15%
  Snapshot chunk size    4.00 KiB
  Segments               1
  Allocation             inherit
  Read ahead sectors     auto
  - currently set to     8192
  Block device           251:3
第 3 步:为了校验SNAP 快照卷的效果,需要对逻辑卷进行快照还原操作。在此之前记得先卸载掉逻辑卷设备与目录的挂载。
[root@oelora ~]# umount /oracle
[root@oelora ~]# lvconvert --merge /dev/vgoracle/SNAP
  Merging of volume vgoracle/SNAP started.
  vo: Merged: 31.39%
  vo: Merged: 100.00%
第 4 步:快照卷会被自动删除掉,并且刚刚在逻辑卷设备被执行快照操作后再创建出来的100MB 的垃圾文件也被清除了。
[root@oelora ~]# mount -a
[root@oelora /]# ls /oracle/
lost+found
LVM快照完成
删除逻辑卷:
说明:当生产环境中想要重新部署LVM 或者不再需要使用LVM 时,则需要执行LVM 的删除操作。为此,需要提前备份好重要的数据信息,然后依次删除逻辑卷、卷组、物理卷设备,这个顺序不可颠倒。
第 1 步:取消逻辑卷与目录的挂载关联,删除配置文件中永久生效的设备参数。
[root@oelora /]# umount /oracle
[root@oelora /]# vim /etc/fstab

#
# /etc/fstab
# Created by anaconda on Thu Jan 10 08:27:01 2019
#
# Accessible filesystems, by reference, are maintained under '/dev/disk'
# See man pages fstab(5), findfs(8), mount(8) and/or blkid(8) for more info
#
UUID=788f2c24-2f34-4616-a170-4074dee2b669 /                       xfs     defaults        0 0
UUID=64a8f3f5-d8b2-42cf-9c8e-a5d57725f527 /boot                   xfs     defaults        0 0
UUID=95c524ac-5b49-49ac-958b-bf4d2b756ca1 swap                    swap    defaults        0 0
第 2 步:删除逻辑卷设备,需要输入y 来确认操作。
[root@oelora /]# lvremove /dev/vgoracle/vo
Do you really want to remove active logical volume vgoracle/vo? [y/n]: y
  Logical volume "vo" successfully removed
第 3 步:删除卷组,此处只写卷组名称即可,不需要设备的绝对路径。
[root@oelora /]# vgremove vgoracle
  Volume group "vgoracle" successfully removed
第 4 步:删除物理卷设备。
[root@oelora /]# pvremove /dev/sdb /dev/sdc
  Labels on physical volume "/dev/sdb" successfully wiped.
  Labels on physical volume "/dev/sdc" successfully wiped.