这里写目录标题
一、项目环境配置
根组件App.vue
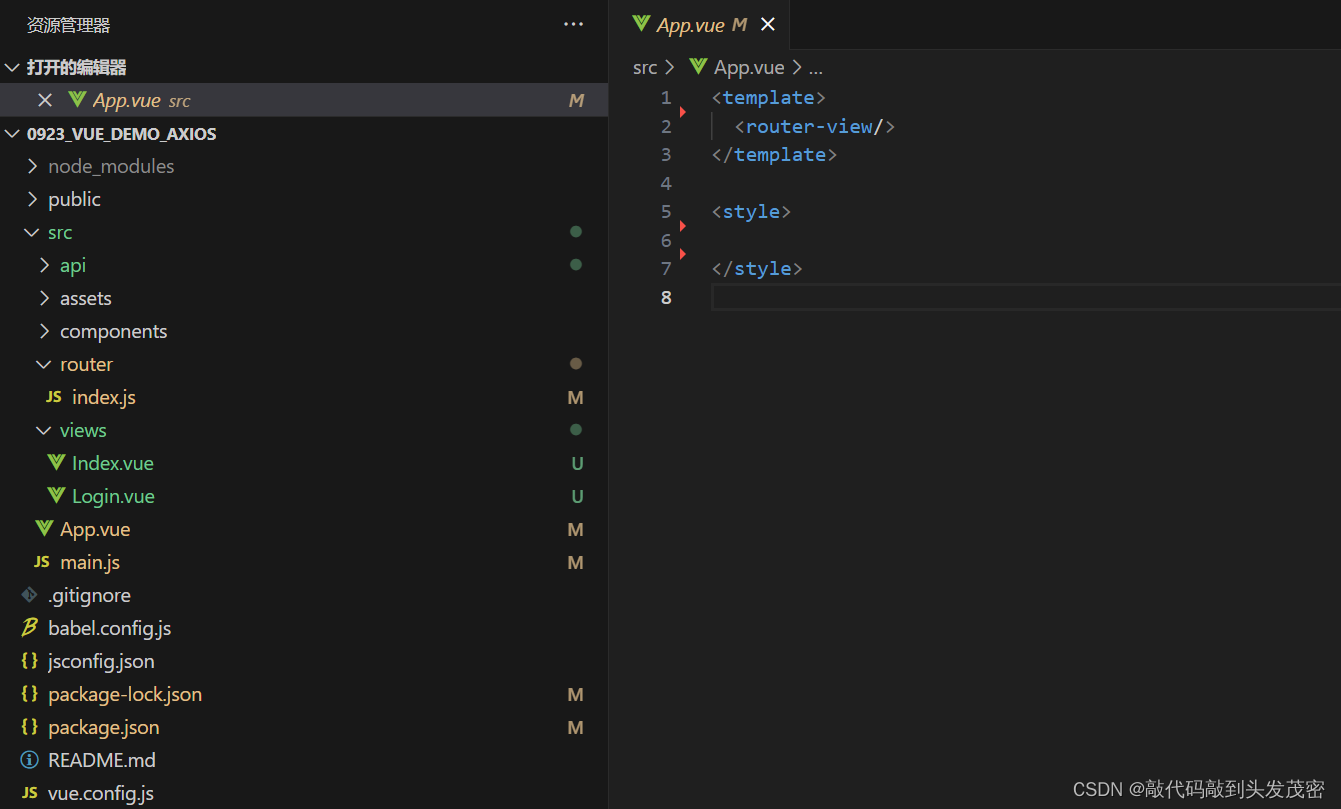
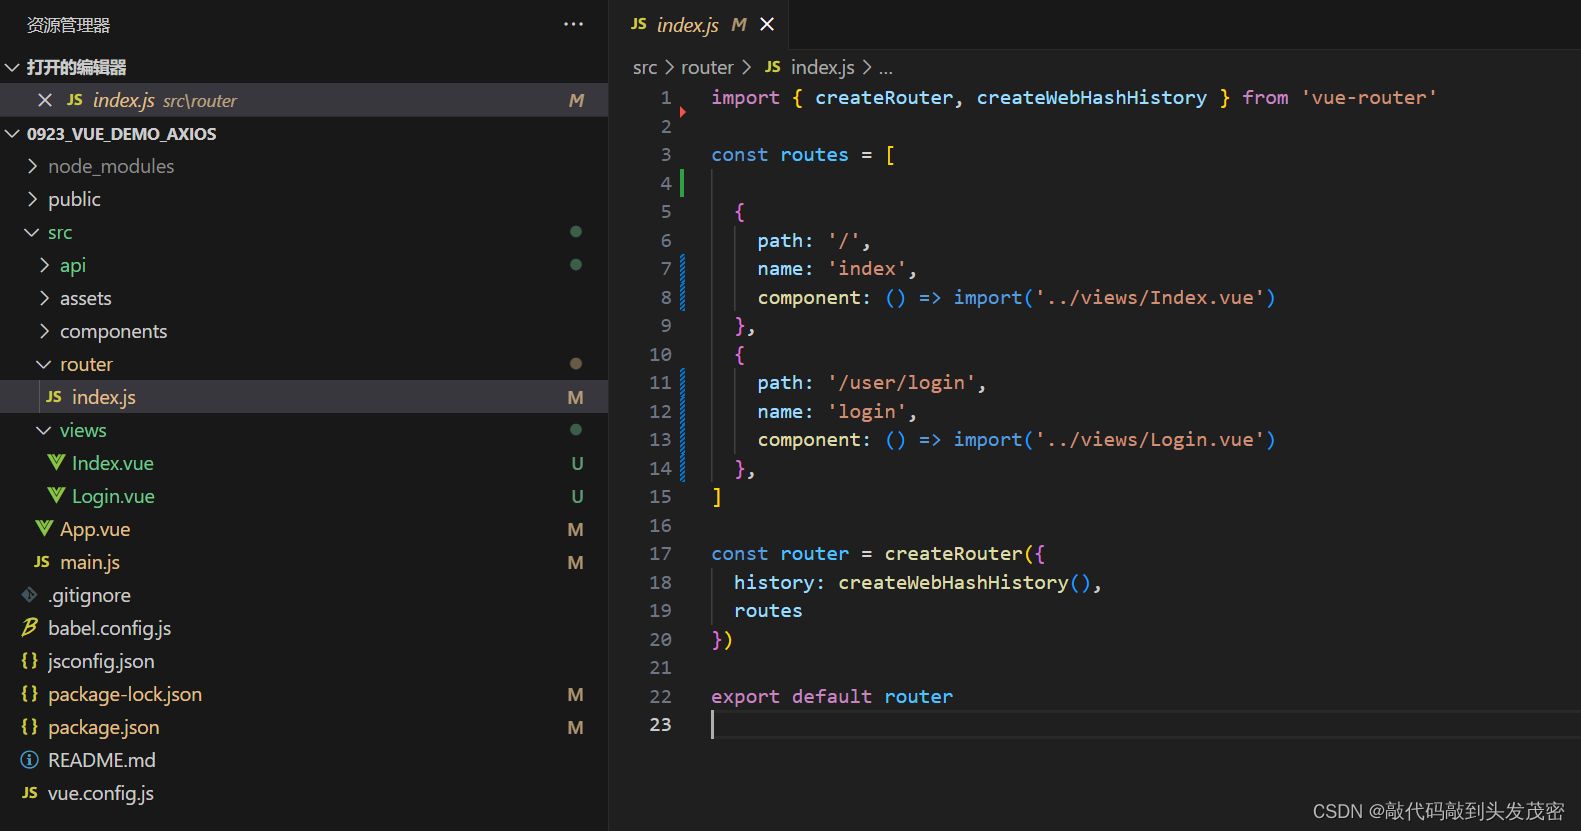
路由配置
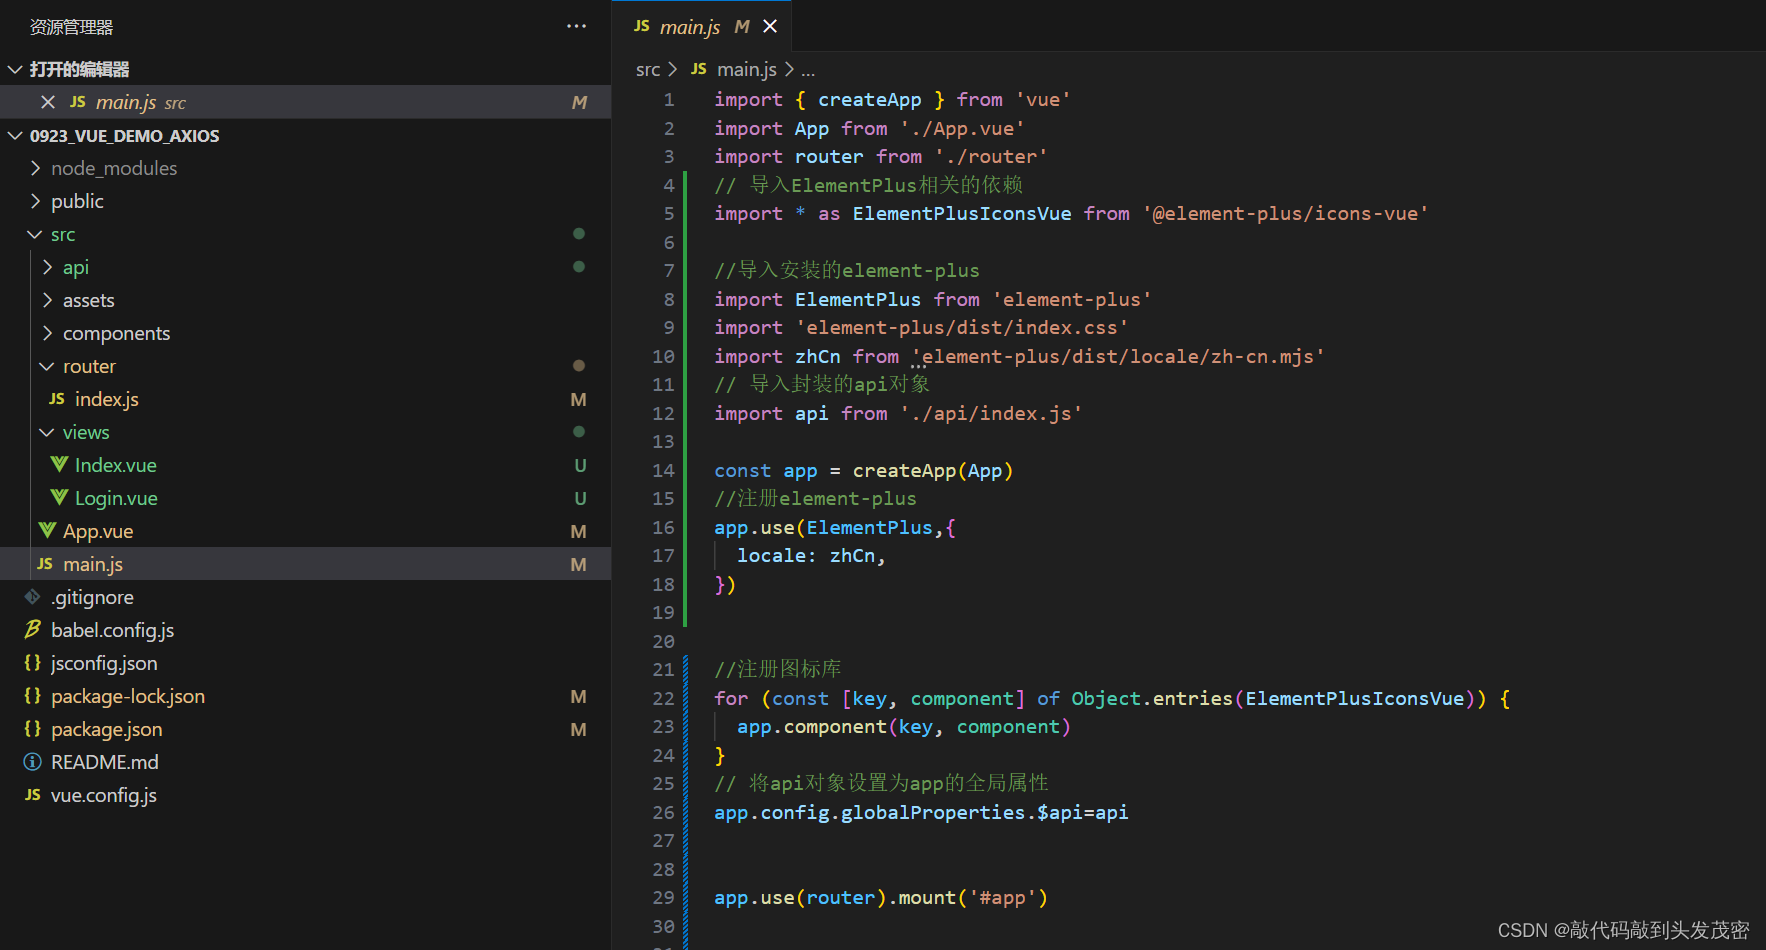
main.js配置
固定写法,复制粘贴即可
二、利用axios发送POST请求登录
<template>
<div class="box1">
<el-form label-width="120px">
<el-form-item label="用户名">
<el-input v-model="loginForm.username"></el-input>
</el-form-item>
<el-form-item label="密码">
<el-input type="password" v-model="loginForm.password"></el-input>
</el-form-item>
<el-form-item>
<el-button style="width:100%" type="primary" @click="submitLogin">登录</el-button>
</el-form-item>
</el-form>
</div>
</template>
<script>
import axios from 'axios'
// 使用axios发送post请求
// 案例:实现登录
export default{
data(){
return{
loginForm:{
username:"",
password:""
}
}
},
methods:{
// 点击登录执行的方法
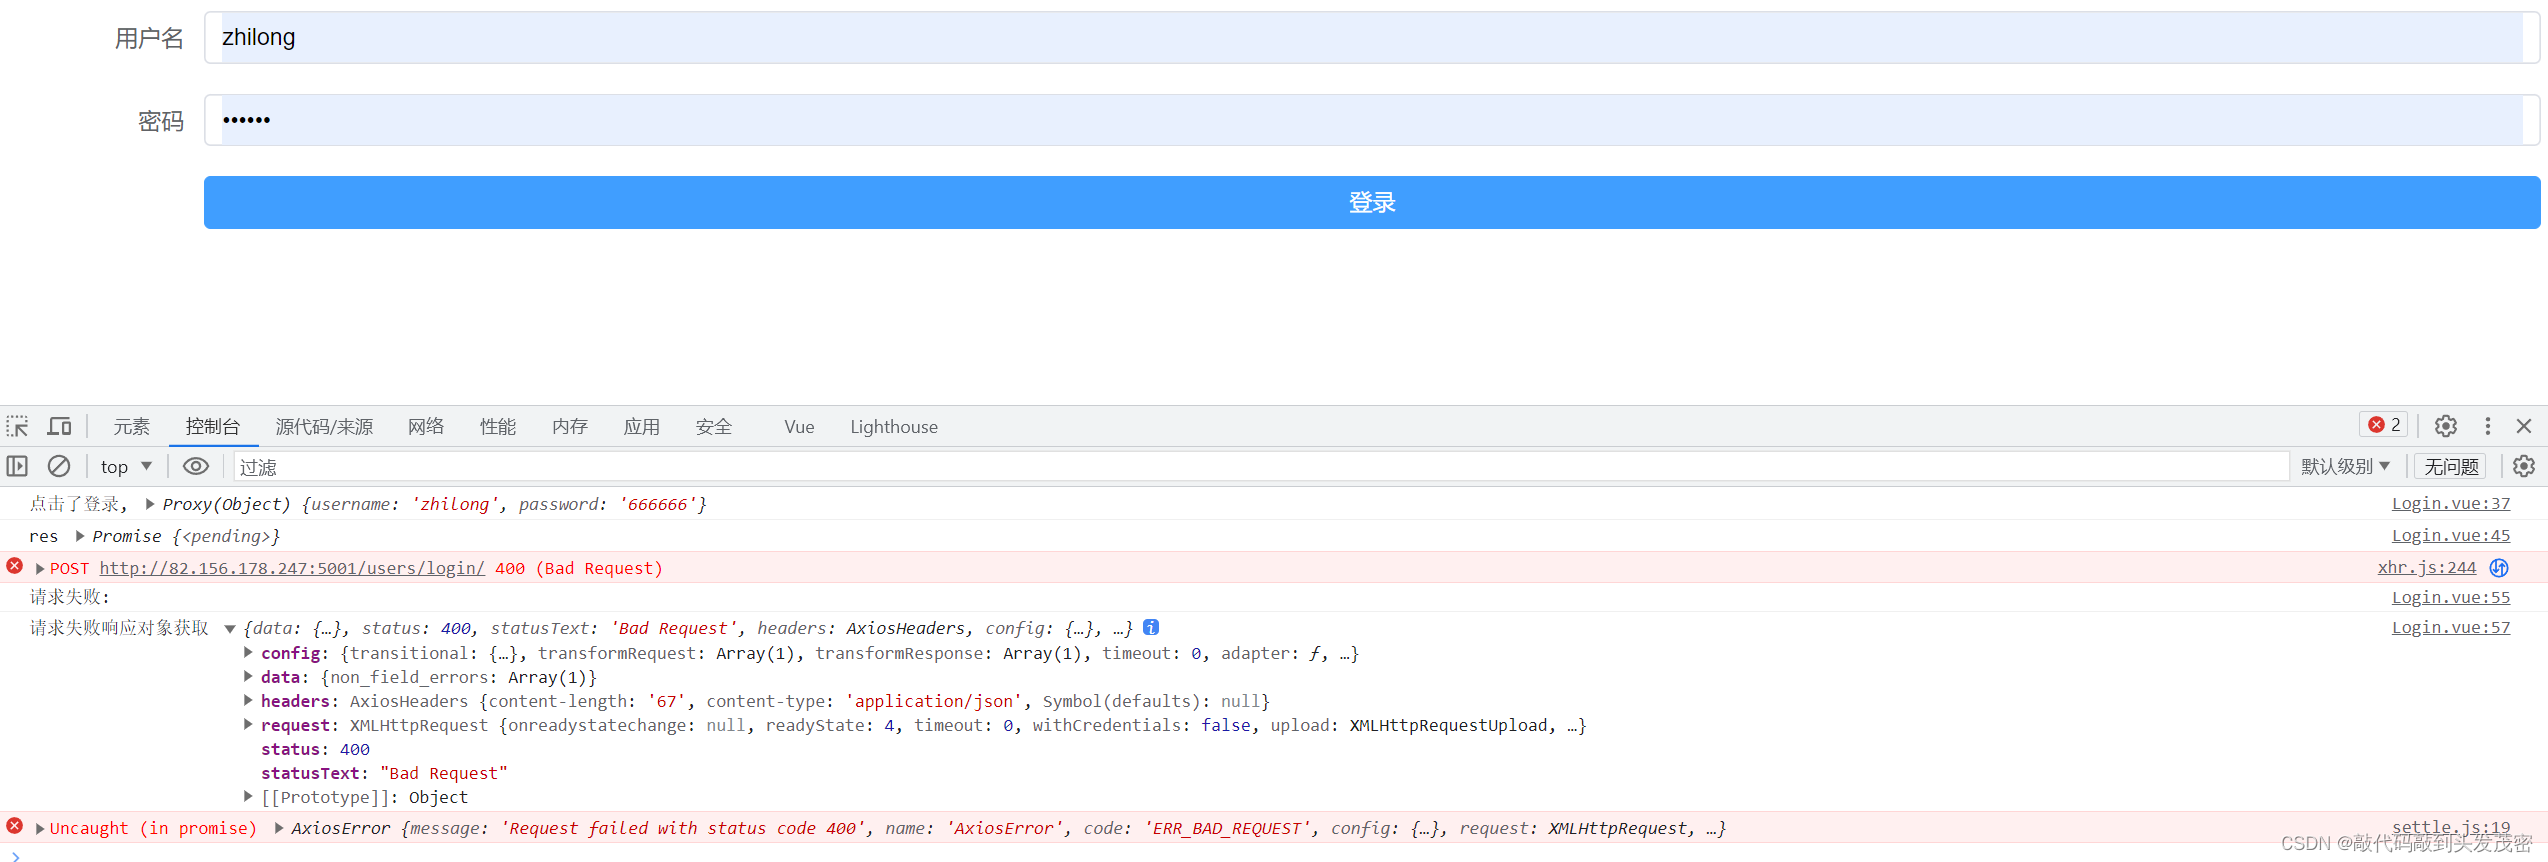
submitLogin(){
console.log('点击了登录,',this.loginForm)
// 点击了登录如何发送http请求?axios
const params={
username:this.loginForm.username,
password:this.loginForm.password
}
// 登录的post请求
const res = axios.post('http://82.156.178.247:5001/users/login/',params)
console.log('res',res)
// 设置回调函数,接收返回的响应对象
// 异步操作成功时,执行的回调函数
res.then(response=>{
console.log('请求成功:')
console.log('respnse',response)
})
// 异步操作失败时,执行的回调函数
res.catch(error=>{
console.log('请求失败:')
// console.log('error:',error)
console.log('请求失败响应对象获取',error.response)
})
}
}
}
</script>
<style>
</style>
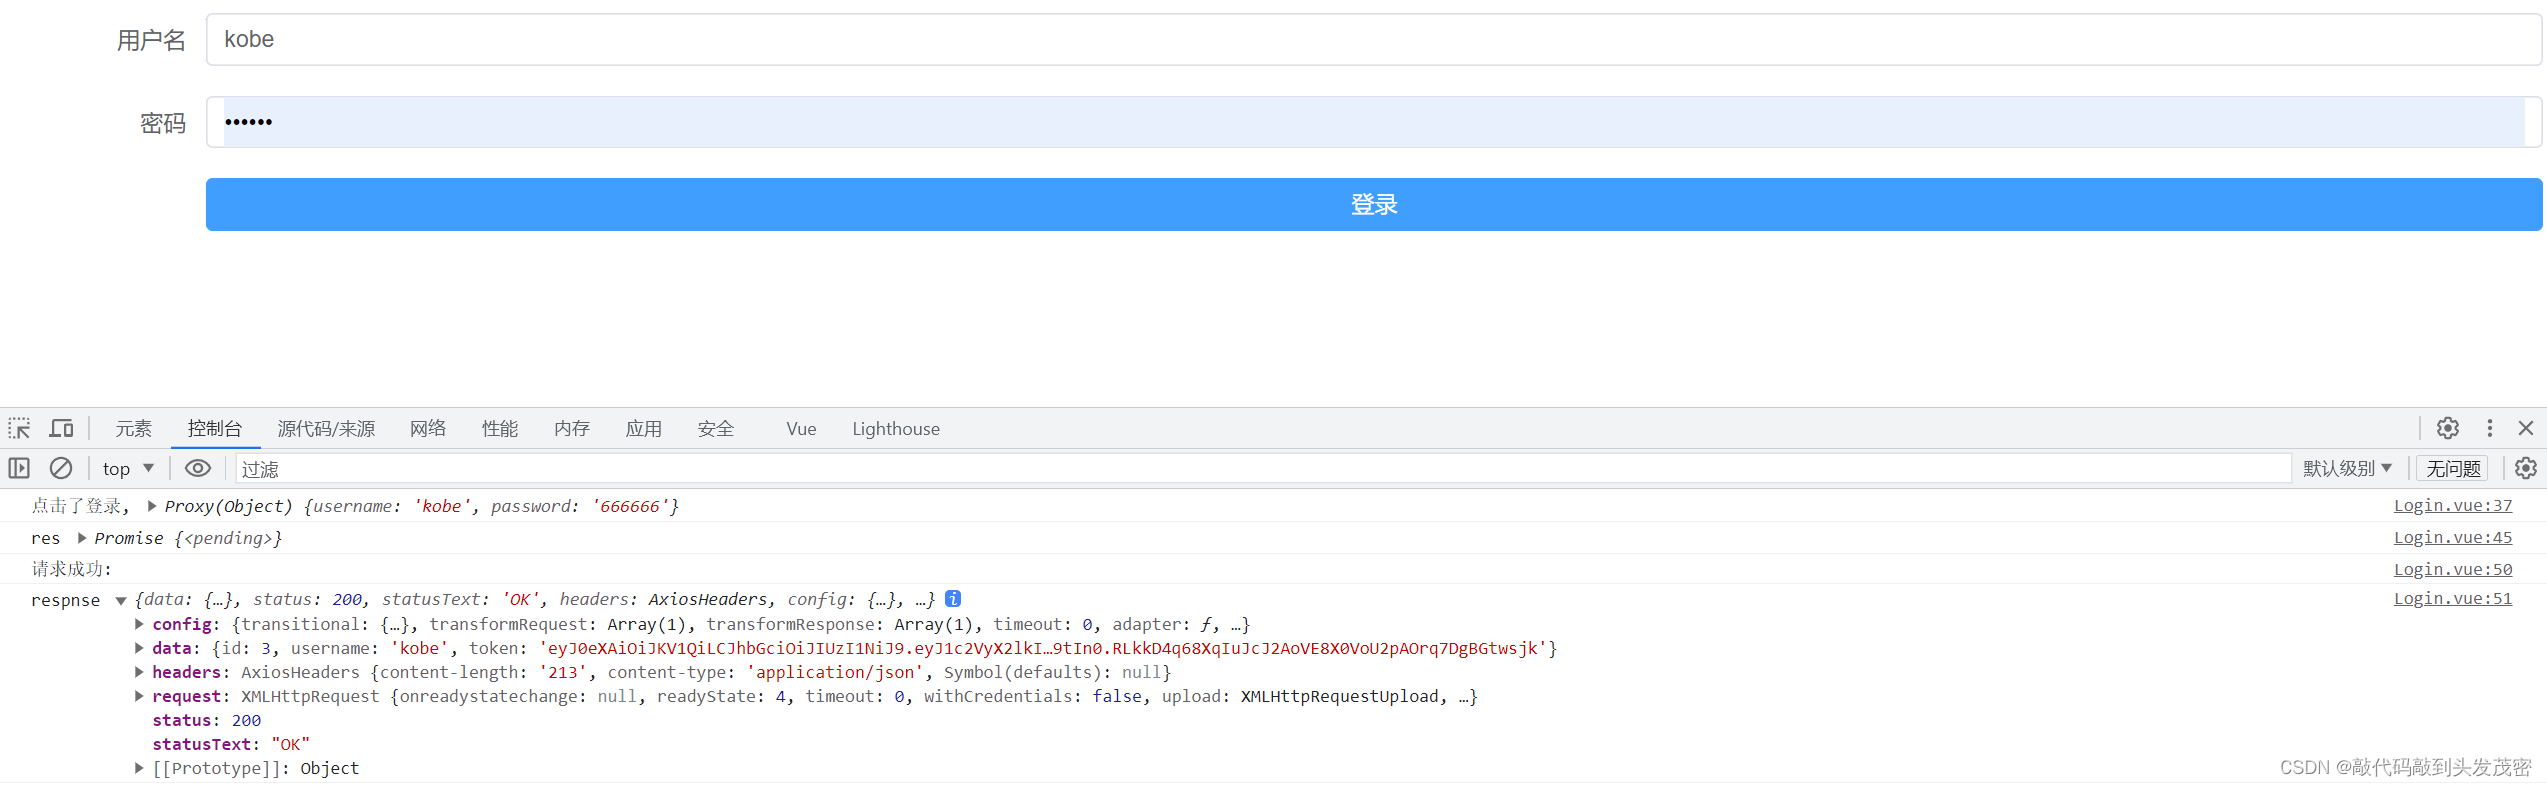
请求失败时,控制台输出的对象
请求成功时,控制台输出的对象
三、异步实现:利用axios发送POST请求登录(json)
<template>
	<div class="box1">
		<el-form label-width="120px">
			<el-form-item label="用户名">
				<el-input v-model="loginForm.username"></el-input>
			</el-form-item>
			<el-form-item label="密码">
				<el-input type="password" v-model="loginForm.password"></el-input>
			</el-form-item>
			<el-form-item>
				<el-button style="width:100%" type="primary" @click="submitLogin">登录</el-button>
			</el-form-item>
		</el-form>
	</div>

</template>

<script>
import axios from 'axios'


	// 使用axios发送post请求
	// 案例:实现登录
	export default{


		data(){


			return{


				loginForm:{


					username:"",
					password:""
				}
			}
		},
		methods:{


			// 点击登录执行的方法
			async submitLogin(){


				const params={


					username:this.loginForm.username,
					password:this.loginForm.password
				}
				// 登录的post请求
				const response =await axios.post('http://82.156.178.247:5001/users/login/',params)
				console.log('response:',response)
				// 对响应信息进行判断
				if (response.status===200){


					this.$message({


						type:"success",
						message:"登录成功"
					});
					// 跳转
					this.$router.push({

    name:"index"})
				}
			},

		}
	}

</script>

<style>

</style>
四、异步实现:利用axios发送POST请求登录(表单)
<template>
<div class="box1">
<el-form label-width="120px">
<el-form-item label="用户名">
<el-input v-model="loginForm.username"></el-input>
</el-form-item>
<el-form-item label="密码">
<el-input type="password" v-model="loginForm.password"></el-input>
</el-form-item>
<el-form-item>
<el-button style="width:100%" type="primary" @click="submitLogin">登录</el-button>
</el-form-item>
</el-form>
</div>
</template>
<script>
import axios from 'axios'
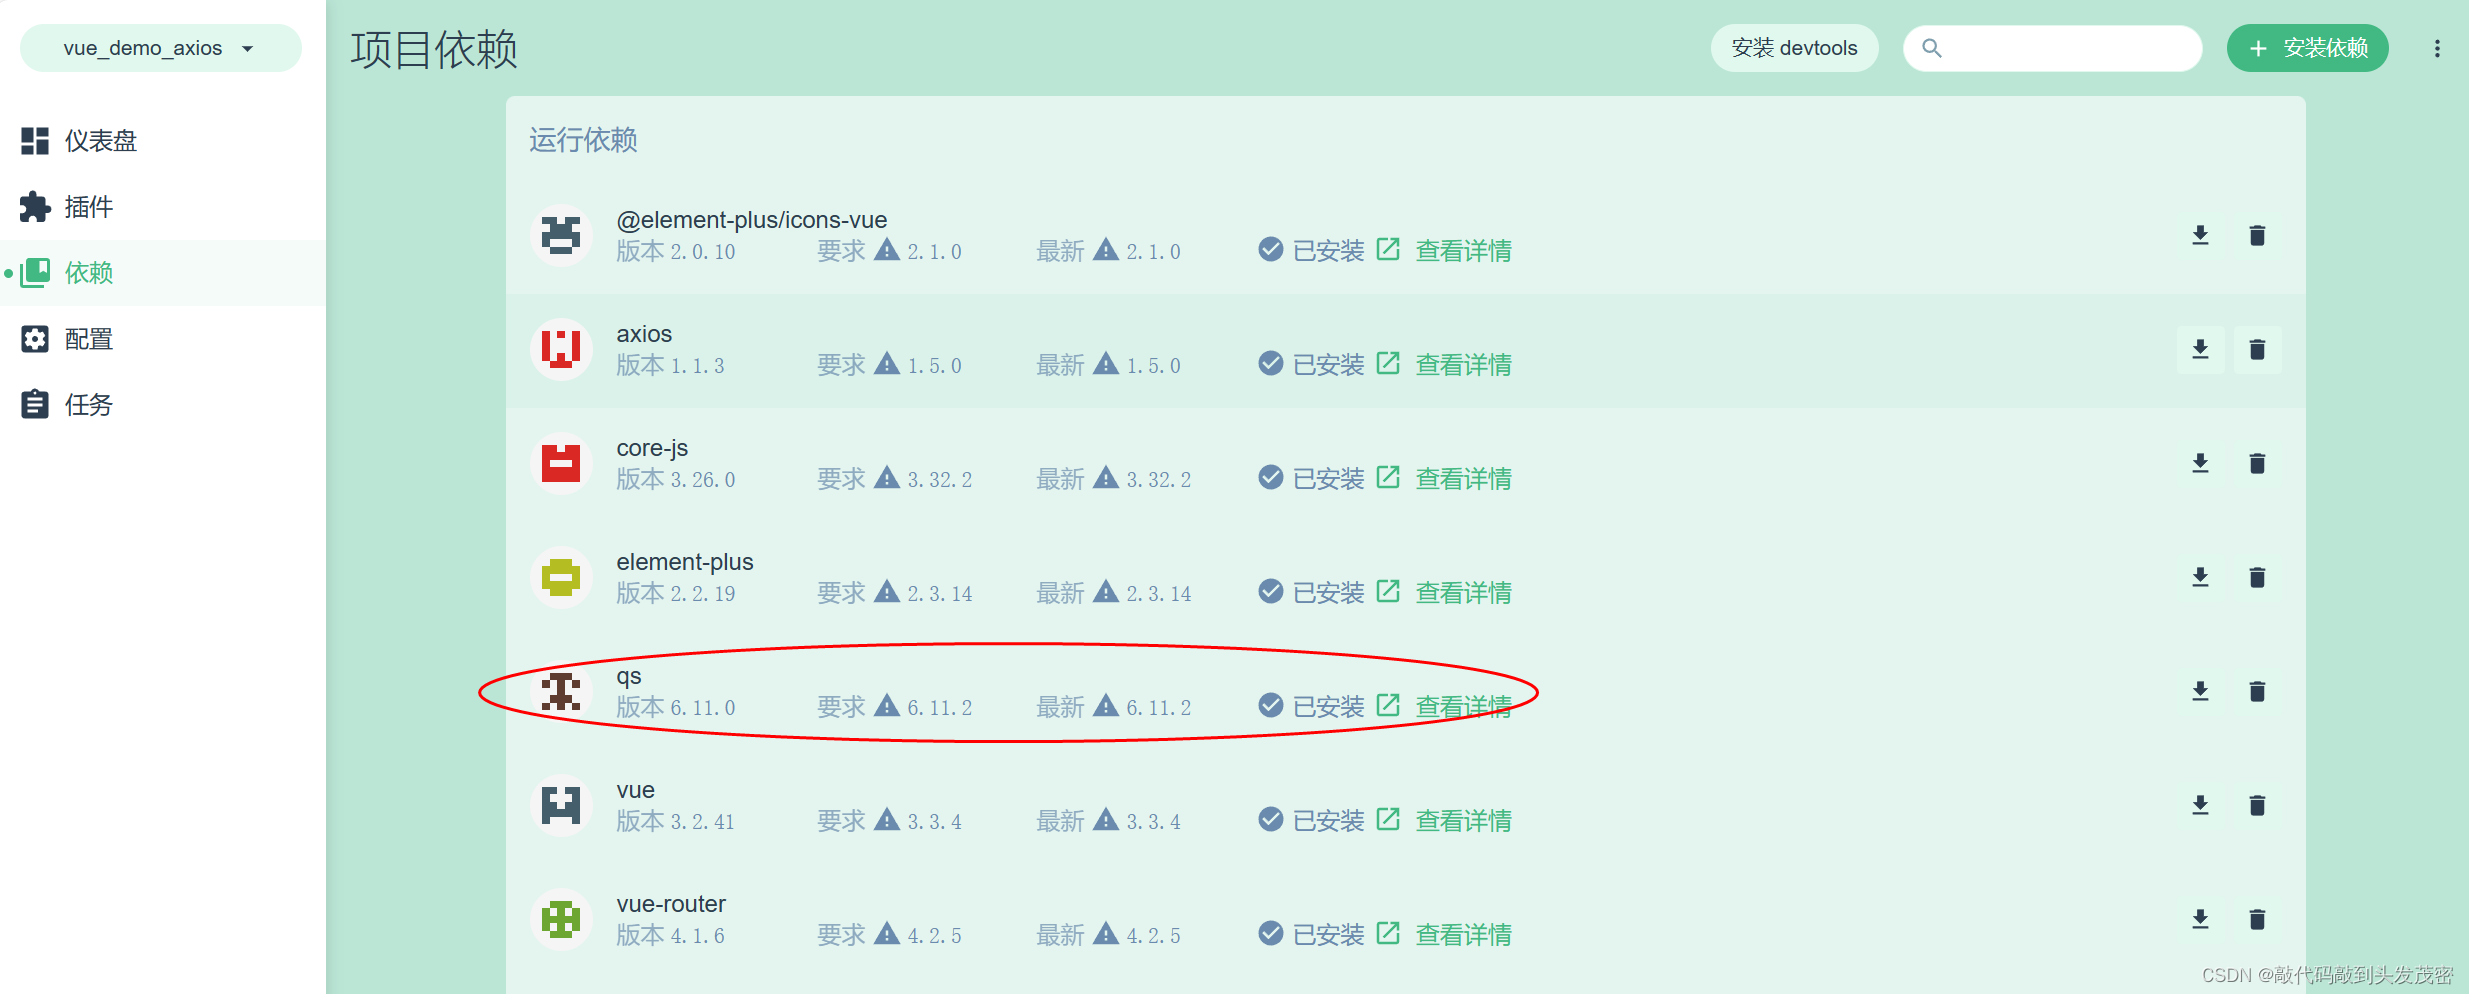
import qs from 'qs'
// 使用axios发送post请求
// 案例:实现登录
export default{
data(){
return{
loginForm:{
username:"",
password:""
}
}
},
methods:{
// 点击登录执行的方法
async submitLogin(){
// axios发送表单格式的请求
const params = qs.stringify(this.loginForm)
// 登录的post请求
const response =await axios.post('http://82.156.178.247:5001/users/login/',params)
console.log('response:',response)
// 对响应信息进行判断
if (response.status===200){
this.$message({
type:"success",
message:"登录成功"
});
// 跳转
this.$router.push({
name:"index"})
}
},
}
}
</script>
<style>
</style>
五、token存储
保存登录返回的token
获取token
const token=response.data.token
保存到LocalStorage中:永久存储,只有不手动删除,永久保存到LocalStorage中
window.localStorage.setItem(‘token’,token)
保存到sessionStorage中:关闭浏览器之后,删除内容
window.sessionStorage.setItem(‘token’,token)
保存到cookie中:
window.cookieStore.set(‘token’,token)
<template>
	<div class="box1">
		<el-form label-width="120px">
			<el-form-item label="用户名">
				<el-input v-model="loginForm.username"></el-input>
			</el-form-item>
			<el-form-item label="密码">
				<el-input type="password" v-model="loginForm.password"></el-input>
			</el-form-item>
			<el-form-item>
				<el-button style="width:100%" type="primary" @click="submitLogin">登录</el-button>
			</el-form-item>
		</el-form>
	</div>

</template>

<script>
import axios from 'axios'
import qs from 'qs'


	// 使用axios发送post请求
	// 案例:实现登录
	export default{


		data(){


			return{


				loginForm:{


					username:"",
					password:""
				}
			}
		},
		methods:{


			// 点击登录执行的方法
			async submitLogin(){


				// axios发送json格式的请求
				const params={


					username:this.loginForm.username,
					password:this.loginForm.password
				}
				// 登录的post请求
				const response =await axios.post('http://82.156.178.247:5001/users/login/',params)
				console.log('response:',response)
				// 对响应信息进行判断
				if (response.status===200){


					this.$message({


						type:"success",
						message:"登录成功"
					});
					// 跳转
					this.$router.push({

    name:"index"})
					// 保存登录返回的token
					// 获取token
					const token=response.data.token
					// 保存到LocalStorage中
					// window.localStorage.setItem('token',token)
					// // 保存到sessionStorage中
					// window.sessionStorage.setItem('token',token)
					// 保存到cookie中
					window.cookieStore.set('token',token)
				}
			},

		}
	}

</script>

<style>

</style>
六、token使用
<template>
	<h1>index页面</h1>
	<el-button @click="getAllProject">获取项目数据</el-button>

	<h3>{

    {

    pros}}</h3>
</template>

<script>
import axios from 'axios'

	export default{


		data(){


			return{


				pros:{


				}
			}
		},
		methods:{


			async getAllProject(){


				// 发送请求
				const url="http://82.156.178.247:5001/projects/"
				const response=await axios.get(url,{


					headers:{


						'Authorization':'JWT ' + window.sessionStorage.getItem('token')
					}
				});
				console.log('response',response);
				this.pros=response.data
			}
		}
	}
</script>

<style>
</style>

七、全局的axios配置
在api/index.js中对axios对后端请求进行统一封装
1、方式一
// 针对axios对后端请求进行统一封装(方便后期维护管理)
import axios from "axios"

// 方式一:直接配置axios对象,进行相关的封装
// 设置全局的baseURL
axios.defaults.baseURL='http://82.156.178.247:5001'
axios.defaults.headers.common['kobe']='0924'

export const login=(params)=>{


	axios.post('/login',params)
}

export const getALLPro=()=>{


	axios.get('/login')
}
2、方式二
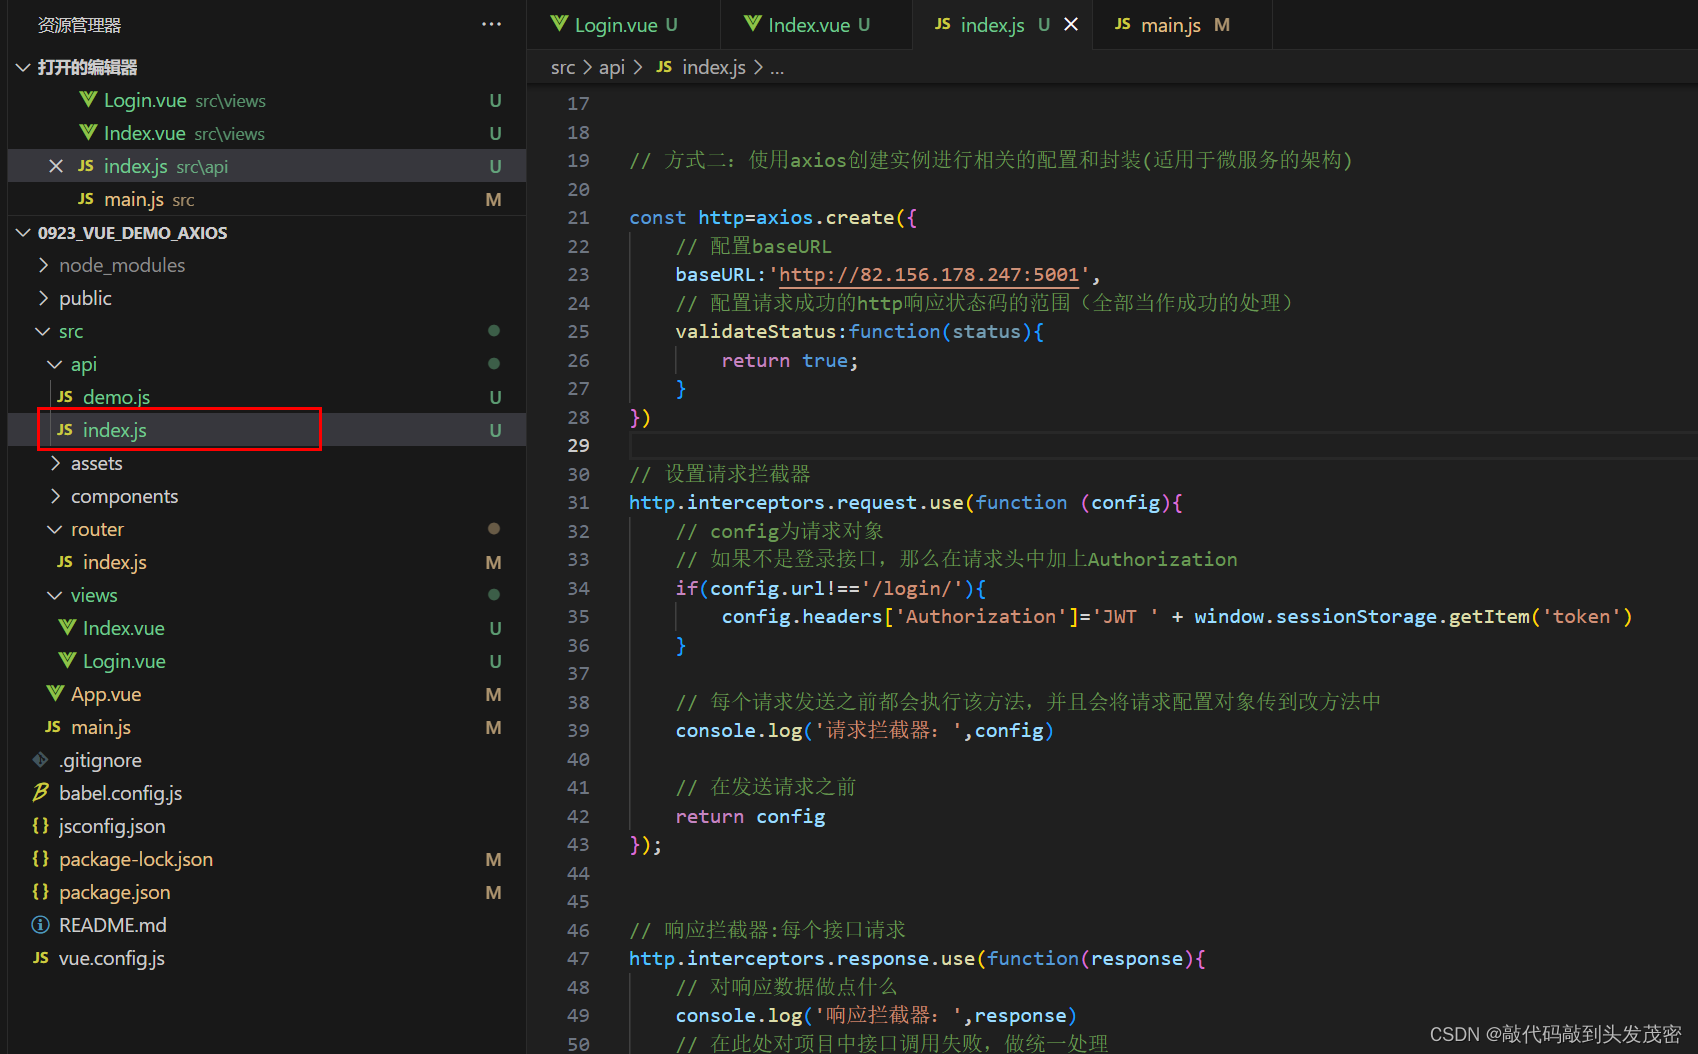
// 方式二:使用axios创建实例进行相关的配置和封装(适用于微服务的架构)

const http=axios.create({


	// 配置baseURL
	baseURL:'http://82.156.178.247:5001',
	// 配置请求成功的http响应状态码的范围(全部当作成功的处理)
	validateStatus:function(status){


		return true;
	}
})

export default{


	login(params){


		return http.post('/login/',params)
	},
	getAllProject(){


		return http.get('/projects/')

}
}
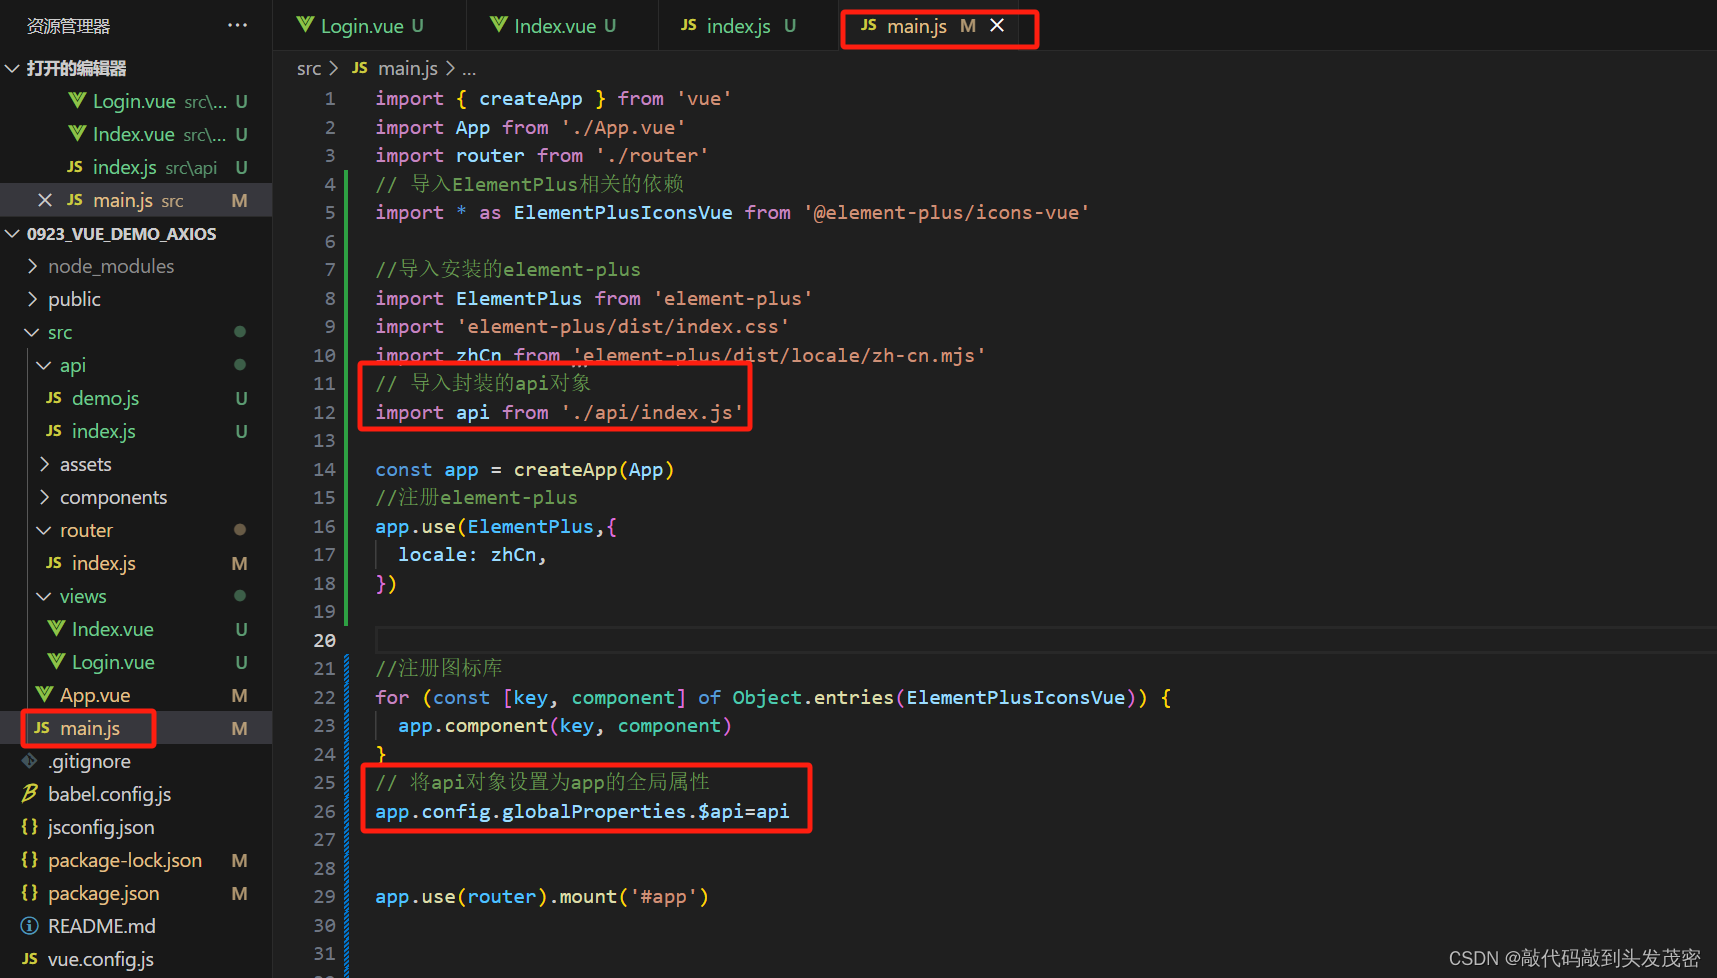
在main.js中导入index.js,作为全局对象,方便以后的开发项目中使用
$api为属性名称
八、请求拦截器和响应拦截器
// 设置请求拦截器
http.interceptors.request.use(function (config){


	// config为请求对象
	// 如果不是登录接口,那么在请求头中加上Authorization
	if(config.url!=='/login/'){


		config.headers['Authorization']='JWT ' + window.sessionStorage.getItem('token')
	}

	// 每个请求发送之前都会执行该方法,并且会将请求配置对象传到该方法中
	console.log('请求拦截器:',config)

	// 在发送请求之前
	return config
});


// 响应拦截器:每个接口请求
http.interceptors.response.use(function(response){


	// 对响应数据做点什么
	console.log('响应拦截器:',response)
	// 在此处对项目中接口调用失败,做统一处理
	return response;

})