【React】react组件传参、redux状态管理
一、redux全局状态管理
1、redux概述
- redux是一个JavaScript容器,用于进行全局的状态管理;
- redux三大核心;
-
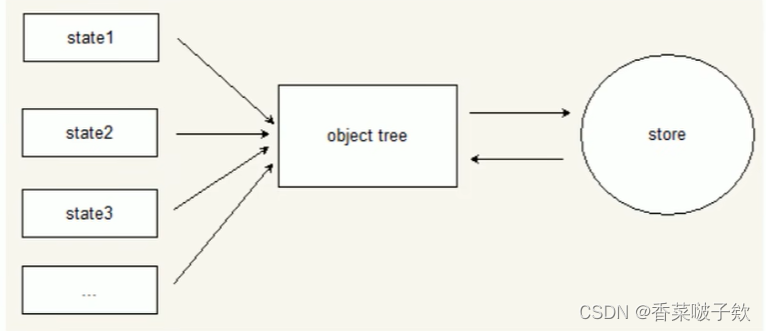
单一数据源头:所有state都会被挂载到一个叫Object tree中,Object tree又只存在唯一的Store(理解为容器,存储Object tree,Object tree挂在state)中;
-
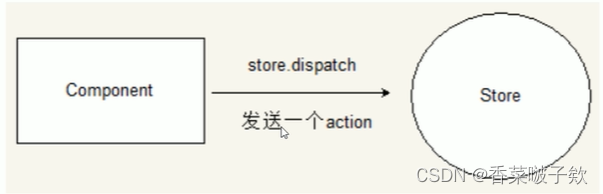
State是只读的:唯一改变state的方法就是触发
action,触发action,store.dispatch ( {type: '字符串' , val: 1}),val自定义 -
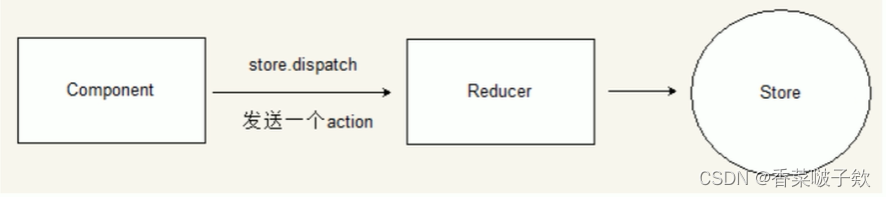
使用纯函数来执行修改:编写
reducers,接受state和action,并返回一个新的state;
-
2、redux的组成
1.1 State-状态
- 就是我们传递的数据,后端返回的数据、决定ui展示的状态等等;
1.2 Action-事件
- Action是把数据从应用传到store的载体(对象),它是store数据的唯一来源,一般来说,我们可以通过store.dispatch()将action传递给store;
- Action的特点
- Action的本质就是一个javaScript的普通对象;
- Action对象内部必须要有一个type属性来表示要执行的动作多数情况下,这个type会被定义成字符串常量;
- 除了type字段之外,action的结构随意进行定义;
- 而我们在项目中,更多的喜欢用action创建函数(就是创建action的地方);
- 只是描述了有事情要发生,并没有描述如何去更新state;
// Action创建函数
function addAction(params){


	//返回一个Action对象
	return {


		type:'add',//add为自定义
		...params
	}
}
1.3 Reducer
- Reducer本质就是一个函数,它用来响应发送过来的actions,然后经过处理,把 state发送给Store的;
- 在Reducer函数中,需要return返回值,这样Store才能接收到数据;
- 函数会接收两个参数,第一个参数是初始化 state,第二个参数是action;
const initState={

    ...}
function reducer(state=initState,action){


	return {

    ...}
}
1.4 Store
//构建store
import {

     createstore } from "redux";
//构建store对象
const store = createstore(传递reducer) ;
- Store 就是把action 与reducer联系到一起的对象;
- 主要职责:
- 维持应用的state
- 提供getState()方法获取state
- 提供dispatch()方法发送action
- 通过subscribe()来注册监听
- 通过subscribe()返回值来注销监听
3、redux入门案例
1.1 前期准备
- 打开VSCode终端
- 新建项目,输入npx create-react-app + 项目名称(自定义,注意最好不要中文)
- 删除多余的配置文件,只留下(App.css,App.js,index.js)并清除三个文件下不必要的代码
- 进入新的项目文件夹
- 安装redux相关依赖
npm i react-redux
npm i redux
//异步解决方案redux-thunk
npm i redux-thunk
//持久化redux
npm i redux-persist
- npm run start启动项目
1.2 构建store
1.2.1 在src下新建store文件夹
1.2.2 在store文件夹下新建index.ts文件
1.2.3 在index.ts文件里编写redux核心代码
//创建一个仓储对象,需要reducer作为对象
//本来是这么写的
import {

     createStore} from 'redux'
//但是改版之后,需要写成下面这个样子
import {

     legacy_createStore} from 'redux'
1.2.4 在store文件夹下新建reducer.ts文件
//用来管理数据的
const initData={


num :20
}
// state是状态数据的原始值,action={type : "add " ,data:{}
function reducer(state=initData,action){


	//!!!!不能操作修改旧的数据
	//不能直接修改老的状态数据,应该根据老的状态数据,生成一个新的状态数据,然后返回
	const newState=JSON.parse(JSON.stringify(state))
	switch(action.type){


		case "add1":
			newState.num++
			break;
		case "add2":
			newState.num+=action.valbreak;
			break;
		default:
			break;
	}
	return newState;
}
export default reducer
1.2.5 在index.ts文件中引入reducer.ts
//创建一个仓储对象,需要reducer作为对象
import {

    legacy_createStore,applyMiddleware}from ' redux';
import reduxThunk from 'redux-thunk'
import {

     persistStore, persistReducer } from "redux-persist";//持久化
import storage from "redux-persist/lib/storage";
import reducer from './reducer ';
const persistConfig = {


   key: "xxx",
   storage: storage,
   // whitelist:['LoadingReducers'],//想持久化哪个
};
const persistReducers = persistReducer(persistConfig, reducer )
const store = legacy_createStore(persistReducers, applyMiddleware(reduxThunk))
let persisttore = persistStore(store)
export  {

     store, persisttore }
1.2.6 到根目录下的入口文件index.ts文件导入store仓储对象
- 将store与项目挂钩,导入store仓储对象
//这里可能还引入其他东西,为了简洁,我就不写了
...
//状态管理
import ReactDOM from "react-dom";
import {

     Provider } from "react-redux";
//持久化
import {

     PersistGate } from "redux-persist/lib/integration/react";
import {

    store,persisttore} from "@/store";
import App from "./App" ;
ReactDOM.render(
// 将仓储对象传递给根组件
 <Provider store={

    store}>
  	<PersistGate persistor={

    persisttore}>
       <App />
  	 </PersistGate >
  </Provider>,
document.querySelector( "#root")
);
1.3 在组件中使用store
- 通过useselector获取仓库数据
import {

     useDispatch, useSelector } from "react-redux";
const View = () => {


  // 通过useSelector获取仓库数据
  const {

     num } = useSelector((state: {

      num: any }) => ({

     num: state.num }));
  // 通过useDispatch修改仓库的数据
  const dispatch = useDispatch();
  const changeNum = () => {


    // dispatch ( {type: '字符串' , val: 1}),val自定义
    //同步的写法
    dispatch({

     type: "add1" });//每点击一次加1
    dispatch({

     type: "add2" ,val:10});//每点击一次加10
   // 异步的写法:dispatch ( 异步执行的函数)
    dispatch((dis:Function)=>{


   		 setTimeout(()=>{


   			 dis({

     type: "add1" })
    	},1000)
    })
  };
  return (
    <div className="home">
      <p>这是Page1页面内容</p>
      <p>{

    num}</p>
      <button onClick={

    changeNum}>按钮</button>
    </div>
  );
};
export default View;
二、react-redux状态管理高级封装模块化
- 封装的目的:最终是有利于我们的开发或者维护
- 封装的思路:将来开发的时候只需要把数据和方法写入到这个状态文件中,例如:XxxxStatus/index.ts,而不需要再去操作其他的文件。

1、在store文件夹下新建NumStatus文件夹(管理num的模块)
2、在NumStatus文件夹下新建index.ts和reducer.ts文件
//index.ts
const store: any = {


    state: {


        isLoading: false
    },
    actions: {


    	//只放同步的方法
		add1(newState:{

     num:number} ,action:{

     type : string}){


				newstate.num++,
			}
		add2(newstate:{

     num: number},action:{

     type: string,val:number}){


				newState.num+=action.val,
			},
    },
    asyncActions: {


      //react-redux的异步解决方案redux-thunk
      //只放异步的方法
	  //优化redux-thunk的异步写法(模仿vuex的写法)
		asyncAdd1(dispatch: Function){


			setTimeout(()=>{


				dispatch({

    type: "add1"})
			},1000)
		},
    },
    // 名字统一管理
    actionNames: {


    }
}
//定义一个全局
let actionNames: any = {

    }
for (let key in store.actions) {


    actionNames[key] = key
}
store.actionNames = actionNames
export default store
//reducer.ts
//处理数据
import handle from "./index"
let reducer = (state = {

      ...handle.state }, action: {

      type: string}) => {


    let newState = JSON.parse(JSON.stringify(state))
    for (let key in handle.actionNames) {


        if (action.type === handle.actionNames[key]) {


            handle.actions[handle.actionNames[key]](newState, action)
            break;
        }
    }
    return newState
}
export default reducer
3、如果还有其他的状态需要管理,如新建ArrStatus文件夹(管理数组模块)
- 在ArrStatus文件夹下新建index.ts和reducer.ts文件
- index.ts内容如下
//处理数据
const store ={


state:{


	sarr:[10,20,30]
},
actions:{


	sarrpush(newState:{

    sarr:number[},action:{

    type:string, val:number})(
	newstate.sarr.push(action.val)
	}
},
 asyncActions: {


      //只放异步的方法
    },
    // 名字统一管理
  actionNames: {


    }
}
//定义一个全局
let actionNames: any = {

    }
for (let key in store.actions) {


    actionNames[key] = key
}
store.actionNames = actionNames
export default store
- reducer.ts内容都是 一样的
总结,不同的模块只有state和action里的内容,其他都一样
4、在index.ts文件中引入reducer.ts
- 引入reducer.ts,
combineReducers组合各个模块的reducer
//创建一个仓储对象,需要reducer作为对象
import {

    legacy_createStore,combineReducers,applyMiddleware}from ' redux';
import reduxThunk from 'redux-thunk'
import {

     persistStore, persistReducer } from "redux-persist";//持久化
import storage from "redux-persist/lib/storage";
import NumStatusrReducer from "./NumStatus/reducer"
import ArrstatusReducer from "./Arrstatus/reducer"
//组合各个模块的reducer
const reducers = combineReducers(i
   NumStatusReducer,
   ArrstatusReducer
})
const persistConfig = {


   key: "xxx",
   storage: storage,
   // whitelist:['LoadingReducers'],//想持久化哪个
};
const persistReducers = persistReducer(persistConfig, reducers)
const store = legacy_createStore(persistReducers, applyMiddleware(reduxThunk))
let persisttore = persistStore(store)
export  {

     store, persisttore }
5、在组件中使用store
- 通过useselector获取仓库数据,跟1.3一样,唯一不一样的就是获取state不一样了
  // 通过useSelector获取仓库数据
  const {

     num } = useSelector((state: {

      num: any }) => ({

     num: state.NumStatusReducer.num }));
6、模块化结束
总结
- 不同的模块只有state和action里的内容,其他都一样;
- 相同模块下如果需要添加同步方法,则只需在index.ts文件添加方法,在对应的组件内部调用
dispatch("add3")即可
  actions: {


		add1(newState:{

     num:number} ,action:{

     type : string}){


				newstate.num++,
			}
		add2(newstate:{

     num: number},action:{

     type: string,val:number}){


				newState.num+=action.val,
			},
		add3(){


		....
		}
    },
- 相同模块下如果需要添加异步方法,则只需在index.ts文件添加方法,在对应的组件内部调用
dispatch(调用状态管理中的asyncAddx),即dispatch(state.NumStatusReducer.asyncAdd2)
   asyncActions: {


		asyncAdd1(dispatch: Function){


			setTimeout(()=>{


				dispatch({

    type: "add1"})
			},1000)
		 },
     asyncAdd2(){

    }
 },
    ```