简介 源代码及其来源
RPi.GPIO是Python的一个module( 模块 ), 树莓派官方系统默认已经安装, 仍在不断更新中, 截至20160314, 最新版0.6.2, 适配了树莓派3, 访问 python主页 .
源代码(也有教程的链接)公布在Sourceforge上: 点 这里 查看源代码.
简介及注意事项:
A module to control Raspberry Pi GPIO channels.
This package provides a class to control the GPIO on a Raspberry Pi.
Note that this module is unsuitable for real-time or timing critical applications. This is because you can not predict when python will be busy garbage collecting. It also runs under the Linux kernel which is not suitable for real time applications - it is multitasking O/S and another process may be given priority over the CPU, causing jitter in your program. If you are after true real-time performance and predictability, buy yourself an Arduino http://www.arduino.cc !
Note that the current release does not support SPI, I2C, hardware PWM or serial functionality on the RPi yet. This is planned for the near future - watch this space! One-wire functionality is also planned.
Although hardware PWM is not available yet, software PWM is available to use on all channels.
大致含义是: 这个包提供了操作树莓派GPIO的一个类, 不是实时的, 不支持硬件的SPI,I2C,PWM等, 但软件PWM可以在所有通道使用. 如果想要实时控制, 推荐Arduino.
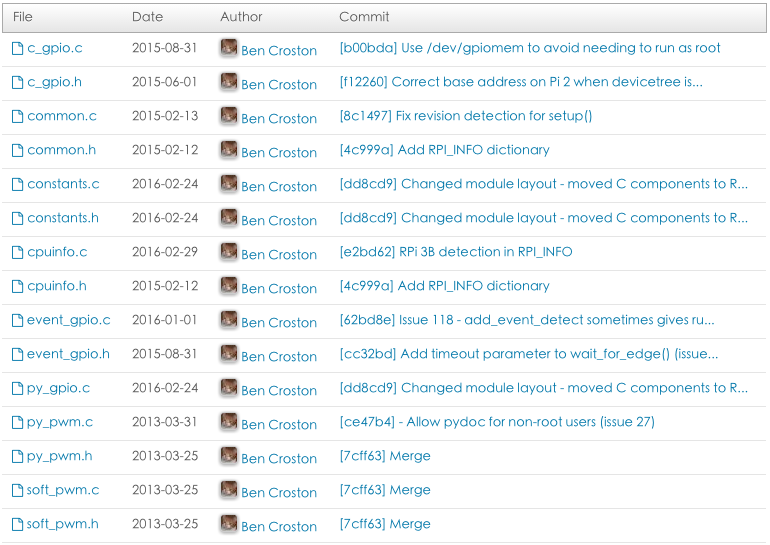
源代码包中可以看到下列文件:
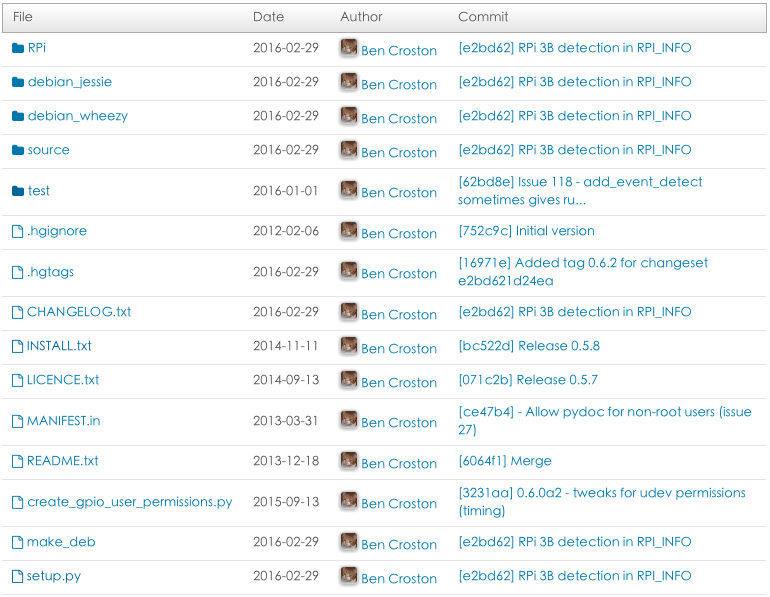
source文件夹中放置了 C语言操作底层寄存器以及外设封装的源码, 感兴趣的可以下载下来研究一下:
test文件夹中放了test.py, 大量的测试代码, 很有参考价值:

RPi Board Information and RPi.GPIO version
树莓派官方系统默认已经安装了Python和RPi.GPIO, 树莓派终端输入命令 python --version 可查看Python版本, 输入命令 python 启动python, 输入 import RPi.GPIO as GPIO 导入RPi.GPIO模块.
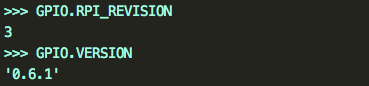
To discover information about your RPi:
GPIO.RPI_INFO- 1
- 1

To discover the Raspberry Pi board revision:
GPIO.RPI_INFO['P1_REVISION']
GPIO.RPI_REVISION #(deprecated 弃用)- 1
- 2
- 1
- 2
To discover the version of RPi.GPIO:
GPIO.VERSION- 1
- 1
RPi.GPIO使用说明
像学一门语言第一个程序是”Hello World”一样, 搞硬件的第一个任务是 点灯(Blink). 先来看下点灯的程序吧:
#!/usr/bin/python
import RPi.GPIO as GPIO
import sys
import time
LED = 21
def main():
    GPIO.setwarnings(False)
    GPIO.setmode(GPIO.BCM)
    GPIO.setup(LED,GPIO.OUT)
    while (True):
        GPIO.output(LED,True)
        time.sleep(0.5)
        GPIO.output(LED,False)
        time.sleep(0.5)
main()- 1
- 2
- 3
- 4
- 5
- 6
- 7
- 8
- 9
- 10
- 11
- 12
- 13
- 14
- 15
- 1
- 2
- 3
- 4
- 5
- 6
- 7
- 8
- 9
- 10
- 11
- 12
- 13
- 14
- 15
LED接在BCM编号方式下的21引脚, 每隔0.5s亮一次, time.sleep(), 延时秒数. 类似Arduino中的delay(), 当然,后者是延时的ms数.
具体每句话的意思, 往下面看:
Importing the module ( 导入模块 )
To import the RPi.GPIO module(导入RPi.GPIO模块):
import RPi.GPIO as GPIO- 1
- 1
To import the module and check to see if it is successful( 判断检查导入模块是否成功, 可能需要超级用户权限执行: sudo python xx.py ):
try:
    import RPi.GPIO as GPIO
except RuntimeError:
print("Error importing RPi.GPIO! This is probably because you need superuser privileges. You can achieve this by using 'sudo' to run your script")- 1
- 2
- 3
- 4
- 1
- 2
- 3
- 4
Pin numbering ( 引脚编号 )
There are two ways of numbering the IO pins on a Raspberry Pi within RPi.GPIO. The first is using the BOARD numbering system. This refers to the pin numbers on the P1 header of the Raspberry Pi board. The advantage of using this numbering system is that your hardware will always work, regardless of the board revision of the RPi. You will not need to rewire your connector or change your code.
The second numbering system is the BCM numbers. This is a lower level way of working - it refers to the channel numbers on the Broadcom SOC. You have to always work with a diagram of which channel number goes to which pin on the RPi board. Your script could break between revisions of Raspberry Pi boards.
大致含义: 树莓派引脚有BOARD和BCM两种编号方式( 使用python时? 似乎使用C还有一种wringPi编号方式 ), BOARD具有很好的适用性( 不用看接口图,数引脚1~40就可以接线 ), 不论树莓派1 2 3, 都不用修改代码, 吼啊! BCM编号方式换个版本再接线时数引脚是不行的, 需要看下下面的接口图…不难看出推荐用BOARD编号方式. 但很多程序中使用BCM方式.
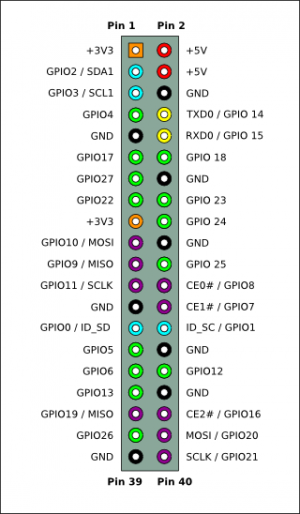
下面给出一张树莓派2B的硬件接口图( 来源找不到了,侵删 ):
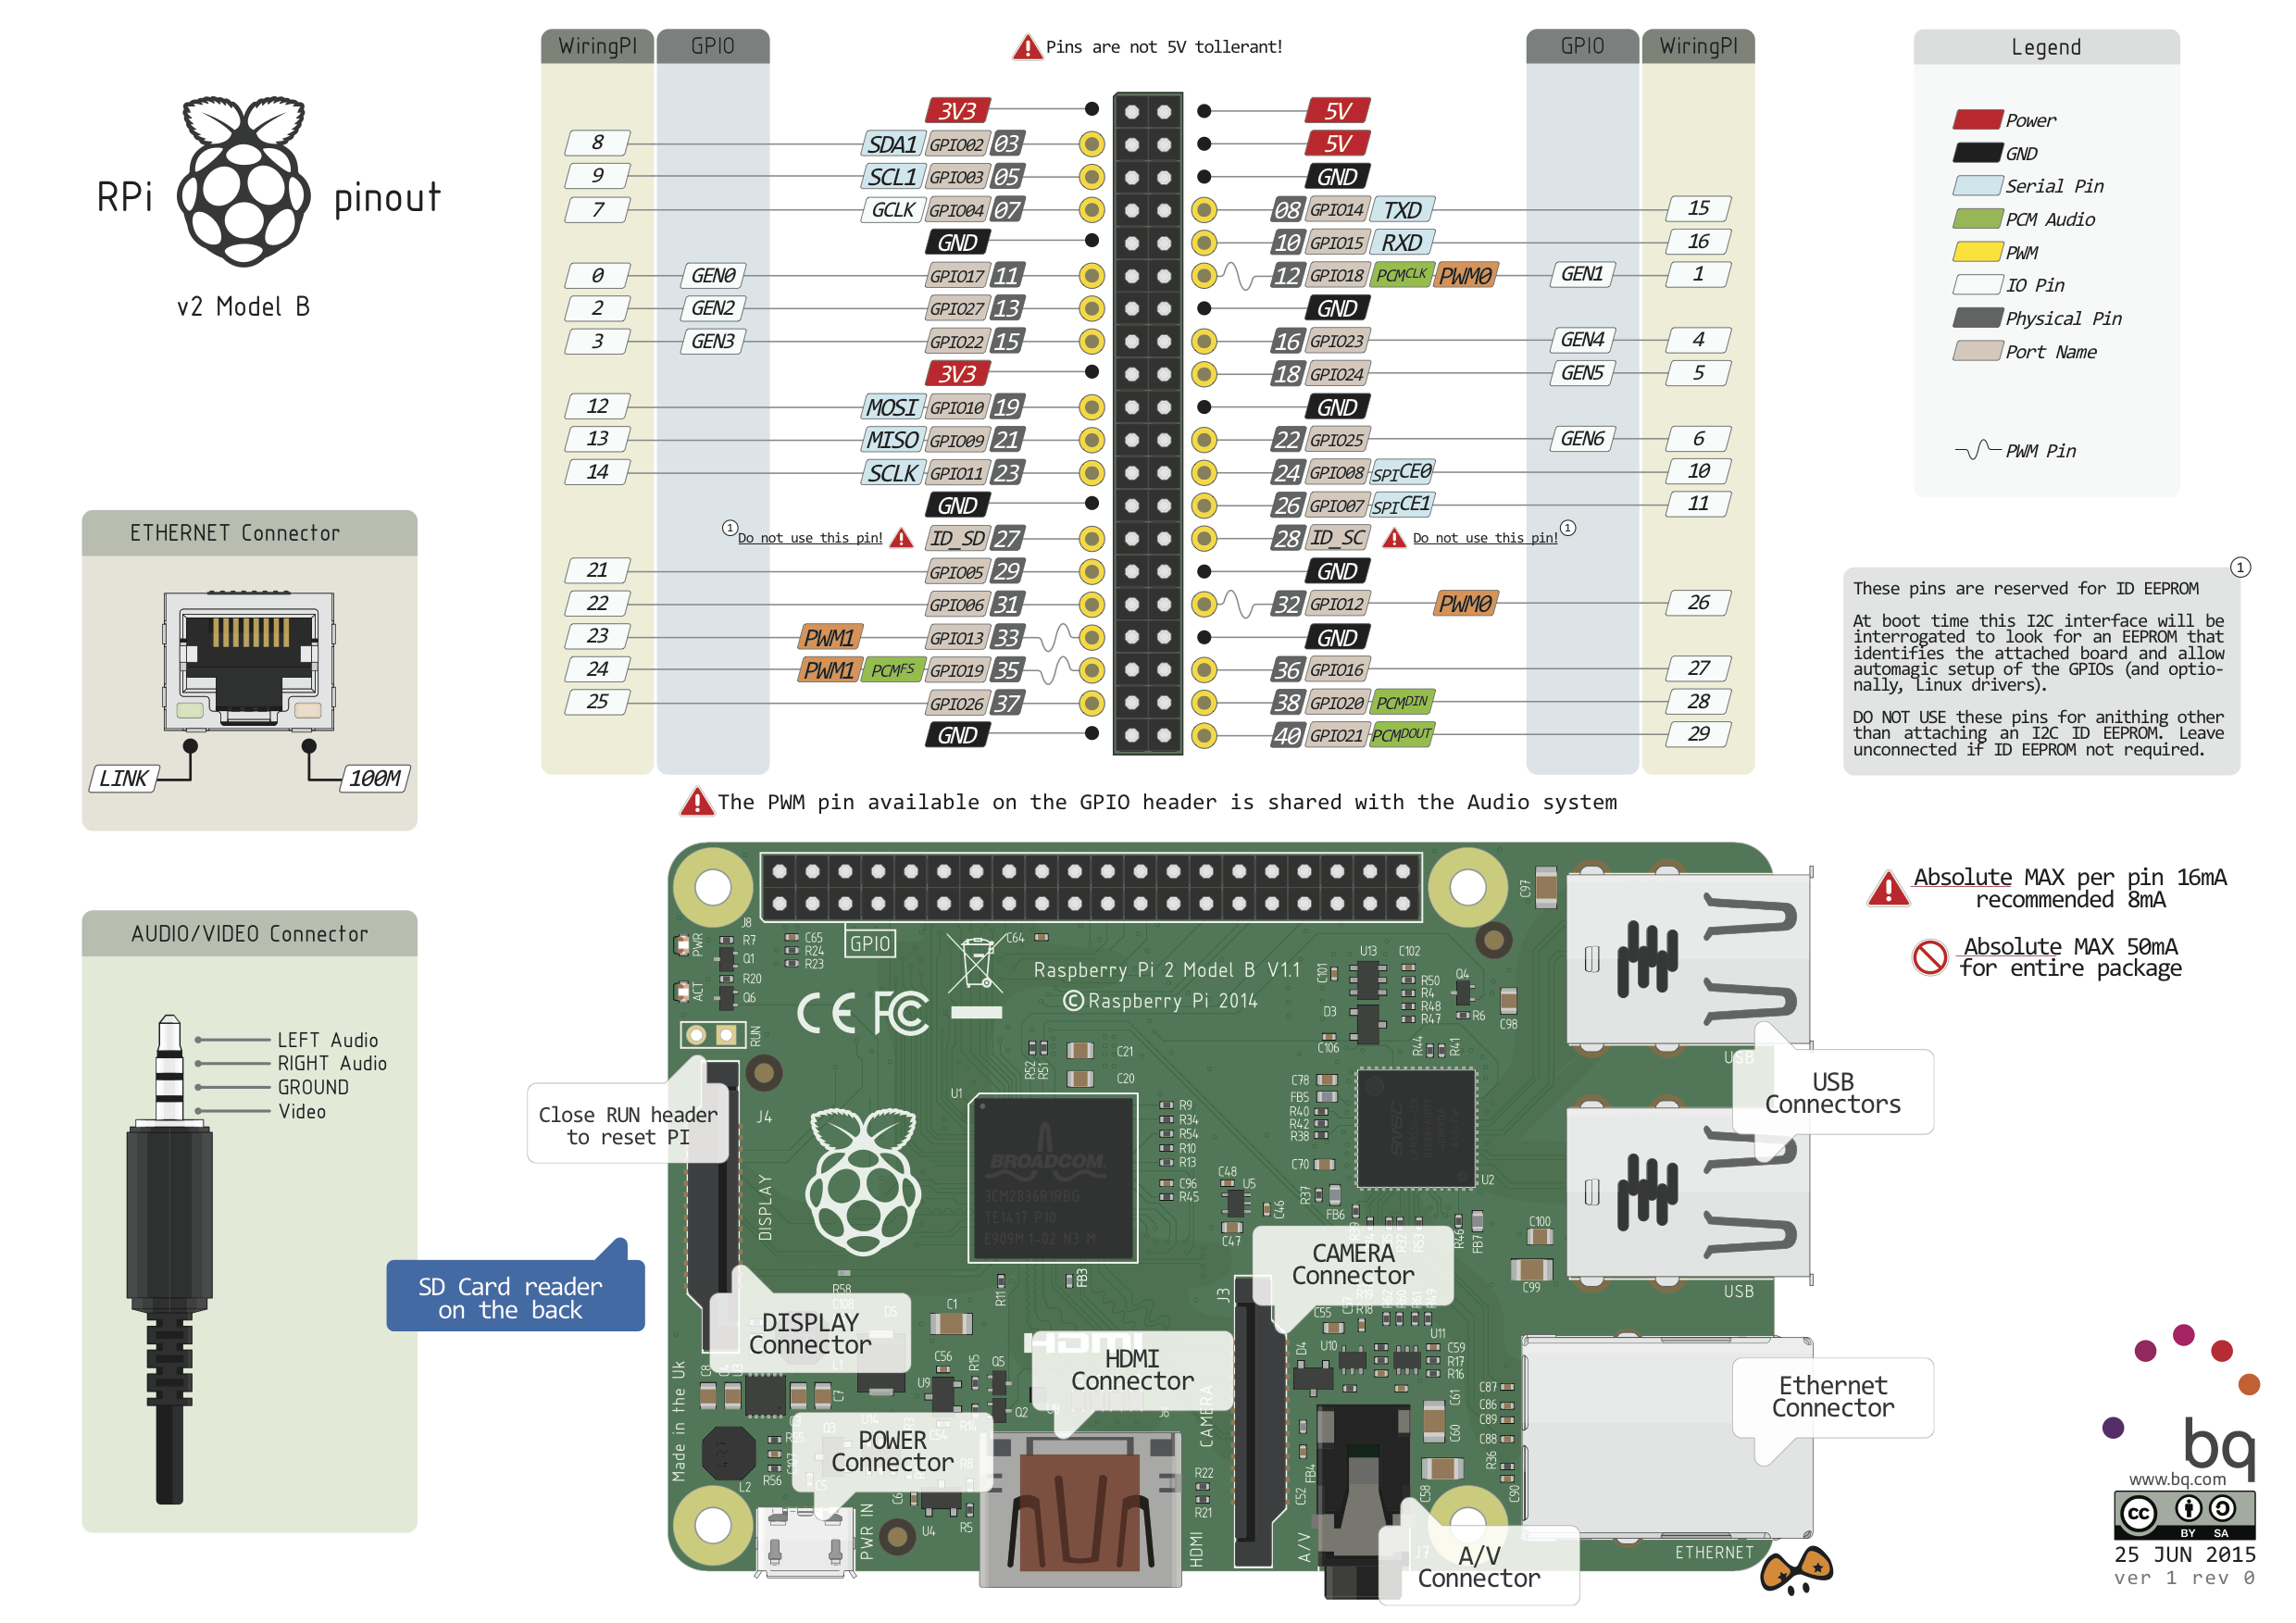
图中的GPIOxx的方框即是BCM编码方式, 直接写数字的深灰框是BOARD编码方式, 如BCM编码方式的 GPIO02 对应BOARD编码方式的 3.
只需要使用BCM编号方式时, 用下面这两张好了, 不眼花:
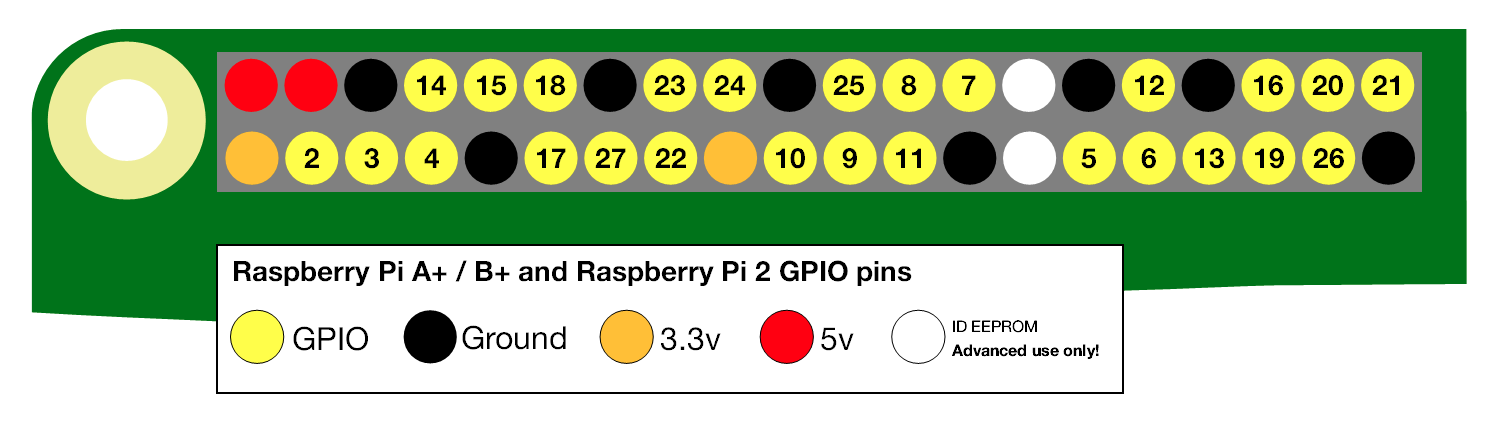
图片来源:
https://www.raspberrypi.org/documentation/usage/gpio-plus-and-raspi2/README.md
http://elinux.org/RPi_Low-level_peripherals#I.C2.B2C
终端查看BCM编号的方式:

To specify which you are using using (mandatory)(确认使用的引脚编号方式):
GPIO.setmode(GPIO.BOARD)
  # or
GPIO.setmode(GPIO.BCM)- 1
- 2
- 3
- 1
- 2
- 3
To detect which pin numbering system has been set (for example, by another Python module)(检测使用的是哪种编号方式):
#The mode will be GPIO.BOARD, GPIO.BCM or None
mode = GPIO.getmode()- 1
- 2
- 1
- 2
Warning(警告)
It is possible that you have more than one script/circuit on the GPIO of your Raspberry Pi. As a result of this, if RPi.GPIO detects that a pin has been configured to something other than the default (input), you get a warning when you try to configure a script. To disable these warnings:
树莓派可能不止有一个脚本/电路在操纵GPIO, 如果树莓派检测到引脚不是默认的输入状态, 会给出警告, 可以用一行代码避免警告:
GPIO.setwarnings(False)- 1
- 1
Setup up a channel(设置一个通道)
You need to set up every channel you are using as an input or an output.
你需要设置用作输入输出的引脚.
To configure a channel as an input( 通道设置为输入 ) :
GPIO.setup(channel, GPIO.IN)- 1
- 1
(where channel is the channel number based on the numbering system you have specified (BOARD or BCM))( channel参数为BOARD或BCM的引脚编号 ).
To read the value of a GPIO pin( 读输入引脚的值 ):
#This will return either 0 / GPIO.LOW / False or 1 / GPIO.HIGH / True.
GPIO.input(channel) - 1
- 2
- 1
- 2
To set up a channel as an output( 设置为输出 ):
GPIO.setup(channel, GPIO.OUT)- 1
- 1
To set the output state of a GPIO pin( 设置输出引脚的状态 ):
#State can be 0 / GPIO.LOW / False or 1 / GPIO.HIGH / True.
GPIO.output(channel, state)- 1
- 2
- 1
- 2
You can also specify an initial value for your output channel( 可以初始化引脚的输入输出和电平 ):
GPIO.setup(channel, GPIO.OUT, initial=GPIO.HIGH)- 1
- 1
Setup more than one channel( 设置超过一个通道 )
You can set up more than one channel per call (release 0.5.8 onwards). For example:
每次调用你可以设置超过一个通道(0.5.8版本之后):
chan_list = [11,12]    # add as many channels as you want!
                       # you can tuples instead i.e.:
                       #   chan_list = (11,12)
GPIO.setup(chan_list, GPIO.OUT)- 1
- 2
- 3
- 4
- 1
- 2
- 3
- 4
You can output to many channels in the same call (release 0.5.8 onwards). For example:
每次调用你可以设置输出到多个通道(0.5.8版本之后):
chan_list = [11,12]                             # also works with tuples
GPIO.output(chan_list, GPIO.LOW)                # sets all to GPIO.LOW
GPIO.output(chan_list, (GPIO.HIGH, GPIO.LOW)) # sets first HIGH and second LOW- 1
- 2
- 3
- 1
- 2
- 3
用的是Python的列表.
Cleanup(清除引脚设置恢复默认)
At the end any program, it is good practice to clean up any resources you might have used. This is no different with RPi.GPIO. By returning all channels you have used back to inputs with no pull up/down, you can avoid accidental damage to your RPi by shorting out the pins. Note that this will only clean up GPIO channels that your script has used. Note that GPIO.cleanup() also clears the pin numbering system in use.
程序结束时, 最好清除引脚设置并恢复默认.
To clean up at the end of your script:
GPIO.cleanup()- 1
- 1
It is possible that don’t want to clean up every channel leaving some set up when your program exits. You can clean up individual channels, a list or a tuple of channels:
有可能程序退出时, 不想清除某些通道的设置, 你可以使用python的列表或元组 来只清除某几个通道:
GPIO.cleanup(channel)
GPIO.cleanup( (channel1, channel2) )
GPIO.cleanup( [channel1, channel2] )- 1
- 2
- 3
- 1
- 2
- 3
输入的高级应用
关于Input引脚状态的检测
There are several ways of getting GPIO input into your program. The first and simplest way is to check the input value at a point in time. This is known as ‘polling’ and can potentially miss an input if your program reads the value at the wrong time. Polling is performed in loops and can potentially be processor intensive. The other way of responding to a GPIO input is using ‘interrupts’ (edge detection). An edge is the name of a transition from HIGH to LOW (falling edge) or LOW to HIGH (rising edge).
有polling( 轮询 )式 和 interrupt( 中断 )式( edge detection 边缘检测 ).
(如: 单片机中, 轮询并不一定在while中, 也可以在定时器中, 如在时基定时器中使用静态变量和定时器间隔进行按键消抖, 可以避免全部使用外部中断带来的中断消耗, 当然树莓派使用Python有时可能要稍微转变下思想, 从中断转成线程, 从串行到并行? RPi.GPIO提供了按键消抖的GPIO函数, 具体可以参看下面).
设置上拉下拉电阻
If you do not have the input pin connected to anything, it will ‘float’. In other words, the value that is read in is undefined because it is not connected to anything until you press a button or switch. It will probably change value a lot as a result of receiving mains interference.
To get round this, we use a pull up or a pull down resistor. In this way, the default value of the input can be set. It is possible to have pull up/down resistors in hardware and using software. In hardware, a 10K resistor between the input channel and 3.3V (pull-up) or 0V (pull-down) is commonly used. The RPi.GPIO module allows you to configure the Broadcom SOC to do this in software:
树莓派引脚默认是高阻状态?如用于按键时, 按键按下之前读的时候值不确定, 可以用内部上拉下拉电阻(10K, 也有说10K以上)来稳定电平, 这样引脚外部就不用接电阻了:
GPIO.setup(channel, GPIO.IN, pull_up_down=GPIO.PUD_UP)
  # or
GPIO.setup(channel, GPIO.IN, pull_up_down=GPIO.PUD_DOWN)- 1
- 2
- 3
- 1
- 2
- 3
用轮询的方式检测输入
You can take a snapshot(快照) of an input at a moment in time( 及时地 ):
if GPIO.input(channel):
    print('Input was HIGH')
else:
print('Input was LOW')- 1
- 2
- 3
- 4
- 1
- 2
- 3
- 4
To wait for a button press by polling in a loop(循环中轮询按键是否按下):
while GPIO.input(channel) == GPIO.LOW:
time.sleep(0.01) # wait 10 ms to give CPU chance to do other things- 1
- 2
- 1
- 2
(this assumes that pressing the button changes the input from LOW to HIGH)(假设按键按下输入从低到高)
边缘检测
An edge is the change in state of an electrical signal from LOW to HIGH (rising edge) or from HIGH to LOW (falling edge). Quite often, we are more concerned by a change in state of an input than it’s value. This change in state is an event.
To avoid missing a button press while your program is busy doing something else, there are two ways to get round this:
the wait_for_edge() functionthe
event_detected() function
a threaded callback function that is run when an edge is detected
我们很多时候并不关心电平值, 而关心电平 从低到高 或 从高到低 的变化(如编码器测速/按键按下弹开等), 为避免主程序忙于其它事情错过引脚的电平改变, 有两种方式: wait_for_edge() 函数和 event_detected() 函数. threaded callback(见下一小节)函数(一个新的线程)在检测到边缘后会运行.
( 检测的两个函数是直接调用了底层的寄存器, 还是开了新线程的软中断 还是要去看看源代码) ((⊙_⊙)?明白的小伙伴可以在评论区解释一下这两个函数实现的原理).
①wait_for_edge() function
The wait_for_edge() function is designed to block execution of your program until an edge is detected. In other words, the example above that waits for a button press could be rewritten as:
wait_for_edge() 函数设计成block execution ((⊙_⊙)?)知道一个边缘被检测, 上面 循环中轮询按键是否按下 可以重写为:
GPIO.wait_for_edge(channel, GPIO.RISING)- 1
- 1
Note that you can detect edges of type GPIO.RISING, GPIO.FALLING or GPIO.BOTH. The advantage of doing it this way is that it uses a negligible amount of CPU, so there is plenty left for other tasks.
If you only want to wait for a certain length of time, you can use the timeout parameter:
注意检测的边缘参数有 GPIO.RISING, GPIO.FALLING or GPIO.BOTH (上升沿, 下降沿 或 升降沿), 这样用几乎不占用CPU, 如果你只希望在确定的时间段内查询, 可以使用 timeout 参数:
# wait for up to 5 seconds for a rising edge (timeout is in milliseconds)
channel = GPIO.wait_for_edge(channel, GPIO_RISING, timeout=5000)
if channel is None:
    print('Timeout occurred')
else:
print('Edge detected on channel', channel)- 1
- 2
- 3
- 4
- 5
- 6
- 1
- 2
- 3
- 4
- 5
- 6
②event_detected() function
The event_detected() function is designed to be used in a loop with other things, but unlike polling it is not going to miss the change in state of an input while the CPU is busy working on other things. This could be useful when using something like Pygame or PyQt where there is a main loop listening and responding to GUI events in a timely basis.
event_detected()函数被设计用来在循环中使用, 不同于polling轮询, 当CPU忙于其它事时, 不会错过引脚状态的改变, 这使得Pygame 或 PyQt 用主循环监听时可以及时回应GUI事件.((⊙_⊙)?).
#Note that you can detect events for GPIO.RISING, GPIO.FALLING or GPIO.BOTH.
GPIO.add_event_detect(channel, GPIO.RISING)  # add rising edge detection on a channel
do_something()
if GPIO.event_detected(channel):
print('Button pressed')- 1
- 2
- 3
- 4
- 5
- 1
- 2
- 3
- 4
- 5
Threaded callbacks
RPi.GPIO runs a second thread for callback functions. This means that callback functions can be run at the same time as your main program, in immediate response to an edge.
RPi.GPIO为边缘检测的回调函数又开了一个线程.
For example:
def my_callback(channel):
    print('This is a edge event callback function!')
    print('Edge detected on channel %s'%channel)
    print('This is run in a different thread to your main program')
GPIO.add_event_detect(channel, GPIO.RISING, callback=my_callback)  # add rising edge detection on a channel
...the rest of your program...- 1
- 2
- 3
- 4
- 5
- 6
- 1
- 2
- 3
- 4
- 5
- 6
If you wanted more than one callback function(如果你想要不止一个回调函数):
def my_callback_one(channel):
    print('Callback one')
def my_callback_two(channel):
    print('Callback two')
GPIO.add_event_detect(channel, GPIO.RISING)
GPIO.add_event_callback(channel, my_callback_one)
GPIO.add_event_callback(channel, my_callback_two)- 1
- 2
- 3
- 4
- 5
- 6
- 7
- 1
- 2
- 3
- 4
- 5
- 6
- 7
回调函数只有一个线程:
Note that in this case, the callback functions are run sequentially, not concurrently. This is because there is only one thread used for callbacks, in which every callback is run, in the order in which they have been defined.
注意因为边缘检测的回调函数都在一个线程中, 有先后顺序.
Switch debounce ( 开关去抖 )
You may notice that the callbacks are called more than once for each button press. This is as a result of what is known as ‘switch bounce’. There are two ways of dealing with switch bounce:
add a 0.1uF capacitor across your switch.
software debouncing
a combination of both
To debounce using software, add the bouncetime= parameter to a function where you specify a callback function. Bouncetime should be specified in milliseconds. For example:
由于存在开关抖动(用示波器可以看到), 每次按下开关会调用多次回调函数, 这不是我们希望的, 有两种方式处理开关抖动:
①在开关两个引脚之间添加一个0.1uF的电容
②软件消抖
③二者结合使用
使用软件消抖时, 给回调函数添加一个弹跳时间的参数( bouncetime= ), 弹跳时间(参照单片机可以为10~20ms)在ms级别, 下面的程序用200ms来消抖:
# add rising edge detection on a channel, ignoring further edges for 200ms for switch bounce handling
GPIO.add_event_detect(channel, GPIO.RISING, callback=my_callback, bouncetime=200)- 1
- 2
- 1
- 2
Remove event detection(移除边缘检测)
If for some reason, your program no longer wishes to detect edge events, it is possible to stop them(由于某些原因, 你的程序可能不希望用边缘检测了, 可以停止它们):
GPIO.remove_event_detect(channel)- 1
- 1
Using PWM in RPi.GPIO (RPi.GPIO的软件PWM)
To create a PWM instance(创建一个PWM实例):
p = GPIO.PWM(channel, frequency)- 1
- 1
To start PWM(开启PWM):
p.start(dc) # where dc is the duty cycle (0.0 <= dc <= 100.0)- 1
- 1
To change the frequency(改变频率):
p.ChangeFrequency(freq) # where freq is the new frequency in Hz- 1
- 1
To change the duty cycle(改变占空比):
p.ChangeDutyCycle(dc) # where 0.0 <= dc <= 100.0- 1
- 1
To stop PWM(停止PWM):
p.stop()- 1
- 1
Note that PWM will also stop if the instance variable ‘p’ goes out of scope.
注意实例变量’p’越界时PWM将停止.
An example to blink an LED once every two seconds(一个每2秒闪灯的例子, 固定占空比):
import RPi.GPIO as GPIO

GPIO.setmode(GPIO.BOARD)
GPIO.setup(12, GPIO.OUT)
p = GPIO.PWM(12, 0.5)
p.start(1)
input('Press return to stop:')   # use raw_input for Python 2
p.stop()
GPIO.cleanup()- 1
- 2
- 3
- 4
- 5
- 6
- 7
- 8
- 9
- 1
- 2
- 3
- 4
- 5
- 6
- 7
- 8
- 9
An example to brighten/dim an LED(一个改变LED明暗亮度的例子, 改变占空比):
import time
import RPi.GPIO as GPIO
GPIO.setmode(GPIO.BOARD)
GPIO.setup(12, GPIO.OUT)
p = GPIO.PWM(12, 50)  # channel=12 frequency=50Hz
p.start(0)
try:
    while 1:
        for dc in range(0, 101, 5):
            p.ChangeDutyCycle(dc)
            time.sleep(0.1)
        for dc in range(100, -1, -5):
            p.ChangeDutyCycle(dc)
            time.sleep(0.1)
except KeyboardInterrupt:
    pass
p.stop()
GPIO.cleanup()- 1
- 2
- 3
- 4
- 5
- 6
- 7
- 8
- 9
- 10
- 11
- 12
- 13
- 14
- 15
- 16
- 17
- 18
- 1
- 2
- 3
- 4
- 5
- 6
- 7
- 8
- 9
- 10
- 11
- 12
- 13
- 14
- 15
- 16
- 17
- 18
gpio_function(channel)
Shows the function of a GPIO channel(返回GPIO通道功能的函数).
For example:
import RPi.GPIO as GPIO
GPIO.setmode(GPIO.BOARD)
func = GPIO.gpio_function(pin)- 1
- 2
- 3
- 1
- 2
- 3
will return a value from:
GPIO.IN, GPIO.OUT, GPIO.SPI, GPIO.I2C, GPIO.HARD_PWM, GPIO.SERIAL, GPIO.UNKNOWN.
(我居然没试成功/(ㄒoㄒ)/~~)