一、Mysql 源码安装
1、解压、预编译 mysql
- 注意:mysql 包和 mysql-boost 包的区别(mysql包必须配合boost-1.59版)
- 示例为 mysql-boost 包安装(boost 模块自带)
- 注意:安装 2.8 及以上版本的 cmake
tar zxf mysql-boost-5.7.11.tar.gz
yum install -y cmake-2.8.12.2-4.el6.x86_64.rpm
cd mysql-5.7.11/
cmake -DCMAKE_INSTALL_PREFIX=/usr/local/lnmp/mysql -DMYSQL_DATADIR=/usr/local/lnmp/mysql/data -DMYSQL_UNIX_ADDR=/usr/local/lnmp/mysql/data/mysql.sock -DWITH_MYISAM_STORAGE_ENGINE=1 -DWITH_INNOBASE_STORAGE_ENGINE=1 -DWITH_PARTITION_STORAGE_ENGINE=1 -DDEFAULT_CHARSET=utf8 -DDEFAULT_COLLATION=utf8_general_ci -DEXTRA_CHARSETS=all
-DCMAKE_INSTALL_PREFIX=/usr/local/lnmp/mysql  ##指定目录
-DMYSQL_DATADIR=/usr/local/lnmp/mysql/data    ##指定数据库路径
-DMYSQL_UNIX_ADDR=/usr/local/lnmp/mysql/data/mysql.sock  ##Unix socket 存放路径
-DWITH_MYISAM_STORAGE_ENGINE=1      ##安装 myisam 存储引擎
-DWITH_INNOBASE_STORAGE_ENGINE=1    ##安装 innodb 存储引擎
-DWITH_PARTITION_STORAGE_ENGINE=1   ##安装数据库分区
-DDEFAULT_CHARSET=utf8          ##使用 utf8 字符
-DDEFAULT_COLLATION=utf8_general_ci ##校验字符
-DEXTRA_CHARSETS=all            ##安装所有扩展字符集
-DWITH_BOOST=boost/boost_1_59_0/    ##指定 boost 路径
2、解决依赖性
- 安装 gcc gcc-c++
- 指定 boost 路径
- 安装 ncurses-devel
- 安装 bison
- 注意:编译错误时,要清空CmakeCache,否则 cmake 时会读取错误文件
- rm -fr CMakeCache.txt
3、编译、安装 make && make install
4、初始化
[root@server1 mysql-5.7.11]# cd /usr/local/lnmp/mysql/support-files
[root@server1 mysql]# cd support-files/
[root@server1 support-files]# ls
magic  my-default.cnf  mysqld_multi.server  mysql-log-rotate  mysql.server
[root@server1 support-files]# rpm -qa |grep mysql
mysql-libs-5.1.71-1.el6.x86_64      ## lib 很重要,不要动!!!

[root@server1 support-files]# cd /etc/
[root@server1 etc]# mv my.cnf my.cnf.back   ##将原配置文件备份

[root@server1 etc]# cd -
/usr/local/lnmp/mysql/support-files         ##将mysql配置文件复制到/etc
[root@server1 support-files]# cp my-default.cnf /etc/my.cnf
[root@server1 support-files]# cp mysql.server /etc/init.d/mysqld
[root@server1 support-files]# ll /etc/init.d/mysqld ##脚本复制到/etc/init.d/,x权限
-rwxr-xr-x 1 root root 11005 Jun 29 10:55 /etc/init.d/mysqld

[root@server1 mysql]# useradd -u 27 -g 27 -d /usr/local/lnmp/mysql/data -M -s /sbin/nologin mysql
[root@server1 mysql]# grep mysql /etc/passwd    ##新建mysql用户,指定uid、gid和家目录
mysql:x:27:27::/usr/local/lnmp/mysql/data:/sbin/nologin
[root@server1 mysql]# chown mysql.mysql . -R

[root@server1 bin]# pwd     ##添加环境变量
/usr/local/lnmp/mysql/bin
[root@server1 bin]# vim /root/.bash_profile
[root@server1 bin]# source /root/.bash_profile

[root@server1 bin]# mysql_install_db    ## 老版本的初始化命令,5.6以后新命令
2018-06-29 11:01:28 [WARNING] mysql_install_db is deprecated. Please consider switching to mysqld --initialize
2018-06-29 11:01:28 [ERROR]   The data directory needs to be specified.
[root@server1 bin]# mysqld --initialize --user=mysql

A temporary password is generated for root@localhost: _AcXHlHrf4Qk(临时密码)

[root@server1 mysql]# chown root . -R
[root@server1 mysql]# chown mysql data/ -R   ##保证 mysql 用户对 data 目录有绝对权限

[root@server1 mysql]# /etc/init.d/mysqld start
Starting MySQL.. SUCCESS!

[root@server1 mysql]# mysql_secure_installation     ##安全初始化

##密码强度校验,y|Y:加载该模块,else:不检验密码强度
VALIDATE PASSWORD PLUGIN can be used to test passwords
and improve security. It checks the strength of password
and allows the users to set only those passwords which are
secure enough. Would you like to setup VALIDATE PASSWORD plugin?
4、登陆测试
[root@server1 mysql]# mysql -p

mysql> create database westos;
Query OK, 1 row affected (0.00 sec)

mysql> show databases;
+--------------------+
| Database           |
+--------------------+
| information_schema |
| mysql              |
| performance_schema |
| sys                |
| westos             |
+--------------------+
5 rows in set (0.00 sec)

[root@server1 mysql]# cd data/
[root@server1 data]# ls
auto.cnf        ib_logfile0  mysql            mysql.sock.lock     server1.pid
ib_buffer_pool  ib_logfile1  mysqld_safe.pid  performance_schema  sys
ibdata1         ibtmp1       mysql.sock       server1.err         westos
二、Php 源码安装
1、解压、预编译 php
- tar jxf php-5.6.35.tar.bz2
- cd php-5.6.35
./configure –prefix=/usr/local/lnmp/php –with-config-file-path=/usr/local/lnmp/php/etc –enable-mysqlnd –with-mysql=mysqlnd –with-mysqli=mysqlnd –with-pdo-mysql=mysqlnd –with-openssl –with-snmp –with-gd –with-zlib –with-curl –with-libxml-dir –with-png-dir –with-jpeg-dir –with-freetype-dir –with-pear –with-gettext –with-gmp –enable-inline-optimization –enable-soap –enable-ftp –enable-sockets –enable-mbstring –enable-fpm –with-fpm-user=nginx –with-fpm-group=nginx –with-mcrypt –with-mhash
--prefix    ##指定目录
--with-config-file-path     ##指定配置文件目录
--with-openssl      ##支持 openssl 服务
--with-curl/gd/zlib     ##支持 curl/gd/zlib
--with-libxml-dir    ##支持 libxml 函数
--with-png-dir//--with-jpeg-dir     ##支持图片格式
--mysql(等等)     ##数据库类型指定 mysqlnd
--with-fpm-user/group   ##指定用户、组
--with-mcrypt/mhash ##支持 crypt/hash
2、解决依赖性
- libxml2-devel libjpeg-turbo-devel libpng-devel
- openssl-devel freetype-devel gmp-devel net-snmp-devel
- curl-devel libmcrypt-devel-2.5.8-9.el6.x86_64.rpm
- libmcrypt-2.5.8-9.el6.x86_64.rpm
3、编译、安装 make && make install
4、配置 php
[root@server1 php-5.6.35]# cp php.ini-production /usr/local/lnmp/php/etc/php.ini
[root@server1 php-5.6.35]# cd -
/usr/local/lnmp/php
[root@server1 php]# ls
bin  etc  include  lib  php  sbin  var
[root@server1 php]# cd etc/
[root@server1 etc]# cp php-fpm.conf.default php-fpm.conf
[root@server1 etc]# ls
pear.conf  php-fpm.conf  php-fpm.conf.default  php.ini

[root@server1 etc]# vim php-fpm.conf    ##打开 pid

[root@server1 etc]# vim php.ini     ##设定时区 Asia/Shanghai
5、复制脚本,启动 php
root@server1 php-5.6.35]# cd sapi/fpm/
[root@server1 fpm]# cp init.d.php-fpm /etc/init.d/php-fpm
[root@server1 fpm]# chmod +x /etc/init.d/php-fpm
[root@server1 fpm]# /etc/init.d/php-fpm status
php-fpm is stopped
[root@server1 fpm]# /etc/init.d/php-fpm start
Starting php-fpm  done
三、Nginx 源码安装
1、解压、预编译
- tar zxf nginx-1.10.1.tar.gz
- tar zxf nginx-sticky-module-ng.tar.gz
- cd nginx-1.10.1
- vim src/core/nginx.h ##隐藏版本
- vim auto/cc/gcc ##注释debug
./configure –prefix=/usr/local/lnmp/nginx –with-http_ssl_module –with-http_stub_status_module –with-threads –with-file-aio –add-module=/root/nginx-sticky-module-ng
--prefix=/usr/local/nginx    ##指定安装目录
--with-http_ssl_module      ##安装 ssl 模块
--with-threads      ##设置多线程
--with-file-aio     ##文件读写,aio 模式,一个有效请求,一个线程
2、解决依赖性 pcre-devel
3、编译、安装 make && make install
4、配置 nginx
[root@server1 nginx]# vim /usr/local/lnmp/nginx/conf/nginx.conf

 65         location ~ \.php$ {
 66             root           html;
 67             fastcgi_pass   127.0.0.1:9000;
 68             fastcgi_index  index.php;
 69        #     fastcgi_param  SCRIPT_FILENAME  /scripts$fastcgi_script_name;
 70             include        fastcgi.conf;
 71         }
5、调试、运行
[root@server1 nginx]# ln -s /usr/local/lnmp/nginx/sbin/nginx /sbin/
[root@server1 ~]# nginx -t
nginx: the configuration file /usr/local/lnmp/nginx/conf/nginx.conf syntax is ok
nginx: configuration file /usr/local/lnmp/nginx/conf/nginx.conf test is successful
[root@server1 ~]# cd /usr/local/lnmp/nginx/html/
[root@server1 html]# vim index.php
<?php
phpinfo()
?>
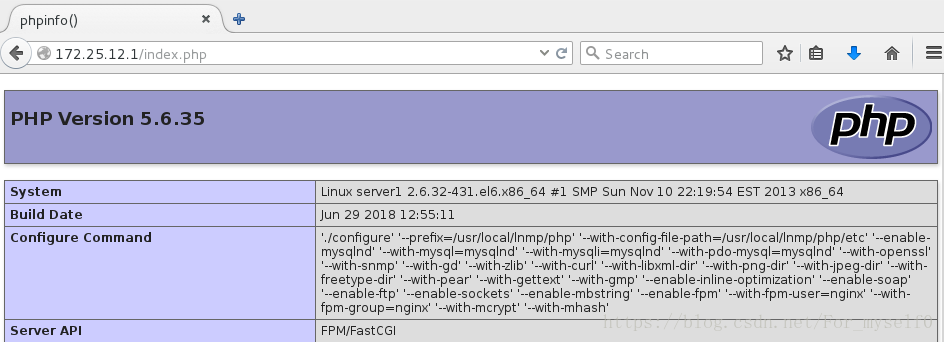
##访问 172.25.12.1 172.25.12.1/index.php (看效果)
[root@server1 html]# vim /usr/local/lnmp/nginx/conf/nginx.conf
43 location / {
44 root html;
45 index index.php index.html index.htm;
46 }
[root@server1 html]# nginx -s reload
##访问 172.25.12.1/index.php (看效果)
## /usr/local/lnmp/nginx/logs/nginx.pid nginx 的进程 pid ##
nginx -s reload (跟 nginx.pid 息息相关)
###########################################################访问 172.25.12.1/index.php 结果:
四、搭建论坛
1、在 /usr/local/lnmp/nginx/html 目录下载 Discuz_X3.2_SC_UTF8.zip
2、安装 unzip,解压 Discuz_X3.2_SC_UTF8.zip
3、访问网页搭建论坛 (重命名 upload -> bbs)
排错:
- bbs下文件权限不够
[root@server1 bbs]# chmod 777 uc_server/ config/ data/ uc_client/ -R- 目录不存在
[root@server1 bbs]# vim /usr/local/lnmp/php/etc/php.ini

1013 pdo_mysql.default_socket= /usr/local/lnmp/mysql/data/mysql.sock
1162 mysql.default_socket = /usr/local/lnmp/mysql/data/mysql.sock
1221 mysqli.default_socket = /usr/local/lnmp/mysql/data/mysql.sock

[root@server1 bbs]# /etc/init.d/php-fpm reload
Reload service php-fpm  done
- 数据库权限不够
[root@server1 bbs]# chmod 755 /usr/local/lnmp/mysql/data/- 输入数据库密码,设定 admin 密码,搭建成功
- 避免重复安装,删除 /usr/local/lnmp/nginx/html/bbs/install/index.php
五、Php 添加新模块
1、解压,配置 memcache-2.2.5
2、添加环境变量
[root@server1 bin]# vim ~/.bash_profile
/usr/local/lnmp/php/bin/
[root@server1 bin]# source ~/.bash_profile
3、编译、安装 memcache-2.2.5
[root@server1 ~]# cd memcache-2.2.5
[root@server1 memcache-2.2.5]# phpize
Configuring for:
PHP Api Version:         20131106
Zend Module Api No:      20131226
Zend Extension Api No:   220131226

[root@server1 memcache-2.2.5]# ./configure
[root@server1 memcache-2.2.5]# make && make install
4、修改配置文件,查看模块是否加载
[root@server1 memcache-2.2.5]# vim /usr/local/lnmp/php/etc/php.ini

 874 extension=memcache.so

[root@server1 memcache-2.2.5]# php -m | grep memcache
memcache
## 修改配置文件切记 reload
[root@server1 etc]# /etc/init.d/php-fpm  reload
Reload service php-fpm  done
5、查看 memcache 端口
[root@server1 memcache-2.2.5]# yum install -y memcached
[root@server1 memcache-2.2.5]# /etc/init.d/memcached start
Starting memcached:                                        [  OK  ]

[root@server1 memcache-2.2.5]# netstat -antuple | grep memcache
       User       Inode      PID/Program name
tcp        0      0 0.0.0.0:11211               0.0.0.0:*                   LISTEN      498        254469     13869/memcached
6、设置 memcache.php
[root@server1 memcache-2.2.5]# cp memcache.php /usr/local/lnmp/nginx/html/
[root@server1 memcache-2.2.5]# cd /usr/local/lnmp/nginx/html/
[root@server1 html]# vim memcache.php
22 define('ADMIN_USERNAME','memcache'); // Admin Username
23 define('ADMIN_PASSWORD','westos'); // Admin Password
28 $MEMCACHE_SERVERS[] = '172.25.12.1:11211'; // add more as an array
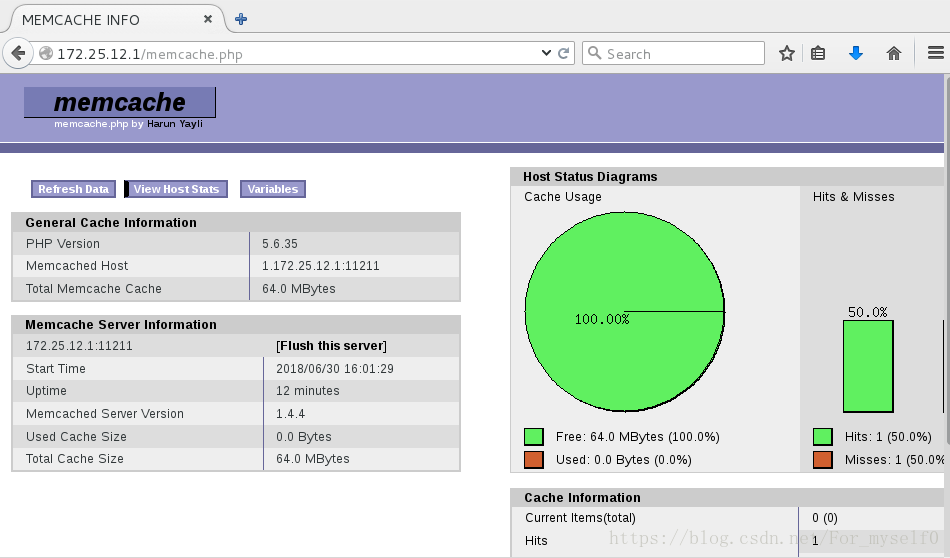
##访问 172.25.12.1/memcache.php
访问 172.25.12.1/memcache.php 结果:
7、设置 example.php
[root@server1 memcache-2.2.5]# cp example.php /usr/local/lnmp/nginx/html/

##访问 172.25.12.1/example.php
访问结果:

8、物理主机测试
[root@foundation12 ~]# ab -c 10 -n 1000 http://172.25.12.1/example.php
Complete requests:      1000
Failed requests:        0
Write errors:           0
Requests per second:    1728.62 [#/sec] (mean)

[root@foundation12 ~]# ab -c 10 -n 1000 http://172.25.12.1/index.php
Complete requests:      1000
Failed requests:        752
   (Connect: 0, Receive: 0, Length: 752, Exceptions: 0)
Write errors:           0
Requests per second:    369.41 [#/sec] (mean)
六、Nginx 虚拟主机和 https 加密
1、配置虚拟主机
[root@server1 ~]# vim /usr/local/lnmp/nginx/conf/nginx.conf

117 server {
118         listen 80;
119         server_name www.test.org;
120
121         location / {
122                 root /www1;
123                 index index.html;
124         }
125 }
126
127 server {
128         listen 80;
129         server_name www.hello.org;
130
131         location / {
132                 root /www2;
133                 index index.html;
134         }
135 }
2、配置默认发布目录,默认发布文件
[root@server1 ~]# mkdir /www1 /www2
[root@server1 ~]# vim /www1/index.html
www.test.org
[root@server1 ~]# vim /www2/index.html
www.hello.org
3、调试,重新加载 nginx
[root@server1 ~]# nginx -t
nginx: the configuration file /usr/local/lnmp/nginx/conf/nginx.conf syntax is ok
nginx: configuration file /usr/local/lnmp/nginx/conf/nginx.conf test is successful
[root@server1 ~]# nginx -s reload
4、物理主机测试
[root@foundation12 ~]# vim /etc/hosts
[root@foundation12 ~]# curl www.test.org
www.test.org
[root@foundation12 ~]# curl www.hello.org
www.hello.org
5、配置 https 加密
[root@server1 ~]# vim /usr/local/lnmp/nginx/conf/nginx.conf

 98     server {
 99         listen       443 ssl;
100         server_name  www.test.org;
101
102         ssl_certificate      cert.pem;
103         ssl_certificate_key  cert.pem;
104
105         ssl_session_cache    shared:SSL:1m;
106         ssl_session_timeout  5m;
107
108         ssl_ciphers  HIGH:!aNULL:!MD5;
109         ssl_prefer_server_ciphers  on;
110
111         location / {
112             root   /www1;
113             index  index.html index.htm;
114         }
115     }

##生成cert.pem (key)文件
[root@server1 ~]# cd /etc/pki/tls/certs/
[root@server1 certs]# make cert.pe

[root@server1 certs]# mv cert.pem /usr/local/lnmp/nginx/conf/
[root@server1 certs]# nginx -t
nginx: the configuration file /usr/local/lnmp/nginx/conf/nginx.conf syntax is ok
nginx: configuration file /usr/local/lnmp/nginx/conf/nginx.conf test is successful
[root@server1 certs]# nginx -s reload

[root@server1 certs]# netstat -antuple | grep 443
tcp        0      0 0.0.0.0:443                 0.0.0.0:*                   LISTEN      0          264343     11229/nginx