apache
apache(Web服务器):
Apache是世界使用排名第一的Web服务器软件。它可以运行在几乎所有广泛使用的计算机平台上,由于其跨平台和安全性被广泛使用,是最流行的Web服务器端软件之一。它快速、可靠并且可通过简单的API扩充,将Perl/Python等解释器编译到服务器中。同时Apache音译为阿帕奇,是北美印第安人的一个部落,叫阿帕奇族,在美国的西南部。也是一个基金会的名称、一种武装直升机等等。
apache 高效,异步非阻塞模式
nginx 稳定,同步阻塞模式1>安装apache
1>yum install httpd
2>systemctl start httpd
3>netstat -autlupe | grep 80 #查看80端口都有谁在用
4>netstat -autlupe | grep httpd
5>cd /var/www/html/
6>vim index.html
<h1> hello,lala </h1> #<h1>可以改变字体大小
在浏览器上面访问:172.25.254.132 http的根目录在/var/www/html/
访问apache

2>修改访问端口
1>vim /etc/httpd/conf/httpd.conf
 42 Listen 8011
2>systemctl restart httpd
在浏览器中访问172.25.254.132:8011
3>vim /etc/httpd/conf/httpd.conf
 42 Listen 80
4>systemctl restart httpd
在浏览器中访问172.25.254.132
3>修改发布目录
1>mkdir /westos/html -p
2>cd /westos/html/
3>vim index.html
4>vim /etc/httpd/conf/httpd.conf
119 DocumentRoot "/westos/html" #修改http访问根目录路径
120 <Directory "/westos"> #在/westos目录下
121  require all granted #所有文件都被授权访问
122  DirectoryIndex index.html #默认为发布文件为index.html
122 </Directory>
5>systemctl restart httpd
访问测试

3>修改默认发布文件
1>cd /westos/html/
2>mkdir linux
3>touch linux/text.html
4>vim linux/text.html
5>vim /etc/httpd/conf/httpd.conf
119 DocumentRoot "/westos/html"
120 <Directory "/westos/html/linux">
121      DirectoryIndex text.html #当访问linux目录时默认发布文件为text.html
122 </Directory>
123 <Directory "/westos">
124           require all granted #访问授权
125           DirectoryIndex index.html #当访问/westos时,默认发布文件为index.html
126 </Directory>
6>systemctl restart httpd
访问/westos/html/linux/目录

二.apache的访问控制
1黑名单访问
访问ip黑名单
vim /etc/httpd/conf/httpd.conf
  <Directory "/var/www/html/westos">
          Order Allow,Deny #先读白名单,后读黑名单,黑名单会使白名单的指定用户失效
          Allow from ALL
          Deny from 172.25.254.32
  </Directory>
systemctl restart httpd
黑名单主机访问时

2>访问ip白名单
vim /etc/httpd/conf/httpd.conf
  <Directory "/var/www/html/westos">
          Order Deny,Allow
          Allow from 172.25.254.32
          Deny from All
  </Directory>
systemctl restart httpd
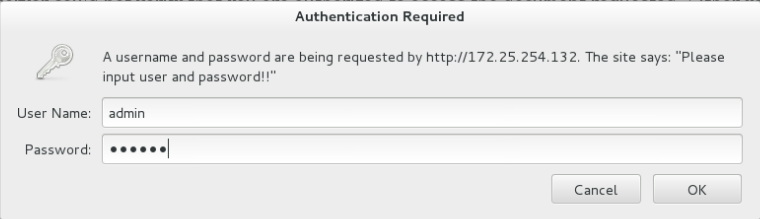
3>指定用户登陆访问
cd /etc/httpd/
htpasswd -cm apacheuser tom #新建apache用户,如果没有建apacheuser文件,要用c,表新建,当已经有该文件时,不加c参数,否则会覆盖原文件内容
htpasswd -c apacheuser admin
cat apacheuser
vim /etc/httpd/conf/httpd.conf
  <Directory "/var/www/html/westos">
          AuthUserFile /etc/httpd/apacheuser
          AuthName "Please input user and password!!"
          AuthType basic
          Require user admin #只允许admin用户登陆
          #Require user valid-user #允许该目录下的所有用户访问
  </Directory>
systemctl restart httpd
主配置文件

admin 登陆界面
5>网址制作
在浏览器访问端编辑本地解析
vim /etc/hosts
4 172.25.254.132 www.westos.com news.westos.com music.westos.com login.westos.com
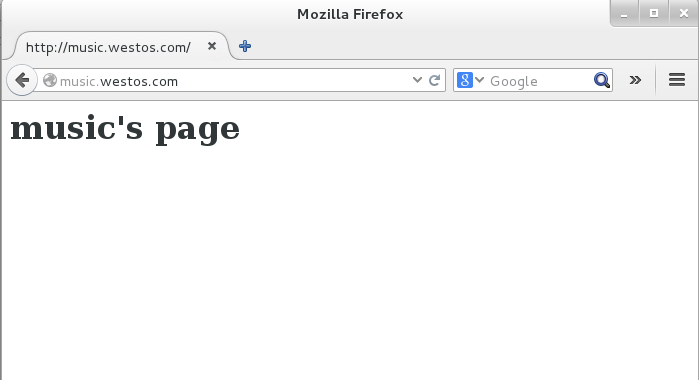
制作apache访问网址news.westos.com music.westos.com
mkdir /var/www/virtual/westos.com/music -p
mkdir /var/www/virtual/westos.com/news -p
vim /var/www/virtual/westos.com/news/index.html
vim /var/www/virtual/westos.com/music/index.html
cd /etc/httpd/conf.d/vim default.conf
vim news.conf
vim music.conf
systemctl restart httpdvim default.conf

vim news.conf

vim music.conf

访问news.westos.com

访问music.westos.com
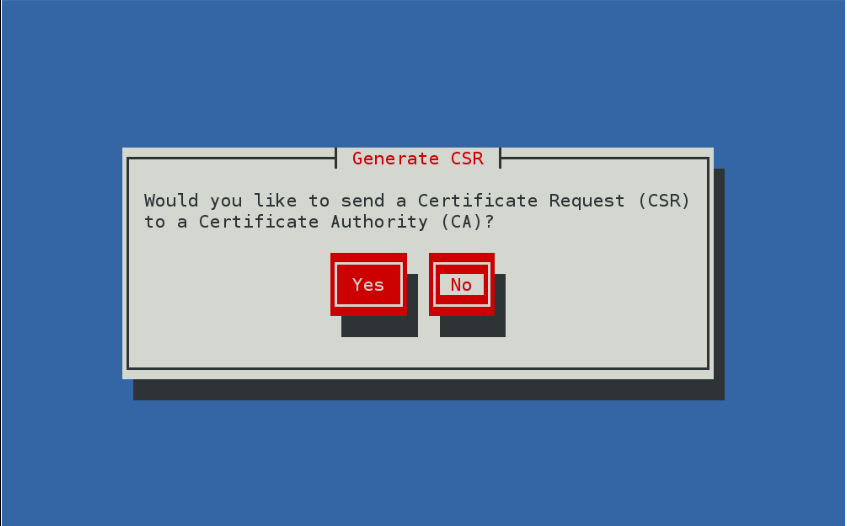
6>证书制作www.westos.com
yum install mod_ssl -y
ls /etc/httpd/conf.d/
yum install  crypto-utils -y
genkey www.westos.com
编辑自己的证书页面
vim /etc/httpd/conf.d/ssl.conf
修改证书生成路径
101 SSLCertificateFile /etc/pki/tls/certs/www.westos.com.crt
108 SSLCertificateKeyFile /etc/pki/tls/private/www.westos.com.key/etc/pki/tls/serts
/etc/pki/tls/private

genkey www.westos.com
生成证书路径
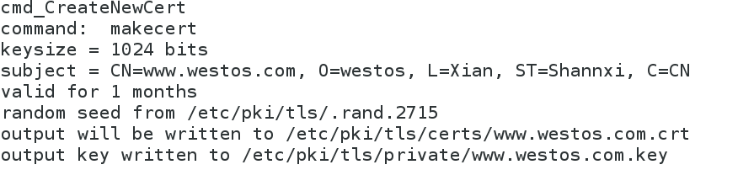
不用联网

编辑自己的证书页面

当登陆www.westos.com时需要先下载认证证书

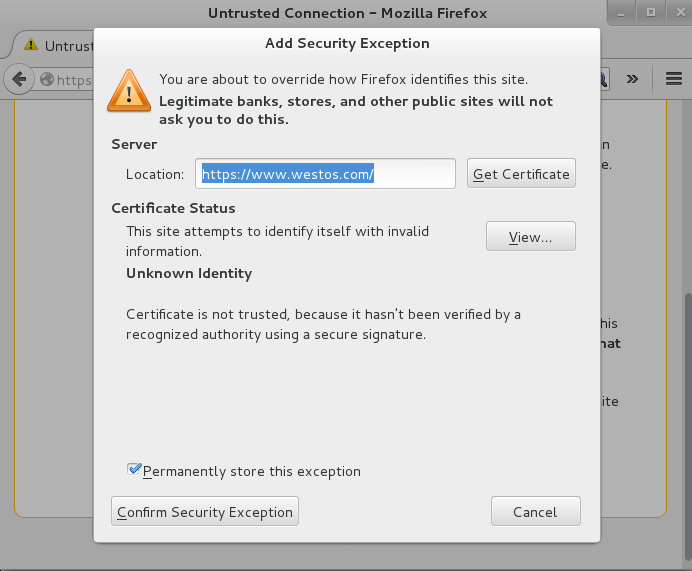
当下载了证书,当访问www.westos.com就会看到自己的证书

7>虚拟端口,网页重写
mkdir /var/www/virtual/westos.com/login/ -p
vim /var/www/virtual/westos.com/login/index.html
cd /etc/httpd/conf.d/
vim login.conf
   <VirtualHost *:443>
    ServerName login.westos.com
    DocumentRoot "/var/www/virtual/westos.com/login/"
    CustomLog "logs/login.log" comnbined
    SSLEngine on
    SSLCertificateFile /etc/pki/tls/certs/www.westos.com.crt
    SSLCertificateKeyFile /etc/pki/tls/private/www.westos.com.key
  </VirtualHost>
  <Directory "/var/www/virtual/westos.com/login/">
    Require all granted
  </Directory>
systemctl restart httpd
vim login.conf
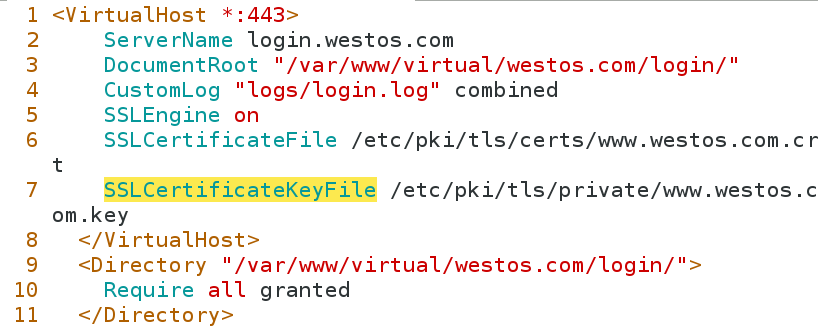
当访问login.westos.com时,需要先下载认证文件,然后再次访问时浏览器会将该网页转换成加密格式的网页

8.1>访问php文件
1.yum install php
2.cd /var/www/html
3.vim index.php
<?php
      phpinfo();
?>
4.vim /etc/httpd/conf.d/php.conf
5.vim /etc/httpd/conf/httpd.conf
175 <IfModule dir_module>
176     DirectoryIndex index.php  index.html #修改默认发布目录
177 </IfModule>
systemctl restart httpd
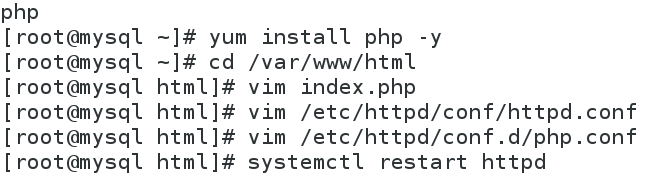
访问php

8.2>访问cgi文件
cd /var/www/html
mkdir cgi
vim cgi/index.cgi
#!/usr/bin/perl
print "Content-type: text/html\n\n";
print `date`;
chmod +x cgi/index.cgi
cd /etc/httpd/conf.d/
vim default.conf
vim default.conf

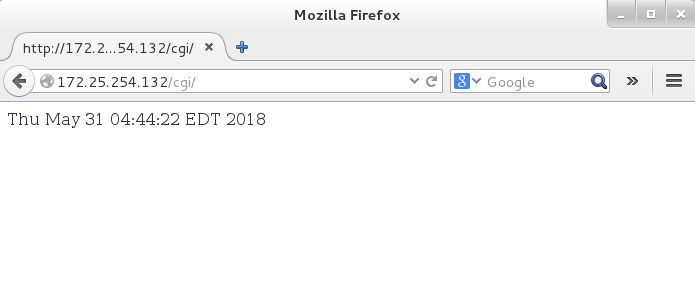
访问测试cgi
三.squid
Squid cache:
(简称为Squid)是一个流行的自由软件(GNU通用公共许可证)的代理服务器和Web缓存服务器。Squid有广泛的用途,从作为网页服务器的前置cache服务器缓存相关请求来提高Web服务器的速度,到为一组人共享网络资源而缓存万维网,域名系统和其他网络搜索,到通过过滤流量帮助网络安全,到局域网通过代理上网。Squid主要设计用于在Linux一类系统运行。
Squid是一种在Linux系统下使用的优秀的代理服务器软件。squid不仅可用在Linux系统上,还可以用在AIX、Digital Unix、FreeBSD、HP-UX、Irix、NetBSD、Nextstep、SCO和Solaris等系统上。Squid与Linux下其它的代理软件如Apache、Socks、TIS FWTK和delegate相比,下载安装简单,配置简单灵活,支持缓存和多种协议。
1>安装squid
正向代理
yum install squid
vim /etc/squid/squid.conf
59 http_port 3128
62 cache_dir ufs /var/spool/squid 100 16 256
在squid上面缓存250的http数据
#vim /etc/sysconfig/network-scripts/ifcfg-eth0
DNS1=172.25.254.250
在浏览器上设置http接口
perforence advanced-network setting-http_Proxy 172.25.254.132 Port 3128 #为squid缓存接口
vim /etc/squid/squid.conf

在squid上面缓存64的http数据
在squid主机的浏览器设置http服务端和端口,通过3128squid端口缓存能上网的64真机上的数据


这样132就可以访问从64上面缓存的数据了但是并不能上网

3.2>cnd加速squid反向代理
设置server为squid主机
yum install squid
vim /etc/squid/squid.conf
59 http_port 80 vhost vport
60 cache_peer 172.25.254.132  parent  80#通过80端口向132访问apache从而缓存数据 0 proxy-only
62 cache_dir ufs /var/spool/squid 100 16 256
客户端访问网络太慢,通过80端口向232squid主机访问数据
systemctl restart squid

systemctl stop firewalld
vim /etc/squid/squid.conf

有时候会因为客户端的网速太慢从而导致访问终端浏览器时的过程太长,不能达到客户的标准,此时有一个squid浏览器能更快地通过apache访问到数据,于是将其客户端想要访问的数据通过squid从终端服务器上面高速缓存下来,并且近距离的发送到客户主机上面,从而实现了两次加速,即反向代理。
客户端浏览器还需要将设置浏览器端口还原
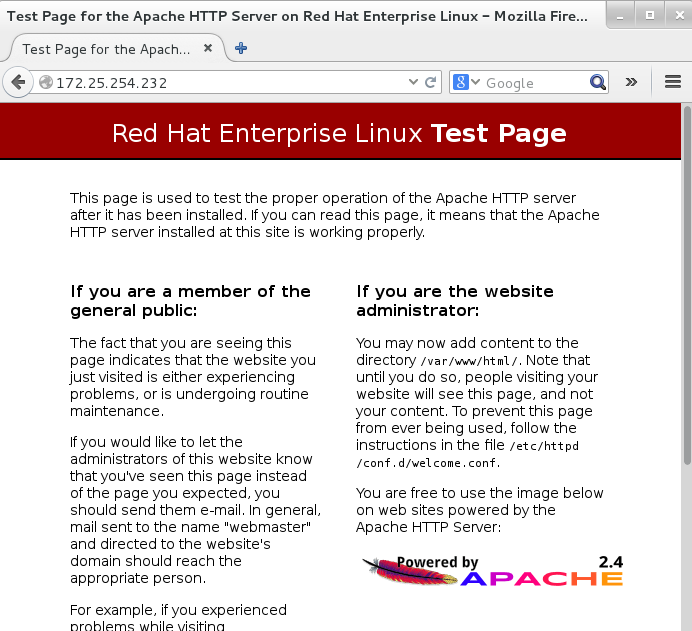
客户端访问172.25.254.232