mysql源码编译安装
官网下载mysql安装包 : mysql-boost-5.7.22.tar.gz
mysql源码安装需要使用c++的boost库,而mysql-boost压缩包自带boost库,不需要在下载boost安装包,mysql在3.8版本以后使用cmake跨平台工具预编译源码,用于设置mysql的编译参数;bison 一种linux下的c/c++语法分析器;
###解压压缩包编译安装环境###
[root@serevr1 ~]# tar -zxf mysql-boost-5.7.11.tar.gz
[root@serevr1 ~]# cd mysql-5.7.11/
[root@serevr1 mysql-5.7.11]# du -sh    ##查看数据库解压包大小
521M    .
[root@serevr1 mysql-5.7.11]# ls
boost            dbug                 libevent     plugin         testclients
BUILD            Docs                 libmysql     README         unittest
client           Doxyfile-perfschema  libmysqld    regex          VERSION
cmake            extra                libservices  scripts        vio
CMakeLists.txt   include              man          sql            win
cmd-line-utils   INSTALL              mysql-test   sql-common     zlib
config.h.cmake   INSTALL-SOURCE       mysys        storage
configure.cmake  libbinlogevents      mysys_ssl    strings
COPYING          libbinlogstandalone  packaging    support-files
[root@server1 mysql-5.7.11]# yum install -y cmake
[root@server1 mysql-5.7.11]# cmake -DCMAKE_INSTALL_PREFIX=/usr/local/mysql -DMYSQL_DATADIR=/usr/local/mysql/data  -DMYSQL_UNIX_ADDR=/usr/local/mysql/data/mysql.sock -DWITH_MYISAM_STORAGE_ENGINE=1 -DWITH_INNOBASE_STORAGE_ENGINE=1 -DDEFAULT_CHARSET=utf8 -DDEFAULT_COLLATION=utf8_general_ci -DEXTRA_CHARSETS=all


##执行编译后报错##
CMake Error at CMakeLists.txt:21 (CMAKE_MINIMUM_REQUIRED):
  CMake 2.8.2 or higher is required.  You are running version 2.6.4
  我们安装的cmake版本过低,需要安装2.8.2版本或者以上
[root@serevr1 ~]# yum update cmake-2.8.12.2-4.el6.x86_64.rpm
###升级版本再次执行编译,以下列出编译时我遇见的错误
CMake Error: your C compiler: "CMAKE_C_COMPILER-NOTFOUND" was not found.   Please set CMAKE_C_COMPILER to a valid compiler path or name.
CMake Error: your CXX compiler: "CMAKE_CXX_COMPILER-NOTFOUND" was not found.   Please set CMAKE_CXX_COMPILER to a valid compiler path or name.
[root@server1 mysql-5.7.11]# yum install -y gcc gcc-c++

CMake Error at cmake/boost.cmake:81 (MESSAGE):
  You can download it with -DDOWNLOAD_BOOST=1 -DWITH_BOOST=<directory>
 [root@server1 mysql-5.7.11]# cmake -DCMAKE_INSTALL_PREFIX=/usr/local/mysql -DMYSQL_DATADIR=/usr/local/mysql/data  -DMYSQL_UNIX_ADDR=/usr/local/mysql/data/mysql.sock -DWITH_MYISAM_STORAGE_ENGINE=1 -DWITH_INNOBASE_STORAGE_ENGINE=1 -DDEFAULT_CHARSET=utf8 -DDEFAULT_COLLATION=utf8_general_ci -DEXTRA_CHARSETS=all
 -DWITH_BOOST=boost/boost_1_59_0/
###boost解压包自带,不知道路径时两次tab补齐
CMake Error at cmake/readline.cmake:64 (MESSAGE):
  Curses library not found.  Please install appropriate package,
remove CMakeCache.txt and rerun cmake.On Debian/Ubuntu, package name is libncurses5-dev, on Redhat and derivates it is ncurses-devel.
##提示我们需要删除编译文件CMakeCache.txt,解决相关报错,再次执行编译,后面步骤同以上步骤!
[root@server1 mysql-5.7.11]# rm -fr CMakeCache.txt
[root@server1 mysql-5.7.11]# yum install -y ncurses-devel
Make Warning at cmake/bison.cmake:20 (MESSAGE):
  Bison executable not found in PATH
Call Stack (most recent call first):
  libmysqld/CMakeLists.txt:142 (INCLUDE)
[root@server1 mysql-5.7.11]# yum install -y bison
以上就是我编译安装遇见的问题!
make  &&  make install    ##编译环境和安装需要很长时间

####配置文件和启动脚本###
[root@server1 support-files]# pwd
/usr/local/mysql/support-files
[root@server1 support-files]# ls
magic  my-default.cnf  mysqld_multi.server  mysql-log-rotate  mysql.server
[root@server1 support-files]# file mysql.server
mysql.server: POSIX shell script text executable    <mysql的启动脚本>
[root@server1 support-files]# cp mysql.server /etc/init.d/mysql
[root@server1 support-files]# mv /etc/my.cnf /etc/my.cnf.bak
<将原来配置配置文件备份,复制模板到改目录>
[root@server1 support-files]# cp my-default.cnf /etc/my.cnf<mysql默认配置文件>


###创建mysql运行的用户mysql###
[root@server1 mysql]# id mysql
id: mysql: No such user
[root@server1 mysql]# groupadd -g 27 mysql
[root@server1 mysql]# useradd -u 27 -g 27 -d /usr/local/mysql/data -M -s /sbin/nologin mysql
[root@server1 mysql]# id mysql
uid=27(mysql) gid=27(mysql) groups=27(mysql)

##编辑安装,data数据以及sock文件路径,让其他人知道你的安装目录利于修改##
[root@server1 mysql]# vi /etc/my.cnf
17 # These are commonly set, remove the # and set as required.
18 basedir = /usr/local/mysql
19 datadir = /usr/local/mysql/data
20 port = 3306
21 # server_id = .....
22 socket = /usr/local/mysql/data/mysql.sock

###将mysql的系统文件添加到全局变量和环境下###
[root@server1 bin]# pwd
/usr/local/mysql/bin
[root@server1 bin]# ls
innochecksum                mysql_config               mysqlshow
lz4_decompress              mysql_config_editor        mysqlslap
myisamchk                   mysqld                     mysql_ssl_rsa_setup
myisam_ftdump               mysqld_multi               mysqltest
myisamlog                   mysqld_safe                mysqltest_embedded
myisampack                  mysqldump                  mysql_tzinfo_to_sql
my_print_defaults           mysqldumpslow              mysql_upgrade
mysql                       mysql_embedded             perror
mysqladmin                  mysqlimport                replace
mysqlbinlog                 mysql_install_db           resolveip
mysqlcheck                  mysql_plugin               resolve_stack_dump
mysql_client_test           mysqlpump                  zlib_decompress
mysql_client_test_embedded  mysql_secure_installation
[root@server1 bin]# vim ~/.bash_profile
# .bash_profile

# Get the aliases and functions
if [ -f ~/.bashrc ]; then
        . ~/.bashrc
fi

# User specific environment and startup programs

PATH=$PATH:$HOME/bin:/usr/local/mysql/bin

export PATH
[root@server1 bin]# source ~/.bash_profile


###为了数据库的安全,指定data数据其他人可读,其他文件无权限,视情况而定###
[root@server1 mysql]# pwd
/usr/local/mysql
[root@server1 mysql]# chown mysql.mysql .  -R
[root@server1 mysql]# chown root . -R
[root@server1 mysql]# chown mysql data/ -R
[root@server1 mysql]# ll
total 60
drwxr-xr-x  2 root  mysql  4096 Jun 30 01:09 bin
-rw-r--r--  1 root  mysql 17987 Feb  2  2016 COPYING
drwxr-x---  5 mysql mysql  4096 Jun 30 01:37 data
drwxr-xr-x  2 root  mysql  4096 Jun 30 01:09 docs
drwxr-xr-x  3 root  mysql  4096 Jun 30 01:09 include
drwxr-xr-x  4 root  mysql  4096 Jun 30 01:09 lib
drwxr-xr-x  4 root  mysql  4096 Jun 30 01:09 man
drwxr-xr-x 10 root  mysql  4096 Jun 30 01:09 mysql-test
-rw-r--r--  1 root  mysql  2478 Feb  2  2016 README
drwxr-xr-x 28 root  mysql  4096 Jun 30 01:10 share
drwxr-xr-x  2 root  mysql  4096 Jun 30 01:10 support-files

###数据库系统初始化,使用的命令:mysql目录下执行该命令或者使用绝对路径执行!###
[root@server1 mysql]# mysql_install_db
2018-06-30 01:32:11 [WARNING] mysql_install_db is deprecated. Please consider switching to mysqld --initialize
2018-06-30 01:32:11 [ERROR]   The data directory needs to be specified.
[root@server1 mysql]# mysqld --verbose --help | less  ###查询支持的参数
[root@server1 mysql]# mysqld --initialize --user=mysql
##初始化数据库,以mysql身份运行####
2018-06-29T17:37:00.664303Z 1 [Note] A temporary password is generated for root@localhost: OtgrgPd6;tN(初始化密码)
***

###mysql数据库的安全配置###
[root@server1 mysql]# mysql_secure_installation
初始化时遇见问题:
ecuring the MySQL server deployment.

Enter password for user root:
Error: Access denied for user 'root'@'localhost' (using password: YES)
####复制粘贴时初始密码没有对,多试几次####

[root@server1 ~]# mysql_secure_installation

Securing the MySQL server deployment.

Enter password for user root: (复制粘贴初始密码)

The existing password for the user account root has expired. Please set a new password.

New password:(为数据库设置新的密码一般由数字字母特殊字符组成的八个字符)

Re-enter new password:

VALIDATE PASSWORD PLUGIN can be used to test passwords
and improve security. It checks the strength of password
and allows the users to set only those passwords which are
secure enough. Would you like to setup VALIDATE PASSWORD plugin?
###数据库检验我们的密码强度是否符和要求,太弱让我们更改密码,如果你认为你的密码合适,可以不用修改!#####
Press y|Y for Yes, any other key for No: n
Using existing password for root.
Change the password for root ? ((Press y|Y for Yes, any other key for No) : n
####请求是否修改root用户的密码####
 ... skipping.
By default, a MySQL installation has an anonymous user,
allowing anyone to log into MySQL without having to have
a user account created for them. This is intended only for
testing, and to make the installation go a bit smoother.
You should remove them before moving into a production
environment.

Remove anonymous users? (Press y|Y for Yes, any other key for No) : y
####是否删除匿名用户,生产环境建议删除######
Success.


Normally, root should only be allowed to connect from
'localhost'. This ensures that someone cannot guess at
the root password from the network.
######是否允许root用户远程登录,根据实际情况而定######
Disallow root login remotely? (Press y|Y for Yes, any other key for No) : y
Success.

By default, MySQL comes with a database named 'test' that
anyone can access. This is also intended only for testing,
and should be removed before moving into a production
environment.

######是否删除test数据库######
Remove test database and access to it? (Press y|Y for Yes, any other key for No) : y
 - Dropping test database...
Success.
- Removing privileges on test database...
Success.

Reloading the privilege tables will ensure that all changes
made so far will take effect immediately.
####是否现在重新加载权限表,y是#######
Reload privilege tables now? (Press y|Y for Yes, any other key for No) : y
Success.

 ####登录数据库进行测试#####
[root@server1 ~]# mysql -p
Enter password:
Welcome to the MySQL monitor.  Commands end with ; or \g.
Your MySQL connection id is 9
Server version: 5.7.11 Source distribution

Copyright (c) 2000, 2016, Oracle and/or its affiliates. All rights reserved.

Oracle is a registered trademark of Oracle Corporation and/or its
affiliates. Other names may be trademarks of their respective
owners.

Type 'help;' or '\h' for help. Type '\c' to clear the current input statement.

mysql> databases show;
ERROR 1064 (42000): You have an error in your SQL syntax; check the manual that corresponds to your MySQL server version for the right syntax to use near 'databases show' at line 1
mysql> show databases;
+--------------------+
| Database           |
+--------------------+
| information_schema |
| mysql              |
| performance_schema |
| sys                |
+--------------------+
4 rows in set (0.00 sec)

mysql> create database westos;          ####为数据库创建westos的数据库表###
Query OK, 1 row affected (0.00 sec)

mysql> show databases;
+--------------------+
| Database           |
+--------------------+
| information_schema |
| mysql              |
| performance_schema |
| sys                |
| westos             |
+--------------------+
5 rows in set (0.00 sec)

mysql> exit
Bye

####进入数据库data目录查看多出westos文件######
[root@server1 ~]# cd /usr/local/mysql/data/
[root@server1 data]# ls
auto.cnf        ib_logfile0  mysql            mysql.sock.lock     server1.pid
ib_buffer_pool  ib_logfile1  mysqld_safe.pid  performance_schema  sys
ibdata1         ibtmp1       mysql.sock       server1.err         westos
php源码编译安装
php官网下载地址:php-5.6.35.tar.bz2
###解压压缩包,进入解压目录,编译配置环境###
[root@server1 ~]# tar jxf php-5.6.35.tar.bz
[root@server1 ~]# cd php-5.6.35
[root@server1 php-5.6.35]# ./configure --help
[root@server1 php-5.6.35]# ./configure --prefix=/usr/local/php --with-config-file-path=/usr/local/php/etc --with-mysql=mysqlnd --enable-mysqlnd  --with-openssl --with-snmp --with-gd --with-zlib --with-curl --with-libxml-dir --with-png-dir --with-jpeg-dir --with-freetype-dir --with-pear --with-gettext --with-gmp  --enable-inline-optimization --enable-soap --enable-ftp --enable-sockets --enable-mbstring --with-mysqli=mysqlnd --enable-fpm --with-fpm-user=nginx --with-fpm-group=nginx --with-mcrypt --with-mhash


###编译时遇见的报错问题###
configure: error: xml2-config not found. Please check your libxml2 installation.
[root@server1 ~]#yum install -y libxml2-devel-2.7.6-14.el6.x86_64
warning: libmcrypt-2.5.8-9.el6.x86_64.rpm: Header V3 RSA/SHA256 Signature, key ID 0608b895: NOKEY
Preparing...                ########################################### [100%]
   1:libmcrypt              ########################################### [ 50%]
   2:libmcrypt-devel        ########################################### [100%]

configure: error: Cannot find OpenSSL's <evp.h>
[root@server1 php-5.6.35]# yum install -y openssl-devel
[root@server1 ~]# rpm -ivh re2c-0.13.5-1.el6.x86_64.rpm
warning: re2c-0.13.5-1.el6.x86_64.rpm: Header V3 RSA/SHA256 Signature, key ID 0608b895: NOKEY
Preparing...                ########################################### [100%]
   1:re2c                   ########################################### [100%]


configure: error: Please reinstall the libcurl distribution -
    easy.h should be in <curl-dir>/include/curl/
[root@server1 php-5.6.35]# yum install -y  libcurl-devel


If configure fails try --with-vpx-dir=<DIR>
configure: error: jpeglib.h not found.
[root@server1 php-5.6.35]# yum provieds */jpeglib.h
###有些缺失文件或者其他东西,yum provides 缺失的文件:查询由那些软件提供的文件或者其他之类!
[root@server1 php-5.6.35]# yum install -y libjpeg-turbo-devel-1.2.1-1.el6.x86_64

configure: error: png.h not found.

configure: error: freetype-config not found.
[root@server1 php-5.6.35]# yum install -y freetype-devel-2.3.11-14.el6_3.1.x86_64

configure: error: Unable to locate gmp.h
[root@server1 php-5.6.35]# yum install -y gmp-devel-4.3.1-7.el6_2.2.x86_64


configure: error: Could not find net-snmp-config binary. Please check your net-snmp installation.
[root@server1 php-5.6.35]# yum install -y net-snmp-devel-5.5-49.el6.x86_64


####出现下面表示我们编译环境完成#####
Thank you for using PHP.

config.status: creating php5.spec
config.status: creating main/build-defs.h
config.status: creating scripts/phpize
config.status: creating scripts/man1/phpize.1
config.status: creating scripts/php-config
config.status: creating scripts/man1/php-config.1
config.status: creating sapi/cli/php.1
config.status: creating sapi/fpm/php-fpm.conf
config.status: creating sapi/fpm/init.d.php-fpm
config.status: creating sapi/fpm/php-fpm.service
config.status: creating sapi/fpm/php-fpm.8
config.status: creating sapi/fpm/status.html
config.status: creating sapi/cgi/php-cgi.1
config.status: creating ext/phar/phar.1
config.status: creating ext/phar/phar.phar.1
config.status: creating main/php_config.h
config.status: executing default commands

####编译以及安装php####
make  &&  make  install

###创建php运行用户nginx###
[root@server1 etc]# useradd -M -s /sbin/nologin nginx

###php配置文件###
[root@server1 php-5.6.35]# cp php.ini-production  /usr/local/php/etc/php.ini
[root@server1 php-5.6.35]# cd /usr/local/php/etc/
[root@server1 etc]# ls
pear.conf  php-fpm.conf.default  php.ini
##复制模板未配置文件###
[root@server1 etc]# cp php-fpm.conf.default php-fpm.conf
###编辑配置文件去掉注释php运行的id###
[root@server1 etc]# vim php-fpm.conf
 25 pid = run/php-fpm.pid
 ###设置上海时区###
[root@server1 etc]# vim php.ini
 936 date.timezone = Asia/Shanghai


###php启动脚复制到/etc/init.d/目录下,添加执行权限####
[root@server1 fpm]# pwd
/root/php-5.6.35/sapi/fpm
[root@server1 fpm]# ls
config.m4          LICENSE        php-fpm.conf        status.html.in
CREDITS            Makefile.frag  php-fpm.conf.in     tests
fpm                php-fpm        php-fpm.service     www.conf.in
init.d.php-fpm     php-fpm.8      php-fpm.service.in
init.d.php-fpm.in  php-fpm.8.in   status.html
[root@server1 fpm]# file init.d.php-fpm
init.d.php-fpm: POSIX shell script text executable
###备份之前配置文件,复制模板未配置文件###
[root@server1 fpm]# cp init.d.php-fpm /etc/init.d/php-fpm
[root@server1 fpm]# chmod +x /etc/init.d/php-fpm
[root@server1 fpm]# /etc/init.d/php-fpm start
Starting php-fpm  done
[root@server1 ~]# netstat -antpl
#####查看配置文件php监听的端口号127.0.0.1:9000是否存在,如果不存在说名启动有问题#####
tcp        0      0 127.0.0.1:9000              0.0.0.0:*                   LISTEN      13930/php-fpm
nginx源码编译安装
nginx官网下载地址:nginx
###解压压缩包,进入解压目录,编译安装环境###
[root@server1 ~]# tar zxf nginx-1.10.1.tar.gz
[root@server1 ~]# cd nginx-1.10.1
[root@server1 nginx-1.10.1]# ls
auto CHANGES.ru configure html man src
CHANGES conf contrib LICENSE README
###不展示nginx的版本号###
[root@server1 nginx-1.10.1]# vim src/core/nginx.h
14 #define NGINX_VER "nginx/"
{{{如果去掉注释,编译时会报错找不到指定版本号,缺少其他一些东西,报错截取一部分
src/core/nginx.h:14: error: expected ‘=’, ‘,’, ‘;’, ‘asm’ or ‘__attribute__’ before ‘NGINX_VER’
src/core/nginx.c:158: error: variable ‘ngx_core_module’ has initializer but incomplete type
cc1: warnings being treated as errors
src/core/nginx.c:159: error: excess elements in struct initializer
src/core/nginx.c:159: error: (near initialization for ‘ngx_core_module’)
src/core/nginx.c:159: error: excess elements in struct initializer
src/core/nginx.c:159: error: (near initialization for ‘ngx_core_module’)
src/core/nginx.c:159: error: excess elements in struct initializer
src/core/nginx.c:159: error: (near initialization for ‘ngx_core_module’)}}}
###注释编译时占用很少部分空间###
[root@server1 nginx-1.10.1]# vim auto/cc/gcc
179 #CFLAGS="$CFLAGS -g"
[root@server1 ~]# tar -zxf nginx-sticky-module-ng.tar.gz
[root@server1 nginx-1.10.1]# ./configure --prefix=/usr/local/nginx --with-http_ssl_module --with-http_stub_status_module --with-threads --with-file-aio --add-module=/root/nginx-sticky-mod
###编译环境时遇见的错误###
./configure: error: the HTTP rewrite module requires the PCRE library.
You can either disable the module by using --without-http_rewrite_module
option, or install the PCRE library into the system, or build the PCRE library
statically from the source with nginx by using --with-pcre=<path> option.
[root@server1 nginx-1.10.1]# yum install -y pcre-devel
[root@server1 nginx-1.10.1]#make && make install
###编译nginx配置文件,使nginx支持php文件###
[root@server1 conf]# pwd
/usr/local/nginx/conf
[root@server1 conf]# vim nginx.conf
2 user nginx nginx;
43 location / {
44 root html;
45 index index.php index.html index.htm;
46 }
65 location ~ \.php$ {
66 root html;
67 fastcgi_pass 127.0.0.1:9000;
68 fastcgi_index index.php;
69 # fastcgi_param SCRIPT_FILENAME /scripts$fastcgi_script_name;
70 include fastcgi.conf;
71 }
###检查语法有没有错误###
[root@server1 ~]# nginx -t
nginx: the configuration file /usr/local/nginx/conf/nginx.conf syntax is ok
nginx: configuration file /usr/local/nginx/conf/nginx.conf test is successful
###重新加载nginx配置文件###
[root@server1 ~]# nginx -s reload
[root@server1 ~]# nginx
###创建软连接###
[root@server1 conf]# ln -s /usr/local/nginx/sbin/nginx /sbin/
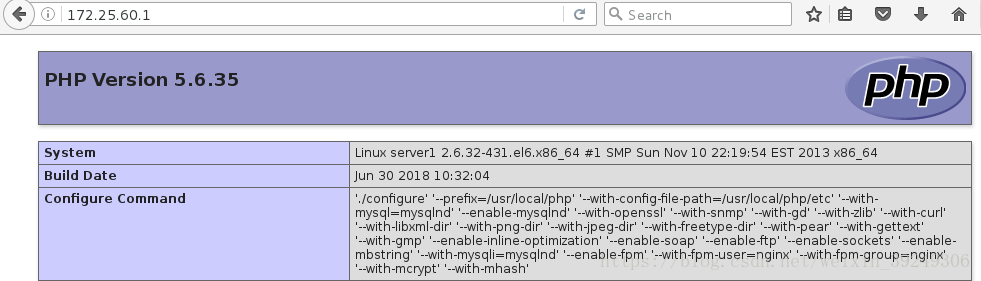
###编辑php文件,向我们展示安装的php信息####
[root@server1 conf]# vim /usr/local/nginx/html/index.php
[root@server1 conf]# cat /usr/local/nginx/html/index.php
<?php
phpinfo()
?>
[root@server1 ~]# netstat -antplue
tcp 0 0 127.0.0.1:9000 0.0.0.0:* LISTEN 0 22762 15586/php-fpm 客户端php测试:输入172.25.60.1
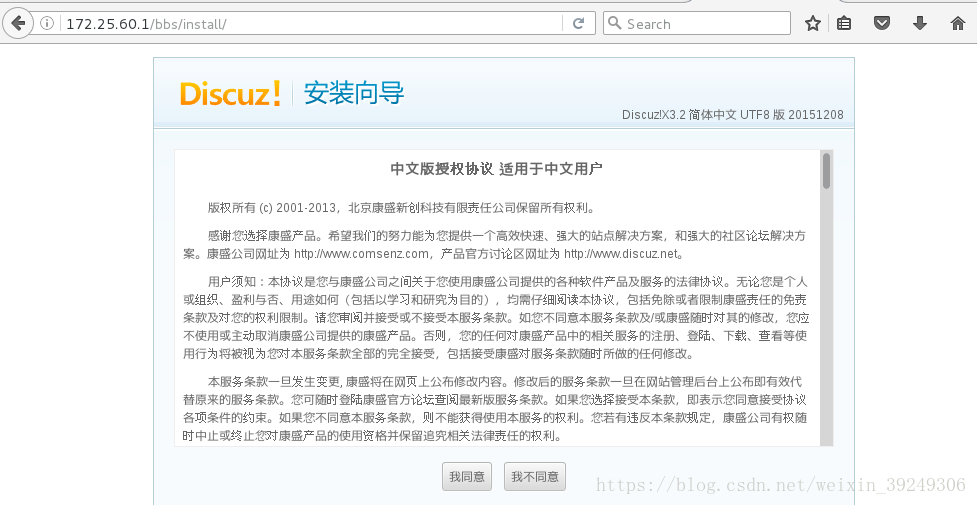
搭建论坛测试lnmp平台
###将论坛压缩包解压到nginx的html目录下,网页进行安装论坛###
[root@server1 ~]# cd /usr/local/nginx/html/
[root@server1 html]# ls
50x.html Discuz_X3.2_SC_UTF8.zip index.html index.php
[root@server1 html]# unzip Discuz_X3.2_SC_UTF8.zip
-bash: unzip: command not found
[root@server1 html]# yum install -y unzip
[root@server1 html]# unzip Discuz_X3.2_SC_UTF8.zip
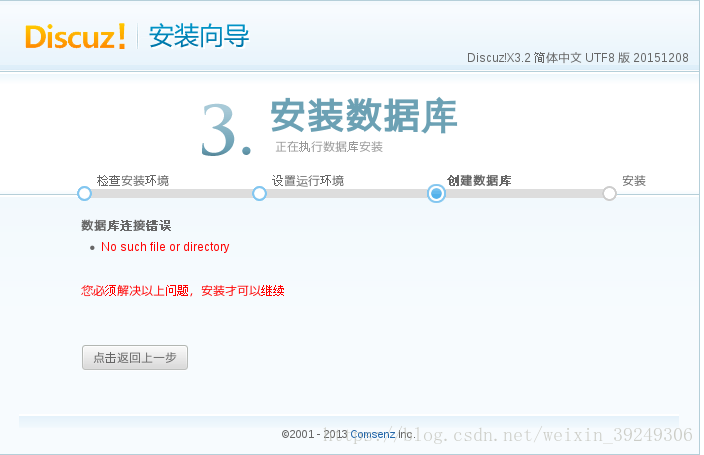
[root@server1 html]# mv upload bbs浏览器输入172.25.60.1/bbs/install/ 回车开始进行安装

改变文件的目录权限
[root@server1 bbs]# chmod 777 config/ data/ uc_client/ uc_server/ -R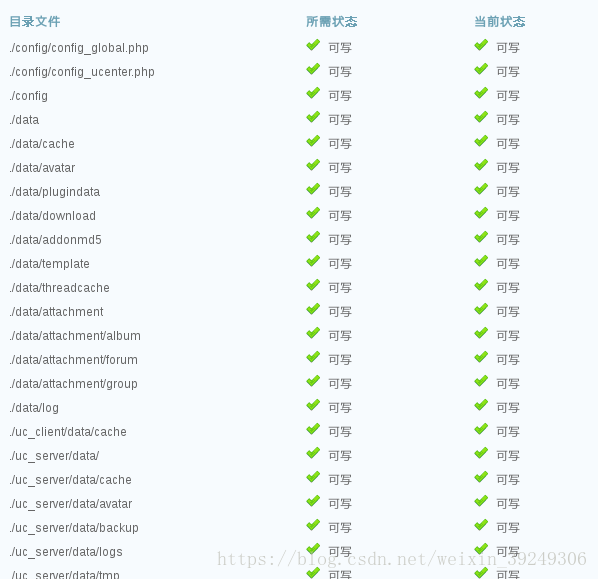
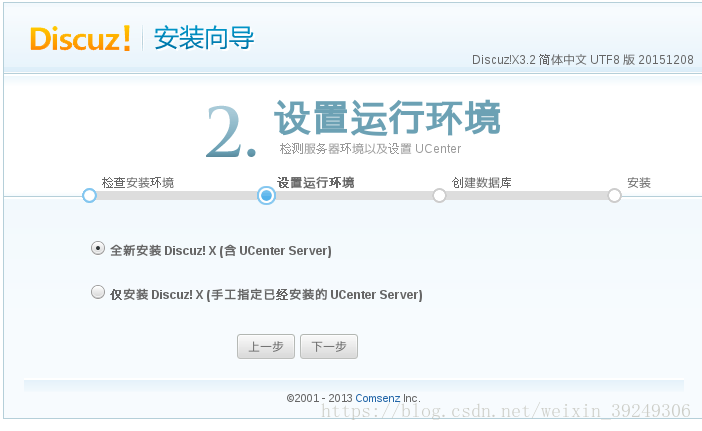
选择全新安装
[root@server1 etc]# vim php.ini
1013 pdo_mysql.default_socket= /usr/local/mysql/data/mysql.sock
1162 mysql.default_socket = /usr/local/mysql/data/mysql.sock
1221 mysqli.default_socket = /usr/local/mysql/data/mysql.sock
[root@server1 etc]# /etc/init.d/php-fpm reload
Reload service php-fpm  done
每次需要刷新页面重新发送内容
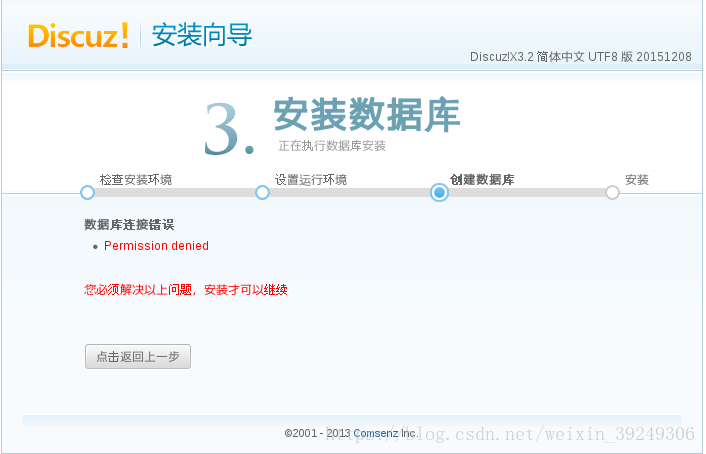
更改数据库data的目录权限
[root@server1 mysql]# ls -ld data/
drwxr-x--- 5 mysql mysql 4096 Jun 30 10:02 data/
[root@server1 mysql]# chmod 755 data/
[root@server1 mysql]# ls -ld data/
drwxr-xr-x 5 mysql mysql 4096 Jun 30 10:02 data/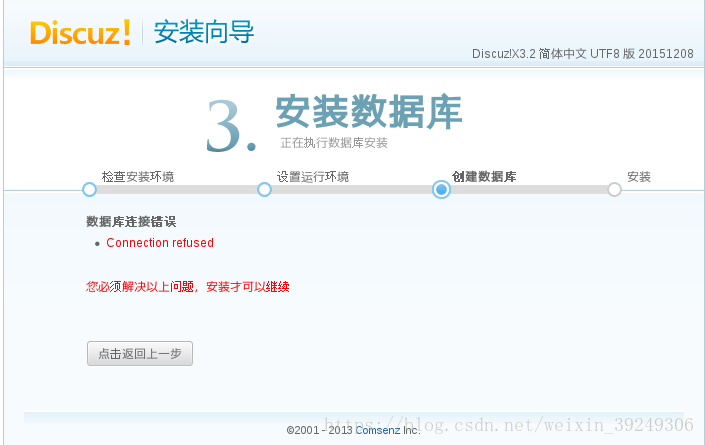
数据库没有启动
[root@server1 ~]# /etc/init.d/mysql start
Starting MySQL SUCCESS! 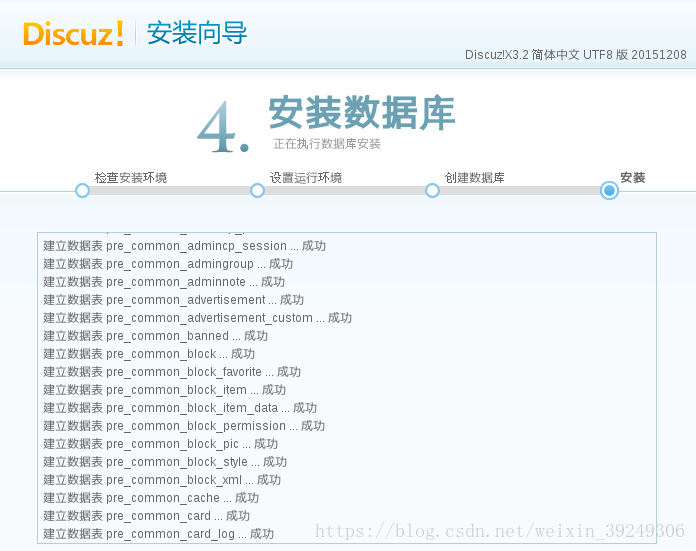
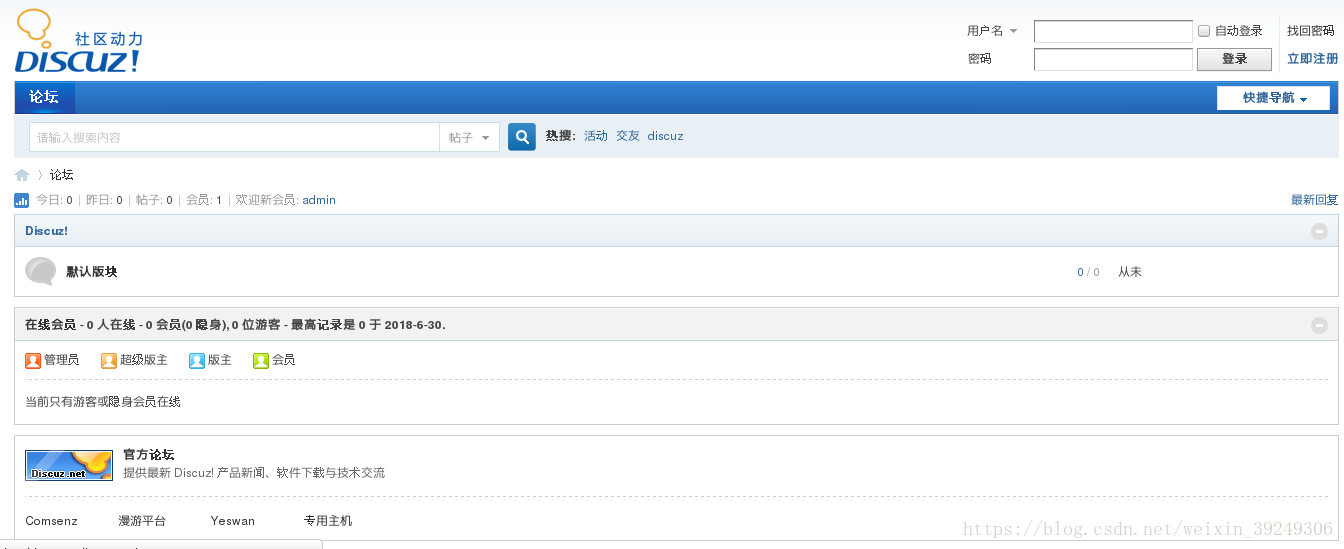
安装完成点击右下角进入论坛
删除文件防止再次重复安装
[root@server1 install]# pwd
/usr/local/nginx/html/bbs/install
[root@server1 install]# ls
data  images  include  index.php
[root@server1 install]# rm -f index.php
memcache安装以及测试
phpize是一个shell脚本,用来扩展php扩展模块,通过phpize可以安装第三方模块。
###将phpzie编译添加到全局环境变量###
[root@server1 install]# cd /usr/local/php/bin/
[root@server1 bin]# ls
pear  peardev  pecl  phar  phar.phar  php  php-cgi  php-config  phpize
[root@server1 bin]# vim ~/.bash_profile
PATH=$PATH:$HOME/bin:/usr/local/mysql/bin:/usr/local/php/bin
[root@server1 bin]# source ~/.bash_profile
[root@server1 bin]# which phpize
/usr/local/php/bin/phpize

###解压memcache压缩包,编译安装memcache###
[root@server1 ~]# tar xf memcache-2.2.5.tgz
[root@server1 ~]# cd memcache-2.2.5
[root@server1 memcache-2.2.5]# ./configure
[root@server1 memcache-2.2.5]# make
[root@server1 memcache-2.2.5]# make install
Installing shared extensions:     /usr/local/php/lib/php/extensions/no-debug-non-zts-20131226/
[root@server1 memcache-2.2.5]# ls /usr/local/php/lib/php/extensions/no-debug-non-zts-20131226/
memcache.so  opcache.a  opcache.so

###让php支持memcache扩展###
[root@server1 memcache-2.2.5]# vim /usr/local/php/etc/php.ini
869 ;   extension=msql.dll
870 extension=memcache.so
[root@server1 memcache-2.2.5]# /etc/init.d/php-fpm reload
Reload service php-fpm  done
[root@server1 memcache-2.2.5]# /etc/init.d/memcached start
Starting memcached:                                        [  OK  ]
[root@server1 memcache-2.2.5]# netstat -antplue
tcp 0 0 0.0.0.0:11211 0.0.0.0:* LISTEN 498 30756 18429/memcached 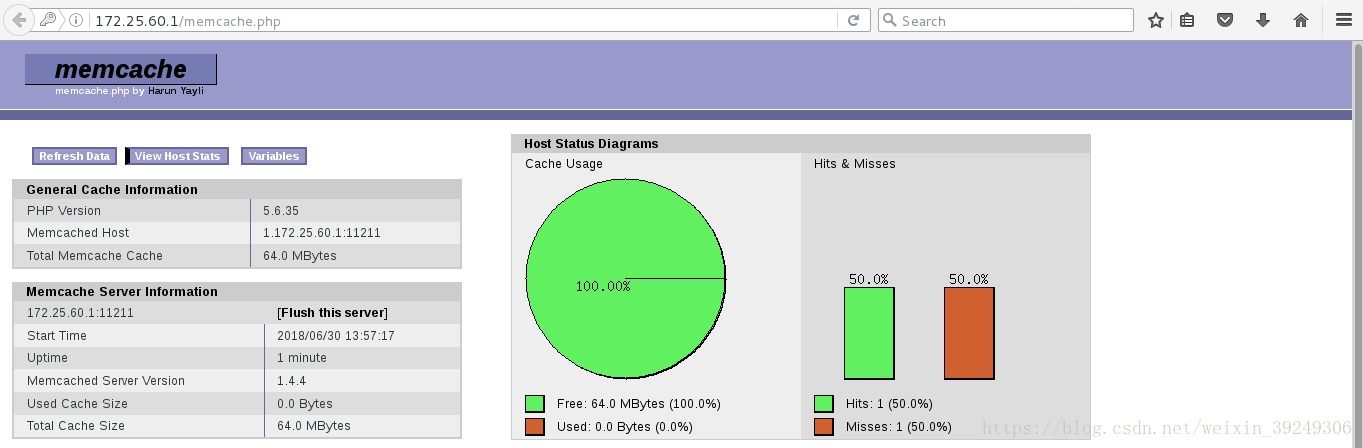
基于用户进行访问:
[root@server1 memcache-2.2.5]# cp memcache.php /usr/local/nginx/html/
[root@server1 memcache-2.2.5]# vim /usr/local/nginx/html/memcache.php
#####设置访问登录的用户名以及密码######
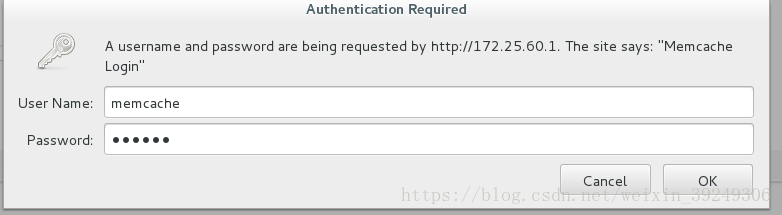
22 define('ADMIN_USERNAME','memcache'); // Admin Username
23 define('ADMIN_PASSWORD','westos'); // Admin Password
###设置memcache服务器时,我们只有一台,注释掉另外一台,多台的话可以添加多个####
28 $MEMCACHE_SERVERS[] = '172.25.60.1:11211'; // add more as an array
29 #$MEMCACHE_SERVERS[] = 'mymemcache-server2:11211'; // add more as an array
[root@server1 memcache-2.2.5]# /etc/init.d/memcached reload
Stopping memcached: [ OK ]
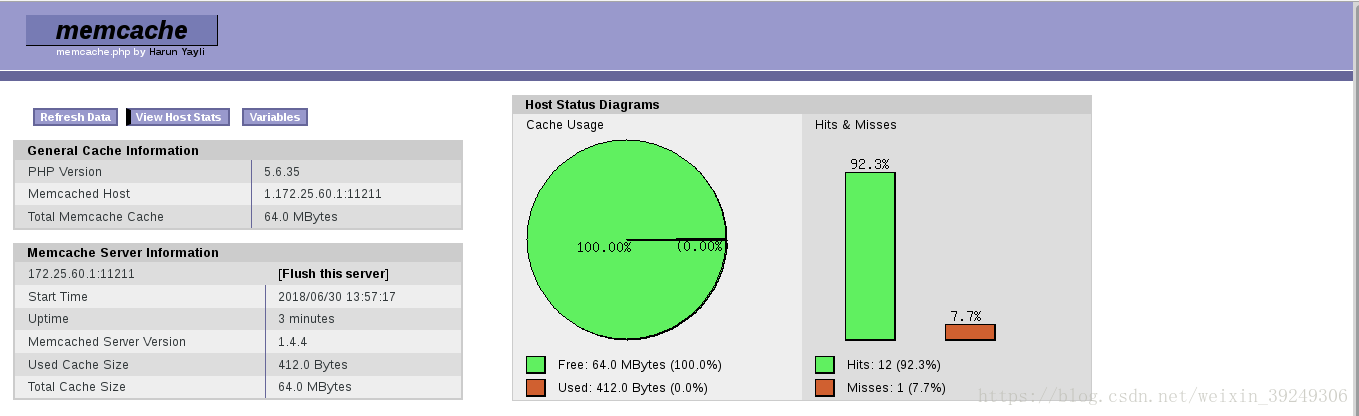
Starting memcached: [ OK ] 浏览器测试:https://172.25.60.1/memcache.php

测试memcache的命中率
[root@server1 memcache-2.2.5]# cp example.php /usr/local/nginx/html/浏览器测试输入:172.25.60.1/example.php

memcache的命中率变化
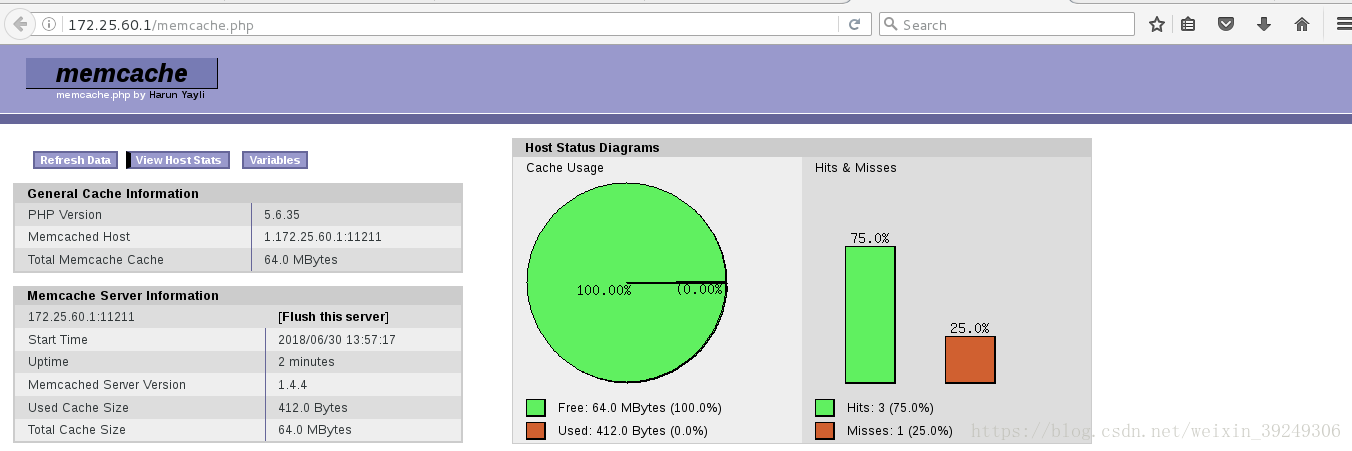
172.25.60.1/example.php ###多刷新几次,命中率会更高
客户端进行测试:
ab(apache bench)是apache下的一个工具,主要作用是对web服务器做压力测试!-c 表示一次发送的请求数量; -n 表示请求次数
[root@foundation60 Desktop]# ab -c 10 -n 1000 http://172.25.60.1/example.php
This is ApacheBench, Version 2.3 <$Revision: 1430300 $>
Copyright 1996 Adam Twiss, Zeus Technology Ltd, http://www.zeustech.net/
Licensed to The Apache Software Foundation, http://www.apache.org/

Benchmarking 172.25.60.1 (be patient)
Completed 100 requests
Completed 200 requests
Completed 300 requests
Completed 400 requests
Completed 500 requests
Completed 600 requests
Completed 700 requests
Completed 800 requests
Completed 900 requests
Completed 1000 requests
Finished 1000 requests

####不向别人展示我们服务器的版本信息###
Server Software:        nginx/

Server Hostname:        172.25.60.1   ###请求的服务器
Server Port:            80      ###请求的端口

Document Path:          /example.php  ###请求路径
Document Length:        123 bytes  ###请求页面大小

Concurrency Level:      10   ###并发量
Time taken for tests:   0.598 seconds ###测试总共时间
Complete requests:      1000   ###完成请求
Failed requests:        0  ###失败请求
Write errors:           0  ###错误
Total transferred:      280000 bytes  ###总共传输数据量
HTML transferred:       123000 bytes
Requests per second:    1672.61 [#/sec]  (mean)   ###每秒请求量
Time per request:       5.979 [ms] (mean)  ##平均请求等待时间
Time per request:       0.598 [ms] (mean, across all concurrent requests)  ###服务器平均请求响应时间
Transfer rate:          457.35 [Kbytes/sec] received  ##每秒多少k,即宽带速率

Connection Times (ms)
              min  mean[+/-sd] median   max
Connect:        0    0   0.2      0       3
Processing:     1    6   1.0      6      11
Waiting:        1    6   1.0      6      11
Total:          1    6   0.9      6      11

Percentage of the requests served within a certain time (ms)
  50%      6
  66%      6
  75%      6
  80%      7
  90%      7
  95%      8
  98%      8
  99%      9
 100%     11 (longest request)


[root@foundation60 Desktop]# ab -c 10 -n 1000 http://172.25.60.1/memcache.php
This is ApacheBench, Version 2.3 <$Revision: 1430300 $>
Copyright 1996 Adam Twiss, Zeus Technology Ltd, http://www.zeustech.net/
Licensed to The Apache Software Foundation, http://www.apache.org/

Benchmarking 172.25.60.1 (be patient)
Completed 100 requests
Completed 200 requests
Completed 300 requests
Completed 400 requests
Completed 500 requests
Completed 600 requests
Completed 700 requests
Completed 800 requests
Completed 900 requests
Completed 1000 requests
Finished 1000 requests


Server Software:        nginx/
Server Hostname:        172.25.60.1
Server Port:            80

Document Path:          /memcache.php
Document Length:        101 bytes

Concurrency Level:      10
Time taken for tests:   1.281 seconds
Complete requests:      1000
Failed requests:        0
Write errors:           0
Non-2xx responses:      1000
Total transferred:      316000 bytes
HTML transferred:       101000 bytes
Requests per second:    780.53 [#/sec] (mean)
Time per request:       12.812 [ms] (mean)
Time per request:       1.281 [ms] (mean, across all concurrent requests)
Transfer rate:          240.87 [Kbytes/sec] received

Connection Times (ms)
              min  mean[+/-sd] median   max
Connect:        0    0   0.2      0       4
Processing:     1   13   1.8     12      21
Waiting:        1   13   1.8     12      21
Total:          2   13   1.8     12      21

Percentage of the requests served within a certain time (ms)
  50%     12
  66%     13
  75%     14
  80%     14
  90%     15
  95%     16
  98%     17
  99%     18
 100%     21 (longest request)
nginx虚拟机 + memcache
memcache是一套分布式的高速缓存系统,目前被许多网站使用以提升网站的访问速度,Memcached是以守护程序方式运行于一个或多个服务器,
###nginx基于虚拟机访问###
[root@server1 memcache-2.2.5]# vim /usr/local/nginx/conf/nginx.conf

116 server{
117      listen  80;
118      server_name  www.westos.org;
119      location / {
120              root  /www/westos;
121              index  index.html;
122      }
123 }
124 server{
125      listen  80;
126      server_name  www.bbs.org;
127      location / {
128              root  /www/bbs;
129              index  index.html;
130      }
131 }

[root@server1 ~]# mkdir /www
[root@server1 ~]# mkdir /www/{westos,bbs}
[root@server1 ~]# vim /www/westos/index.html
[root@server1 ~]# cat /www/westos/index.html
<h1> www.westos.org </h1>
[root@server1 ~]# vim /www/bbs/index.html
[root@server1 ~]# cat /www/bbs/index.html
<h1> www.bbs.org </h1>
[root@server1 ~]# nginx -t
nginx: the configuration file /usr/local/nginx/conf/nginx.conf syntax is ok
nginx: configuration file /usr/local/nginx/conf/nginx.conf test is successful
[root@server1 ~]# nginx -s reload
测试(注意配置客户端的本地解析/etc/hosts)


加密访问
[root@server1 memcache-2.2.5]# vim /usr/local/nginx/conf/nginx.conf
98     server {
 99         listen       443 ssl;
100         server_name  www.westos.org;
101
102         ssl_certificate      cert.pem;###公钥
103         ssl_certificate_key  cert.pem;###私钥(为了方便设置一样)
104
105         ssl_session_cache    shared:SSL:1m;
106         ssl_session_timeout  5m;
107
108         ssl_ciphers  HIGH:!aNULL:!MD5;
109         ssl_prefer_server_ciphers  on;
110
111         location / {
112             root   /www/westos;
113             index  index.html index.htm;
114         }
115     }
###生成1024/2048位的加密公钥和私钥###
[root@server1 ~]# cd /etc/pki/tls/certs/
[root@server1 certs]# ls
ca-bundle.crt  ca-bundle.trust.crt  make-dummy-cert  Makefile  renew-dummy-cert
[root@server1 certs]# make cert.pem
umask 77 ; \
    PEM1=`/bin/mktemp /tmp/openssl.XXXXXX` ; \
    PEM2=`/bin/mktemp /tmp/openssl.XXXXXX` ; \
    /usr/bin/openssl req -utf8 -newkey rsa:2048 -keyout $PEM1 -nodes -x509 -days 365 -out $PEM2 -set_serial 0 ; \
    cat $PEM1 >  cert.pem ; \
    echo ""    >> cert.pem ; \
    cat $PEM2 >> cert.pem ; \
    rm -f $PEM1 $PEM2
Generating a 2048 bit RSA private key
..............................................................................................+++
.............................+++
writing new private key to '/tmp/openssl.RznPWe'
-----
You are about to be asked to enter information that will be incorporated
into your certificate request.
What you are about to enter is what is called a Distinguished Name or a DN.
There are quite a few fields but you can leave some blank
For some fields there will be a default value,
If you enter '.', the field will be left blank.
-----
Country Name (2 letter code) [XX]:CN    ##国家名称
State or Province Name (full name) []:shanxi    ##省级名称
Locality Name (eg, city) [Default City]:xi'an    ##所在城市
Organization Name (eg, company) [Default Company Ltd]:westos  ##所在公司
Organizational Unit Name (eg, section) []:linux  ##所在部门
Common Name (eg, your name or your server's hostname) []:redhat  ##注册名字或者服务器名称
Email Address []:root@localhost   ##发送邮件地址
[root@server1 certs]# ls
ca-bundle.crt        cert.pem(公钥和私钥)         Makefile
ca-bundle.trust.crt  make-dummy-cert  renew-dummy-cert
###检查nginx配置文件有没有语法错误###
[root@server1 certs]# nginx -t
nginx: [emerg] BIO_new_file("/usr/local/nginx/conf/cert.pem") failed (SSL: error:02001002:system library:fopen:No such file or directory:fopen('/usr/local/nginx/conf/cert.pem','r') error:2006D080:BIO routines:BIO_new_file:no such file)
nginx: configuration file /usr/local/nginx/conf/nginx.conf test failed
大概意思是:/usr/local/nginx/conf/目录下找不到公钥和私钥

[root@server1 certs]# mv cert.pem /usr/local/nginx/conf/
[root@server1 certs]# nginx -t
nginx: the configuration file /usr/local/nginx/conf/nginx.conf syntax is ok
nginx: configuration file /usr/local/nginx/conf/nginx.conf test is successful
[root@server1 certs]# nginx -s reload
浏览器测试:www.westos.org
生成的加密证书


客户端测试:
[root@foundation60 Desktop]# curl -I www.westos.org
HTTP/1.1 200 OK
Server: nginx/
Date: Sat, 30 Jun 2018 06:29:26 GMT
Content-Type: text/html
Content-Length: 26
Last-Modified: Sat, 30 Jun 2018 06:09:56 GMT
Connection: keep-alive
ETag: "5b371eb4-1a"
Accept-Ranges: byte``