概述:
1.简述lnmp架构
LNMP架构:Linux系统下Nginx+MySQL+PHP,是一组搭建动态网站的开源软件架构,本身是各自独立的软件服务,放在一起使用拥有很高的兼容性,共同组成了一个强大的WEB应用程序平台。

(1)Linux:是一类Unix计算机操作系统的统称,是目前最流行的免费操作系统。代表版本有:debian、centos、ubuntu、fedora、gentoo等。
(2)Nginx:是一个高性能的HTTP和反向代理服务器,也是一个IMAP/POP3/SMTP代理服务器。
(3)Mysql:是一个小型关系型数据库管理系统。
(4)PHP:  是一种在服务器端执行的嵌入HTML文档的脚本语言。
2.简述lnmp架构原理
首先,浏览器发送http request请求到服务器(Nginx),服务器响应并处理web请求,将一些静态资源(CSS,图片,视频等)保存服务器上,
然后将php脚本通过接口传输协议(网关协议)PHP-FCGI(fast-cgi)传输给PHP-FPM(进程管理程序),PHP-FPM不做处理,
然后PHP-FPM调用PHP解析器进程,PHP解析器解析php脚本信息。PHP解析器进程可以启动多个,进行并发执行。
然后将解析后的脚本返回到PHP-FPM,PHP-FPM再通过fast-cgi的形式将脚本信息传送给Nginx.服务器再通过Http response的形式传送给浏览器。
浏览器再进行解析与渲染然后进行呈现。
3.简述nginx
Nginx为一款高性能Web服务器,本身是不能处理PHP的,当接收到请求时,判断如果是PHP请求就会将请求交给PHP解释器处理,然后将结果返回给Client
Nginx一般把请求转发给fast-cgi管理进程处理,fast-cgi管理进程再选择cgi子进程处理请求,然后把结果返给Nginx。
4.简述php-fpm
PHP-FPM是一个PHP FastCGI管理器,是只用于PHP的,它其实是PHP源代码的一个补丁,旨在将Fast-CGI进程管理整合进PHP包中。
必须将它patch到你的PHP源代码中,在编译安装PHP后才可以使用。新版的PHP已经集成了php-fpm,在./configure的时候带 –enable-fpm参数即可开启PHP-FPM。
5.LAMP和LNMP的区别
LAMP和LNMP最主要的区别在于:一个使用的是Apache,一个使用的是Nginx

在LNMP中,Nginx本身对脚本不做任何的处理,而是去调用一个PHP-FPM的进程,二者是相互独立的。
在LAMP中,PHP是Apache的一个模块,具有相同的生命周期。

Apache是世界是用排名第一的Web服务器软件,其几乎可以在所有广泛使用的计算机平台上运营,由于其跨平台和安全性被广泛使用,是最流行的Web服务端软件之一。
相比于nginx,apache有些臃肿,内存和CPU开销较大,性能上有损耗,nginx对于静态文件的响应能力远高apache。
Apache是负载PHP的最佳选择,如果流量很大的话,可以使用nginx来负载非PHP的Web请求。在整个IT界而言,70%的流量访问均来源于Apache

Nginx是一款高性能额Http和反向代理服务器,也是一个AMAP/POP3/SMTP服务器,Nginx是由Igor Sysoev为俄罗斯访问量第二的Rambler.ru站点开发的,第一个公开版本0.1.0发布于2004年10月4日,2011年6月1日,nginx 1.0.4发布。
相比于Apache,nginx使用资源更少,支持更多并发连接,效率更高,作为负载均衡服务器。nginx即可对内进行支持,也可对外进行服务。其还是一款非常优秀的邮件代理服务器,安装简单,配置简介。
6.LNMP与LAMP的优缺点
LNMP的优缺点:
优点:占用VPS资源较少,Nginx配置起来也比较简单,利用fast-cgi的方式动态解析PHP脚本。
缺点:php-fpm组件的负载能力有限,在访问量巨大的时候,php-fpm进程容易僵死,容易发生502 bad gateway错误
LAMP的优缺点:
优点:由于Apache本身处理PHP的能力比起php-fpm要强,所以不容易出现类似502 bad gateway的错误。适合访问量较大的站点使用。
缺点:相比LNMP方式会多占用一些资源,另外,配置虚拟主机需要同时修改Nginx和Apache的配置文件,要稍微麻烦一些。
1.MySQL的源码编译与基础配置
安装包:
cmake-2.8.12.2-4.el6.x86_64.rpm
mysql-boost-5.7.17.tar.gz
1.下载安装包并解压
#1.在官网上下载安装包
[root@server1 ~]# ls
cmake-2.8.12.2-4.el6.x86_64.rpm  mysql-boost-5.7.17.tar.gz
#2.解压
[root@server1 ~]# tar zxf mysql-boost-5.7.17.tar.gz
[root@server1 ~]# ls
cmake-2.8.12.2-4.el6.x86_64.rpm  mysql-5.7.17  mysql-boost-5.7.17.tar.gz
#3.安装cmake编译工具
[root@server1 ~]# yum install -y cmake-2.8.12.2-4.el6.x86_64.rpm
2.源码编译

(1).camake配置
[root@server1 ~]# cd mysql-5.7.17/
[root@server1 mysql-5.7.17]# ls
#camake配置,报错;注意:mysql不能用configure编译,只能用cmake编译
[root@server1 mysql-5.7.17]# cmake -DCMAKE_INSTALL_PREFIX=/usr/local/lnmp/mysql \        #安装目录
> -DMYSQL_DATADIR=/usr/local/lnmp/mysql/data \                  #数据库存放目录
> -DMYSQL_UNIX_ADDR=/usr/local/lnmp/mysql/data/mysql.sock \     #套接字文件路径
> -DWITH_MYISAM_STORAGE_ENGINE=1 \         #安装 myisam 存储引擎
> -DWITH_INNOBASE_STORAGE_ENGINE=1 \       #安装 innodb 存储引擎
> -DDEFAULT_CHARSET=utf8 \                 #使用 utf8 字符
> -DDEFAULT_COLLATION=utf8_general_ci \    #校验字符
> -DEXTRA_CHARSETS=all                     #安装所有扩展字符集
解决依赖性:
#1.安装依赖包
[root@server1 mysql-5.7.17]# yum install gcc gcc-c++ ncurses-devel bison -y
#2.删除缓存文件(每解决一个依赖包,都需要删除缓存文件)
[root@server1 mysql-5.7.17]# rm -rf CMakeCache.txt
#3.添加-DWITH_BOOST参数;没有error即可
[root@server1 mysql-5.7.17]# cmake -DCMAKE_INSTALL_PREFIX=/usr/local/lnmp/mysql -DMYSQL_DATADIR=/usr/local/lnmp/mysql/data -DMYSQL_UNIX_ADDR=/usr/local/lnmp/mysql/data/mysql.sock -DWITH_MYISAM_STORAGE_ENGINE=1 -DWITH_INNOBASE_STORAGE_ENGINE=1 -DDEFAULT_CHARSET=utf8 -DDEFAULT_COLLATION=utf8_general_ci -DEXTRA_CHARSETS=all -DWITH_BOOST=boost/boost_1_59_0/
(2).编译
为了make编译可以快速一些,增加内存:(注意:需要先关闭系统再增加内存)

#编译
[root@server1 mysql-5.7.17]# make
(3).安装
#安装
[root@server1 mysql-5.7.17]# make install
3.配置MySQL
#源码编译后生成了/usr/local/lnmp/mysql目录
[root@server1 etc]# cd /usr/local/lnmp/
[root@server1 lnmp]# ls
mysql
[root@server1 lnmp]# cd mysql/
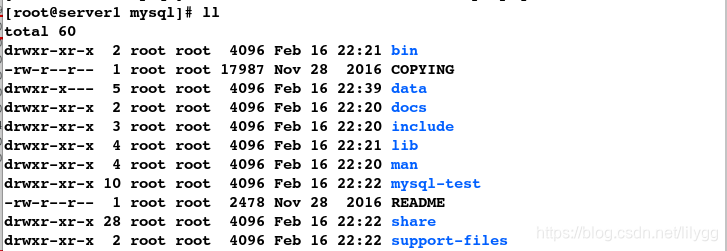
[root@server1 mysql]# ls
bin data include man README support-files
COPYING docs lib mysql-test share
#1.生成mysql的配置文件
[root@server1 mysql]# cd /usr/local/lnmp/mysql/support-files
[root@server1 support-files]# cp my-default.cnf /etc/my.cnf
cp: overwrite `/etc/my.cnf'? y
#2.编辑配置文件,声明数据位置等信息
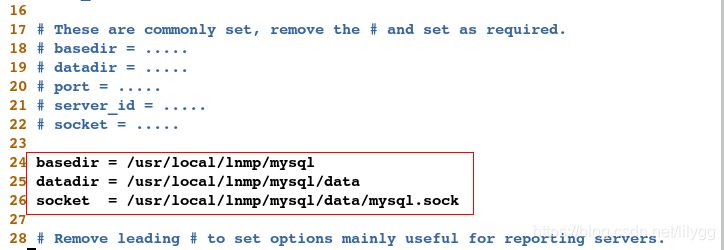
[root@server1 support-files]# vim /etc/my.cnf
#############################
basedir = /usr/local/lnmp/mysql #安装目录
datadir = /usr/local/lnmp/mysql/data #数据目录
socket = /usr/local/lnmp/mysql/data/mysql.sock #套接字文件路径
#3.创建mysql启动脚本
[root@server1 support-files]# cp mysql.server /etc/init.d/mysqld
#4.添加可执行权限
[root@server1 support-files]# chmod +x /etc/init.d/mysqld
[root@server1 support-files]# ll /etc/init.d/mysqld
-rwxr-xr-x 1 root root 10911 Feb 16 16:13 /etc/init.d/mysqld
#5.创建mysql用户和组
[root@server1 ~]# groupadd -g 27 mysql
[root@server1 ~]# useradd -u 27 -g 27 mysql
[root@server1 ~]# id mysql
uid=27(mysql) gid=27(mysql) groups=27(mysql)
[root@server1 ~]# ll -d /usr/local/lnmp/mysql/
drwxr-xr-x 10 root root 4096 Feb 16 16:01 /usr/local/lnmp/mysql/
#6.更改文件所有用户和组
[root@server1 ~]# chown mysql.mysql /usr/local/lnmp/mysql/ -R
[root@server1 ~]# ll -d /usr/local/lnmp/mysql/
drwxr-xr-x 10 mysql mysql 4096 Feb 16 16:01 /usr/local/lnmp/mysql/
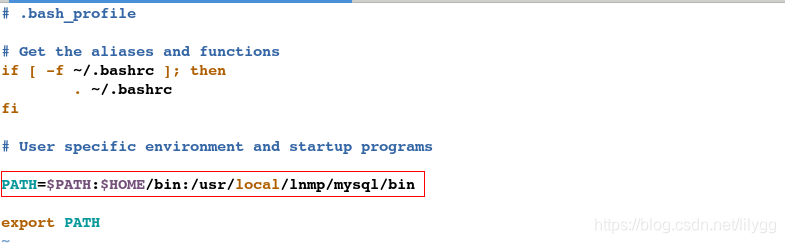
#7.更改环境变量
[root@server1 ~]# vim .bash_profile
#################
PATH=$PATH:$HOME/bin:/usr/local/lnmp/mysql/bin
#8.刷新配置
[root@server1 ~]# source  .bash_profile
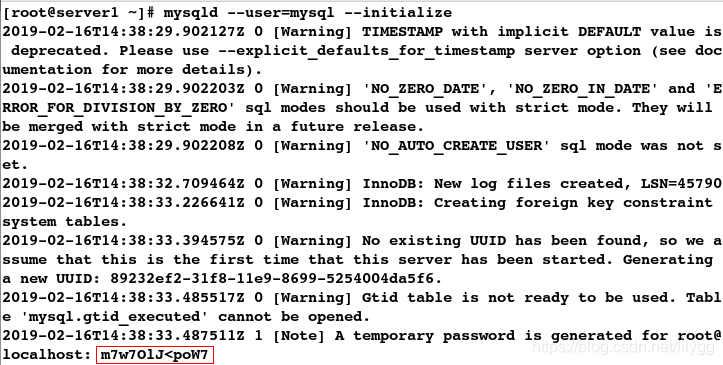
#9.初始化,生成临时登陆密码
[root@server1 ~]# mysqld --user=mysql --initialize
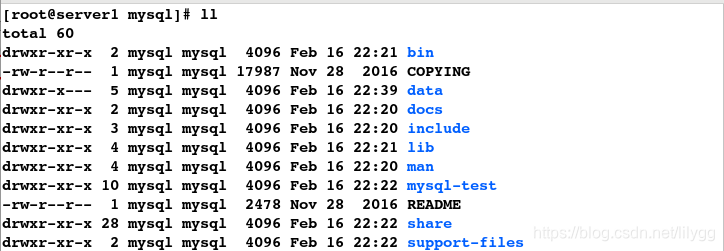
[root@server1 ~]# cd /usr/local/lnmp/mysql/
[root@server1 mysql]# ll
#10.修改权限
[root@server1 mysql]# chown root.root /usr/local/lnmp/mysql/ -R
[root@server1 mysql]# ll
[root@server1 mysql]# chown mysql data -R
[root@server1 mysql]# ll

#11.开启数据库
[root@server1 mysql]# /etc/init.d/mysqld start
Starting MySQL.Logging to '/usr/local/mysql/data/server1.err'.
. SUCCESS!
#12.登陆数据库,注意:由于若是有特殊字符,则需要用\转义(或是'')
[root@server1 ~]# mysql -uroot -p'm7w7OlJ<poW7'
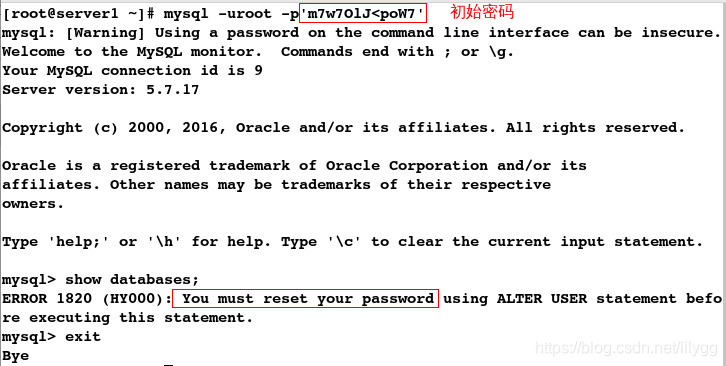
#13.安全初始化,更改数据库密码
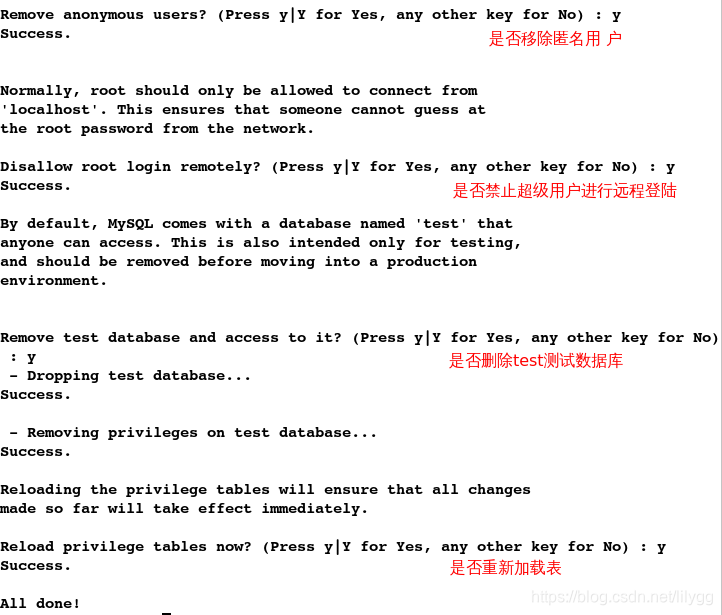
[root@server1 ~]# mysql_secure_installation

#14.重新登陆数据库,检测密码是否更改成功
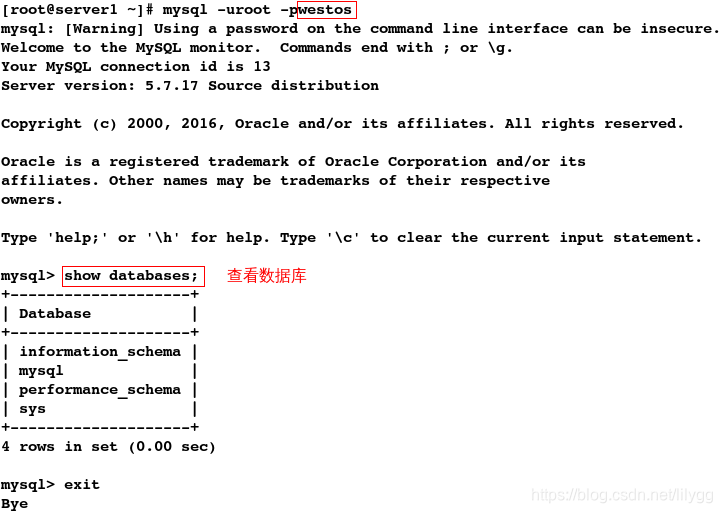
[root@server1 ~]# mysql -uroot -pwestos
2.PHP的源码编译与基础配置
安装包:
php-5.6.35.tar.bz2
1.下载php源码编译包并解压
#1.在官网上下载php源码编译包
[root@server1 ~]# ls
cmake-2.8.12.2-4.el6.x86_64.rpm  mysql-boost-5.7.17.tar.gz
mysql-5.7.17                     php-5.6.35.tar.bz2
[root@server1 ~]# tar jxf php-5.6.35.tar.bz2
[root@server1 ~]# ls
cmake-2.8.12.2-4.el6.x86_64.rpm  mysql-boost-5.7.17.tar.gz  php-5.6.35.tar.bz2
mysql-5.7.17                     php-5.6.35
2.源码编译
(1).configure配置
#1.configure配置;报错
[root@server1 ~]# cd php-5.6.35
[root@server1 php-5.6.35]# ./configure --prefix=/usr/local/lnmp/php --with-config-file-path=/usr/local/lnmp/php/etc --with-openssl --with-snmp --with-gd --with-zlib --with-curl --with-libxml-dir --with-png-dir --with-jpeg-dir --with-freetype-dir --with-gmp --with-gettext --with-pear --enable-mysqlnd --with-mysql=mysqlnd --with-mysqli=mysqlnd --with-pdo-mysql=mysqlnd --enable-inline-optimization --enable-soap --enable-ftp --enable-sockets --enable-mbstring --enable-fpm --with-fpm-user=nginx --with-fpm-group=nginx --with-mcrypt --with-mhash

根据报错提示,依次解决依赖性: (没有error即可,Warning可忽略)
[root@server1 php-5.6.35]# yum install -y libxml2-devel
[root@server1 php-5.6.35]# ./configure --prefix=/usr/local/lnmp/php --with-config-file-path=/usr/local/lnmp/php/etc --with-openssl --with-snmp --with-gd --with-zlib --with-curl --with-libxml-dir --with-png-dir --with-jpeg-dir --with-freetype-dir --with-gmp --with-gettext --with-pear --enable-mysqlnd --with-mysql=mysqlnd --with-mysqli=mysqlnd --with-pdo-mysql=mysqlnd --enable-inline-optimization --enable-soap --enable-ftp --enable-sockets --enable-mbstring --enable-fpm --with-fpm-user=nginx --with-fpm-group=nginx --with-mcrypt --with-mhash

[root@server1 php-5.6.35]# yum install -y openssl-devel
[root@server1 php-5.6.35]# ./configure --prefix=/usr/local/lnmp/php --with-config-file-path=/usr/local/lnmp/php/etc --with-openssl --with-snmp --with-gd --with-zlib --with-curl --with-libxml-dir --with-png-dir --with-jpeg-dir --with-freetype-dir --with-gmp --with-gettext --with-pear --enable-mysqlnd --with-mysql=mysqlnd --with-mysqli=mysqlnd --with-pdo-mysql=mysqlnd --enable-inline-optimization --enable-soap --enable-ftp --enable-sockets --enable-mbstring --enable-fpm --with-fpm-user=nginx --with-fpm-group=nginx --with-mcrypt --with-mhash

[root@server1 php-5.6.35]# yum install -y libcurl-devel
[root@server1 php-5.6.35]# ./configure --prefix=/usr/local/lnmp/php --with-config-file-path=/usr/local/lnmp/php/etc --with-openssl --with-snmp --with-gd --with-zlib --with-curl --with-libxml-dir --with-png-dir --with-jpeg-dir --with-freetype-dir --with-gmp --with-gettext --with-pear --enable-mysqlnd --with-mysql=mysqlnd --with-mysqli=mysqlnd --with-pdo-mysql=mysqlnd --enable-inline-optimization --enable-soap --enable-ftp --enable-sockets --enable-mbstring --enable-fpm --with-fpm-user=nginx --with-fpm-group=nginx --with-mcrypt --with-mhash

[root@server1 php-5.6.35]# yum whatprovides */jpeglib.h
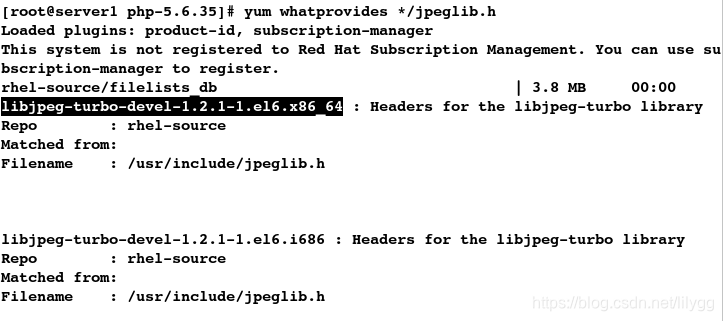
[root@server1 php-5.6.35]# yum install -y libjpeg-turbo-devel-1.2.1-1.el6.x86_64
[root@server1 php-5.6.35]# ./configure --prefix=/usr/local/lnmp/php --with-config-file-path=/usr/local/lnmp/php/etc --with-openssl --with-snmp --with-gd --with-zlib --with-curl --with-libxml-dir --with-png-dir --with-jpeg-dir --with-freetype-dir --with-gmp --with-gettext --with-pear --enable-mysqlnd --with-mysql=mysqlnd --with-mysqli=mysqlnd --with-pdo-mysql=mysqlnd --enable-inline-optimization --enable-soap --enable-ftp --enable-sockets --enable-mbstring --enable-fpm --with-fpm-user=nginx --with-fpm-group=nginx --with-mcrypt --with-mhash

[root@server1 php-5.6.35]# yum whatprovides */png.h
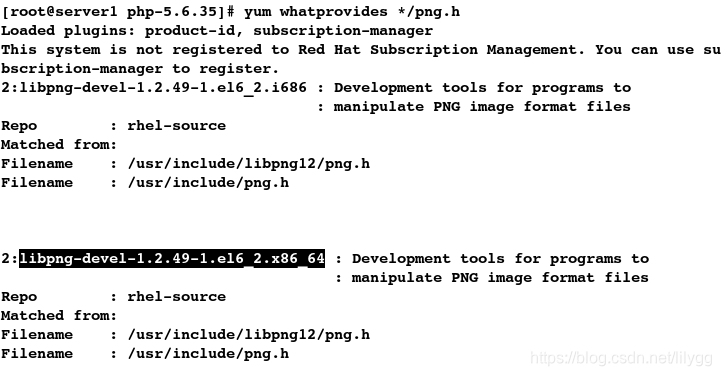
[root@server1 php-5.6.35]# yum install -y libpng-devel-1.2.49-1.el6_2.x86_64
[root@server1 php-5.6.35]# ./configure --prefix=/usr/local/lnmp/php --with-config-file-path=/usr/local/lnmp/php/etc --with-openssl --with-snmp --with-gd --with-zlib --with-curl --with-libxml-dir --with-png-dir --with-jpeg-dir --with-freetype-dir --with-gmp --with-gettext --with-pear --enable-mysqlnd --with-mysql=mysqlnd --with-mysqli=mysqlnd --with-pdo-mysql=mysqlnd --enable-inline-optimization --enable-soap --enable-ftp --enable-sockets --enable-mbstring --enable-fpm --with-fpm-user=nginx --with-fpm-group=nginx --with-mcrypt --with-mhash
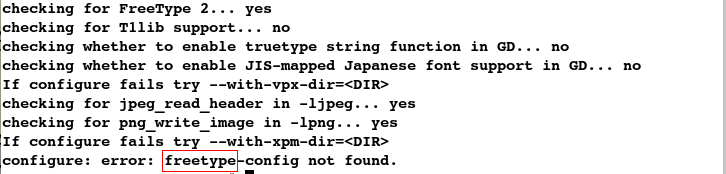
[root@server1 php-5.6.35]# yum install -y freetype-devel
[root@server1 php-5.6.35]# ./configure --prefix=/usr/local/lnmp/php --with-config-file-path=/usr/local/lnmp/php/etc --with-openssl --with-snmp --with-gd --with-zlib --with-curl --with-libxml-dir --with-png-dir --with-jpeg-dir --with-freetype-dir --with-gmp --with-gettext --with-pear --enable-mysqlnd --with-mysql=mysqlnd --with-mysqli=mysqlnd --with-pdo-mysql=mysqlnd --enable-inline-optimization --enable-soap --enable-ftp --enable-sockets --enable-mbstring --enable-fpm --with-fpm-user=nginx --with-fpm-group=nginx --with-mcrypt --with-mhash

[root@server1 php-5.6.35]# yum whatprovides */gmp.h
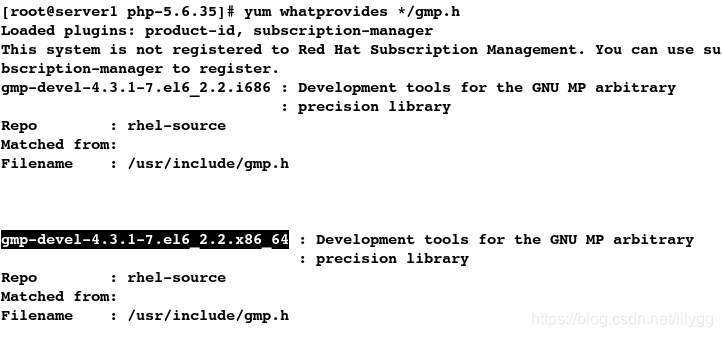
[root@server1 php-5.6.35]# yum install -y gmp-devel-4.3.1-7.el6_2.2.x86_64
[root@server1 php-5.6.35]# ./configure --prefix=/usr/local/lnmp/php --with-config-file-path=/usr/local/lnmp/php/etc --with-openssl --with-snmp --with-gd --with-zlib --with-curl --with-libxml-dir --with-png-dir --with-jpeg-dir --with-freetype-dir --with-gmp --with-gettext --with-pear --enable-mysqlnd --with-mysql=mysqlnd --with-mysqli=mysqlnd --with-pdo-mysql=mysqlnd --enable-inline-optimization --enable-soap --enable-ftp --enable-sockets --enable-mbstring --enable-fpm --with-fpm-user=nginx --with-fpm-group=nginx --with-mcrypt --with-mhash

依赖包:(由于yum仓库中没有这两个包,所以需要在官网上去下载)
libmcrypt-2.5.8-9.el6.x86_64.rpm
libmcrypt-devel-2.5.8-9.el6.x86_64.rpm
点击此处即可下载:libmcrypt-2.5.8-9.el6.x86_64.rpm
点击此处即可下载:libmcrypt-devel-2.5.8-9.el6.x86_64.rpm
[root@server1 php-5.6.35]# ll libmcrypt-*
-rw-r--r-- 1 root root 97932 Feb 17 16:15 libmcrypt-2.5.8-9.el6.x86_64.rpm
-rw-r--r-- 1 root root 12352 Feb 17 16:15 libmcrypt-devel-2.5.8-9.el6.x86_64.rpm
[root@server1 php-5.6.35]# yum install -y libmcrypt-*
[root@server1 php-5.6.35]# ./configure --prefix=/usr/local/lnmp/php --with-config-file-path=/usr/local/lnmp/php/etc --with-openssl --with-snmp --with-gd --with-zlib --with-curl --with-libxml-dir --with-png-dir --with-jpeg-dir --with-freetype-dir --with-gmp --with-gettext --with-pear --enable-mysqlnd --with-mysql=mysqlnd --with-mysqli=mysqlnd --with-pdo-mysql=mysqlnd --enable-inline-optimization --enable-soap --enable-ftp --enable-sockets --enable-mbstring --enable-fpm --with-fpm-user=nginx --with-fpm-group=nginx --with-mcrypt --with-mhash

[root@server1 php-5.6.35]# yum install -y net-snmp-devel
[root@server1 php-5.6.35]# ./configure --prefix=/usr/local/lnmp/php --with-config-file-path=/usr/local/lnmp/php/etc --with-openssl --with-snmp --with-gd --with-zlib --with-curl --with-libxml-dir --with-png-dir --with-jpeg-dir --with-freetype-dir --with-gmp --with-gettext --with-pear --enable-mysqlnd --with-mysql=mysqlnd --with-mysqli=mysqlnd --with-pdo-mysql=mysqlnd --enable-inline-optimization --enable-soap --enable-ftp --enable-sockets --enable-mbstring --enable-fpm --with-fpm-user=nginx --with-fpm-group=nginx --with-mcrypt --with-mhash
(2)编译
[root@server1 php-5.6.35]# make

(3)安装
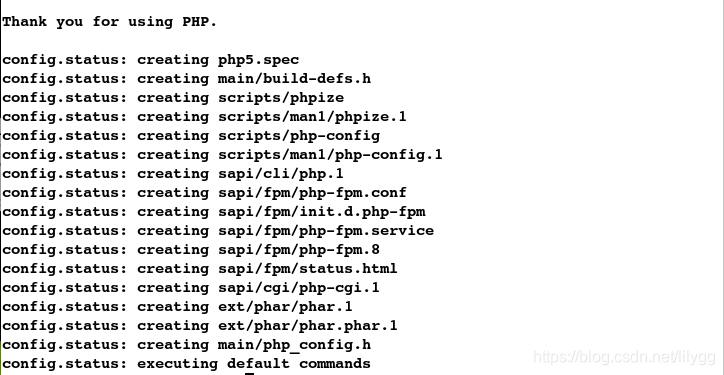
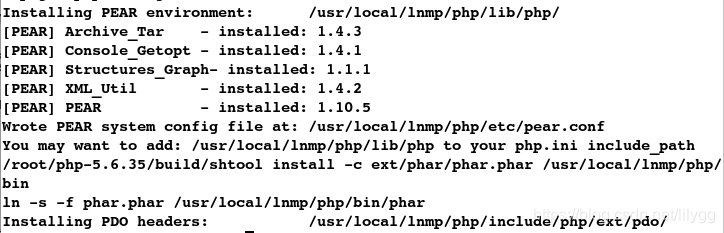
[root@server1 php-5.6.35]# make install
3.配置php
#源码编译后生成了/usr/local/lnmp/php目录
[root@server1 ~]# cd /usr/local/lnmp/
[root@server1 lnmp]# ls
mysql php
[root@server1 lnmp]# cd php/
[root@server1 php]# ls
bin etc include lib php sbin var
[root@server1 php]# cd
#1.建立nginx用户(因为编译时指定了用户组)
[root@server1 ~]# id nginx
id: nginx: No such user
[root@server1 ~]# useradd nginx
[root@server1 ~]# id nginx
uid=500(nginx) gid=500(nginx) groups=500(nginx)
#2.拷贝配置文件并更改文件
[root@server1 php]# cd /usr/local/lnmp/php/etc
#拷贝文件
[root@server1 etc]# cp php-fpm.conf.default php-fpm.conf
#更改配置文件
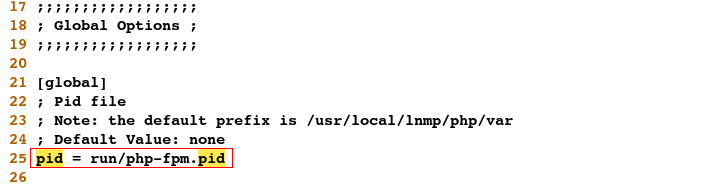
[root@server1 etc]# vim php-fpm.conf
##################
pid = run/php-fpm.pid
[root@server1 etc]# cd /root/php-5.6.35
#拷贝文件
[root@server1 php-5.6.35]# cp php.ini-production /usr/local/lnmp/php/etc/php.ini
[root@server1 php-5.6.35]# cd /usr/local/lnmp/php/etc/
[root@server1 etc]# ls
pear.conf php-fpm.conf php-fpm.conf.default php.ini
#编写主配置文件
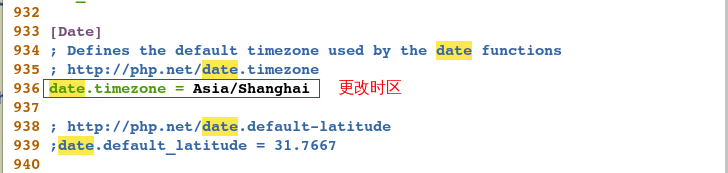
[root@server1 etc]# vim php.ini
###################
date.timezone = Asia/Shanghai #更改时区
#4.设置脚本启动
[root@server1 etc]# cd /root/php-5.6.35/sapi/fpm/
#拷贝
[root@server1 fpm]# cp init.d.php-fpm /etc/init.d/php-fpm
[root@server1 fpm]# ll /etc/init.d/php-fpm
-rw-r--r-- 1 root root 2359 Feb 18 09:31 /etc/init.d/php-fpm
#给脚本添加可执行权限
[root@server1 fpm]# chmod +x /etc/init.d/php-fpm
[root@server1 fpm]# ll /etc/init.d/php-fpm
-rwxr-xr-x 1 root root 2359 Feb 18 09:31 /etc/init.d/php-fpm
#5.脚本方式启动php
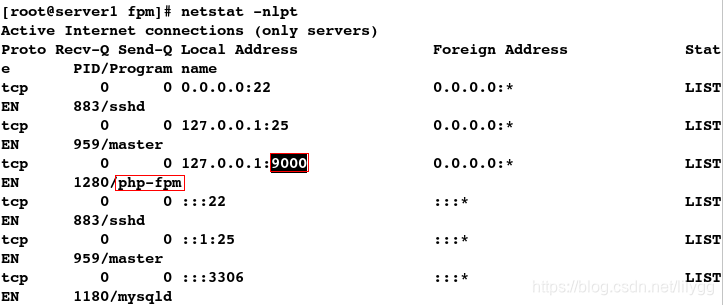
[root@server1 fpm]# /etc/init.d/php-fpm start
Starting php-fpm done
[root@server1 fpm]# netstat -nlpt
3.Nginx的源码编译与基础配置
安装包:
nginx-1.14.0.tar.gz
1.下载nginx源码编译包并解压
#1.在官网上下载nginx源码编译包
[root@server1 ~]# ls
cmake-2.8.12.2-4.el6.x86_64.rpm  mysql-boost-5.7.17.tar.gz  php-5.6.35
mysql-5.7.17                     nginx-1.14.0.tar.gz        php-5.6.35.tar.bz2
#2.解压
[root@server1 ~]# tar zxf nginx-1.14.0.tar.gz
[root@server1 ~]# ls
cmake-2.8.12.2-4.el6.x86_64.rpm  nginx-1.14.0         php-5.6.35.tar.bz2
mysql-5.7.17                     nginx-1.14.0.tar.gz
mysql-boost-5.7.17.tar.gz        php-5.6.35
2.隐藏版本并注释degbug日志
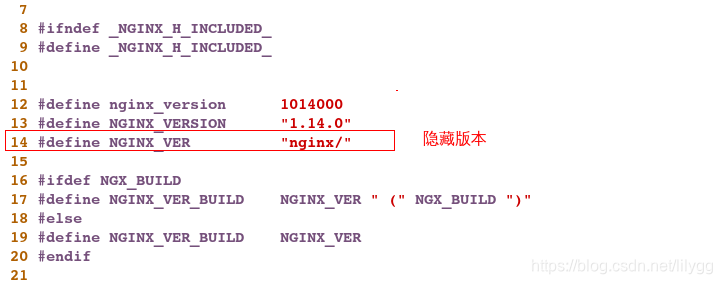
[root@server1 core]# cd /root/nginx-1.14.0/src/core
#1.隐藏版本
[root@server1 core]# vim nginx.h
####################
#define NGINX_VER          "nginx/"         #隐藏版本
[root@server1 core]# cd
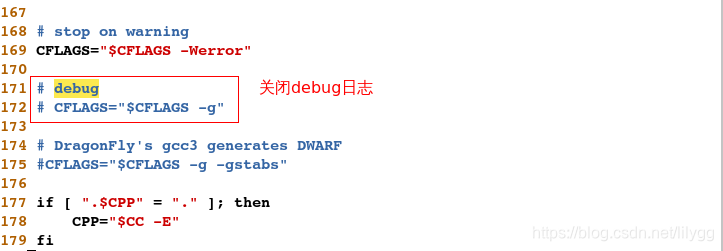
[root@server1 ~]# cd nginx-1.14.0/auto/cc/
#2.关闭degbug日志
[root@server1 cc]# vim gcc
##################
# CFLAGS="$CFLAGS -g" #关闭degbug日志(日志内容太多)
3.源码编译
(1)configure配置
[root@server1 cc]# cd /root/nginx-1.14.0
#configure配置,报错
[root@server1 nginx-1.14.0]# ./configure --prefix=/usr/local/lnmp/nginx --without-http_ssi_module --with-http_stub_status_module --user=nginx --group=nginx --with-threads --with-file-aio

解决依赖性:
[root@server1 nginx-1.14.0]# yum install -y pcre-devel
[root@server1 nginx-1.14.0]# ./configure --prefix=/usr/local/lnmp/nginx --without-http_ssi_module --with-http_stub_status_module --user=nginx --group=nginx --with-threads --with-file-aio
(2)编译与安装
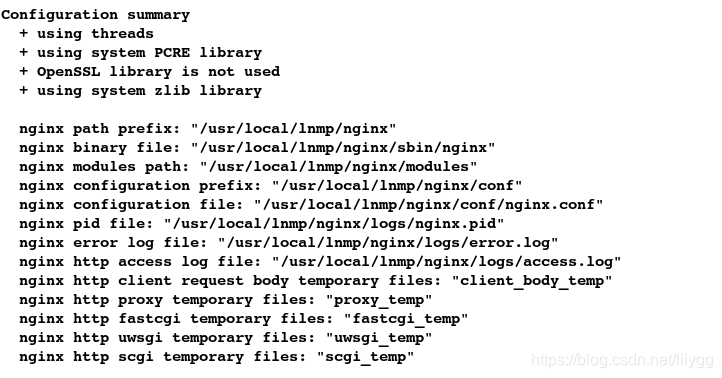
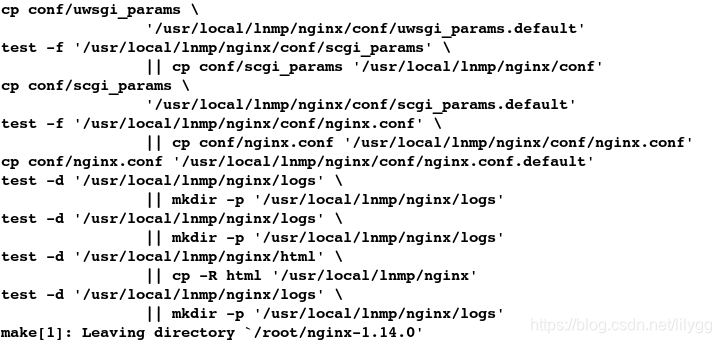
[root@server1 nginx-1.14.0]# make && make install
4.配置nginx
[root@server1 nginx-1.14.0]# cd /usr/local/lnmp/nginx/conf/
[root@server1 conf]# vim nginx.conf

#2.制作软链接,这样便可以直接用命名启动nginx
[root@server1 conf]# cd /usr/local/lnmp/nginx/sbin/
[root@server1 sbin]# ln -s /usr/local/lnmp/nginx/sbin/nginx /usr/local/sbin/
#3.检测语法
[root@server1 sbin]# nginx -t
nginx: the configuration file /usr/local/lnmp/nginx/conf/nginx.conf syntax is ok
nginx: configuration file /usr/local/lnmp/nginx/conf/nginx.conf test is successful
#4.启动nginx
[root@server1 sbin]# nginx
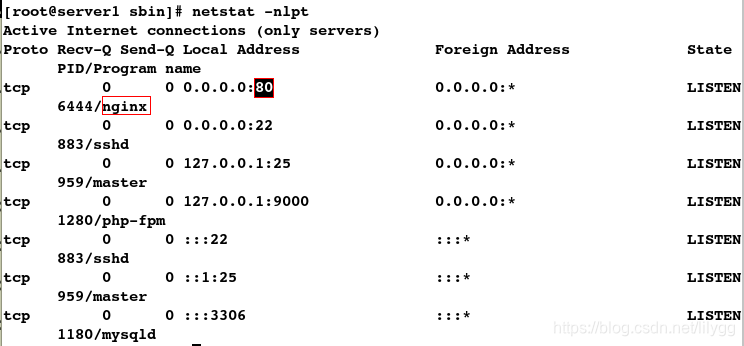
#查看端口
[root@server1 sbin]# netstat -nlpt
测试:
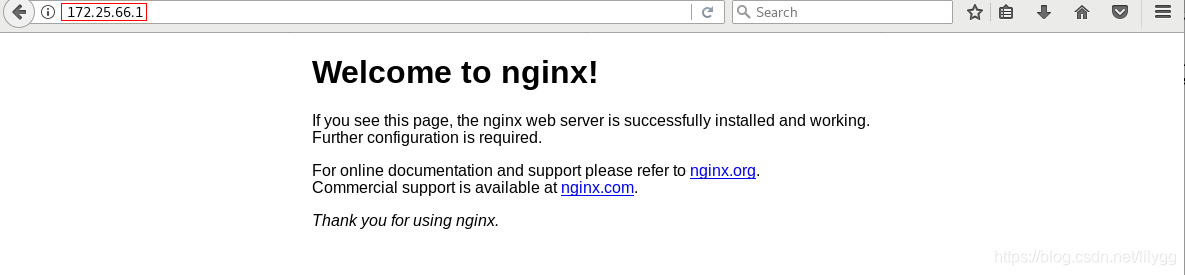
1.在网页上输入172.25.66.1,即可访问到nginx的默认发布目录
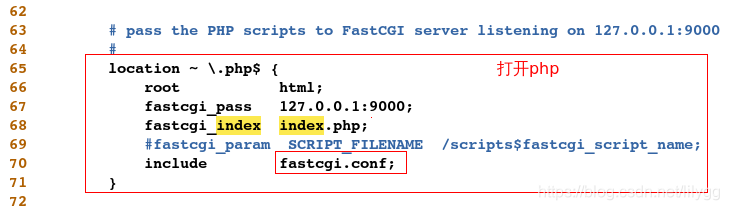
2.检测nginx是否支持php语言
#编写php默认发布网页
[root@server1 sbin]# cd /usr/local/lnmp/nginx/html/
[root@server1 html]# ls
50x.html  index.html
[root@server1 html]# vim index.php
####################
<?php
phpinfo()
?>
刷新网页,即可查看到php默认发布网页
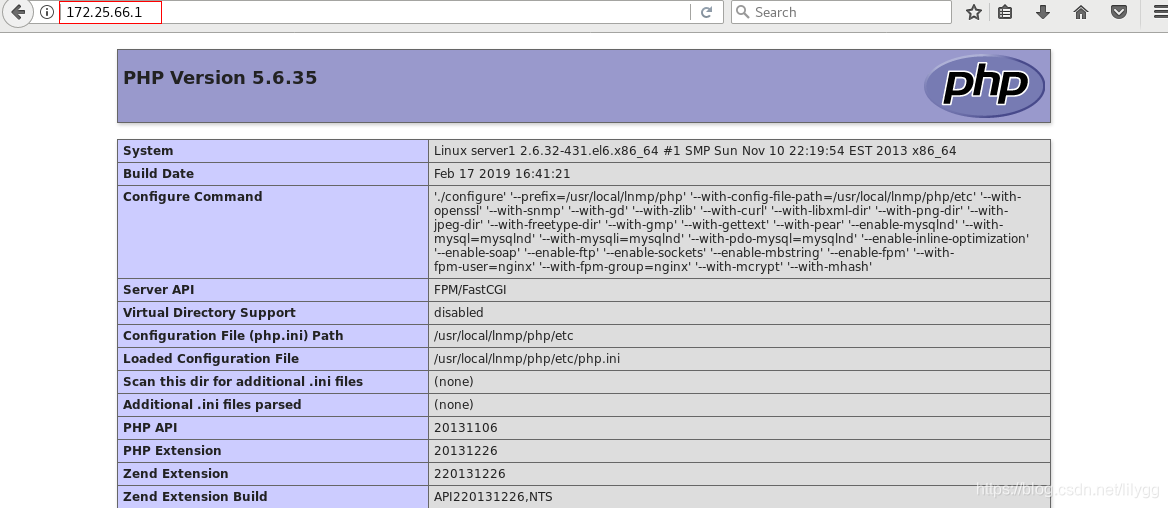
4.整合 Nginx + PHP + MySQL
1.论坛的搭建
安装包:
Discuz_X3.2_SC_UTF8.zip
1.下载论坛安装包并解压
#1.在官网上下载论坛安装包
[root@server1 ~]# ls
cmake-2.8.12.2-4.el6.x86_64.rpm mysql-boost-5.7.17.tar.gz php-5.6.35
Discuz_X3.2_SC_UTF8.zip nginx-1.14.0 php-5.6.35.tar.bz2
mysql-5.7.17 nginx-1.14.0.tar.gz
#2.解压
[root@server1 ~]# unzip Discuz_X3.2_SC_UTF8.zip -d /usr/local/lnmp/nginx/html/
-bash: unzip: command not found
#安装unzip解压工具
[root@server1 ~]# yum install -y unzip
[root@server1 ~]# unzip Discuz_X3.2_SC_UTF8.zip -d /usr/local/lnmp/nginx/html/
#upload 即为论坛
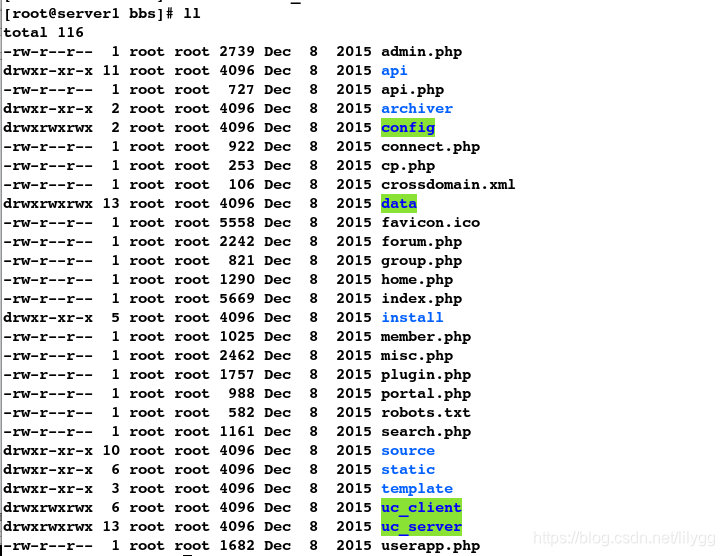
[root@server1 ~]# cd /usr/local/lnmp/nginx/html
[root@server1 html]# ls
50x.html upload index.html index.php readme utility
#3.修改名称
[root@server1 html]# mv upload/ bbs
[root@server1 html]# ls
50x.html bbs index.html index.php readme utility
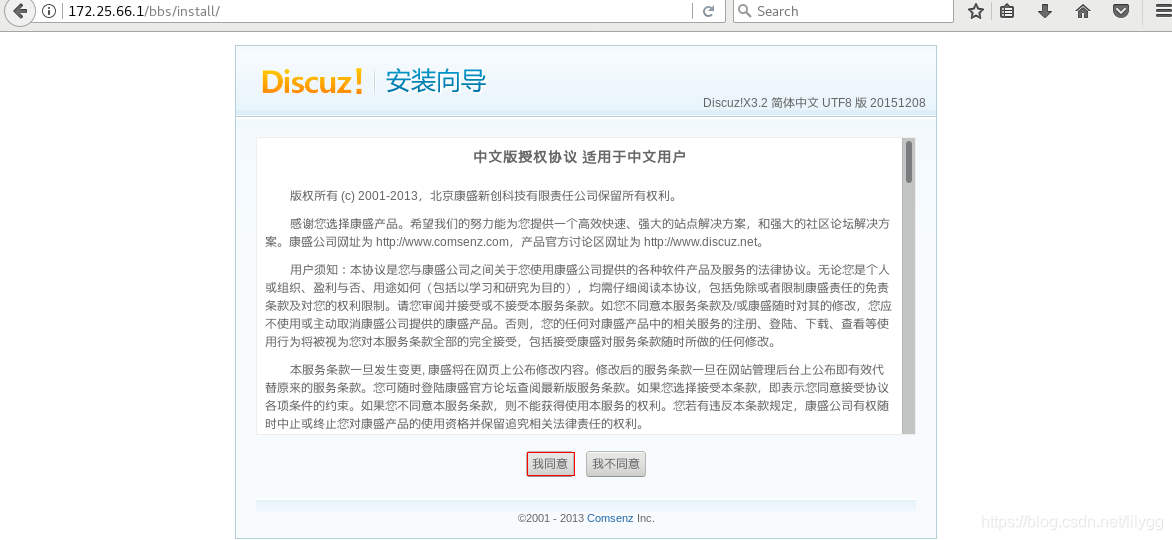
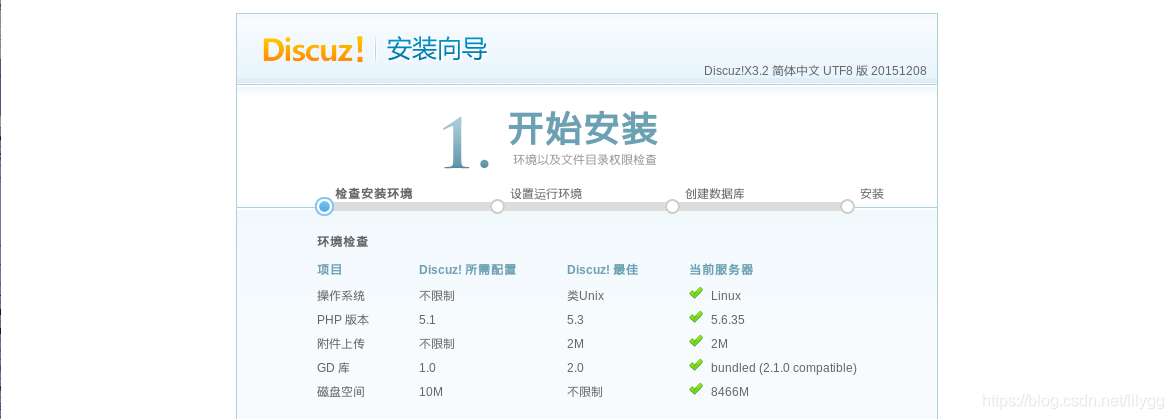
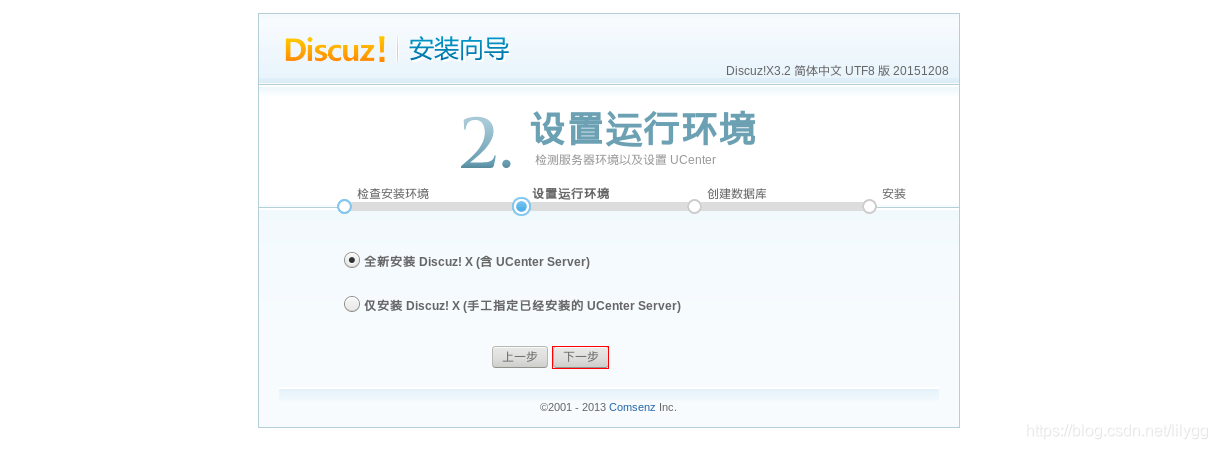
2.在网页上安装论坛
在网页上输入: 172.25.66.1/bbs
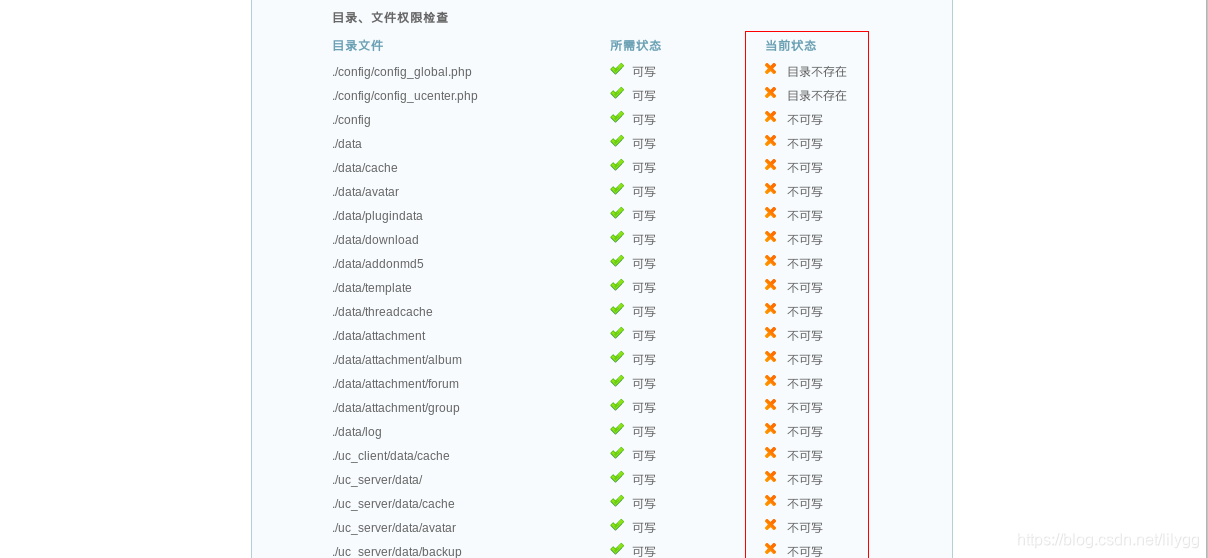

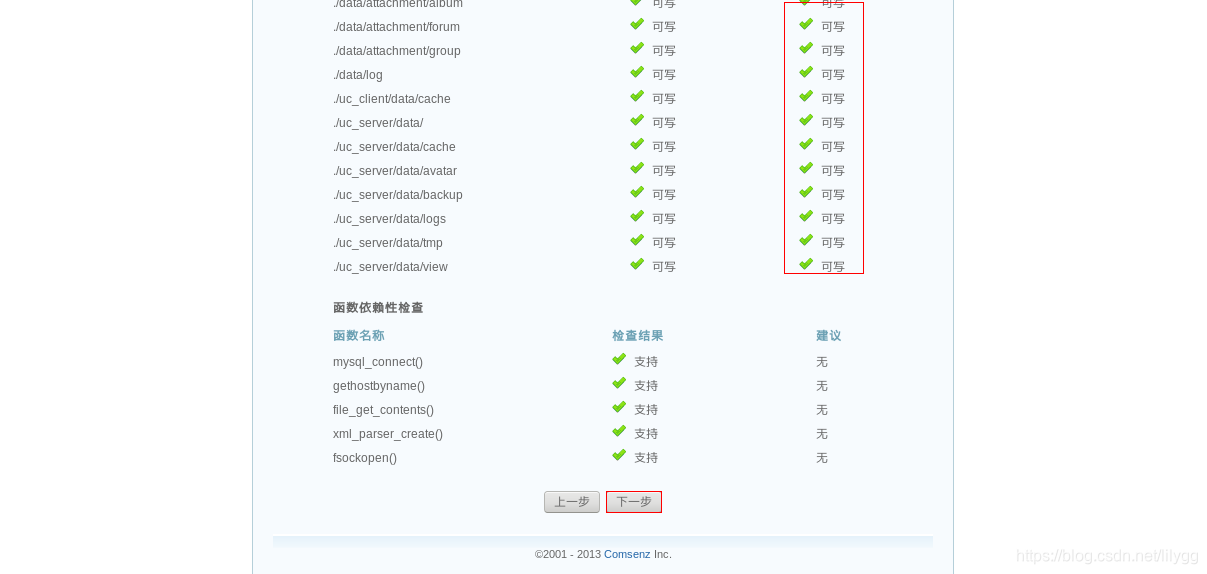
(1).解决权限不可写问题
[root@server1 html]# cd bbs/
[root@server1 bbs]# pwd
/usr/local/lnmp/nginx/html/bbs
#更改权限
[root@server1 bbs]# chmod 777 config/ -R
[root@server1 bbs]# chmod 777 data/ -R
[root@server1 bbs]# chmod 777 uc_ -R
chmod: cannot access `uc_': No such file or directory
[root@server1 bbs]# chmod 777 uc_* -R
[root@server1 bbs]# ll
刷新网页:
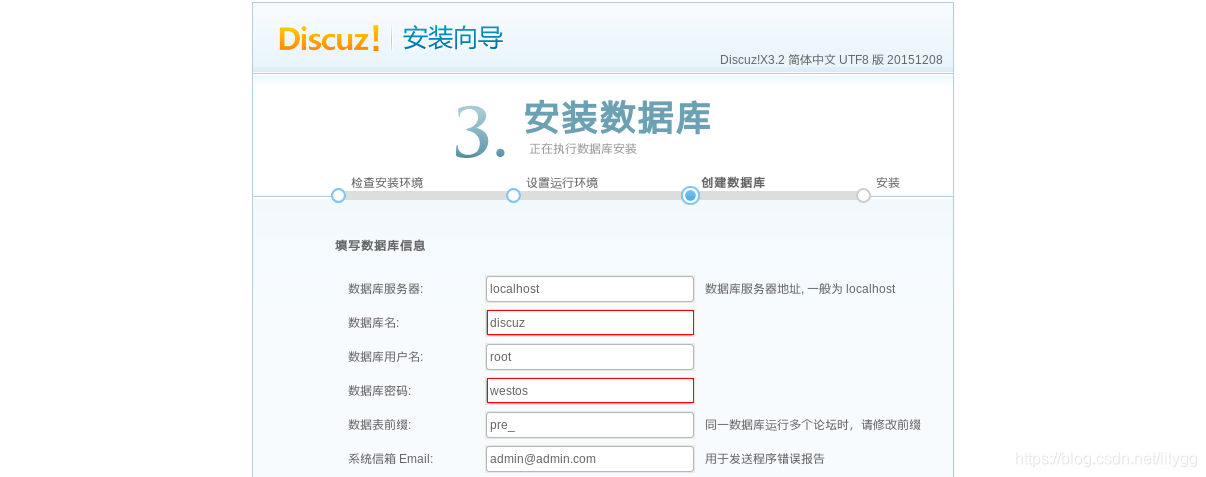
设定数据库信息与管理员信息:


(2).解决文件不存在问题(其实不是不存在,而是未识别)
[root@server1 bbs]# cd /usr/local/lnmp/php/etc/
#1.更改配置文件(更改套接字路径:与源码编译时设定的路径一致)
[root@server1 etc]# vim php.ini
###################
pdo_mysql.default_socket=/usr/local/lnmp/mysql/data/mysql.sock
mysql.default_socket =/usr/local/lnmp/mysql/data/mysql.sock
mysqli.default_socket =/usr/local/lnmp/mysql/data/mysql.sock


#2.重新加载(更改配置文件后必须重新加载服务,才能生效)
[root@server1 etc]# /etc/init.d/php-fpm reload
Reload service php-fpm  done
刷新网页:
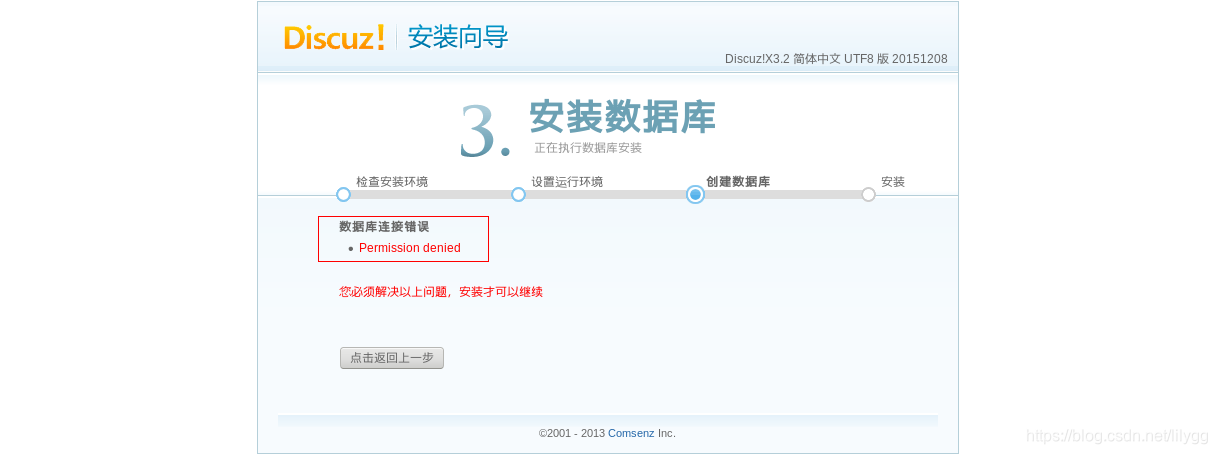
(3).解决操作不被允许问题(没有权限)
[root@server1 etc]# ll -d /usr/local/lnmp/mysql/data/
drwxr-x--- 5 mysql root 4096 Feb 18 09:13 /usr/local/lnmp/mysql/data/
#更改权限
[root@server1 etc]# chmod 755 /usr/local/lnmp/mysql/data/
[root@server1 etc]# ll -d /usr/local/lnmp/mysql/data/
drwxr-xr-x 5 mysql root 4096 Feb 18 09:13 /usr/local/lnmp/mysql/data/
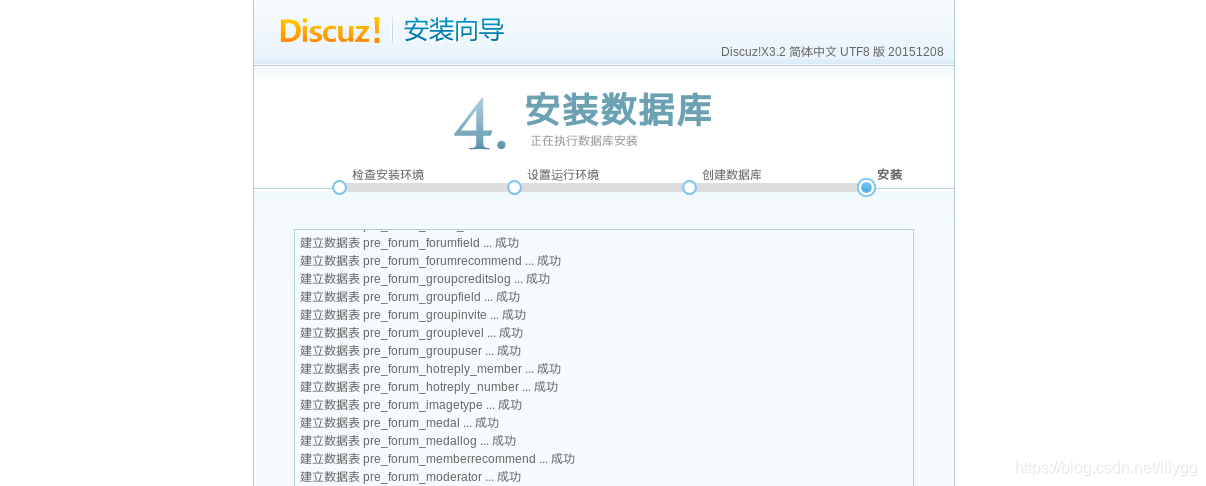
开始安装…
 安装完成,点击进入论坛

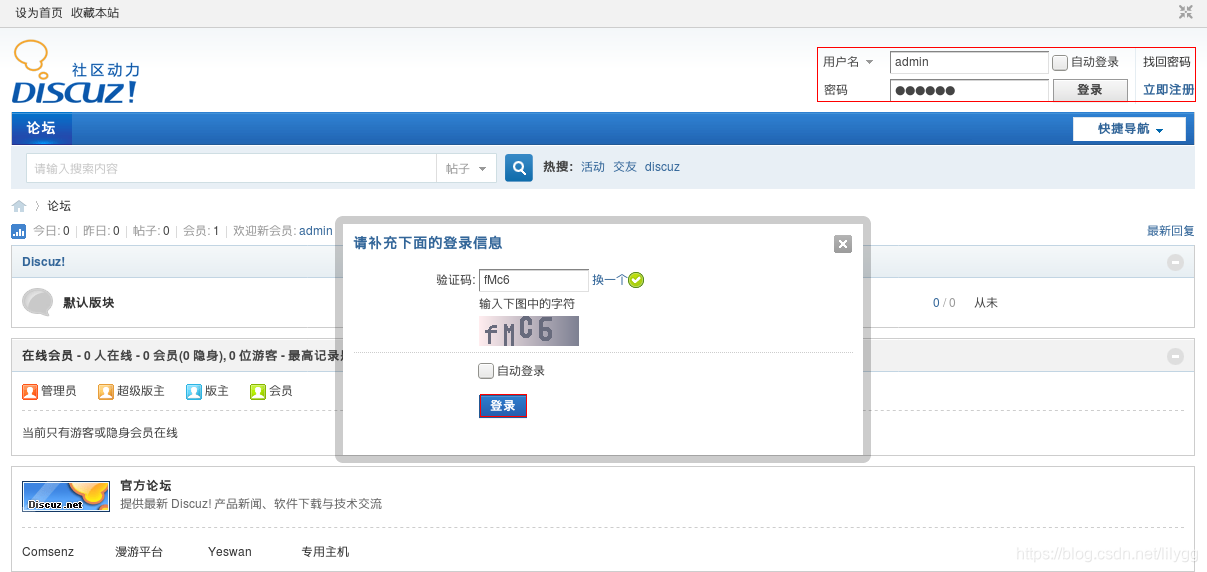
3.管理员登陆
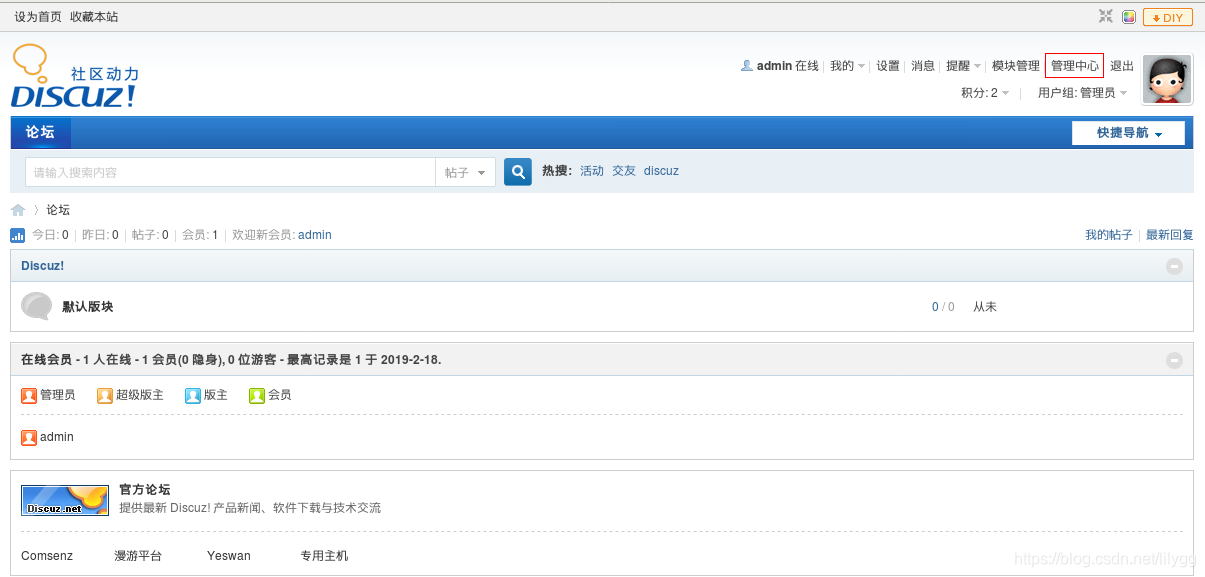
4.管理论坛


(1).根据提示删除文件
[root@server1 etc]# cd /usr/local/lnmp/nginx/html/bbs/install/
[root@server1 install]# ls
data  images  include  index.php
#删除文件
[root@server1 install]# rm -rf index.php
(2).添加用户
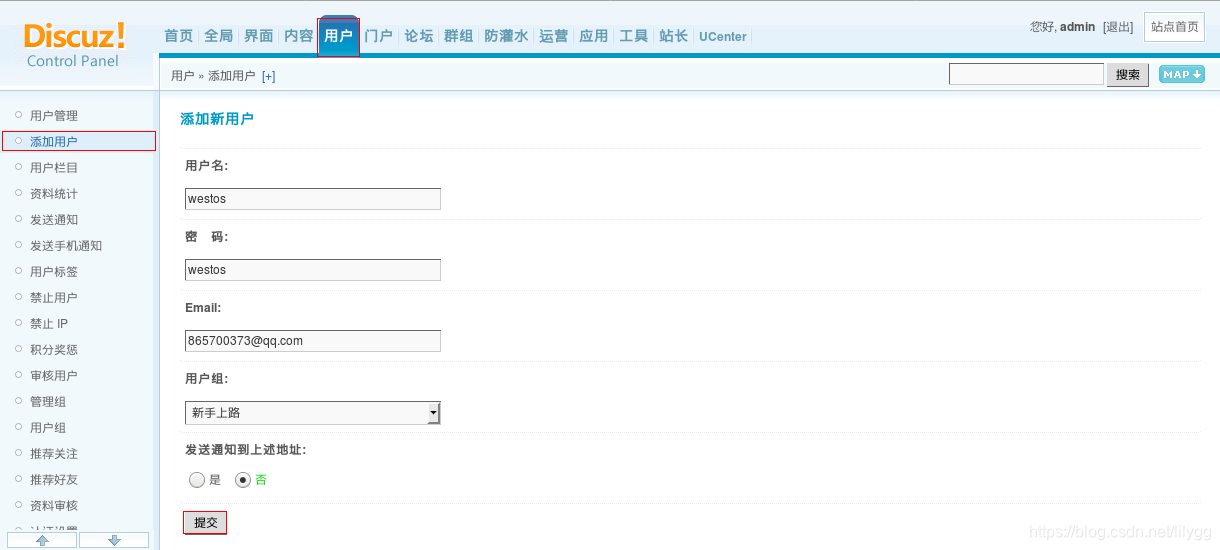

(3).测试:登陆数据库后,便可查看到刚新建的用户
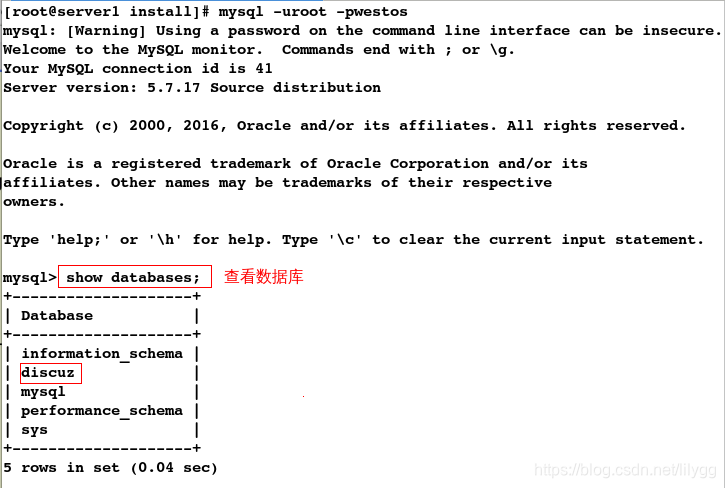
[root@server1 install]# mysql -uroot -pwestos
mysql> show databases; #查看数据库
mysql> use discuz; #使用数据库
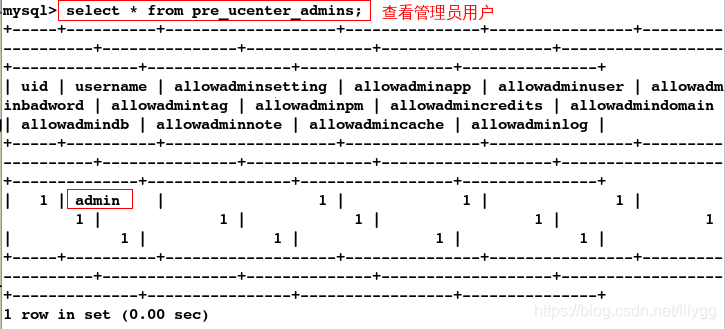
mysql> select * from pre_ucenter_admins; #查看管理员用户
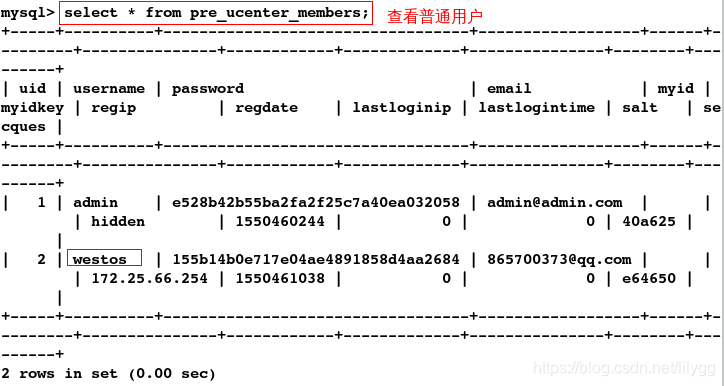
mysql> select * from pre_ucenter_members; #查看普通用户

2.添加存储(memcache)
1.给php添加缓存
安装包:
memcache-2.2.5.tgz
1.下载缓存源码编译包并解压
#1.在官网上下载缓存源码编译包
[root@server1 ~]# ls
cmake-2.8.12.2-4.el6.x86_64.rpm  mysql-5.7.17               nginx-1.14.0.tar.gz
Discuz_X3.2_SC_UTF8.zip          mysql-boost-5.7.17.tar.gz  php-5.6.35
memcache-2.2.5.tgz               nginx-1.14.0               php-5.6.35.tar.bz2
#2.解压
[root@server1 ~]# tar zxf memcache-2.2.5.tgz
[root@server1 ~]# ls
cmake-2.8.12.2-4.el6.x86_64.rpm  mysql-5.7.17               package.xml
Discuz_X3.2_SC_UTF8.zip          mysql-boost-5.7.17.tar.gz  php-5.6.35
memcache-2.2.5                   nginx-1.14.0               php-5.6.35.tar.bz2
memcache-2.2.5.tgz               nginx-1.14.0.tar.gz
2.更改环境变量
#1.更改环境变量
[root@server1 ~]# vim .bash_profile
#################
PATH=$PATH:$HOME/bin:/usr/local/lnmp/mysql/bin:/usr/local/lnmp/php/bin
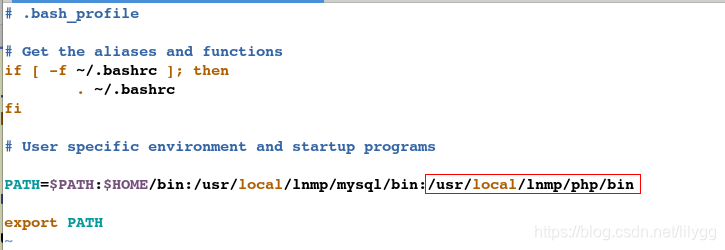
#2.刷新配置
[root@server1 ~]# source .bash_profile
[root@server1 ~]# cd /usr/local/lnmp/php/
[root@server1 php]# ls
bin  etc  include  lib  php  sbin  var
[root@server1 php]# cd bin/
[root@server1 bin]# ls
pear  peardev  pecl  phar  phar.phar  php  php-cgi  php-config  phpize
3.源码编译
(1).congfigure配置
#1.添加congfigure配置
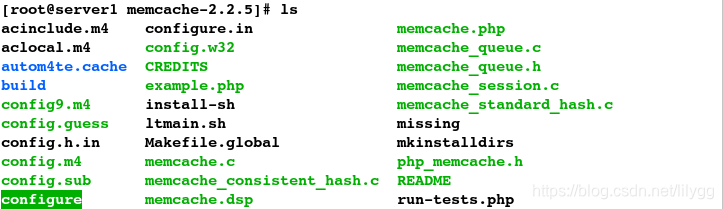
[root@server1 bin]# cd memcache-2.2.5
[root@server1 memcache-2.2.5]# phpize
Configuring for:
PHP Api Version: 20131106
Zend Module Api No: 20131226
Zend Extension Api No: 220131226
[root@server1 memcache-2.2.5]# ls
[root@server1 memcache-2.2.5]# ./configure
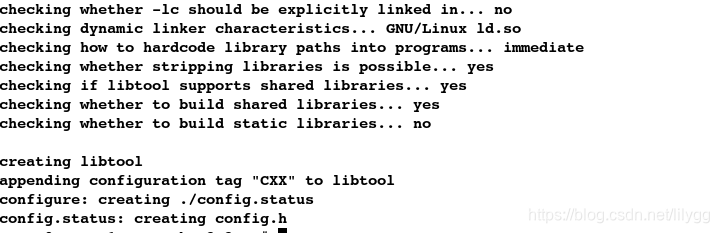
(2)编译与安装
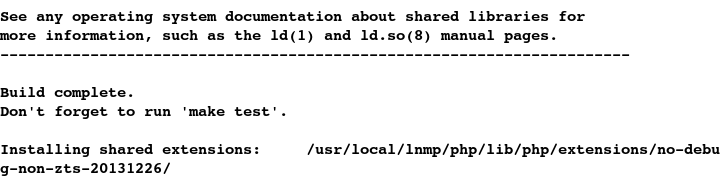
[root@server1 memcache-2.2.5]# make && make install
4.添加模块
[root@server1 memcache-2.2.5]# cd /usr/local/lnmp/php/etc/
[root@server1 etc]# ls
pear.conf php-fpm.conf php-fpm.conf.default php.ini
#1.添加缓存模块
[root@server1 etc]# vim php.ini
###################
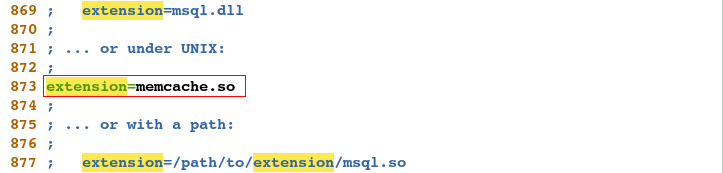
extension=memcache.so #添加memcache缓存模块
#2.重新加载
[root@server1 etc]# /etc/init.d/php-fpm reload
Reload service php-fpm  done
[root@server1 etc]# cd
#3.查看模块
[root@server1 ~]# php -m | grep memcache
memcache
[root@server1 ~]# php -m | grep mysql
mysql
mysqli
mysqlnd
pdo_mysql
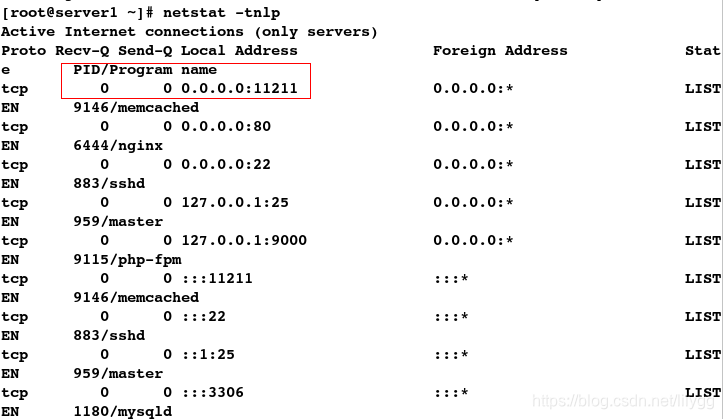
5.开启memcached服务
[root@server1 ~]# yum install -y memcached
[root@server1 ~]# /etc/init.d/memcached start
Starting memcached:                                        [  OK  ]
#查看监听端口
[root@server1 ~]# vim /etc/sysconfig/memcached

#查看端口
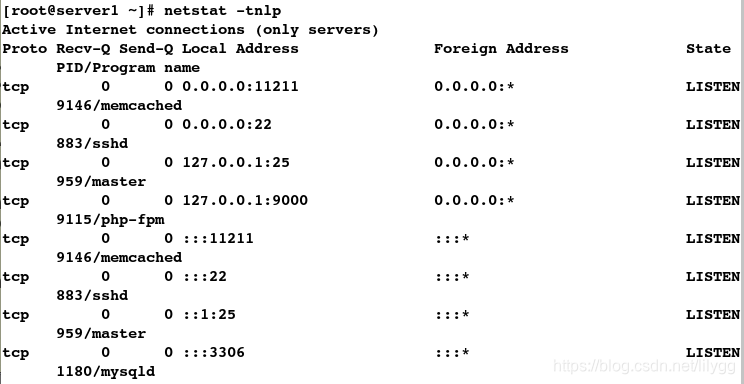
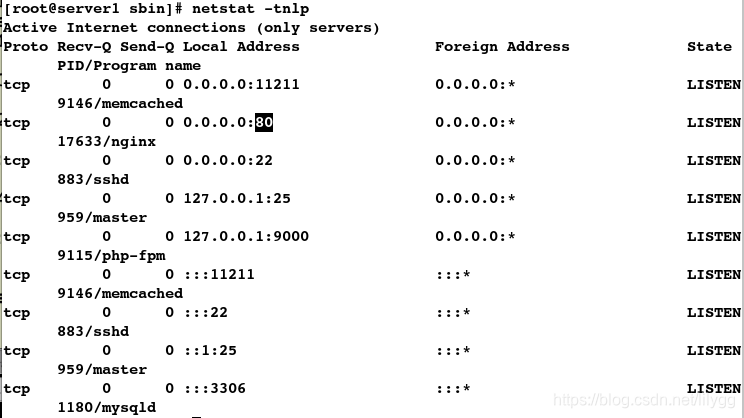
[root@server1 ~]# netstat -tnlp
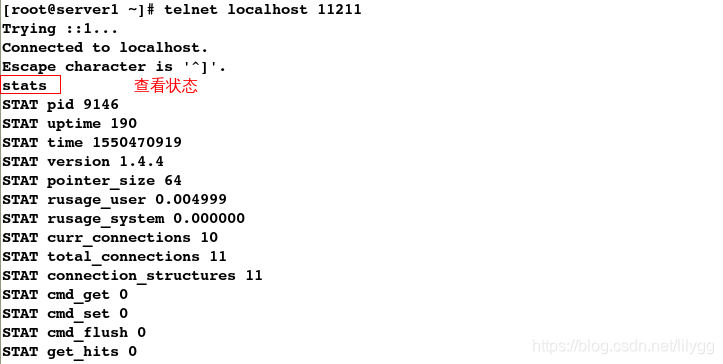
6.telnet测试
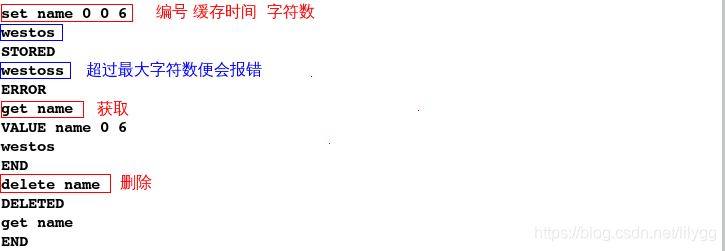
[root@server1 ~]# telnet localhost 11211
-bash: telnet: command not found
[root@server1 ~]# yum install -y telnet
[root@server1 ~]# telnet localhost 11211

7.设定登陆密码
[root@server1 ~]# cd memcache-2.2.5
#1.拷贝发布文件到nginx的默认发布目录中
[root@server1 memcache-2.2.5]# cp memcache.php example.php /usr/local/lnmp/nginx/html/
[root@server1 memcache-2.2.5]# cd /usr/local/lnmp/nginx/html/
[root@server1 html]# ls
50x.html  example.php  index.php     readme
bbs       index.html   memcache.php  utility
#2.更改配置文件
[root@server1 html]# vim memcache.php
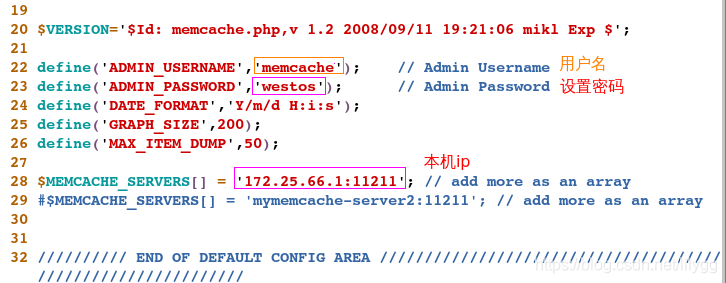
8.网页测试
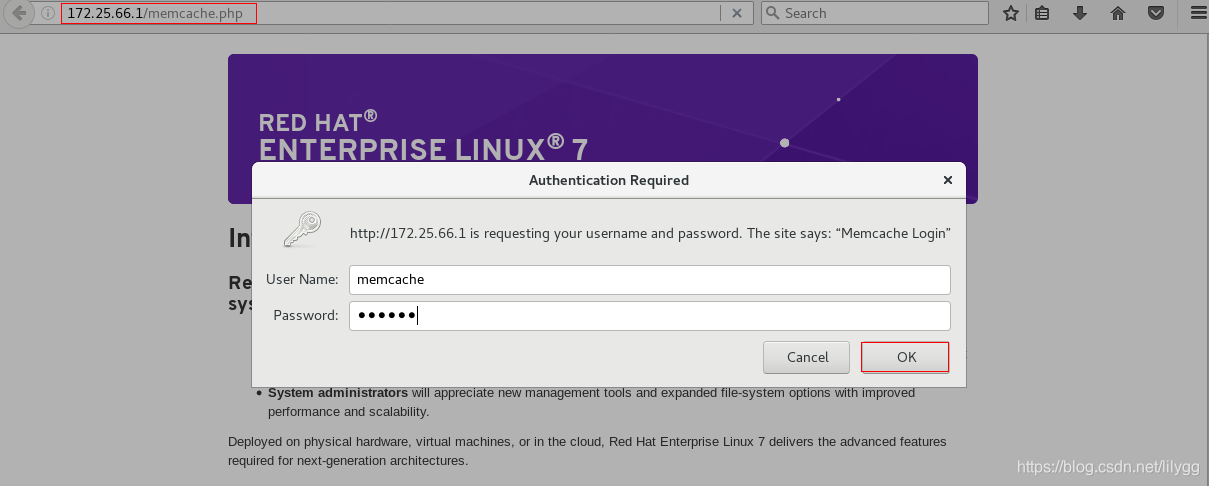
在网页上输入:172.25.66.1/memcache.php进入memcache缓存页面

再打开一个浏览器,输入:172.25.66.1/example.php进入动态页面

多次刷新动态页面,发现memcache缓存页面中,Hits占多数(Hit表是命中缓存)

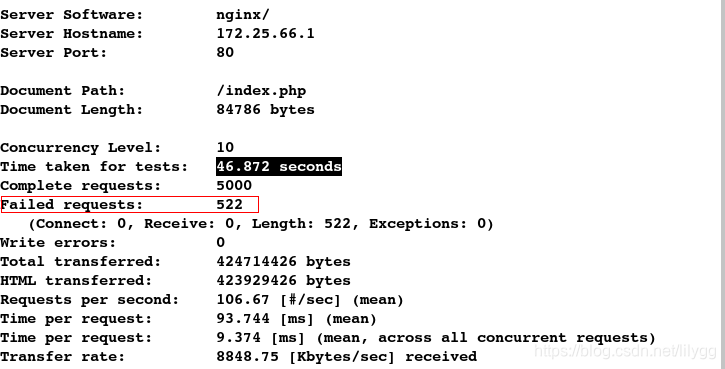
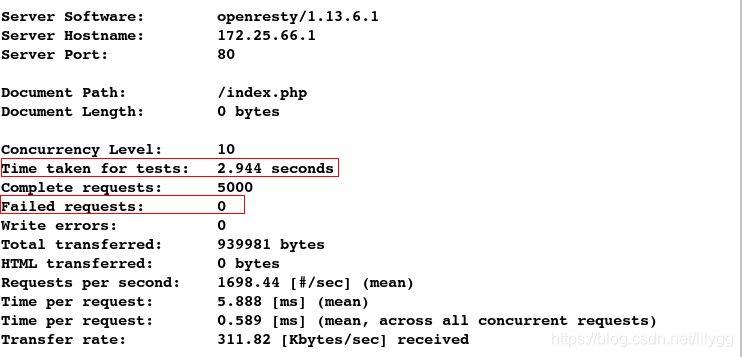
9.压测:比较访问index.php和example.php页面的速度
#访问index.php页面;ab为压测试工具,10个并发,5000个请求
[root@foundation66 ~]# ab -c 10 -n 5000 http://172.25.66.1/index.php
#访问example.php页面
[root@foundation66 ~]# ab -c 10 -n 5000 http://172.25.66.1/example.php
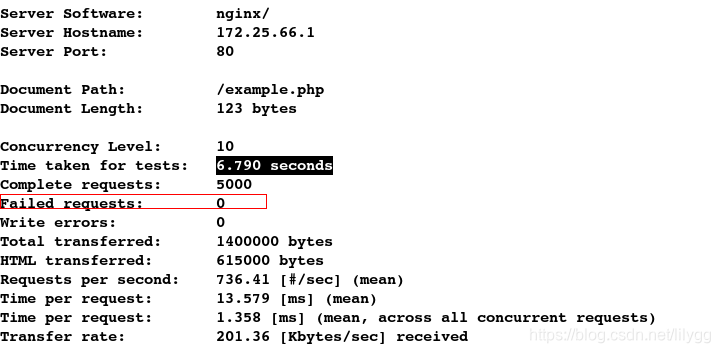
由于访问index.php页面会去后端取数据,而访问example.php页面时将直接去memcache缓存取数据,所以后者的访问速度会快的多
2.给nginx添加缓存
为了解决高并发问题,安装openresty(自带nginx)
安装包:
openresty-1.13.6.1.tar.gz
1.关闭原来的nginx
#关闭nginx
[root@server1 ~]# nginx -s stop
#查看端口,80端口消失
[root@server1 ~]# netstat -tnlp
2.下载openresty源码编译包并解压
[root@server1 ~]# ls
cmake-2.8.12.2-4.el6.x86_64.rpm  nginx-1.14.0
Discuz_X3.2_SC_UTF8.zip          nginx-1.14.0.tar.gz
memcache-2.2.5                   openresty-1.13.6.1.tar.gz
memcache-2.2.5.tgz               package.xml
mysql-5.7.17                     php-5.6.35
mysql-boost-5.7.17.tar.gz        php-5.6.35.tar.bz2
[root@server1 ~]# tar zxf openresty-1.13.6.1.tar.gz
[root@server1 ~]# ls
cmake-2.8.12.2-4.el6.x86_64.rpm  mysql-boost-5.7.17.tar.gz  package.xml
Discuz_X3.2_SC_UTF8.zip          nginx-1.14.0               php-5.6.35
memcache-2.2.5                   nginx-1.14.0.tar.gz        php-5.6.35.tar.bz2
memcache-2.2.5.tgz               openresty-1.13.6.1
mysql-5.7.17                     openresty-1.13.6.1.tar.gz
3.源码编译
(1)configure配置
[root@server1 ~]# cd openresty-1.13.6.1
[root@server1 openresty-1.13.6.1]# ./configure

(2)编译与安装
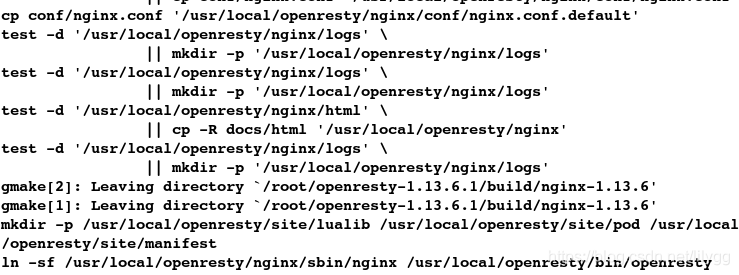
[root@server1 openresty-1.13.6.1]# gmake && gmake install
4.拷贝测试网页
#1.拷贝发布文件到openresty中自带的nginx的默认发布目录中
[root@server1 openresty-1.13.6.1]#cd /usr/local/openresty/nginx/html
[root@server1 html]# cp /usr/local/lnmp/nginx/html/index.php .
[root@server1 html]# cp /usr/local/lnmp/nginx/html/example.php .
[root@server1 html]# ls
50x.html  example.php  index.html  index.php
5.更改配置文件
[root@server1 conf]# cd /usr/local/openresty/nginx/conf
[root@server1 conf]# ls
fastcgi.conf koi-win scgi_params
fastcgi.conf.default mime.types scgi_params.default
fastcgi_params mime.types.default uwsgi_params
fastcgi_params.default nginx.conf uwsgi_params.default
koi-utf nginx.conf.default win-utf
#1.更改文件
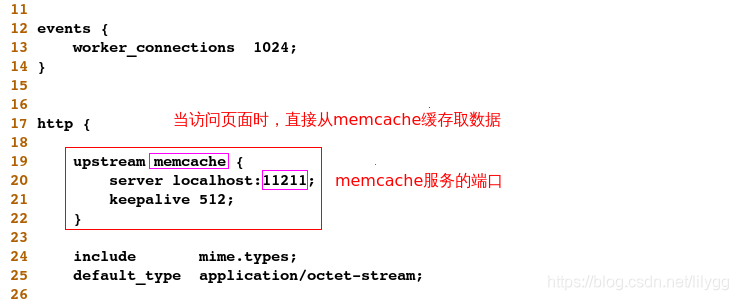
[root@server1 conf]# vim nginx.conf
####################
http {
upstream memcache {
server localhost:11211;
keepalive 512;
}
include mime.types;
default_type application/octet-stream;
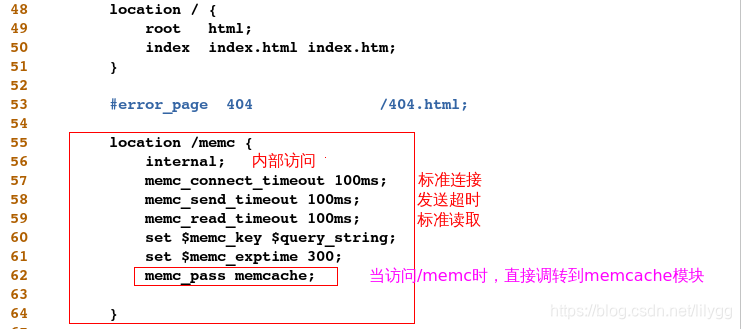
location /memc {
internal;
memc_connect_timeout 100ms;
memc_send_timeout 100ms;
memc_read_timeout 100ms;
set $memc_key $query_string;
set $memc_exptime 300;
memc_pass memcache;
}
set $key $uri$args;
srcache_fetch GET /memc $key;
srcache_store PUT /memc $key;

#2.检测语法
[root@server1 conf]#cd  /usr/local/openresty/nginx/sbin
[root@server1 sbin]# ./nginx -t
nginx: the configuration file /usr/local/openresty/nginx/conf/nginx.conf syntax is ok
nginx: configuration file /usr/local/openresty/nginx/conf/nginx.conf test is successful
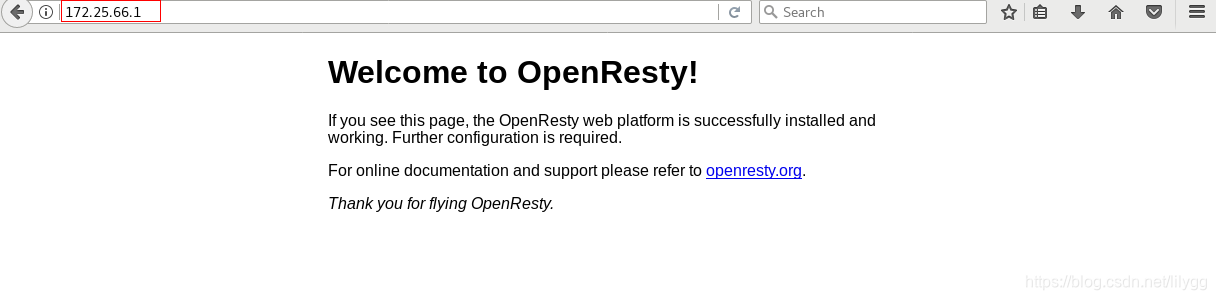
6.启动nginx(注意别启动成之前的nginx了喔)
#开启nginx
[root@server1 sbin]# ./nginx
#查看端口
[root@server1 sbin]# netstat -tnlp
7.网页测试
在网页上输入:172.25.66.1,即可访问到OpenResty的默认发布页面
8.压测
#1.访问index.php页面
[root@foundation66 ~]# ab -c 10 -n 5000 http://172.25.66.1/index.php
#2.访问example.php页面
[root@foundation66 ~]# ab -c 10 -n 5000 http://172.25.66.1/example.php
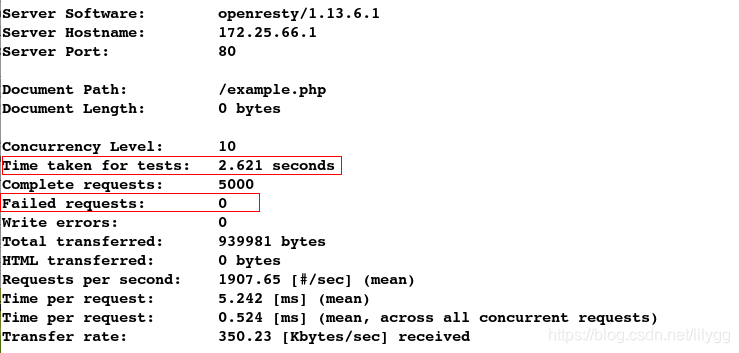
发现访问页面响应速度大大加快,并且不会出现访问失败的情形,因为此时无论是访问index.php页面还是example.php页面,都是从memcache缓存取数据