版权声明:本文为博主原创文章,未经博主允许不得转载,博客地址:http://blog.csdn.net/mars_xiaolei。 https://blog.csdn.net/mars_xiaolei/article/details/83317032
前期准备
我们的目的是将摄像头采集到的视频显示在Qt界面窗口上,而不是imshow到OpenCV自己的窗口上。在编写代码之前,需要先在Qt上配置OpenCV,如果没有配置,请先把OpenCV配置好;如果已配置,直接跳过。
Qt上配置OpenCV链接:https://blog.csdn.net/mars_xiaolei/article/details/83246358
设计UI
1、先创建一个Qt Widgets应用程序,添加一个label控件和两个push button按钮

2、label控件的objectName修改为label,push button的objectName分别修改为btnOpenCamera和btnCloseCamera


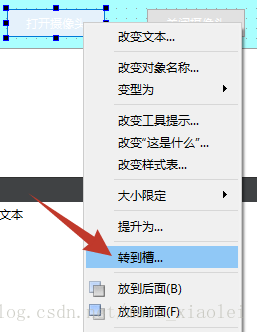
3、然后分别选中两个push button,右键选择转到槽...,然后选择clicked(),系统会自动创建控件单击响应函数。
添加代码
1、mainwindow.h部分代码
#ifndef MAINWINDOW_H
#define MAINWINDOW_H

#include <QMainWindow>
#include "QTimer"
#include "QImage"
#include "opencv2/opencv.hpp"
#include "iostream"

using namespace cv;
using namespace std;

namespace Ui {
class MainWindow;
}

class MainWindow : public QMainWindow
{
    Q_OBJECT

public:
    explicit MainWindow(QWidget *parent = 0);
    ~MainWindow();


private slots:
    void on_btnOpenCamera_clicked();

    void on_btnCloseCamera_clicked();
    void ReadFrame();


private:
    Ui::MainWindow *ui;
    VideoCapture capture;
    QTimer *timer;
    Mat frame;
};

#endif // MAINWINDOW_H
2、mainwindow.cpp部分代码
#include "mainwindow.h"
#include "ui_mainwindow.h"

MainWindow::MainWindow(QWidget *parent) :
    QMainWindow(parent),
    ui(new Ui::MainWindow)
{
    ui->setupUi(this);

    timer=new QTimer(this);
    connect(timer,SIGNAL(timeout()),this,SLOT(ReadFrame()));
}

MainWindow::~MainWindow()
{
    delete ui;
}
void MainWindow::ReadFrame()
{
    capture>>frame;
    // 将抓取到的帧,转换为QImage格式。QImage::Format_RGB888不同的摄像头用不同的格式。
    QImage image((const uchar*)frame.data, frame.cols, frame.rows, QImage::Format_RGB888);
    ui->label->setPixmap(QPixmap::fromImage(image));  // 将图片显示到label上
}
/*
 * 打开摄像头
*/
void MainWindow::on_btnOpenCamera_clicked()
{
    capture.open(0);
    timer->start(25);              // 开始计时,超时则发出timeout()信号
}
/*
 * 关闭摄像头
*/
void MainWindow::on_btnCloseCamera_clicked()
{
    timer->stop();         // 停止读取数据。
    capture.release();//释放内存;
}
显示结果

完整代码
百度网盘:https://pan.baidu.com/s/1kCK2eMtY4LKkA_jlzFkIkQ
提取码:9bb7