版权声明:本文为博主原创文章,可以自由转载。 https://blog.csdn.net/u010953692/article/details/83995871
Image 图像 二值化
1,遍历所有像素
0 黑色
255 白色
设置阀值为127,大于阀值的白色
#! /usr/local/bin/python3
# coding:utf-8
from PIL import Image
import pytesseract
"""
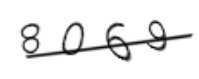
p1 = Image.open("/root/8069.jpg")
text = pytesseract.image_to_string(p1)
print (text)
"""
img = Image.open("/root/8096002.jpg")
#img.show()
# 图像转换为灰度
img = img.convert("L")
img.show()
#load() 读取像素
pixdata = img.load()
w ,h = img.size
for y in range(h):
for x in range(w):
if pixdata[x,y] < 127:
pixdata[x,y] = 0
else:
pixdata[x,y] = 255
img.show()
- 原图
- 二值化图

参考: