基于Python3.6,记录一点Image和OpenCV读取图片时的使用心得。不足之处欢迎交流学习。
- Image读取图片默认是以RGB模式读取;而OpenCV是默认以BGR读取。混合使用时,记得转换。
- Image里img.size结果是宽高,OpenCV里img.shape是行列。
- OpenCV里cv2.imshow(’ ',img)显示图片与不同数据类型的numpy.ndarray有关。当Image转换为cv2后,cv2.imshow()可能会出现问题。
我的解决办法是打印出cv2里具体像素值,并根据cv2.imshow()针对不同数据类型的numpy.ndarray内置的不同处理方法,进行相应的对策。点击这里是我的另一篇博客分析cv2.imshow()与numpy.ndarray数据类型的关系。
这里以RGB模式新建一个测试图片,更好的来说明。
创建RGB演示图片
import cv2
from PIL import Image
import numpy as np

# RGB格式
red, green, blue, yellow = (255, 0, 0), (0, 255, 0), (0, 0, 255), (255, 255, 0)

height, width= 100, 200
arr = np.zeros((height, width, 3), dtype='uint8')
for i in range(0, int(height/2)):
    for j in range(0, int(width/2)):
        arr[i, j, :] = np.array(red)
    for j in range(int(width/2), width):
        arr[i, j, :] = np.array(green)

for i in range(int(height/2), height):
    for j in range(0, int(width/2)):
        arr[i, j, :] = np.array(blue)
    for j in range(int(width/2), width):
        arr[i, j, :] = np.array(yellow)

print(f'type(arr)={type(arr)}, arr.dtype={arr.dtype}, arr.shape={arr.shape}')
# type(arr)=<class 'numpy.ndarray'>, arr.dtype=uint8, arr.shape=(100, 200, 3)
arr = cv2.cvtColor(arr, cv2.COLOR_BGR2RGB) # 将cv2的默认BGR模式转换为RGB模式保存图片
cv2.imwrite('./RGB.png', arr)
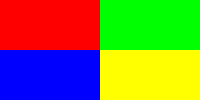
创建图片如下,从左到右,从上到下,颜色依次为红、绿、蓝、黄。
使用各自包单独读取
使用OpenCV读取
path = './RGB.png'
img_cv = cv2.imread(path)

print(f'type(img_cv)={type(img_cv)}\n'
    f'img_cv.dtype={img_cv.dtype}\n'
    f'img_cv.shape={img_cv.shape}')
print(img_cv[0, 0])
'''
type(img_cv)=<class 'numpy.ndarray'>
img_cv.dtype=uint8
img_cv.shape=(100, 200, 3)
[  0   0 255]
'''

cv2.imshow('img_cv', img_cv)
cv2.waitKey(0)
cv2.destroyAllWindows()
使用PIL.Image读取
path = './RGB.png'
img_pil = Image.open(path)

print(type(img_pil))
print(f'img_pil.size = {img_pil.size}\n'
    f'img_pil.width = {img_pil.width}\n'
    f'img_pil.height = {img_pil.height}')
print(img_pil.getpixel((0, 0))) # (255, 0, 0)
'''
<class 'PIL.PngImagePlugin.PngImageFile'>
img_pil.size = (200, 100)
img_pil.width = 200
img_pil.height = 100
(255, 0, 0)
'''

img_pil.show()
cv2 转 Image
正确转法
path = './RGB.png'
img_cv = cv2.imread(path)
# 将BGR模式转换为RGB模式
img_cv2pil = Image.fromarray(cv2.cvtColor(img_cv, cv2.COLOR_BGR2RGB))
print(img_cv2pil.getpixel((0, 0))) # (255, 0, 0)
img_cv2pil.show()
错误转法
path = './RGB.png'
img_cv = cv2.imread(path)
img_cv2pil = Image.fromarray(img_cv)
print(img_cv2pil.getpixel((0, 0))) # (0, 0, 255)
img_cv2pil.show()
这时show()的图片如下,发现显示的颜色模式变为BGR。
一定要注意读取和显示的颜色模式变化。(255, 0, 0)在Image默认的RGB模式里是红色,而在cv2默认的BGR模式里是蓝色。

Image 转 cv2
正确转法
path = './RGB.png'
img_pil = Image.open(path)
print(type(img_pil)) # <class 'PIL.PngImagePlugin.PngImageFile'>

# 转换
img_pil2cv = np.array(img_pil)
print(f'type(img_pil2cv)={type(img_pil2cv)}\n'
      f'img_pil2cv.dtype={img_pil2cv.dtype}\n'
      f'img_pil2cv.shape={img_pil2cv.shape}')
'''
type(img_pil2cv)=<class 'numpy.ndarray'>
img_pil2cv.dtype=uint8
img_pil2cv.shape=(100, 200, 3)
'''
img_pil2cv = cv2.cvtColor(img_pil2cv, cv2.COLOR_RGB2BGR)

print(img_pil2cv[0, 0]) # [  0   0 255]
cv2.imshow('img_pil2cv', img_pil2cv)
cv2.waitKey(0)
cv2.destroyAllWindows()
总结
单独使用时没有影响,但混合使用要注意。
Image => OpenCV,转完类型后要cv2.COLOR_RGB2BGR;
OpenCV => Image,要先转换模式cv2.COLOR_BGR2RGB,再转换到Image类型。
- 参考资料 https://blog.csdn.net/JohinieLi/article/details/81012572
