SpringBoot整合SpringSecurity
配置环境
配置idea
我使用的是idea,点击New Project
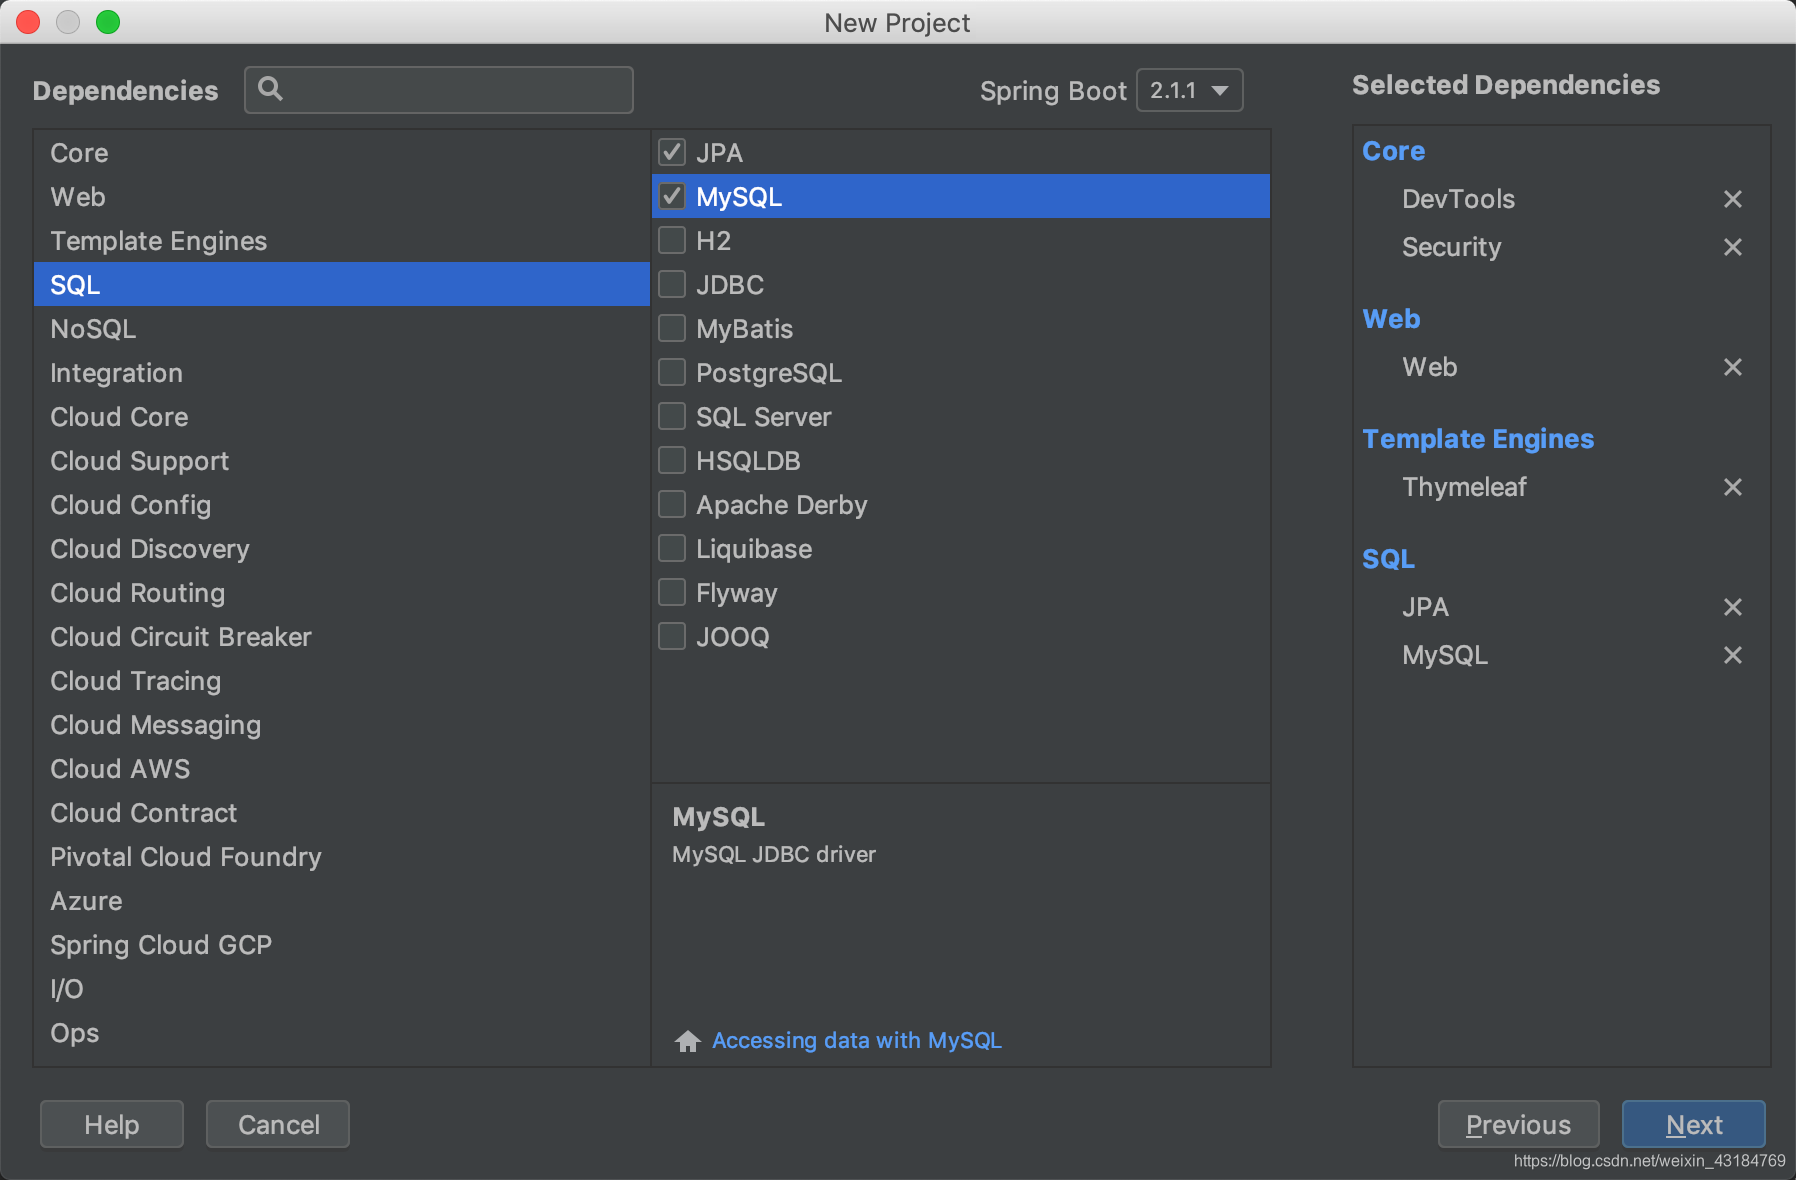
 点击next项目信息配置随意,再下一步选上下图所示的组件
配置thymeleaf
在pom.xml中加入
<dependency>
            <groupId>net.sourceforge.nekohtml</groupId>
            <artifactId>nekohtml</artifactId>
            <version>1.9.22</version>
 </dependency>
在application.yml中加入
spring:
	thymeleaf:
    	suffix: .html
    	cache: false
    	//设置为传统模式,防止因为严格的语法检测遇到的各种麻烦,例如<html />后习惯不会去加斜杠就会被当做错误检测
    	mode: LEGACYHTML5
配置传统检测模式需要额外导入上述的dependency并配合配置文件
配置JPA
在application.yml中加入
spring:

  datasource:
    url: jdbc:mysql://localhost:3306/springsecurity
    driver-class-name: com.mysql.jdbc.Driver
    username: root
    password: root

  jpa:
    show-sql: true
    //由于jpa默认将驼峰命名的entity转化为带下划线的名称去匹配数据库中的表名,而我在数据库中也是使用驼峰命名,所以需要下入下列的配置
    hibernate:
      naming:
        physical-strategy: org.hibernate.boot.model.naming.PhysicalNamingStrategyStandardImpl
配置数据库
导入如下代码
DROP TABLE IF EXISTS `Sys_permission`;

CREATE TABLE `Sys_permission` (
  `id` int(11) unsigned NOT NULL AUTO_INCREMENT,
  `name` varchar(200) DEFAULT NULL,
  `description` varchar(200) DEFAULT NULL,
  `url` varchar(200) DEFAULT NULL,
  `pid` int(11) DEFAULT NULL,
  PRIMARY KEY (`id`)
) ENGINE=InnoDB DEFAULT CHARSET=utf8;

LOCK TABLES `Sys_permission` WRITE;
/*!40000 ALTER TABLE `Sys_permission` DISABLE KEYS */;

INSERT INTO `Sys_permission` (`id`, `name`, `description`, `url`, `pid`)
VALUES
	(1,'ROLE_HOME','index','/',NULL),
	(2,'ROLE_ADMIN','admin','/admin',NULL),
	(3,'ROLE_USER','user','/user',NULL);

/*!40000 ALTER TABLE `Sys_permission` ENABLE KEYS */;
UNLOCK TABLES;


# Dump of table Sys_permission_role
# ------------------------------------------------------------

DROP TABLE IF EXISTS `Sys_permission_role`;

CREATE TABLE `Sys_permission_role` (
  `id` int(11) unsigned NOT NULL AUTO_INCREMENT,
  `role_id` int(11) unsigned NOT NULL,
  `permission_id` int(11) unsigned NOT NULL,
  PRIMARY KEY (`id`),
  KEY `role2` (`role_id`),
  KEY `permission` (`permission_id`),
  CONSTRAINT `permission` FOREIGN KEY (`permission_id`) REFERENCES `Sys_permission` (`id`),
  CONSTRAINT `role2` FOREIGN KEY (`role_id`) REFERENCES `Sys_Role` (`id`)
) ENGINE=InnoDB DEFAULT CHARSET=utf8;

LOCK TABLES `Sys_permission_role` WRITE;
/*!40000 ALTER TABLE `Sys_permission_role` DISABLE KEYS */;

INSERT INTO `Sys_permission_role` (`id`, `role_id`, `permission_id`)
VALUES
	(10,2,1),
	(11,2,3),
	(12,3,1),
	(13,3,2),
	(15,2,2);

/*!40000 ALTER TABLE `Sys_permission_role` ENABLE KEYS */;
UNLOCK TABLES;


# Dump of table Sys_Role
# ------------------------------------------------------------

DROP TABLE IF EXISTS `Sys_Role`;

CREATE TABLE `Sys_Role` (
  `id` int(11) unsigned NOT NULL AUTO_INCREMENT,
  `name` varchar(200) DEFAULT NULL,
  PRIMARY KEY (`id`)
) ENGINE=InnoDB DEFAULT CHARSET=utf8;

LOCK TABLES `Sys_Role` WRITE;
/*!40000 ALTER TABLE `Sys_Role` DISABLE KEYS */;

INSERT INTO `Sys_Role` (`id`, `name`)
VALUES
	(2,'ROLE_USER'),
	(3,'ROLE_ADMIN');

/*!40000 ALTER TABLE `Sys_Role` ENABLE KEYS */;
UNLOCK TABLES;


# Dump of table Sys_Role_User
# ------------------------------------------------------------

DROP TABLE IF EXISTS `Sys_Role_User`;

CREATE TABLE `Sys_Role_User` (
  `id` int(11) unsigned NOT NULL AUTO_INCREMENT,
  `Sys_User_id` int(11) unsigned NOT NULL,
  `Sys_Role_id` int(11) unsigned NOT NULL,
  PRIMARY KEY (`id`),
  KEY `user` (`Sys_User_id`),
  KEY `role` (`Sys_Role_id`),
  CONSTRAINT `role` FOREIGN KEY (`Sys_Role_id`) REFERENCES `Sys_Role` (`id`),
  CONSTRAINT `user` FOREIGN KEY (`Sys_User_id`) REFERENCES `Sys_User` (`id`)
) ENGINE=InnoDB DEFAULT CHARSET=utf8;

LOCK TABLES `Sys_Role_User` WRITE;
/*!40000 ALTER TABLE `Sys_Role_User` DISABLE KEYS */;

INSERT INTO `Sys_Role_User` (`id`, `Sys_User_id`, `Sys_Role_id`)
VALUES
	(6,1,3),
	(7,2,2);

/*!40000 ALTER TABLE `Sys_Role_User` ENABLE KEYS */;
UNLOCK TABLES;


# Dump of table Sys_User
# ------------------------------------------------------------

DROP TABLE IF EXISTS `Sys_User`;

CREATE TABLE `Sys_User` (
  `id` int(11) unsigned NOT NULL AUTO_INCREMENT,
  `username` varchar(200) DEFAULT NULL,
  `password` varchar(200) DEFAULT NULL,
  PRIMARY KEY (`id`)
) ENGINE=InnoDB DEFAULT CHARSET=utf8;

LOCK TABLES `Sys_User` WRITE;
/*!40000 ALTER TABLE `Sys_User` DISABLE KEYS */;

INSERT INTO `Sys_User` (`id`, `username`, `password`)
VALUES
	(1,'admin','6d789d4353c72e4f625d21c6b7ac2982'),
	(2,'user','36f1cab655c5252fc4f163a1409500b8');

/*!40000 ALTER TABLE `Sys_User` ENABLE KEYS */;
UNLOCK TABLES;
最后会生成5个表,分别是用户表,角色表,权限表,用户角色中间表,角色权限中间表。
配置包目录
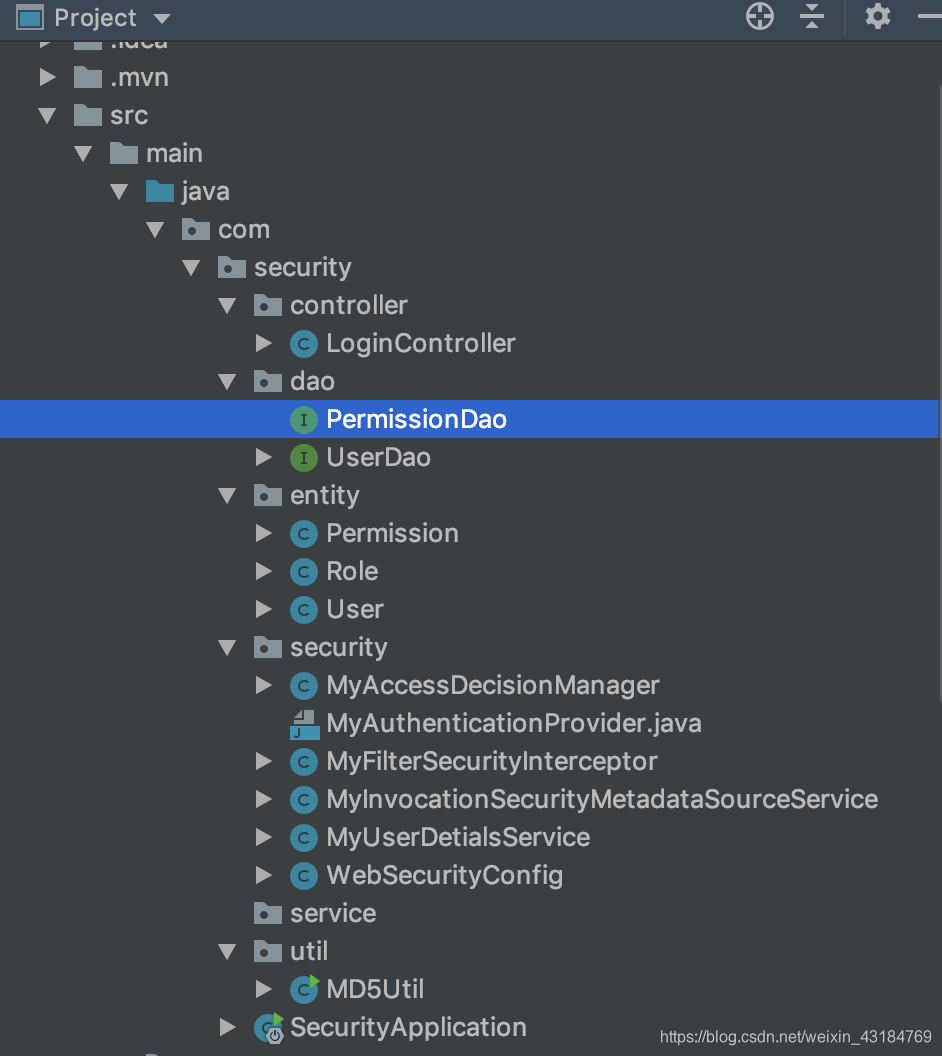
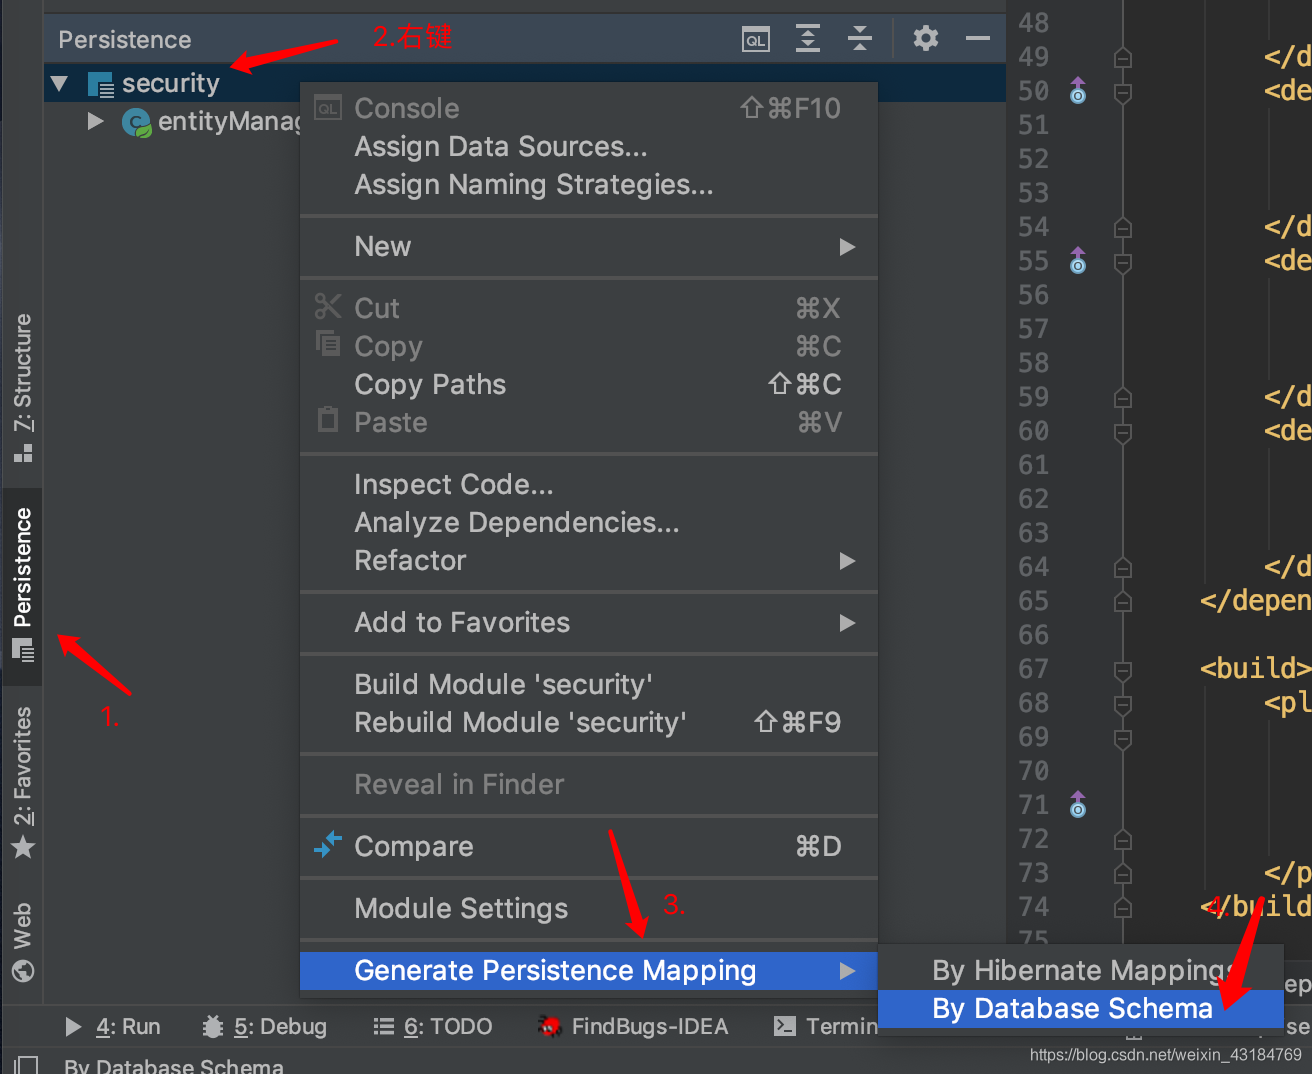
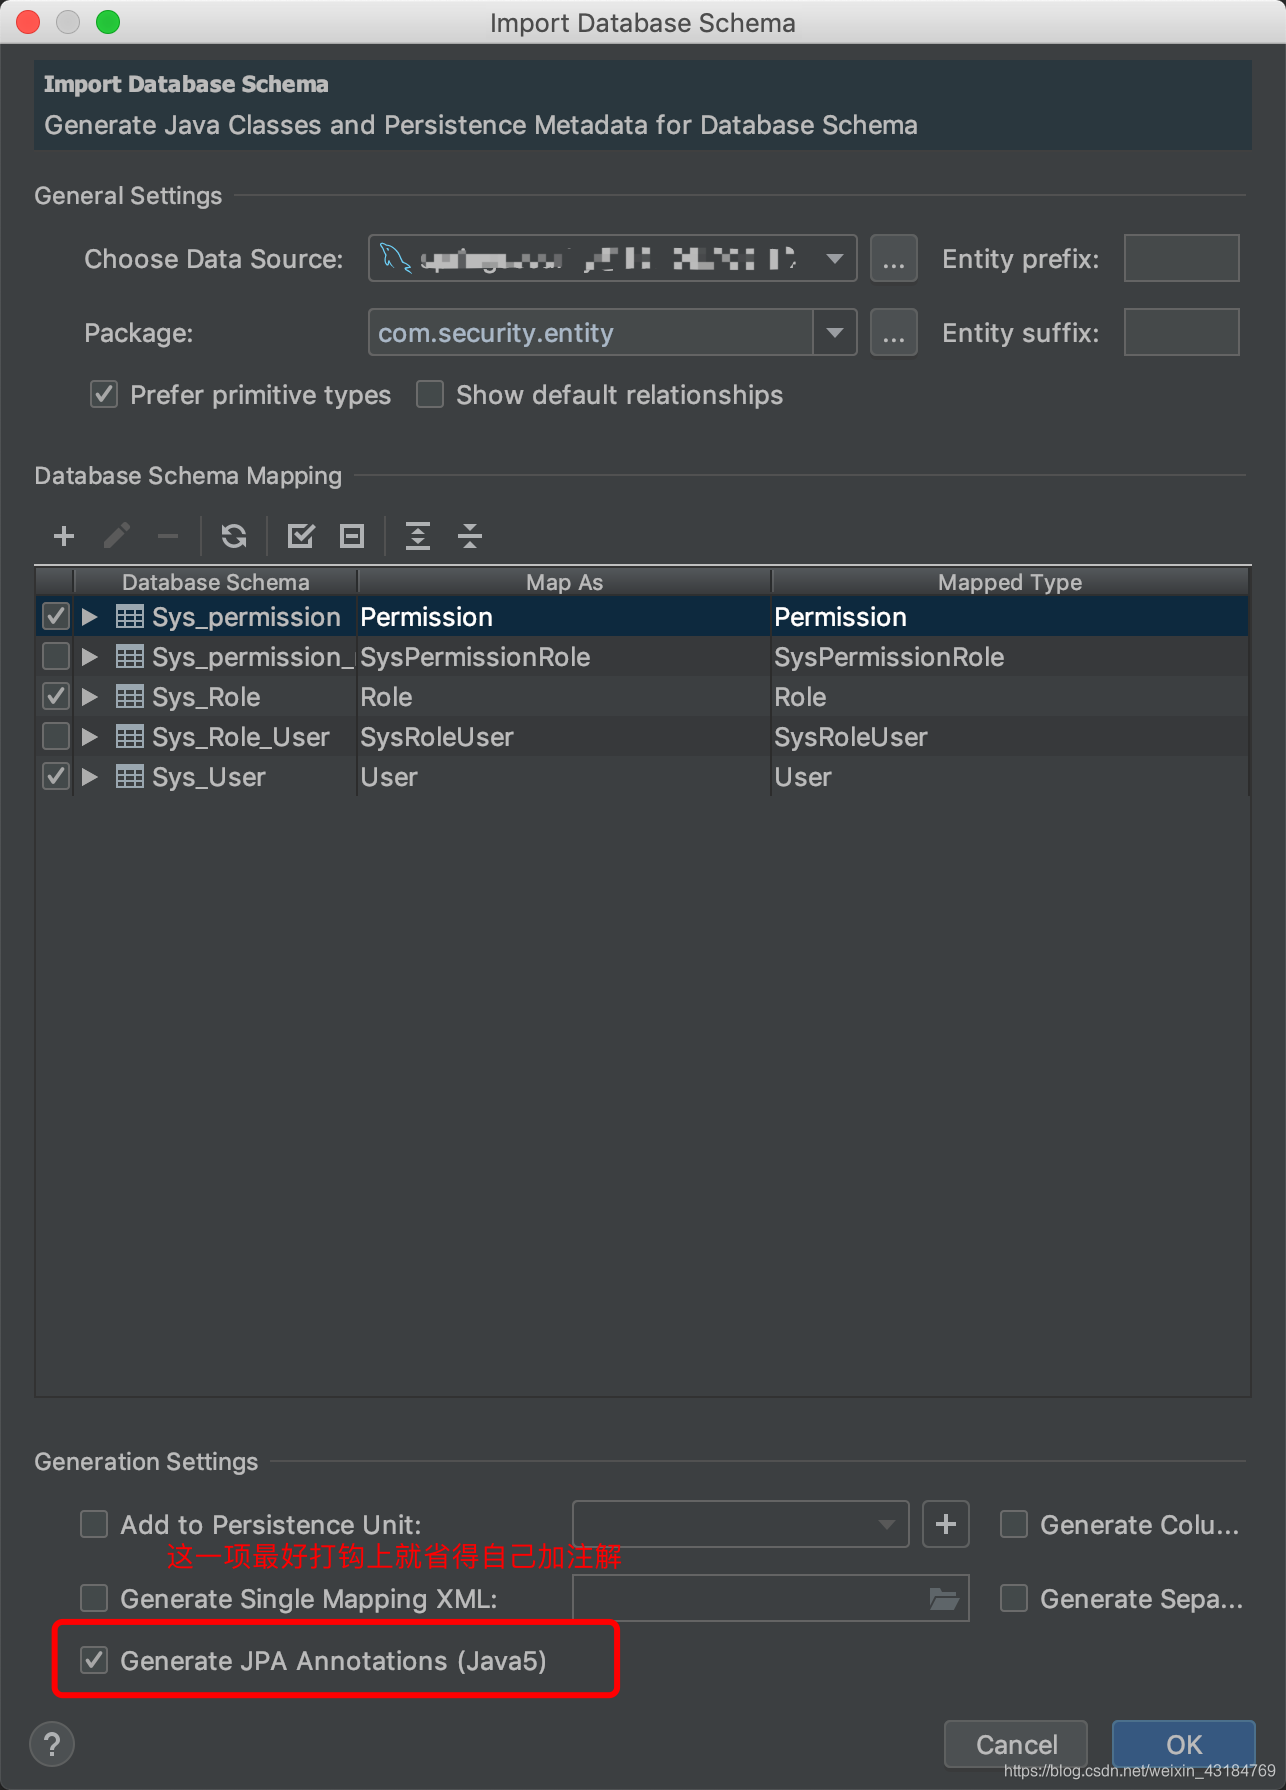
其中entity可以用idea进行生成,
配置dao层
需要新建UserDao和PermissionDao两个类
/**
* UserDao
*/
@Repository
public interface UserDao extends JpaRepository<User,Integer> {
    //自定义一个根据姓名查找用户的方法
    public User findByUsername(String userName);
}


/**
* PermissionDao
* 无需自定义方法,直接使用jpa封装好的就可以
*/
public interface PermissionDao extends JpaRepository<Permission,Integer> {
}
配置Entity关系
在本demo中需要配置两个关系,分别是用户与角色的多对多关系,角色和权限的多对多关系。
在User类中加入:
private List<Role> roles = new ArrayList<>();
/**
     * @ManyToMany 表示多对多关系,fetch = FetchType.EAGER配置懒加载策略为立即加载,因为多对多涉及到树形结构的第二层,
     * 使用懒加载会在使用roles对象时才去数据库查询,但是在本项目中会出现no session,暂时无法解决,所以加上次配置
     *
     * @JoinTable  name:中间表名, @joinColumn : name:在中间表中对应外键名,referencedColumnName在原先表中的主键名
     *
     * inverseJoinColumns中的@joinColumn : name:多的另一方在中间表中对应的主键名,referencedColumnName在原先表中的主键名
     *
     * 此处的配置表明user和role的多对多关系由user维护
     */
    @ManyToMany(fetch = FetchType.EAGER)
    @JoinTable(name = "Sys_Role_User", joinColumns = {@JoinColumn(name = "Sys_User_id", referencedColumnName = "id")},
            inverseJoinColumns = {@JoinColumn(name = "Sys_Role_id", referencedColumnName = "id")})
    public List<Role> getRoles() {
        return roles;
    }

    public void setRoles(List<Role> roles) {
        this.roles = roles;
    }
在Role中加入:
private List<User> users = new ArrayList<>();
//mappedBy:映射的名字为user中role集合的名字
 @ManyToMany(mappedBy = "roles")
    public List<User> getUsers() {
        return users;
    }

    public void setUsers(List<User> users) {
        this.users = users;
    }
Permission和Role的多对多映射也是如此,就不贴出来了。
简单的环境搭建就到此结束了,一切从简所以没有配置连接池。
SpringSecurity配置
我们先做个简单的尝试,在配置好以上步骤后,在template中加入一个名为index的页面
<!DOCTYPE html>
<html lang="en">
<head>
    <meta charset="UTF-8">
    <title>Title</title>
</head>
<body>

<h1>登录成功</h1>

<h2><a href="/logout">退出</a></h2>
</body>
</html>
并创建一个LoginController,在controller中设置映射路径为/index。
我们启动项目,在地址栏中输入localhost:8080/index,你会发现自动跳转到了一个登陆界面,我们完全没有写过 登陆界面,所以这个是springsecurity自带的一个登录页,登陆的用户名为user,密码是输出在console中的uuid字符串。
 登陆以后就可以访问Index页面了。在我们配置Security之前,它默认拦截所有页面并会自动生成一个登陆的账号密码,但这显然不是我们想要的样子。下面我们对它进行改造。
配置拦截策略
首先我们在security包下创建一个类,名字为WebSecurityConfig,继承WebSecurityConfigurerAdapter
//这两个注解缺一不可
@Configuration
@EnableWebSecurity
public class WebSecurityConfig extends WebSecurityConfigurerAdapter {
    //重写参数为HttpSecurity的configure方法,配置拦截策略
    @Override
    protected void configure(HttpSecurity http) throws Exception {
        http
        		//自定义登陆页面
                .formLogin().loginPage("/login")
                	//登陆成功后跳转的页面
                .defaultSuccessUrl("/index")
                	//登陆失败或无权限跳转页面
                .failureUrl("/login-error")
                .permitAll()
                	//其他所有页面必须验证后才可以访问
                .and().authorizeRequests().anyRequest().authenticated()
                //不加上不验证。不知道为什么
                .and().csrf().disable();

    }

}
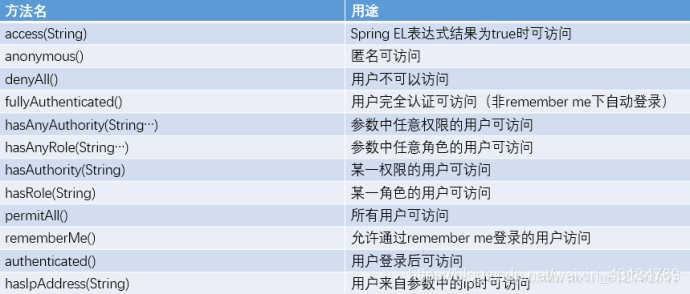
引用网上的图片
 顺带创建两个HTML
login.html

<form  class="form-signin" action="/login" method="post">
    <h2 class="form-signin-heading">用户登录</h2>
    <table>
        <tr>
            <td>用户名:</td>
            <td><input type="text" name="username"  class="form-control"  placeholder="请输入用户名"/></td>
        </tr>
        <tr>
            <td>密码:</td>
            <td><input type="password" name="password"  class="form-control" placeholder="请输入密码" /></td>
        </tr>
        <tr>

            <td colspan="2">
                <button type="submit"  class="btn btn-lg btn-primary btn-block" >登录</button>
            </td>
        </tr>
    </table>
</form>
error.html

<h1>error</h1>
此时再运行项目,输入localhost:8080/跳转到的页面就是我们刚才写好的页面了,随便输入账号密码点击登录的报错页面也是刚刚添加的error页面。
自定义登陆账号验证
实际开发中我们需要在数据库中存储用户的账号密码信息,所以我们需要自定义验证方式。
在security文件夹中创建MyUserDetialsService类 实现UserDetailsService接口
@Service
public class MyUserDetialsService implements UserDetailsService {

    @Autowired
    UserDao userDao;

    @Override
    public UserDetails loadUserByUsername(String userName) throws UsernameNotFoundException {
        //此处的user是entity包中的user
        com.security.entity.User user = userDao.findByUsername(userName);
        if (user != null) {
            List<GrantedAuthority> grantedAuthorities = new ArrayList<>();
            //获取用户的角色集合
            List<Role> roles = user.getRoles();
            //遍历角色集合,并获取每个角色拥有的权限
            for (Role role : roles) {
                List<Permission> permissions = role.getPermissions();
                for (Permission permission :permissions) {
                    //为每个授权中心对象写入权限名
                    grantedAuthorities.add(new SimpleGrantedAuthority(permission.getName()));
                }
            }
            /**此处的user是springsecurity中的一个实现了UserDetails接口的user类,因为我们没有将entity中的user去实现
             * UserDetails接口,所以只能在此处调用实现好的构造方法
             */
            return new User(user.getUsername(), user.getPassword(), grantedAuthorities);
        }
        return null;
    }
}
此处我们的密码使用MD5配合加密盐进行加密,所以需要在utils包中创建MD5Utils类
public class MD5Util {

    private static final String SALT = "tamboo";

    public static String encode(String password) {
        password = password + SALT;
        MessageDigest md5 = null;
        try {
            md5 = MessageDigest.getInstance("MD5");
        } catch (Exception e) {
            throw new RuntimeException(e);
        }
        char[] charArray = password.toCharArray();
        byte[] byteArray = new byte[charArray.length];

        for (int i = 0; i < charArray.length; i++)
            byteArray[i] = (byte) charArray[i];
        byte[] md5Bytes = md5.digest(byteArray);
        StringBuffer hexValue = new StringBuffer();
        for (int i = 0; i < md5Bytes.length; i++) {
            int val = ((int) md5Bytes[i]) & 0xff;
            if (val < 16) {
                hexValue.append("0");
            }
            hexValue.append(Integer.toHexString(val));
        }
        return hexValue.toString();
    }
}
在先前创建好的WebSecurityConfig中加入如下配置:
//注入我们刚才写好的service类
@Autowired
    MyUserDetialsService userService;

    //配置加密
    @Override
    protected void configure(AuthenticationManagerBuilder auth) throws Exception {
        auth.userDetailsService(userService).passwordEncoder(new PasswordEncoder() {
            //加密
            @Override
            public String encode(CharSequence rawPassword) {
                return MD5Util.encode((String) rawPassword);
            }

            //解密,前者是输入的密码,后者是数据库查询的密码
            @Override
            public boolean matches(CharSequence rawPassword, String encodedPassword) {
                return encodedPassword.equals(MD5Util.encode((String) rawPassword));
            }
        });
    }
实际上我们刚才写的代码中并没有对密码进行验证,SpringSecurity中已经在内部写好了验证代码,我们只需要将查询到的user对象转换为UserDetail对象返回给框架即可。此时再次运行demo登陆的账号密码就可以使用数据库中自定义的了,我目前设置的默认账号密码为admin:admin,user:user。
配置自定义权限验证
在security包下创建MyInvocationSecurityMetadataSourceService实现FilterInvocationSecurityMetadataSource接口。该类用于加载权限表中的url信息,并和request的url进行对比,有匹配则将该URL所需要的权限返回给decide()方法,不存在则返回空
@Service
public class MyInvocationSecurityMetadataSourceService implements FilterInvocationSecurityMetadataSource {

    @Autowired
    private PermissionDao permissionDao;

    private HashMap<String, Collection<ConfigAttribute>> map = null;

    //在demo启动第一个用户登陆后,加载所有权限进map
    public void loadResourceDefine() {
        map = new HashMap<>();
        Collection<ConfigAttribute> array;
        ConfigAttribute cfg;
        List<Permission> permissions = permissionDao.findAll();
        for (Permission permission : permissions) {
            array = new ArrayList<>();
            //此处只添加了用户的名字,其实还可以添加更多权限的信息,例如请求方法到ConfigAttribute的集合中去。此处添加的信息将会作为MyAccessDecisionManager类的decide的第三个参数。
            cfg = new SecurityConfig(permission.getName());
            array.add(cfg);
            //用权限的getUrl() 作为map的key,用ConfigAttribute的集合作为 value
            map.put(permission.getUrl(), array);
        }
    }

    @Override
    public Collection<ConfigAttribute> getAttributes(Object object) throws IllegalArgumentException {
        if(map ==null) {
            loadResourceDefine();
        }
        HttpServletRequest request = ((FilterInvocation) object).getHttpRequest();
        AntPathRequestMatcher matcher;
        //遍历权限表中的url
        for (String url : map.keySet()) {
            matcher = new AntPathRequestMatcher(url);
            //与request对比,符合则说明权限表中有该请求的URL
            if(matcher.matches(request)) {
                return map.get(url);
            }
        }
        return null;
    }

    @Override
    public Collection<ConfigAttribute> getAllConfigAttributes() {
        return null;
    }

    @Override
    public boolean supports(Class<?> aClass) {
        return true;
    }
}
接着在security下新建MyAccessDecisionManager类实现AccessDecisionManager接口。该类为决策类,决策该用户的request是否有权限访问。
@Service
public class MyAccessDecisionManager implements AccessDecisionManager {

    /**
     * @param authentication UserService中循环添加到GrantedAuthority中的权限信息集合
     * @param object         包含客户端发起的请求的request信息,可以转换为HTTPRequest
     * @param collection     url所需的权限集合
     * @throws AccessDeniedException
     * @throws InsufficientAuthenticationException
     */
    @Override
    public void decide(Authentication authentication, Object object, Collection<ConfigAttribute> collection) throws AccessDeniedException, InsufficientAuthenticationException {
        //判断URL所需的权限集合是否为空,为空则放行
        if (null == collection || collection.size() <= 0) {
            return;
        }
        String needPermission;
        for (ConfigAttribute c : collection) {
            //获得所需的权限
            needPermission = c.getAttribute();
            //遍历用户拥有的权限与URL所需的权限进行对比
            for (GrantedAuthority ga : authentication.getAuthorities()) {
                if (needPermission.trim().equals(ga.getAuthority())){
                    return;
                }
            }
        }
        throw new AccessDeniedException("no permission");
    }

    @Override
    public boolean supports(ConfigAttribute configAttribute) {
        return true;
    }

    @Override
    public boolean supports(Class<?> aClass) {
        return true;
    }
}
最后在security包下创建MyFilterSecurityInterceptor类
@Service
public class MyFilterSecurityInterceptor extends AbstractSecurityInterceptor implements Filter {


    @Autowired
    private FilterInvocationSecurityMetadataSource securityMetadataSource;

    //设置决策器
    @Autowired
    public void setMyAccessDecisionManager(MyAccessDecisionManager myAccessDecisionManager) {
        super.setAccessDecisionManager(myAccessDecisionManager);
    }


    @Override
    public void init(FilterConfig filterConfig) throws ServletException {

    }

    @Override
    public void doFilter(ServletRequest request, ServletResponse response, FilterChain chain) throws IOException, ServletException {

        FilterInvocation fi = new FilterInvocation(request, response, chain);
        invoke(fi);
    }


    public void invoke(FilterInvocation fi) throws IOException, ServletException {
//fi里面有一个被拦截的url
//里面调用MyInvocationSecurityMetadataSource的getAttributes(Object object)这个方法获取fi对应的所有权限
//再调用MyAccessDecisionManager的decide方法来校验用户的权限是否足够
        InterceptorStatusToken token = super.beforeInvocation(fi);
        try {
//执行下一个拦截器
            fi.getChain().doFilter(fi.getRequest(), fi.getResponse());
        } finally {
            super.afterInvocation(token, null);
        }
    }


    @Override
    public void destroy() {

    }

    @Override
    public Class<?> getSecureObjectClass() {
        return FilterInvocation.class;

    }

    //添加判断url所需的权限类
    @Override
    public SecurityMetadataSource obtainSecurityMetadataSource() {
        return this.securityMetadataSource;
    }
}
创建
admin.html
<p class="bg-info">Admin权限访问</p>
index2.html
<p>这是没录入数据库的url</p>
user.html
<p>User权限访问</p>
将这些页面加入controller映射。
数据库中设置的关系为:
| 用户 | 角色 | 权限 |
|---|---|---|
| admin | ROLE_USER,ROLE_ADMIN | ROLE_ADMIN,ROLE_HOME,ROLE_User |
| user | ROLE_USER | ROLE_HOME,ROLE_User |
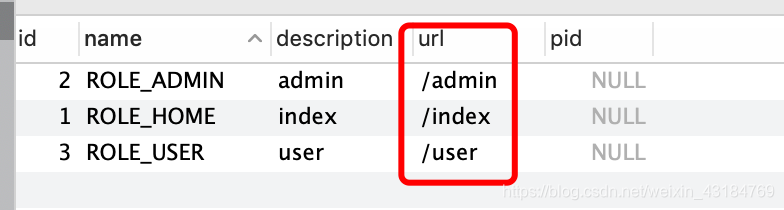 权限表中映射的URL如图。
运行demo
结果如下:
登陆admin账号,所有页面都可以访问
登陆user账号,除了/admin无权限访问,其他都可以访问。
/index2没有录入数据库,但是在任何用户登陆以后都可以访问。
源码地址:
https://gitee.com/king176/springbootdemo_source_code/tree/master