
上一章我们讲解了在springsecurity中的基础配置,现在我们再来看看springsecurity的基础架构
系列其它文章
springboot整合springsecurity从Hello World到源码解析(一):hello world程序入门
springboot整合springsecurity从Hello World到源码解析(二):springsecurity配置加载解析
springboot整合springsecurity从Hello World到源码解析(三):基础配置详解
springboot整合springsecurity从Hello World到源码解析(四):springsecurity基础架构解析
springboot整合springsecurity从Hello World到源码解析(五):springsecurity+jwt整合restful服务
Authentication and Access Control(认证和授权)
认证(authentication)和授权(authorization,有的叫Access Control)是所有权限控制框架所要考虑的两个问题,认证就是我们翻译过来就是 “你是谁”,我们可以理解为登录,而授权则是登陆过后明白自己
有哪些事情可以做,我们可以理解为 ”你可以做什么“,而在springsecurity将这两者完全分开,并且提供了不同的策略去定义它们。
Authentication(认证)
在springsecurity中,认证的主要策略接口是AuthenticationManager,嘿嘿,有没有想到我们上一章自定义DetailsService时configure方法就是它(应该说是它的 builder)
public interface AuthenticationManager {

  Authentication authenticate(Authentication authentication)
    throws AuthenticationException;

}
它通过authenticate主要可以做三件事情:
- 认证成功后返回一个Authentication对象。
- 丢出一个AuthenticationException异常,如果认证失败。
- 如果它决定不了,返回一个null。
而我们对于这个AuthenticationException,springsecurity建议不要自己去catch它,因为springsecurity会自己渲染一个权限错误的页面出来然后展示,并且加上一个WWW-Authenticate头。
AuthenticationManager的常用子类是ProviderManager,并且提供了更多的方法,主要成员变量如下:
public class ProviderManager implements AuthenticationManager, MessageSourceAware,
		InitializingBean {
	// ~ Static fields/initializers
	// =====================================================================================

	private static final Log logger = LogFactory.getLog(ProviderManager.class);

	// ~ Instance fields
	// ================================================================================================

	private AuthenticationEventPublisher eventPublisher = new NullEventPublisher();
	private List<AuthenticationProvider> providers = Collections.emptyList();
	protected MessageSourceAccessor messages = SpringSecurityMessageSource.getAccessor();
	private AuthenticationManager parent;
	private boolean eraseCredentialsAfterAuthentication = true;

	public ProviderManager(List<AuthenticationProvider> providers) {
		this(providers, null);
	}

	public ProviderManager(List<AuthenticationProvider> providers,
			AuthenticationManager parent) {
		Assert.notNull(providers, "providers list cannot be null");
		this.providers = providers;
		this.parent = parent;
		checkState();
	}
}
我们可以看出,它内部代理了一个 AuthenticationProvider链,而AuthenticationProvider如下:
public interface AuthenticationProvider {

	Authentication authenticate(Authentication authentication)
			throws AuthenticationException;

	boolean supports(Class<?> authentication);

}
和AuthenticationManager几乎一样,多了一个supports方法,这个方法的作用是用来指定哪些Authentication可以进行权限判断。所以如果我们能自定义Authentication,就要这里返回true了,另外
我们再来重点关注下ProviderManager实现的 authenticate方法:
public Authentication authenticate(Authentication authentication)
			throws AuthenticationException {
    Class<? extends Authentication> toTest = authentication.getClass();
    AuthenticationException lastException = null;
    Authentication result = null;
    Authentication parentResult = null;
    boolean debug = logger.isDebugEnabled();

    for (AuthenticationProvider provider : getProviders()) {
        if (!provider.supports(toTest)) {
            continue;
        }

        if (debug) {
            logger.debug("Authentication attempt using "
                    + provider.getClass().getName());
        }

        try {
            result = provider.authenticate(authentication);

            if (result != null) {
                copyDetails(authentication, result);
                break;
            }
        }
        catch (AccountStatusException e) {
            prepareException(e, authentication);
            // SEC-546: Avoid polling additional providers if auth failure is due to
            // invalid account status
            throw e;
        }
        catch (InternalAuthenticationServiceException e) {
            prepareException(e, authentication);
            throw e;
        }
        catch (AuthenticationException e) {
            lastException = e;
        }
    }

    if (result == null && parent != null) {
        // Allow the parent to try.
        try {
            result = parentResult = parent.authenticate(authentication);
        }
        catch (ProviderNotFoundException e) {
            // ignore as we will throw below if no other exception occurred prior to
            // calling parent and the parent
            // may throw ProviderNotFound even though a provider in the child already
            // handled the request
        }
        catch (AuthenticationException e) {
            lastException = e;
        }
    }

    if (result != null) {
        if (eraseCredentialsAfterAuthentication
                && (result instanceof CredentialsContainer)) {
            // Authentication is complete. Remove credentials and other secret data
            // from authentication
            ((CredentialsContainer) result).eraseCredentials();
        }

        // If the parent AuthenticationManager was attempted and successful than it will publish an AuthenticationSuccessEvent
        // This check prevents a duplicate AuthenticationSuccessEvent if the parent AuthenticationManager already published it
        if (parentResult == null) {
            eventPublisher.publishAuthenticationSuccess(result);
        }
        return result;
    }

    // Parent was null, or didn't authenticate (or throw an exception).

    if (lastException == null) {
        lastException = new ProviderNotFoundException(messages.getMessage(
                "ProviderManager.providerNotFound",
                new Object[] { toTest.getName() },
                "No AuthenticationProvider found for {0}"));
    }

    prepareException(lastException, authentication);

    throw lastException;
}
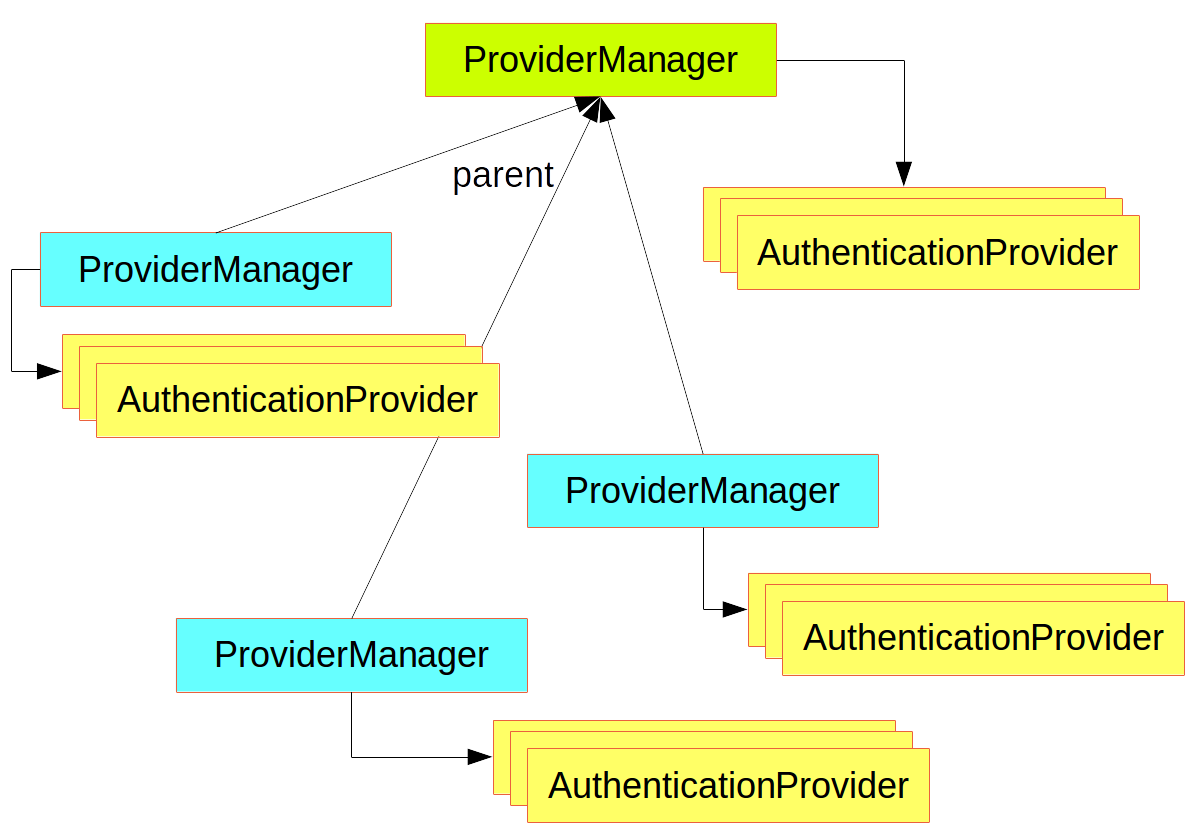
不难看出,就是经过 AuthenticationProvider链一个一个验证,如果一个没有通过,就验证失败,如果都决定不了,由其内部的parent(默认为null)在来决定一次。最后没有结果,就丢出异常。
这个内部的parent是用来定义不同资源的访问控制的公共行为的,所以结构图变成了如图:
说了这么多,那我们怎么自定义AuthenticationManager呢? 其实我们上一章已经演示了,继承 protected void configure(AuthenticationManagerBuilder auth)
或者通过@AutoWired注入也行,所以有了它,就可以”为所欲为了“,比如:
@Autowired
DataSource dataSource;

... // web stuff here

@Override
public configure(AuthenticationManagerBuilder builder) {
builder.jdbcAuthentication().dataSource(dataSource).withUser("jsbintask")
  .password("secret").roles("USER");
}
Authorization or Access Control(授权)
一旦某个实体通过了上面的认证阶段,接下来就该关心授权了!
授权的核心类是AccessDecisionManager,如下:
public interface AccessDecisionManager {
	void decide(Authentication authentication, Object object,
			Collection<ConfigAttribute> configAttributes) throws AccessDeniedException,
			InsufficientAuthenticationException;

	boolean supports(ConfigAttribute attribute);

	boolean supports(Class<?> clazz);
}
它有一个抽象继承类,并且三个主要实现类,如下:
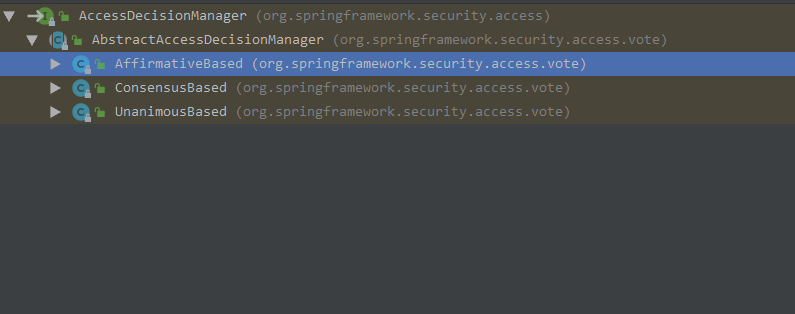
首先我们看下它的默认抽象实现类,AbstractAccessDecisionManager:
public abstract class AbstractAccessDecisionManager implements AccessDecisionManager,
		InitializingBean, MessageSourceAware {
	// ~ Instance fields
	// ================================================================================================
	protected final Log logger = LogFactory.getLog(getClass());

	private List<AccessDecisionVoter<? extends Object>> decisionVoters;

	protected MessageSourceAccessor messages = SpringSecurityMessageSource.getAccessor();

	private boolean allowIfAllAbstainDecisions = false;

	protected AbstractAccessDecisionManager(
			List<AccessDecisionVoter<? extends Object>> decisionVoters) {
		Assert.notEmpty(decisionVoters, "A list of AccessDecisionVoters is required");
		this.decisionVoters = decisionVoters;
	}
}
是不是相似的感觉,它内部有一个 AccessDecisionVoter 链,和上面的ProviderManager一个套路,这个AccessDecisionVoter我们就叫投票器,如下:
public interface AccessDecisionVoter<S> {
	int ACCESS_GRANTED = 1;
	int ACCESS_ABSTAIN = 0;
	int ACCESS_DENIED = -1;


	boolean supports(ConfigAttribute attribute);

	boolean supports(Class<?> clazz);

	int vote(Authentication authentication, S object,
			Collection<ConfigAttribute> attributes);
}
果然,同一个框架,同一个套路,它又和核心授权AccessDecisionManager接口长得几乎一毛一样,那我们再来重点看下decide方法,但是他在抽象类中没有实现,还有三个子类(上图),
通过debug我们知道(不演示了,哈哈),默认实现是AffirmativeBased,它实现的方法如下:
public void decide(Authentication authentication, Object object,
			Collection<ConfigAttribute> configAttributes) throws AccessDeniedException {
    int deny = 0;

    for (AccessDecisionVoter voter : getDecisionVoters()) {
        int result = voter.vote(authentication, object, configAttributes);

        if (logger.isDebugEnabled()) {
            logger.debug("Voter: " + voter + ", returned: " + result);
        }

        switch (result) {
        case AccessDecisionVoter.ACCESS_GRANTED:
            return;

        case AccessDecisionVoter.ACCESS_DENIED:
            deny++;

            break;

        default:
            break;
        }
    }

    if (deny > 0) {
        throw new AccessDeniedException(messages.getMessage(
                "AbstractAccessDecisionManager.accessDenied", "Access is denied"));
    }

    // To get this far, every AccessDecisionVoter abstained
    checkAllowIfAllAbstainDecisions();
}
熟悉的味道,和上面认证一样,它也通过 AccessDecisionVoter来施行一票否决权,一个投票人反对,就丢出异常。
然后我们看下投票器投票的方法参数:
int vote(Authentication authentication, S object, Collection<ConfigAttribute> attributes);
authentication不用说,在系统就是用户的标识,object则是代表你要访问的资源,比如方法,类,文件等等,attributes则是访问该资源需要的标识(有点晦涩),
打个比方,如果访问UserController需要又User身份,那这个attributes则是代表 user,它是一个字符串,然后去查找authentication是否有改字符串,有的话投票通过,没有丢出异常。
例如 hasRole(‘user’)代表的标识即是 ROLE_USER,。 以上就是认证和授权的核心代码解析了,接下来我们看看web环境中的过滤器链。
Web Security
首先看图,在servlet容器中,过滤器和servlet的关系如下:
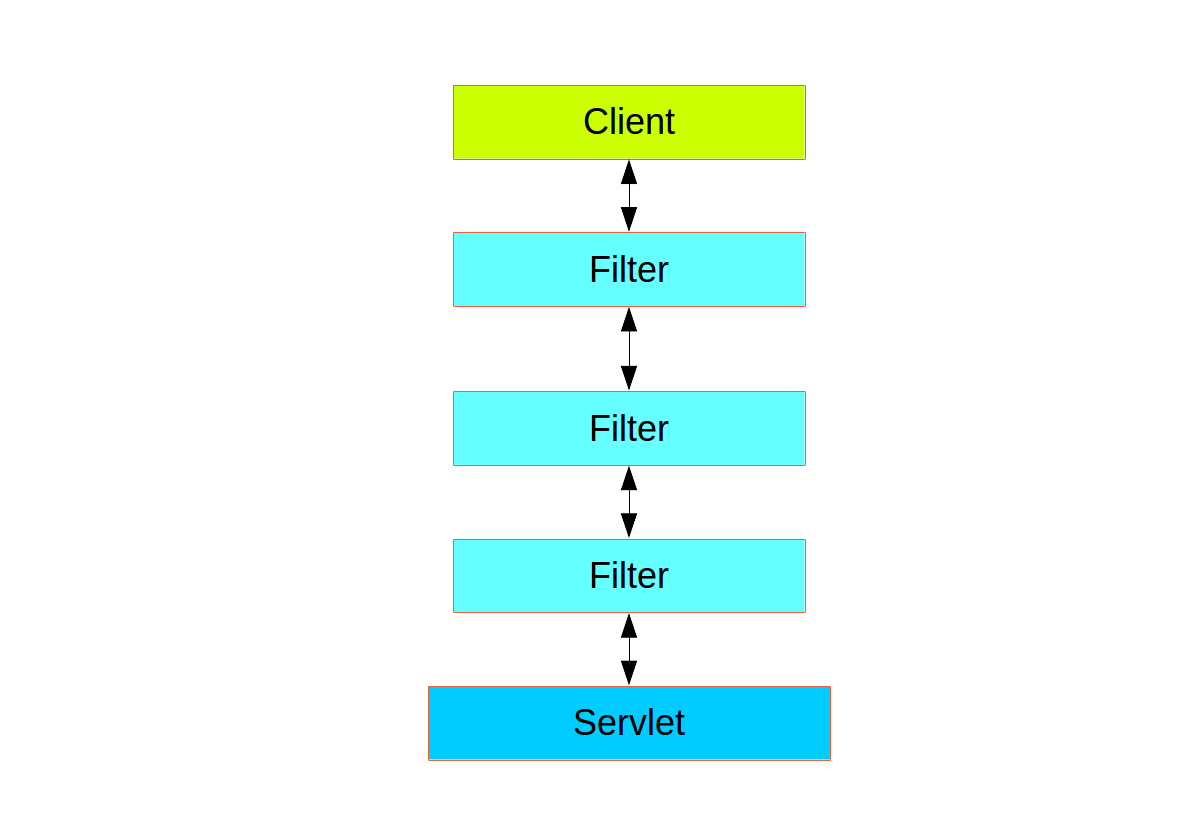
一个http请求最多可由一个servlet处理,但是filter可以有多个,所以filter肯定是有顺序的,因为在filter中是可以处理request的,所以这个时候顺序就显得很重要
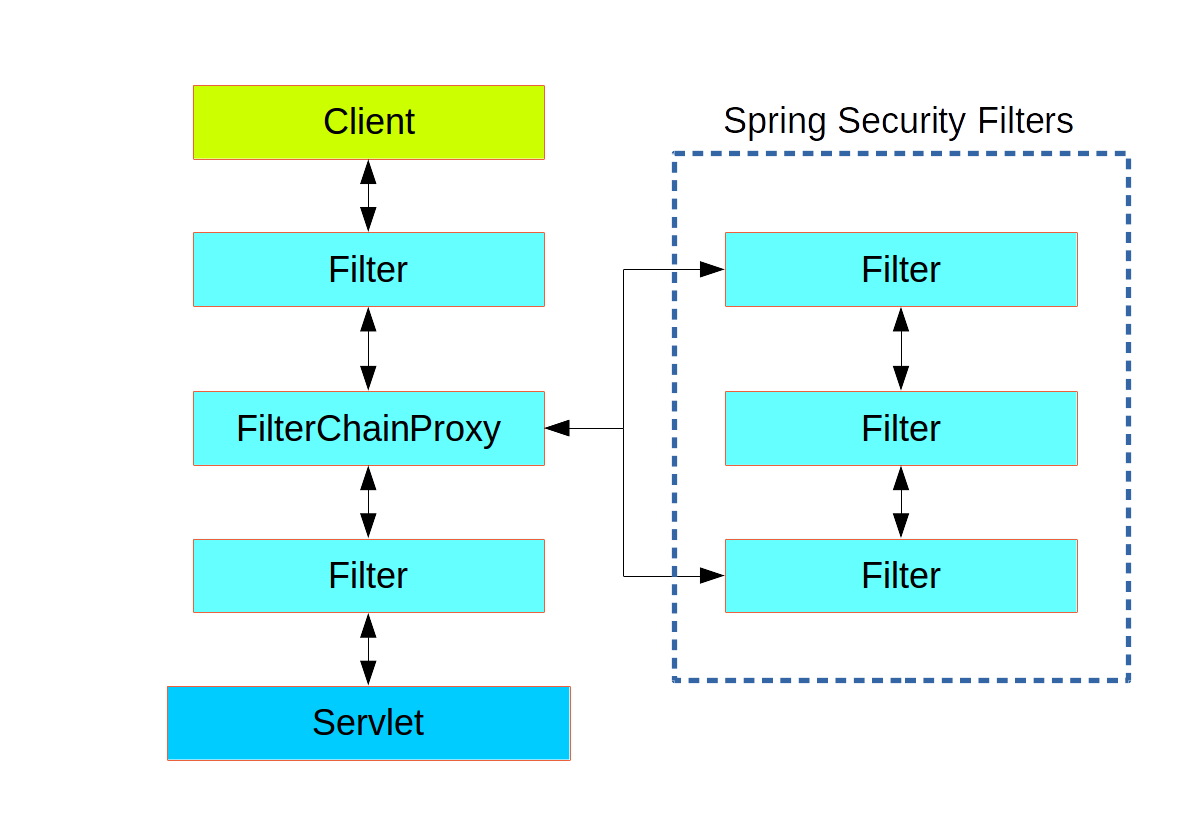
第二章我们已经知道,springsecurity的过滤器链是由一个FilterChainProxy代理,它作为入口,然后进入过滤器链,而这个入口过滤器的装载顺序如下:

SecurityProperties.DEFAULT_FILTER_ORDER,这个值是比较小的,也就是说它基本就是最后访问的filter了(当然,这只是springboot默认这么做了),最后filter链的结构如下:
事实上,入口的FilterChainProxy 的可以代理多个过滤器链,所以对于不同的url,springsecurity可以创建不同的过滤器链,如下:
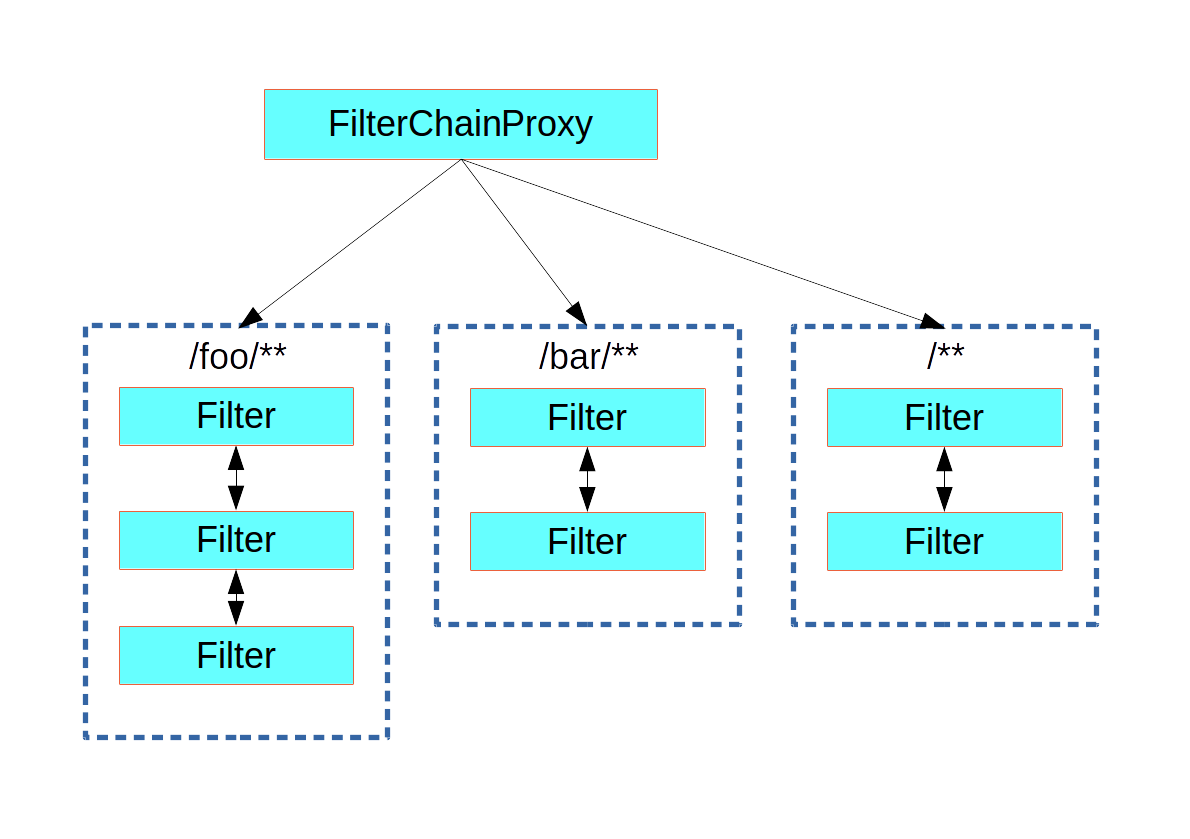
例如,如果我们的springboot直接构建,加入security依赖,会帮我创建6个过滤器链,并且其中的第一个过滤器链就是放行静态资源,如:
/css/** and /images/**, 而最后的一个过滤器链则是匹配所有 /**,也就是我们debug看到的11个默认的过滤器,认证,授权,写头,session管理,异常处理都是在这个默认的过滤器链中,当然
一般情况下我们也不需要去管它们(了解下),至于怎么创建多个过滤器链(api分模块开发可能用到)? 那就是继承多个 WebSecurityAdapter,就像我们之前定义的那样,然后加上**@Order**,如果他们的拦截url
重叠了,当然就是排在前的 过滤器链生效了!例如我们可以这么配置:
@Configuration
@Order(SecurityProperties.BASIC_AUTH_ORDER - 10)
public class ApplicationConfigurerAdapter extends WebSecurityConfigurerAdapter {
  @Override
  protected void configure(HttpSecurity http) throws Exception {
    http.antMatcher("/foo/**")
      .authorizeRequests()
        .antMatchers("/foo/bar").hasRole("BAR")
        .antMatchers("/foo/spam").hasRole("SPAM")
        .anyRequest().isAuthenticated();
  }
}
它表示拦截所有 /foo/下面的请求,并且 访问 /foo/bar需要有 BAR角色,访问/foo/spam需要有 SPAM角色,其他所有请求均需要认证过后才能访问。
方法安全
上面说了springsecurity的过滤器链的定义,接下来我们说一点在springsecurity中的常用安全注解(好像有点超纲了)。
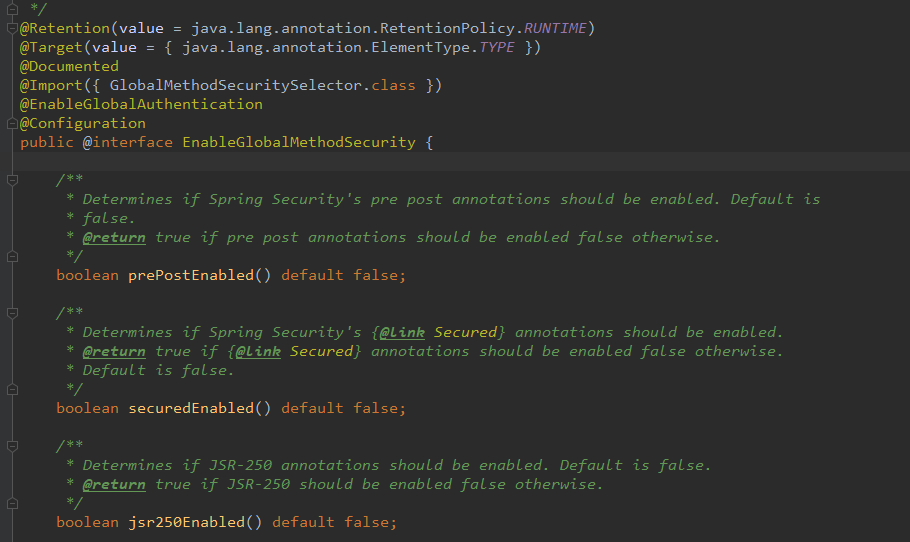
首先我们需要开启方法安全配置,在有@Configuration注解的地方加上**@EnableGlobalMethodSecurity**,它的属性如下:不同名字加上enable就代表可以用对应的注解:
例如加上 securedEnabled = true,我们就可以这么玩,在service或者controller方法上面:
@Service
public class MyService {
  @Secured("ROLE_USER")
  public String secure() {
    return "Hello Security";
  }
}
加上prePostEnabled=true,就可以这么玩: @PreAuthorize("{{spel}}"), 其中{{spel}}代表一个表达式,如: “hasAnyAuthority(‘test’)”,
而一旦用户对应的Authentication没有相应的 test,spel表达式所代表的值,就会丢出AccessDeniedException 异常(下章具体看看这些权限怎么设置)。
工作方式
好了,基本我们本章索要讲的东西差不多了,另外还有一个问题,既然springsecurity中把用户以及它的权限表现为一个Authentication,那它的流程应该是这样的:
认证成功-》生成authentication-》访问某个特定资源(比如方法)-》检查该authentication是否由该资源的权限-》 1.有(放行) 2.无(丢出异常)-》清除authentication。
该流程我们应该已经明白,那问题就是: 这个 authentication springsecurity帮我们放在哪了呢? 既要能随时能取出来,又能清除,然后如果有很多用户,又要能随时标识不错乱。
相信各位已经明白,一个很方便的方法就是 和当前线程绑定在一起! 那就是 ThreadLocal,当然在springsecurity是通过 SecurityContextHolder来操作这个类的,我们来看下它内部是什么:
public class SecurityContextHolder {
	// ~ Static fields/initializers
	// =====================================================================================

	public static final String MODE_THREADLOCAL = "MODE_THREADLOCAL";
	public static final String MODE_INHERITABLETHREADLOCAL = "MODE_INHERITABLETHREADLOCAL";
	public static final String MODE_GLOBAL = "MODE_GLOBAL";
	public static final String SYSTEM_PROPERTY = "spring.security.strategy";
	private static String strategyName = System.getProperty(SYSTEM_PROPERTY);
	private static SecurityContextHolderStrategy strategy;
	private static int initializeCount = 0;

	static {
		initialize();
	}

	private static void initialize() {
    		if (!StringUtils.hasText(strategyName)) {
    			// Set default
    			strategyName = MODE_THREADLOCAL;
    		}

    		if (strategyName.equals(MODE_THREADLOCAL)) {
    			strategy = new ThreadLocalSecurityContextHolderStrategy();
    		}
    		else if (strategyName.equals(MODE_INHERITABLETHREADLOCAL)) {
    			strategy = new InheritableThreadLocalSecurityContextHolderStrategy();
    		}
    		else if (strategyName.equals(MODE_GLOBAL)) {
    			strategy = new GlobalSecurityContextHolderStrategy();
    		}
    		else {
    			// Try to load a custom strategy
    			try {
    				Class<?> clazz = Class.forName(strategyName);
    				Constructor<?> customStrategy = clazz.getConstructor();
    				strategy = (SecurityContextHolderStrategy) customStrategy.newInstance();
    			}
    			catch (Exception ex) {
    				ReflectionUtils.handleReflectionException(ex);
    			}
    		}

    		initializeCount++;
    	}
}
可以看出,除非通过jvm指定,不然默认生成了一个ThreadLocalSecurityContextHolderStrategy,然后它内部是这样子的:
final class ThreadLocalSecurityContextHolderStrategy implements
		SecurityContextHolderStrategy {
	// ~ Static fields/initializers
	// =====================================================================================

	private static final ThreadLocal<SecurityContext> contextHolder = new ThreadLocal<>();

	// ~ Methods
	// ========================================================================================================

	public void clearContext() {
		contextHolder.remove();
	}

	public SecurityContext getContext() {
		SecurityContext ctx = contextHolder.get();

		if (ctx == null) {
			ctx = createEmptyContext();
			contextHolder.set(ctx);
		}

		return ctx;
	}

	public void setContext(SecurityContext context) {
		Assert.notNull(context, "Only non-null SecurityContext instances are permitted");
		contextHolder.set(context);
	}

	public SecurityContext createEmptyContext() {
		return new SecurityContextImpl();
	}
}
果然,内部是ThreadLocal,所以springsecurity是帮我们把Authentication放到了threadlocal中,我们回想第二章登录的例子,有一个UsernamePasswordAuthenticationFilter,大胆猜测如果通过认证,
就是在这个过滤器中加入的,那我们debug看下:
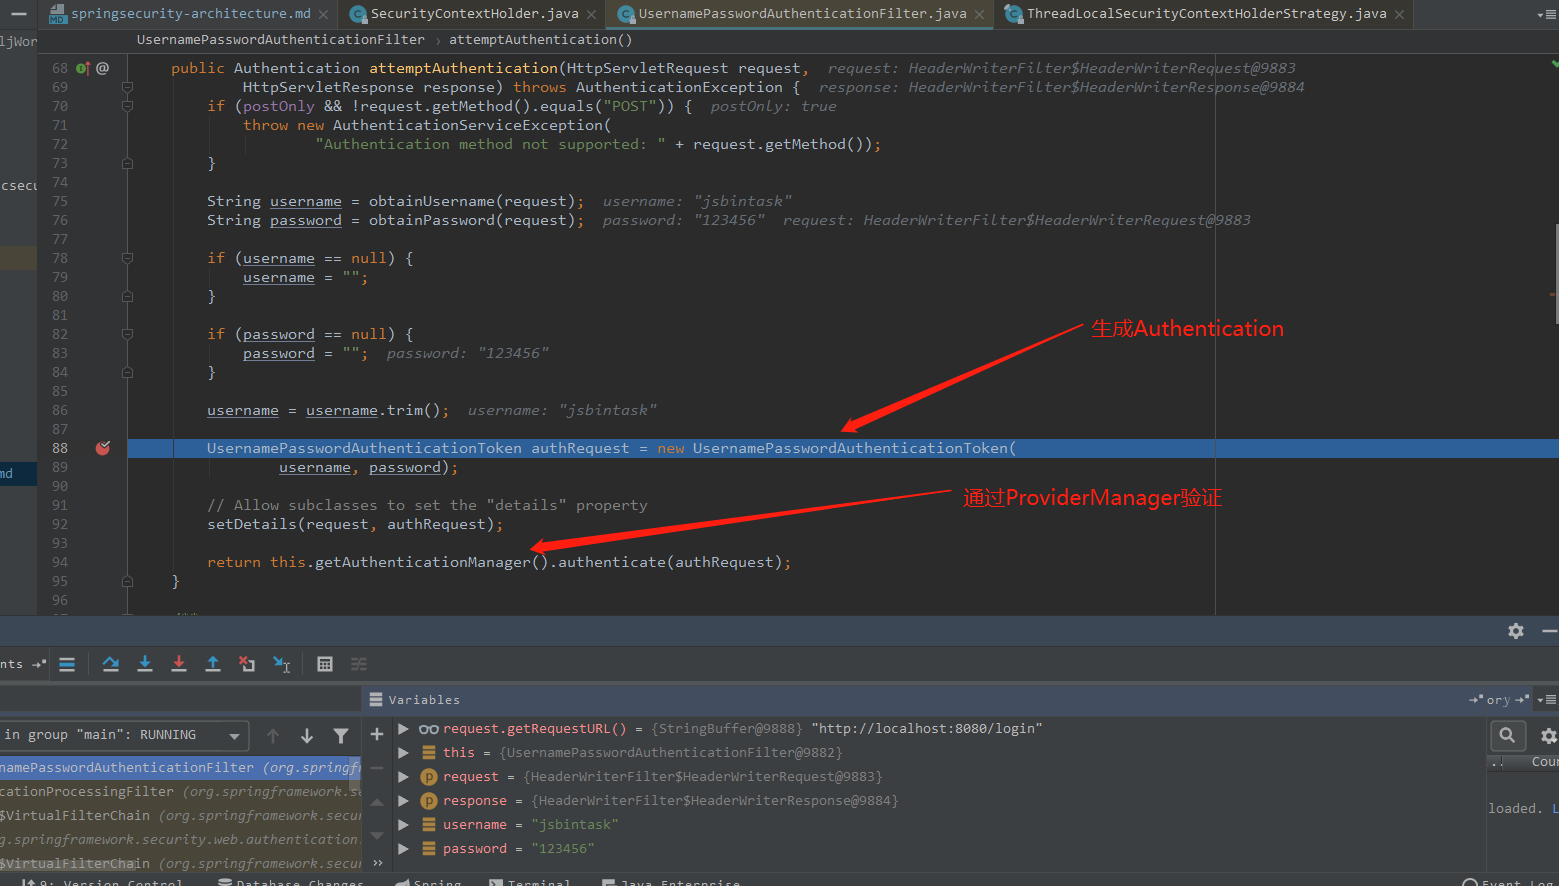
图上已经说清楚了,那结果就是经过ProviderManager后,验证通过,然后继续走:
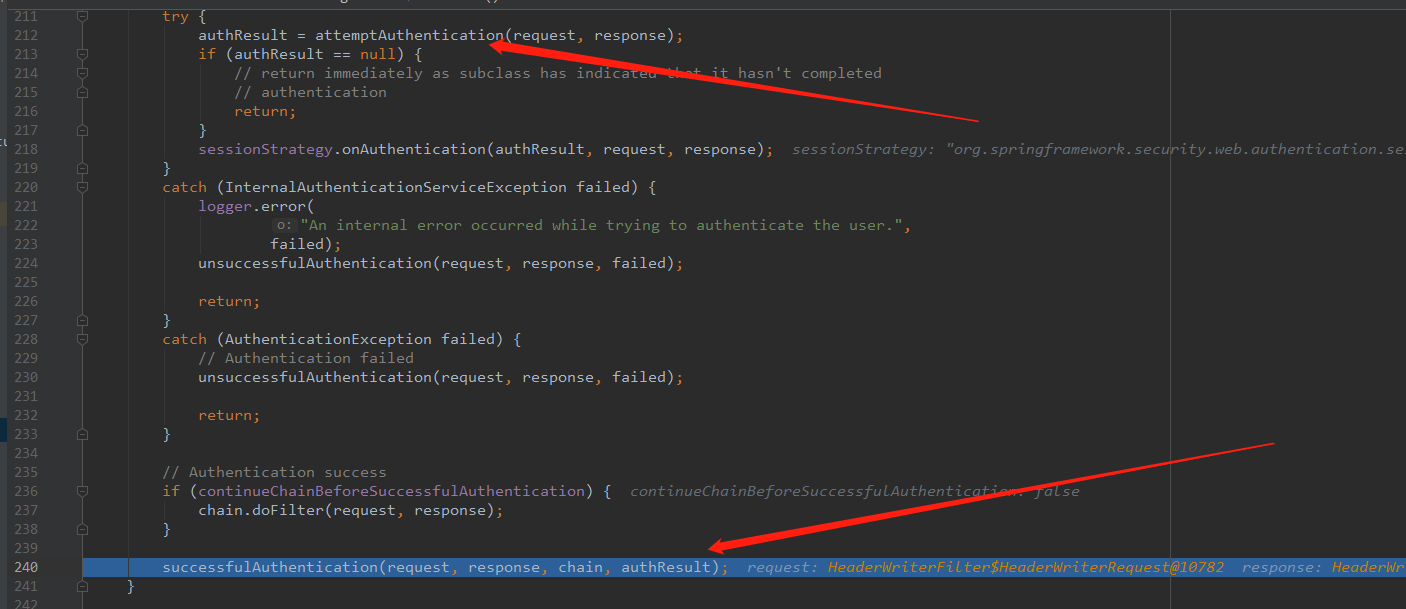
最后走successfulAuthentication这个方法,最终,这个方法我们找到了答案:
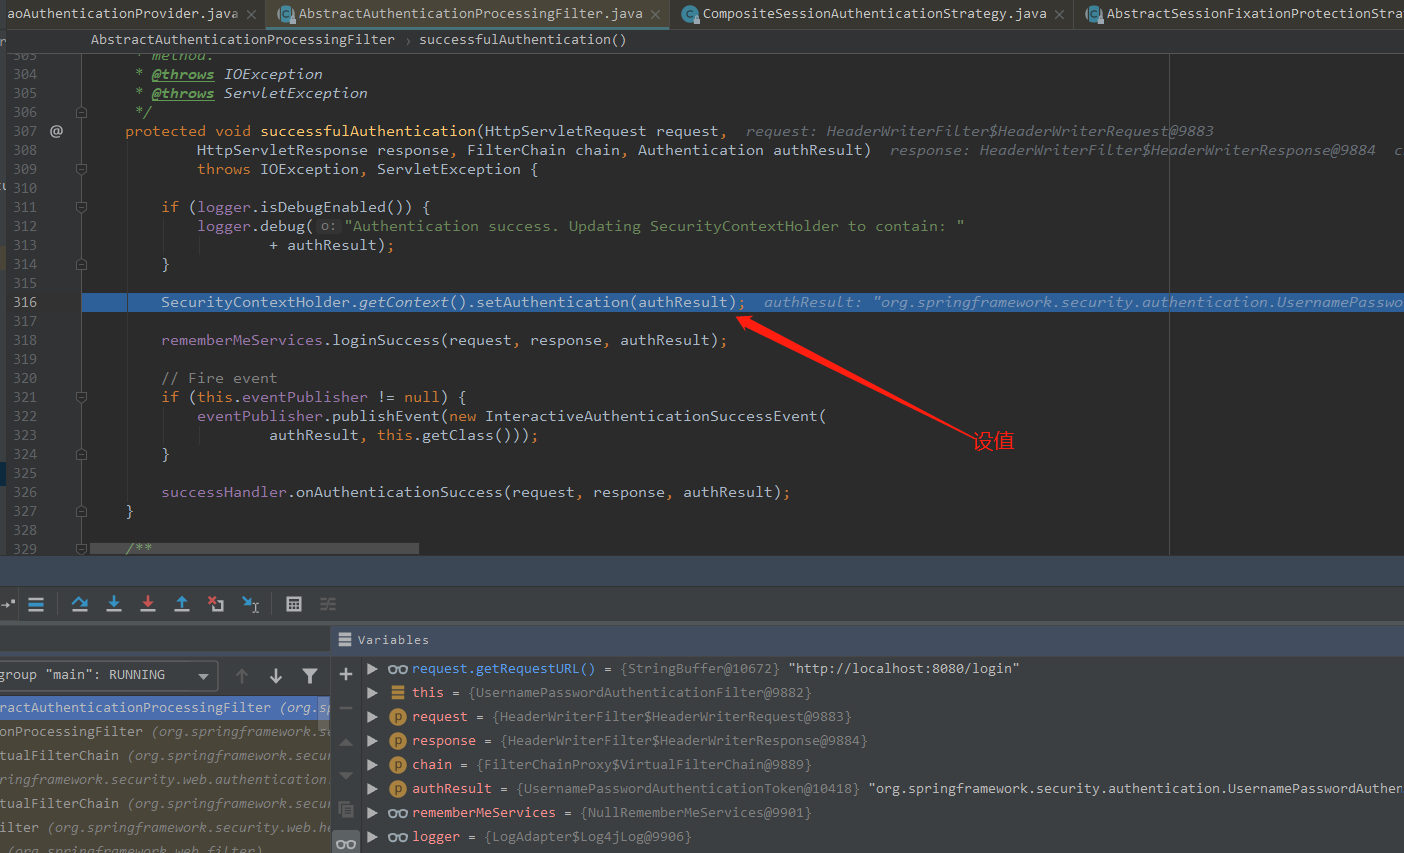
设置成功后,就是帮我们转发到了主页面了。 所以后面这个SecurityContext有了值以后,我们就可以在controller或者其它地方随意使用了。
使用方法就是 **SecurityContextHolder.getContext().getAuthentication()**了,当然springsecurity提供了一种更加简便的方式,controller中:
@RequestMapping("/foo")
public String foo(@AuthenticationPrincipal User user) {
  ... // do stuff with user
}
这里的user就是通过**SecurityContextHolder.getContext().getAuthentication().getPrincipal()**得出来的,当然,你也可以这么写:
@RequestMapping("/foo")
public String foo(Principal principal) {
  Authentication authentication = (Authentication) principal;
  User = (User) authentication.getPrincipal();
  ... // do stuff with user
}
小结
本章,我们首先分析了springsecurity的基础结构,以及它们是如何工作的,然后又通过源码简单验证了我们的分析。 最后介绍了一些使用方法,接下来就是我们的最后一章了。
springboot+springsecurity+jwt整合 restful 服务。
本文原创地址,我的博客:https://jsbintask.cn/2019/01/16/springsecurity-architecture/#more
系列其它文章
springboot整合springsecurity从Hello World到源码解析(一):hello world程序入门
springboot整合springsecurity从Hello World到源码解析(二):springsecurity配置加载解析
springboot整合springsecurity从Hello World到源码解析(三):基础配置详解
springboot整合springsecurity从Hello World到源码解析(四):springsecurity基础架构解析
springboot整合springsecurity从Hello World到源码解析(五):springsecurity+jwt整合restful服务
关注我!
