版权声明:本文为博主原创文章,未经博主允许不得转载。 https://blog.csdn.net/xingfuzhijianxia/article/details/85682870
next主题配置
https://hexo.io/themes/
主题选择,本文是next主题安装配置以及优化。
安装与配置
安装
在博客根目录,打开git bash,
git clone https://github.com/theme-next/hexo-theme-next themes / next
安装完毕后在站点目录下themes文件夹生成next主题文件夹。
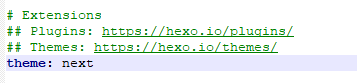
站点开启主题
在站点根目录设置主题:next
next主题中文设置
站点配置文件_config.yml
language: zh-Hans
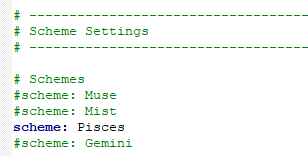
Scheme 外观设置
这里选择了双栏Pisces
Muse黑白主调,大量留白。
Mist是Muse的紧凑版本,整洁有序的单栏外观
Gemini左侧网站信息及目录,块+片段结构布局
新增菜单设置
第一步:
hexo new page 'name' # name分别为tags、categories、about
具体生成如下:
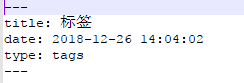
hexo new page 'tags' #创建tags标签子目录
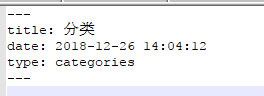
hexo new page 'categories' #创建categories分类子目录
hexo new page 'about' #创建about关于子目录
第二步:
修改这tags和categories文件夹中的index.md,设置如下:
主题优化
公益404
将公益404一份在网页丢失时候。另外还放在了关于里面。
在网页丢失时候:
第一步:创建404页面
hexo new page 404 ;
第二步:在站点source文件夹下创建404.html,将如下代码粘贴进去,保存!
<!DOCTYPE html>
<html lang="en">
<head>]\
<meta charset="UTF-8">
<title>404</title>
</head>
<body>
<script type="text/javascript" src="//qzonestyle.gtimg.cn/qzone/hybrid/app/404/search_children.js" charset="utf-8"></script>
</body>
</html>
网易云音乐
注册一个网易账号,生成一个自己的一个歌单,加入自己喜欢的音乐。
在网易云插件里,嵌入iframe(可以根据自己设定调整,然后复制代码)
hexo配置,在next主题下/layout/_macro/sidebar.swig文件里添加复制的代码即可。
配置显示在左侧栏中
点击桃心
第一步:
在 /themes/next/source/js/src 文件夹下创建 clklove.js 将如下代码粘贴进去,保存!
!function(e,t,a){function n(){c(".heart{width: 10px;height: 10px;position: fixed;background: #f00;transform: rotate(45deg);-webkit-transform: rotate(45deg);-moz-transform: rotate(45deg);}.heart:after,.heart:before{content: '';width: inherit;height: inherit;background: inherit;border-radius: 50%;-webkit-border-radius: 50%;-moz-border-radius: 50%;position: fixed;}.heart:after{top: -5px;}.heart:before{left: -5px;}"),o(),r()}function r(){for(var e=0;e<d.length;e++)d[e].alpha<=0?(t.body.removeChild(d[e].el),d.splice(e,1)):(d[e].y--,d[e].scale+=.004,d[e].alpha-=.013,d[e].el.style.cssText="left:"+d[e].x+"px;top:"+d[e].y+"px;opacity:"+d[e].alpha+";transform:scale("+d[e].scale+","+d[e].scale+") rotate(45deg);background:"+d[e].color+";z-index:99999");requestAnimationFrame(r)}function o(){var t="function"==typeof e.onclick&&e.onclick;e.onclick=function(e){t&&t(),i(e)}}function i(e){var a=t.createElement("div");a.className="heart",d.push({el:a,x:e.clientX-5,y:e.clientY-5,scale:1,alpha:1,color:s()}),t.body.appendChild(a)}function c(e){var a=t.createElement("style");a.type="text/css";try{a.appendChild(t.createTextNode(e))}catch(t){a.styleSheet.cssText=e}t.getElementsByTagName("head")[0].appendChild(a)}function s(){return"rgb("+~~(255*Math.random())+","+~~(255*Math.random())+","+~~(255*Math.random())+")"}var d=[];e.requestAnimationFrame=function(){return e.requestAnimationFrame||e.webkitRequestAnimationFrame||e.mozRequestAnimationFrame||e.oRequestAnimationFrame||e.msRequestAnimationFrame||function(e){setTimeout(e,1e3/60)}}(),n()}(window,document);
第二步:
在主题文件夹下 \themes\next\layout\_layout.swig文件末尾,引入创建的js文件,如下:

动态背景
第一步:引入文件
{% if theme.canvas_nest %}
	<script type="text/javascript" src="//cdn.bootcss.com/canvas-nest.js/1.0.0/canvas-nest.min.js"></script>
{% endif %}
第二步:
在next主题配置文件_config.yml设置
canvas_nest: true
搜索
第一步:安装插件
npm install hexo-generator-searchdb --save
第二步:站点配置文件修改
search:
  path: search.xml
  field: post
  format: html
  limit: 10000
第三步:主题配置文件修改
# Local search
local_search:
  enable: true
  top_n_per_article: 1
  unescape: false
RSS
第一步:安装插件
npm install hexo-generator-feed
第二步:站点配置
_config.yml配置文件添加以下代码:
plugin:
- hexo-generator-feed
#Feed Atom
feed:
type: atom
path: atom.xml
limit: 20
第三步:主题配置
在themes目录下的_config.yml配置如下
rss: /atom.xml