1.grep 文本过滤命令
(1)grep命令的简介
##全面搜索研究正则表达式并显示出来
grep 命令(Global search regular expression and print out the line)是一种强大的文本搜索工具,
根据用户指定的‘模式’对目标文本进行匹配检查,打印匹配到的行。由正则表达式或者字符及基本文本字符所编写的过滤条件
(2)grep命令的基本用法
grep   + 参数  + 文件名

具体参数含义:
      -i	##忽略字母大小写
      -v	##条件取反
      -c	##统计匹配行数
      -q	##静默,无任何输出
      -n	##显示匹配结果所在的行号
      -E    ##解释PATTERN作为扩展正则表达式,(grep -E 就相当于 egrep)
实验:
[root@localhost mnt]# vim grep_test
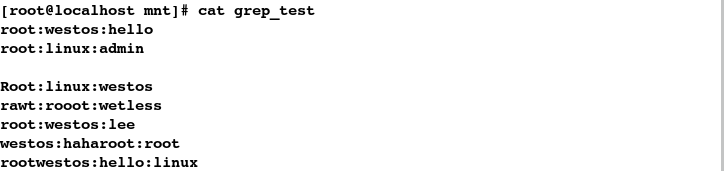
[root@localhost mnt]# cat grep_test

## -i 表示忽略字母大小写(ignore);忽略字母大小写过滤出grep_test文件种含有root字符的行信息
[root@localhost mnt]# grep -i root grep_test

## -v 表示条件取反(revert);过滤出不含有root字符的行信息
[root@localhost mnt]# grep -v root grep_test
Root:linux:westos
rawt:rooot:wetless
## -c 表示统计匹配行数(count)
[root@localhost mnt]# grep -c root grep_test
4

## -n 表示显示匹配结果及其所在行号(number)
[root@localhost mnt]# grep -n root grep_test

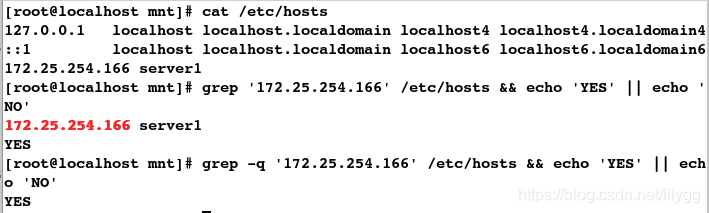
[root@localhost mnt]# cat /etc/hosts
127.0.0.1   localhost localhost.localdomain localhost4 localhost4.localdomain4
::1         localhost localhost.localdomain localhost6 localhost6.localdomain6
172.25.254.166 server1
## &&表示匹配成功则执行, ||表示匹配失败则执行
[root@localhost mnt]# grep '172.25.254.166' /etc/hosts && echo 'YES' || echo 'NO'
172.25.254.166 server1
YES
## -q表示不输出匹配到的信息,即为静默
[root@localhost mnt]# grep -q '172.25.254.166' /etc/hosts && echo 'YES' || echo 'NO'
YES
(3)基本元字符
. ##代表一个任意字符
例如:

'r..t'       #在r和t之间有2个任意字符
'r....'      #在r的后面有4个任意字符
'..t'        #在t的前面有2个任意字符
实验:
##过滤出在r和t之间有2个任意字符的行信息
[root@localhost mnt]# grep 'r..t' grep_test

##过滤出在r的后面有4个任意字符的行信息
[root@localhost mnt]# grep 'r....' grep_test

##过滤出在t的前面有2个任意字符的行信息
[root@localhost mnt]# grep '..t' grep_test

1)grep中字符的匹配位置设定
^           ##表示以……开头
$           ##表示以……结尾
\<  \>      ##表示不做任何拓展
[]          ##匹配中括号内的任意字符
[^]         ##匹配不在括号内的任意字符
例如:
^root           #以关键字root开头
root$           #以关键字root结尾
\<root          #关键字root之前不做拓展 (精确匹配)
root\>          #关键字root之后不做拓展
\<root\>        #关键字root前后不做拓展
实验:
##过滤出含有root关键字的行信息
[root@localhost mnt]# grep root grep_test

##过滤出以root开头的行信息
[root@localhost mnt]# grep ^root grep_test

##过滤出以root结尾的行信息
[root@localhost mnt]# grep root$ grep_test

##关键字root之前不做拓展
[root@localhost mnt]# grep '\<root' grep_test

##关键字root之后不做拓展
[root@localhost mnt]# grep 'root\>' grep_test

##关键字root前后均不做拓展
[root@localhost mnt]# grep '\<root\>' grep_test

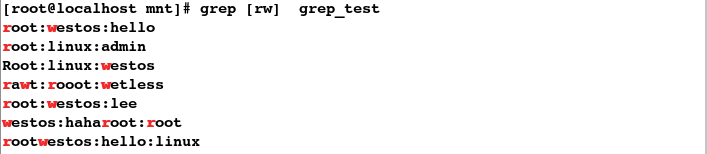
##匹配中括号内的任意字符
[root@localhost mnt]# grep [rw]  grep_test
2)grep中字符的匹配次数设定
*              #字符出现0-任意次
?             #字符出现0-任意次
+              #字符出现1-任意次
{n}            #字符出现n次
{m,n}          #字符出现最少m次,最多n次
{0,n}          #字符出现0-n次
{m,}           #字符出现至少m次
{,n}           #字符出现最多n次
(row){m,n}     ##关键字row出现m-n次
.*             #关键字之间匹配任意字符
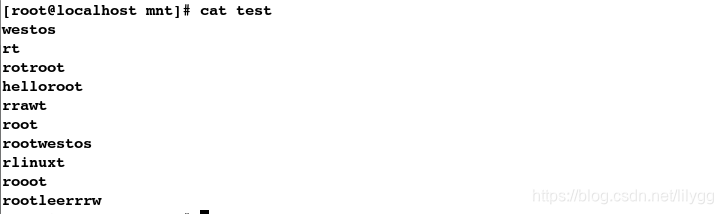
[root@localhost mnt]# vim test
[root@localhost mnt]# cat test
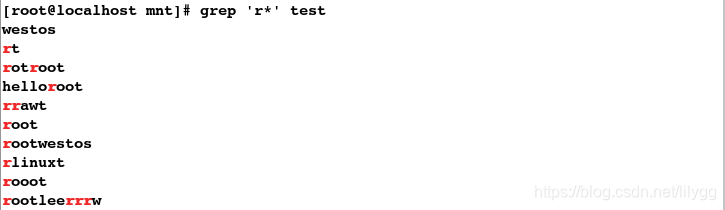
##匹配r字符出现0到任意次
[root@localhost mnt]# grep 'r*' test
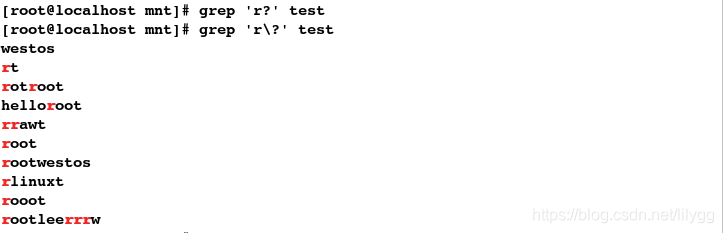
##匹配r字符出现0到任意次;必须加\表示转译
[root@localhost mnt]# grep 'r\?' test
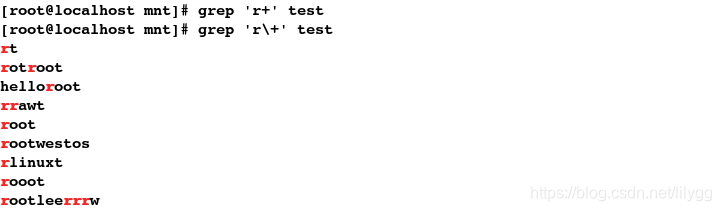
##匹配r字符出现1到任意次
[root@localhost mnt]# grep 'r\+' test
##r字符出现2次;必须是两个r连在一起才做数
[root@localhost mnt]# grep 'r\{2\}' test

##匹配r字符出现2-3次
[root@localhost mnt]# grep 'r\{2,3\}' test

##匹配r字符至少出现2次
[root@localhost mnt]# grep 'r\{2,\}' test

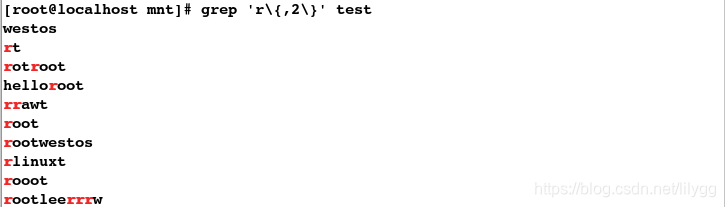
##匹配r字符最多出现2次
[root@localhost mnt]# grep 'r\{,2\}' test
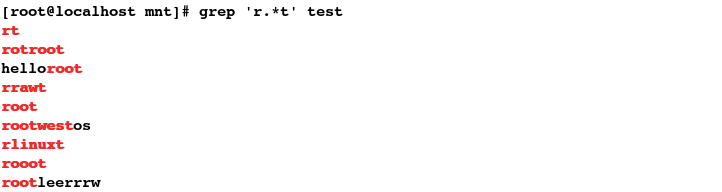
##匹配r和t字符之间出现任意字符的行信息
[root@localhost mnt]# grep 'r.*t' test
(4)egrep命令
实质上: egrep 命令 即为 grep -E 命令
## -c表示统计匹配行数
[root@localhost mnt]# egrep -c '/sbin/nologin' /etc/passwd
39
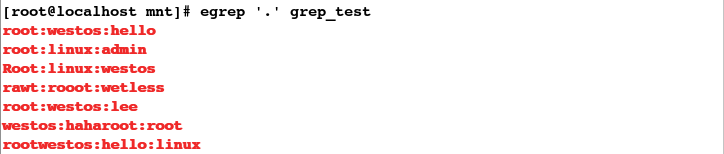
[root@localhost mnt]# cat grep_test
##过滤以root关键字开头的前3行信息
[root@localhost mnt]# grep -m3 '^root' grep_test

##过滤非空行
[root@localhost mnt]# egrep '.' grep_test
##过滤空行;-v表示取反
[root@localhost mnt]# egrep -v '.' grep_test
[root@localhost mnt]# egrep '^$' grep_test

练习1:只显示ip这一行
[root@localhost ~]# ifconfig eth0
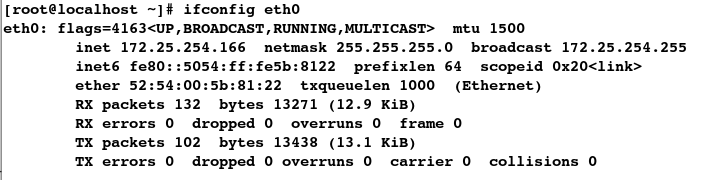
方法1:
##过滤出含有inet  的行信息;注意:inet后边有空格
[root@localhost ~]# ifconfig eth0 | grep 'inet '
        inet 172.25.254.166  netmask 255.255.255.0  broadcast 172.25.254.255

方法2:
##过滤出包含关键字inet且后边不做拓展的行信息
[root@localhost ~]# ifconfig eth0 | grep -E 'inet\>'
        inet 172.25.254.166  netmask 255.255.255.0  broadcast 172.25.254.255

练习 2:将系统中可登陆的用户输出到一行
[root@localhost ~]# cat /etc/shells

## -v表示取反
[root@localhost ~]# grep -v 'nologin' /etc/shells

[root@localhost ~]# echo `grep -v 'nologin' /etc/shells`
/bin/sh /bin/bash /usr/bin/sh /usr/bin/bash /bin/tcsh /bin/csh

2.sed 行编辑器
sed ##一次处理一行内容,处理时,把当前的行存储在临时缓冲区,处理完后,输送到屏幕(stream editor)
一般格式:  sed  [参数]  '命令'  fileame

具体参数含义:
	      p	      ##显示
	      d	      ##删除
	      a	      ##添加
	      c	      ##替换
	      w       ##写入
	      i	      ##插入
(1) p 模式操作(显示)
[root@localhost mnt]# cat /etc/hosts
##显示含有:的行
[root@localhost mnt]# sed -n '/:/p' /etc/hosts

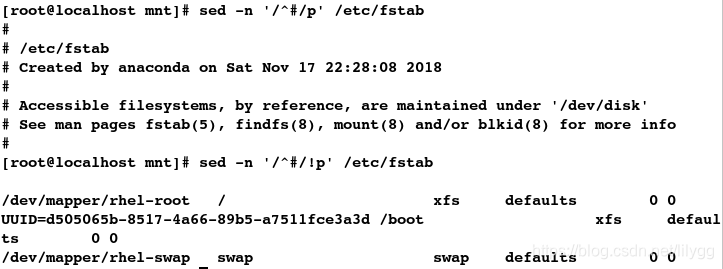
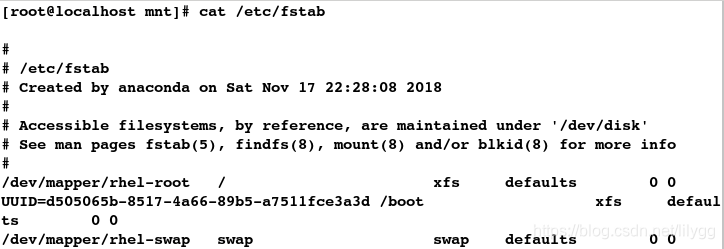
[root@localhost mnt]# cat /etc/fstab
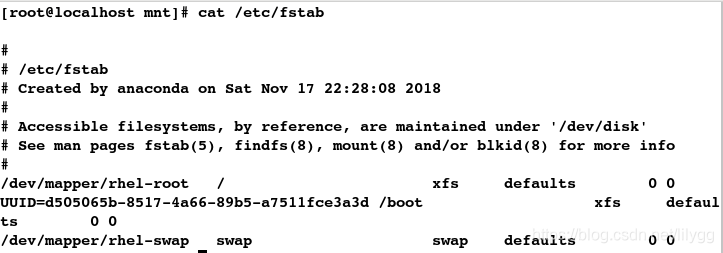
##显示以#开头的行
[root@localhost mnt]# sed -n '/^#/p' /etc/fstab
##不显示以#开头的行
[root@localhost mnt]# sed -n '/^#/!p' /etc/fstab
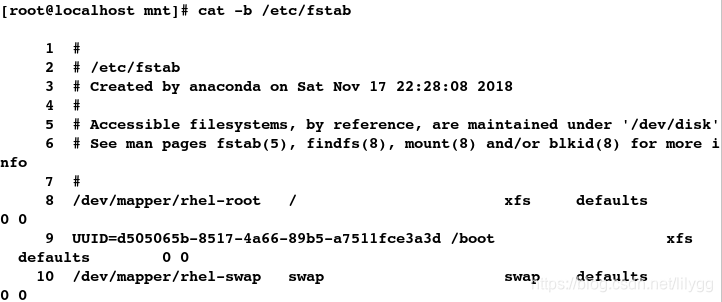
##-b表示显示时添加行号
[root@localhost mnt]# cat -b /etc/fstab
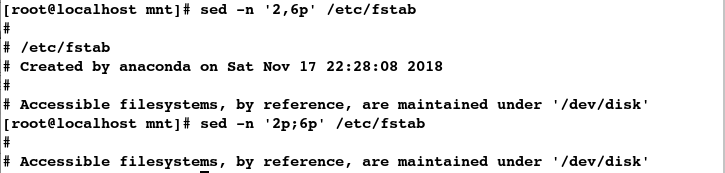
##显示2-6行
[root@localhost mnt]# sed -n '2,6p' /etc/fstab
##仅显示第2和第6行
[root@localhost mnt]# sed -n '2p;6p' /etc/fstab
(2) d模式操作(删除)
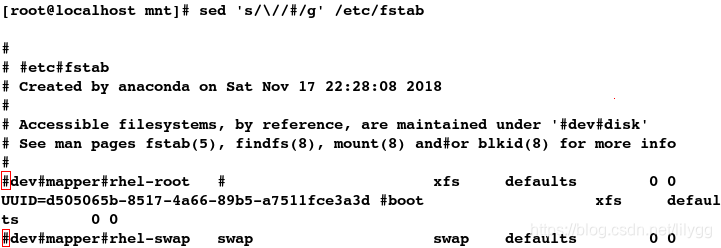
[root@localhost mnt]# cat /etc/fstab

##删除以UUID开头的行
[root@localhost mnt]# sed '/^UUID/d' /etc/fstab

##删除以#开头的行
[root@localhost mnt]# sed '/^#/d' /etc/fstab

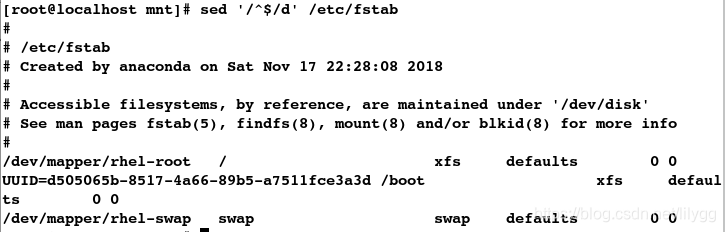
##删除空行
[root@localhost mnt]# sed '/^$/d' /etc/fstab
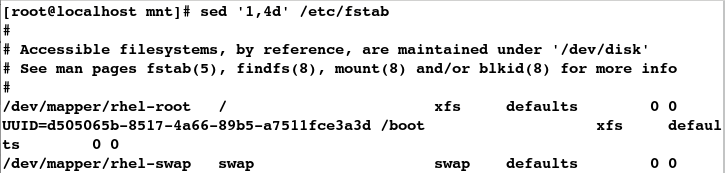
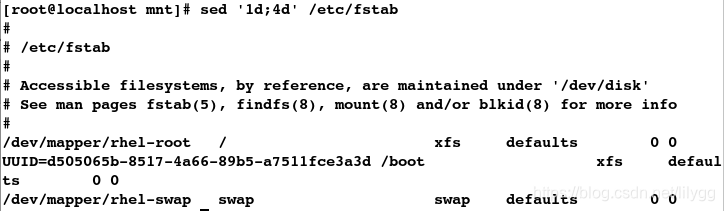
[root@localhost mnt]# cat -b /etc/fstab
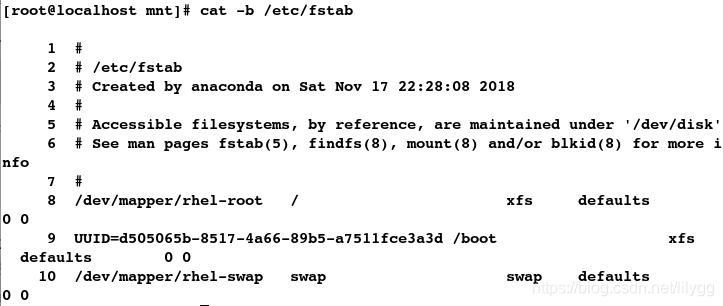
##删除1-4行
[root@localhost mnt]# sed '1,4d' /etc/fstab
##删除第1和第4行
[root@localhost mnt]# sed '1d;4d' /etc/fstab
(3) a操作模式(添加)
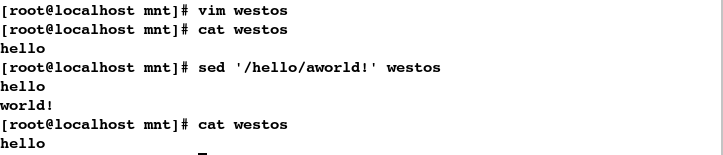
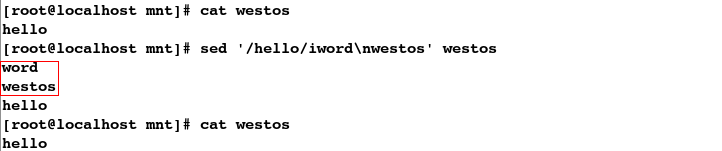
[root@localhost mnt]# vim westos
[root@localhost mnt]# cat westos
hello
##在westos文件中在hello后边添加word!;a表示添加(默认会换行)
[root@localhost mnt]# sed '/hello/aworld!' westos
hello
world!
##默认情况下sed命令不会更改原文件内容
[root@localhost mnt]# cat westos
hello
(4) c操作模式(替换)
方式1:
[root@localhost mnt]# cat /etc/fstab
##\表示转义;将\全文替换为#
[root@localhost mnt]# sed 's/\//#/g' /etc/fstab
##将hello全文替换为hello word!;g表示全文替换(同vim中的替换操作)
[root@localhost mnt]# sed 's/hello/hello word!/g' westos

注意: g 表示全局替换;主要用于一行中有多个目标字符时,如果没有g,那么只会替换一行中的第一个目标字符
##\n表示换行
[root@localhost mnt]# sed 's/hello/hello\nword!/g' westos

方式2:
##c表示替换
[root@localhost mnt]# sed '/hello/chello word!' westos

(5) i操作模式(插入模式:会更改原文件内容)
[root@localhost mnt]# cat westos
hello
## i表示插入;默认在最前面按顺序插入
[root@localhost mnt]# sed '/hello/iword\nwestos' westos
word
westos
hello
[root@localhost mnt]# cat westos
hello
## -i表示更改原文件内容,c表示替换
[root@localhost mnt]# sed -i '/hello/chello word!' westos
[root@localhost mnt]# cat westos
hello word!

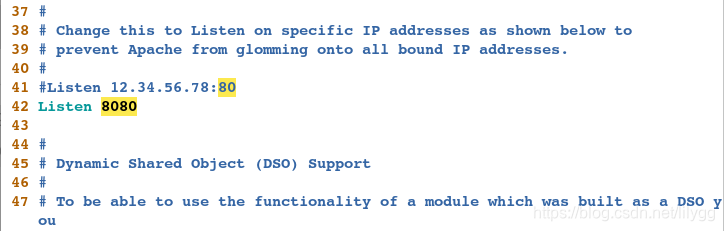
练习2:安装apache并更改apache的默认端口为8080
[root@localhost mnt]# vim /etc/httpd/conf/httpd.conf
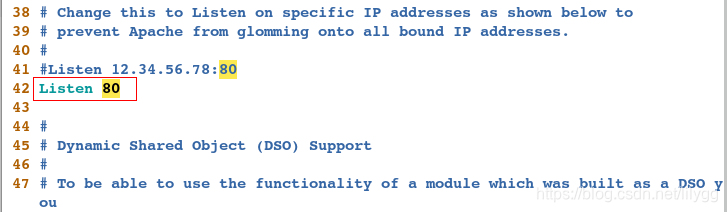
##-i表示更改原文件内容;c表示替换
[root@localhost mnt]# sed -i '/Listen 80/cListen 8080' /etc/httpd/conf/httpd.conf
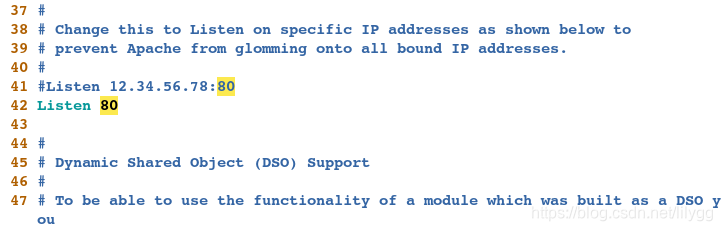
[root@localhost mnt]# vim /etc/httpd/conf/httpd.conf
## ^表示以……开头
[root@localhost mnt]# sed -i '/^Listen/cListen 80' /etc/httpd/conf/httpd.conf
[root@localhost mnt]# vim /etc/httpd/conf/httpd.conf
编写脚本:
[root@localhost mnt]# vim  apache_8080.sh
#####################
read -p "please input a port:" a     ##接收用户输入信息

yum install -y apache &> /dev/null
systemctl start httpd
sed -i '/^Listen/cListen '$a'' /etc/httpd/conf/httpd.conf   ##将以Listen开头的替换为Listen 和你所想要更改的端口号
echo "port has changed!"

setenforce 0                         ##selinux会影响端口的更改
systemctl stop firewalld
systemctl restart httpd
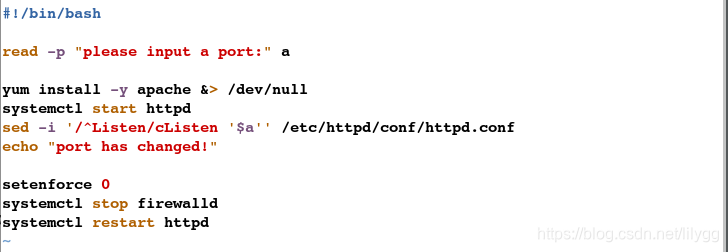
执行脚本:
[root@localhost mnt]# sh apache_8080.sh
please input a port:8080
port has changed!

##发现apache的端口确实更改了
[root@localhost mnt]# vim /etc/httpd/conf/httpd.conf

2.awk报告生成器
awk处理机制:根据模式一次从文件中抽取一行文本,对这行文本进行切片(默认使用空白字符作为分隔符)
awk会逐行处理文本,支持在处理第一行之前做一些准备工作,以及在处理完最后一行做一些总结性质的工作。
变量参数:

NR            ##输出当前操作的行号
NF            ##输出当前字段个数
print         ##后边什么都不跟,表示打印文件内容
FILENAME      ##输出文件名

BEGIN{}       #读入第一行文本之前执行,一般用来初始化操作
{}            #逐行处理,逐行读入文本执行相应的处理,是最常见的编辑指令块
END{}         #处理完最后一行文本之后执行,一般用来输出处理结果
实验:
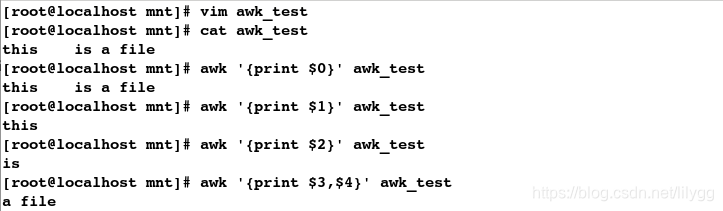
[root@localhost mnt]# vim awk_test
[root@localhost mnt]# cat awk_test
this    is a file
## $0表示输出一整行
[root@localhost mnt]# awk '{print $0}' awk_test
this    is a file
## $n表示输出第n个字段(列)
[root@localhost mnt]# awk '{print $1}' awk_test
this
## 它与cut命令的区别在于:默认分隔符即为空格,且与空格的多少无关
[root@localhost mnt]# awk '{print $2}' awk_test
is
## 显示第三个和第四个字段
[root@localhost mnt]# awk '{print $3,$4}' awk_test
a file
[root@localhost mnt]# vim awk_test
[root@localhost mnt]# cat awk_test
this : is:a:file
## -F表示指定分隔符
[root@localhost mnt]# awk -F ":" '{print $2,$3}' awk_test
 is a

[root@localhost mnt]# vim awk_test
[root@localhost mnt]# cat awk_test
root:westos:linux
hello:lee
harry:tom:lily
westos
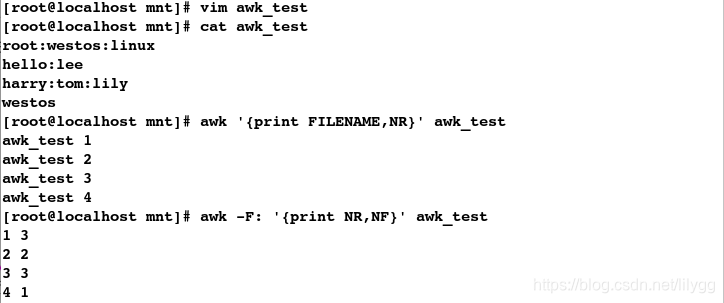
## FILENAME表示输出文件名,NR表示当前操作的行号;说明awk会逐行处理文本
[root@localhost mnt]# awk '{print FILENAME,NR}' awk_test
awk_test 1
awk_test 2
awk_test 3
awk_test 4
## NR表示行,NF表示列
[root@localhost mnt]# awk -F: '{print NR,NF}' awk_test
1 3
2 2
3 3
4 1
## BEGIN表示读入第一行文本之前执行的语句,一般用来初始化操作
[root@localhost mnt]# awk 'BEGIN { a=34;print a+10}'

[root@localhost mnt]# cat awk_test
root:westos:linux
hello:lee
harry:tom:lily
westos
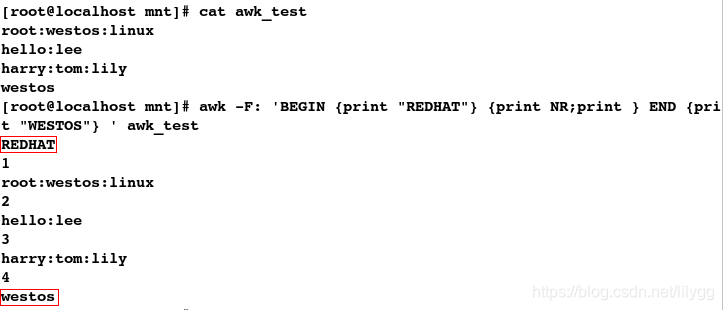
## BEGIN表示读入第一行文本之前执行的语句,END表示处理完最后以行文本后执行
[root@localhost mnt]# awk -F: 'BEGIN {print "REDHAT"} {print NR;print } END {prit "WESTOS"} ' awk_test
REDHAT
1
root:westos:linux
2
hello:lee
3
harry:tom:lily
4
westos
## -b表示显示行号
[root@localhost mnt]# cat -b awk_test

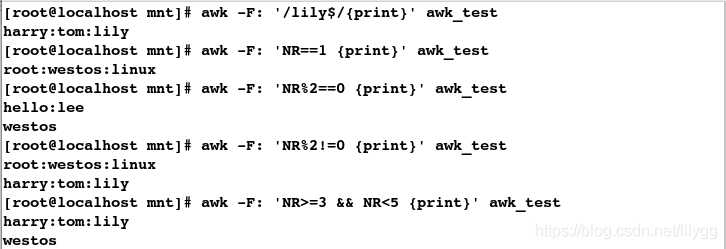
## 输出以lily结尾的行信息;print表示输出匹配的一整行
[root@localhost mnt]# awk -F: '/lily$/{print}' awk_test
harry:tom:lily
## 输出第一行信息
[root@localhost mnt]# awk -F: 'NR==1 {print}' awk_test
root:westos:linux
## 输出偶数行信息
[root@localhost mnt]# awk -F: 'NR%2==0 {print}' awk_test
hello:lee
westos
## 输出基数行信息
[root@localhost mnt]# awk -F: 'NR%2!=0 {print}' awk_test
root:westos:linux
harry:tom:lily
## 输出3-5行信息
[root@localhost mnt]# awk -F: 'NR>=3 && NR<5 {print}' awk_test
harry:tom:lily
westos
## 统计文本总字段个数
[root@localhost mnt]# awk 'BEGIN {i=0} {i+=NF} END {print i}' awk_test
4
## -F表示指定分隔符
[root@localhost mnt]# awk -F: 'BEGIN {i=0} {i+=NF} END {print i}' awk_test
9

练习3:找出系统中uid为2的用户名和uid信息
##发现uid位于第3列,用户名位于第1列
[root@localhost mnt]# vim /etc/passwd
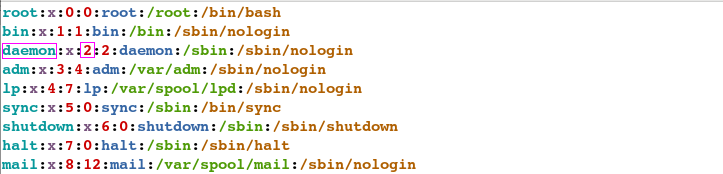
## $n表示第几个字段(n>1)
[root@localhost mnt]# awk -F: '$3==2 {print $1,$3}' /etc/passwd

awk 也可以与 if 语句,if-else 语句搭配使用
练习4:统计系统登陆shell为bash的用户个数(if 单分支语句)
方法1:
## 登陆shell位于第7列
[root@localhost mnt]# awk -F: 'BEGIN{i=0} {if ($7~/bash$/) {i++} } END {print i}' /etc/passwd

方法2:
## $表示以 ....结尾
[root@localhost mnt]# awk -F ":" 'BEGIN {i=0} /bash$/ {i++} END {print i}' /etc/passwd

练习5:统计uid小于等于500和大于500的用户个数 (if 双分支语句)
## uid 只有 小于等于500,或者大于500这两种情况
[root@localhost mnt]# awk -F: 'BEGIN{i=0;j=0} {if($3<=500){i++} else{j++}} END{print i,j}' /etc/passwd
