一.grep文本过滤命令
1.grep
全面搜索研究正则表达式并显示出来
| grep命令是一种强大的文本搜索工具,根据用户指定的“模式”对目标文本进行匹配检查,打印到匹配的行。 由正则表达式或者字符及基本文本字符所编写的过滤条件 |
2.grep的格式
grep 匹配条件 处理文件
3.grep中字符的匹配位置设定
| ^关键字 | 以“关键字“开头 |
|---|---|
| 关键字$ | 以关键字结尾 |
| <关键字 | 关键字前没有字符 |
| 关键字> | 关键字后面没有字符 |
| <关键字> | 关键字前后均没有字符 |
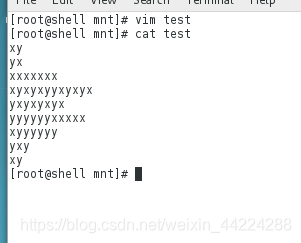
[root@shell mnt]# cp /etc/passwd  .
[root@shell mnt]# ls
passwd
[root@shell mnt]# vim passwd
[root@shell mnt]# grep root passwd
[root@shell mnt]# grep -i root passwd  ##过滤root其中包含大写
[root@shell mnt]# grep -i "\<root" passwd  ##过滤root其中包含大写,并且以root开头
[root@shell mnt]# grep -i "\<root\>" passwd   #root前后都不含有附加字符
[root@shell mnt]# grep -i "^\<root\>" passwd  #在上一步的基础上以root开头的
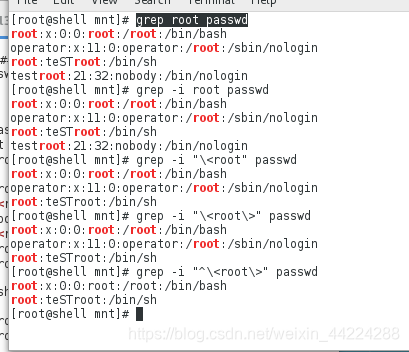
[root@shell mnt]# grep -i "^root" passwd #同上
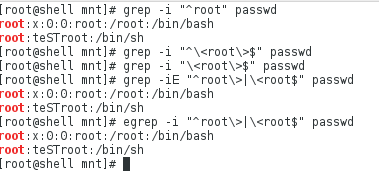
[root@shell mnt]# grep -i "^\<root\>$" passwd #以root开头以root结尾
[root@shell mnt]# grep -i "\<root\>$" passwd #以root结尾的
4.grep中的正则表达式
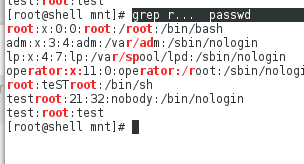
grep r... file #以r开头的任意3个字符的行
grep r...t file #以r开头,t结尾的,并且中间有任意三个字符的行
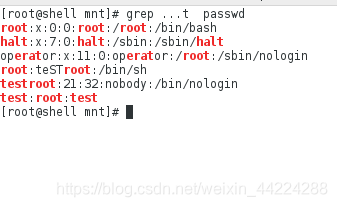
grep ..t file #以t结尾的,前面有3个字符的行

5.grep正则表达式与扩展正则表达式
- 正规的grep不支持扩展的正则表达式
- | 是用于表示或的扩展正则表达式字符,正规的grep无法识别
- 加 \ ,这个字符就被翻译成扩展的正则表达式,就像egrep和grep -E一样。
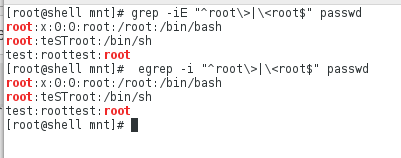
[root@shell mnt]# grep -iE "^root\>|\<root$" passwd  #从开始的root和结束时
[root@shell mnt]# egrep -i "^root\>|\<root$" passwd  #或者
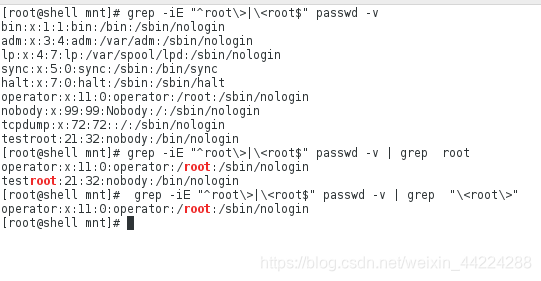
[root@shell mnt]# grep -iE "^root\>|\<root$" passwd -v  #不是以root开头和root结尾的即中间的
[root@shell mnt]# grep -iE "^root\>|\<root$" passwd -v | grep  root   #不是以root开头和root结尾的即中间的
[root@shell mnt]# grep -iE "^root\>|\<root$" passwd -v | grep  "\<root\>"
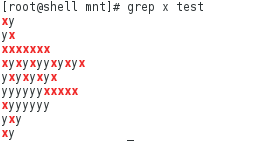
6.grep中字符匹配次数的设定
| .* | 关键字之间匹配任意字符 |
|---|---|
| * | 字符出现【0-任意次】 |
| ? | 字符出现[ 0-1]次 |
| + | 字符出现1到任意次 |
| {n} | 字符出现n次 |
| |{m,n} | 字符出现【最少出现m次,最多出现n次 |
| {0,n} | 字符出现0到n次 |
| {m,} | 字符出现至少m次 |
| xy{n}xy | 关键字出现n次 |
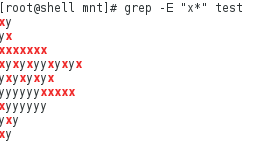
[root@shell mnt]# grep -E "x*" test #过滤x无数次
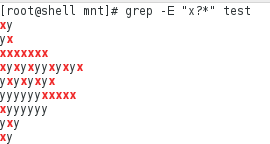
[root@shell mnt]# grep -E "x?*" test
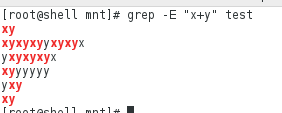
[root@shell mnt]# grep -E "x?y" test
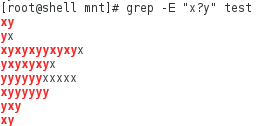
[root@shell mnt]# grep -E "x+y" test
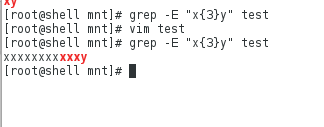
[root@shell mnt]# grep -E "x{3}y" test
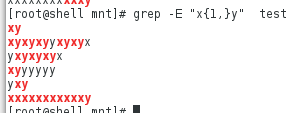
[root@shell mnt]# grep -E "x{1,}y" test
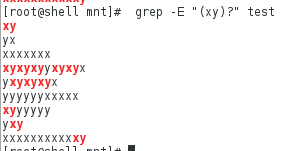
[root@shell mnt]# grep -E "(xy)?" test #字符出现0-1次
二.sed行编辑器
1.sed
- 用来操作纯ASCll码的文本
- 处理时,把当前处理的行存储在临时缓冲区中,称为“模式间“,可以指定仅仅处理那些行
- sed符合末世条件的处理,不符合条件的不与处理
- 处理完之后把缓冲区的内容送往屏幕
- 接着处理下一行,这样不断的重复,直到文件末尾
调用sed命令格式:
sed [options] ‘command’ file
sed [options] -f scriptfile file
2.p模式操作
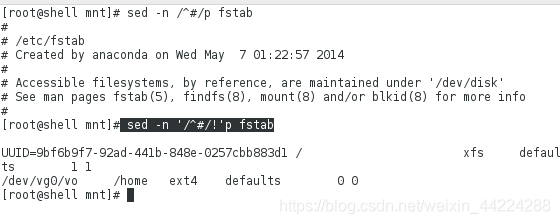
[root@shell mnt]# sed -n /^#/p fstab  ##显示#开头的行
[root@shell mnt]# sed -n '/^#/!'p fstab  ##显示不以#开头的行
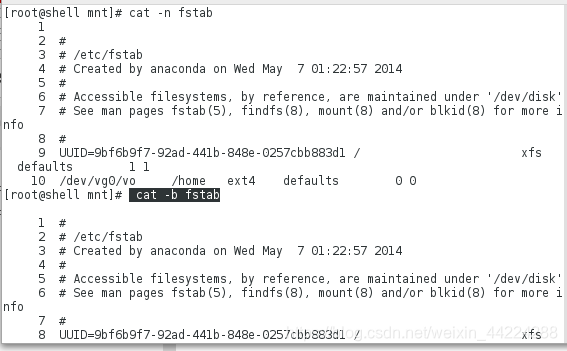
[root@shell mnt]# cat -n fstab   ##显示行号
[root@shell mnt]# cat -b fstab   ##显示行号并且不显示空白行
[root@shell mnt]# cat -n fstab  | sed -n '2,6p'  ##显示第二到第六行
[root@shell mnt]# cat -n fstab  | sed -n '6p'  ##显示第六行
[root@shell mnt]# cat -n fstab  | sed -n -e '6p' -e '2p'  ##只显示第二行和第六行
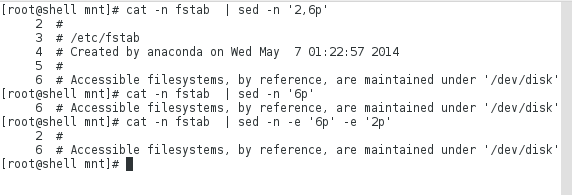
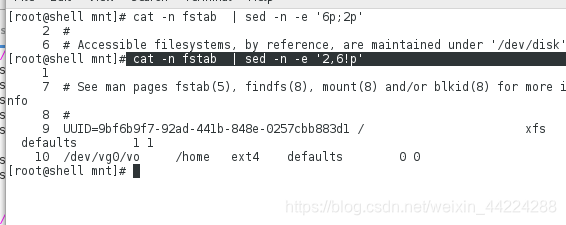
[root@shell mnt]# cat -n fstab  | sed -n -e '6p;2p'   ##只显示第二行和第六行
[root@shell mnt]# cat -n fstab  | sed -n -e '2,6!p'   ##不显示第二行和第六行,其他的全都显示
3.d模式操作
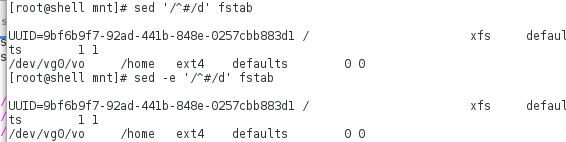
[root@shell mnt]# sed '/^#/d' fstab    ##删掉以#开头的行
[root@shell mnt]# sed -e '/^#/d' fstab  ##删掉以#号开头的行
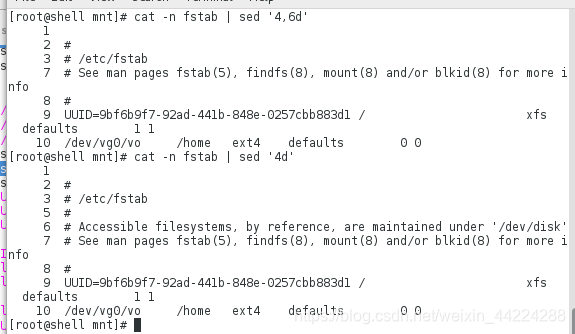
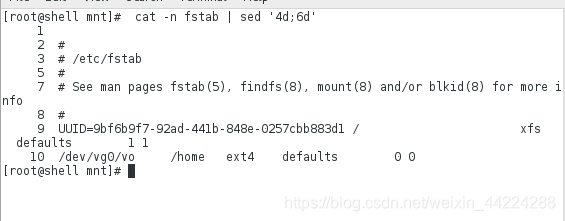
[root@shell mnt]# cat -n fstab | sed '4,6d'
[root@shell mnt]# cat -n fstab | sed '4d'  ##显示行号并删掉第四行
[root@shell mnt]# cat -n fstab | sed '4d;6d'
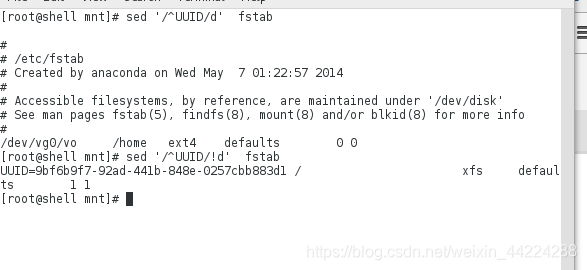
[root@shell mnt]# sed '/^UUID/d'  fstab  ##删掉以次开头的行
[root@shell mnt]# sed '/^UUID/!d'  fstab  ##不删除以此开头的行其它行都删掉
4.a模式操作
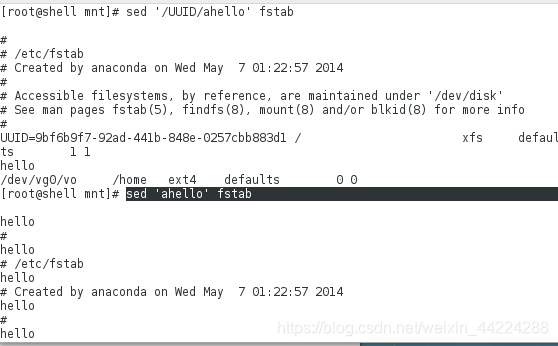
[root@shell mnt]# sed '/UUID/ahello' fstab   ##在UUID这一行后面加hello
[root@shell mnt]# sed 'ahello' fstab
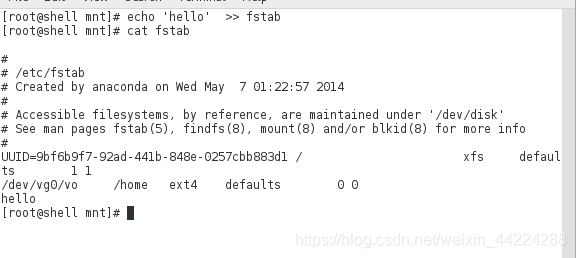
[root@shell mnt]# echo 'hello' >> fstab ##文件最后添加hello,直接更改文件内容
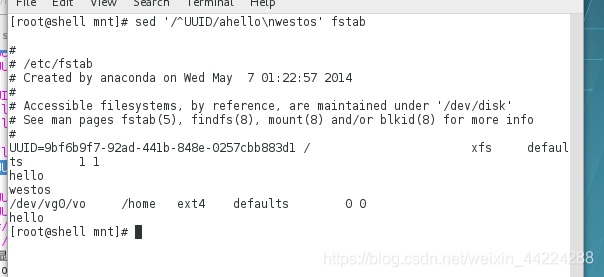
[root@shell mnt]# sed '/^UUID/ahello\nwestos' fstab ##在UUID这一行后面加hello,换行后在加westos
5.i模式
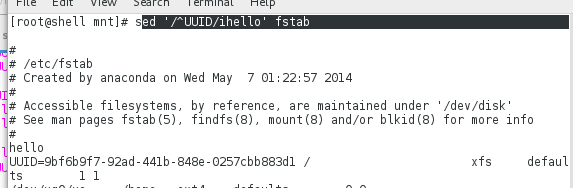
[root@shell mnt]# sed '/^UUID/ihello' fstab ##在UUID的前一行添加hello
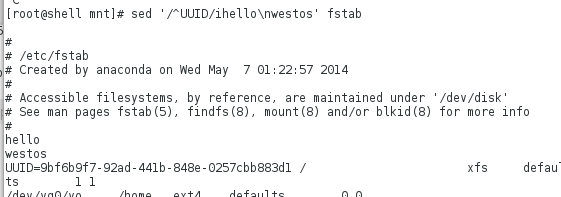
[root@shell mnt]# sed '/^UUID/ihello\nwestos' fstab ##在UUID的前一行添加hello,并且换行再添加westos
6.w模式
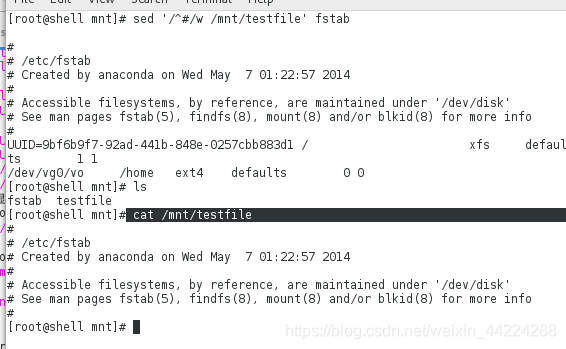
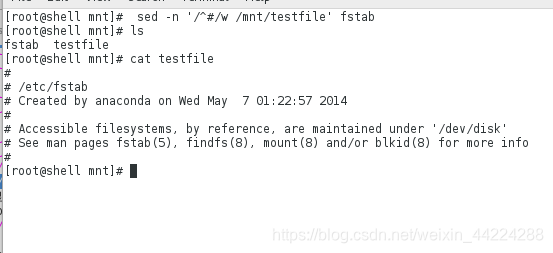
[root@shell mnt]# sed '/^#/w /mnt/testfile' fstab
[root@shell mnt]# sed -n '/^#/w /mnt/testfile' fstab  ##fstab下的以#号开头的都考到/mnt/testfile,-n表示不显示内容
7.sed的其它用法
(1)内容的添加及行号的显示
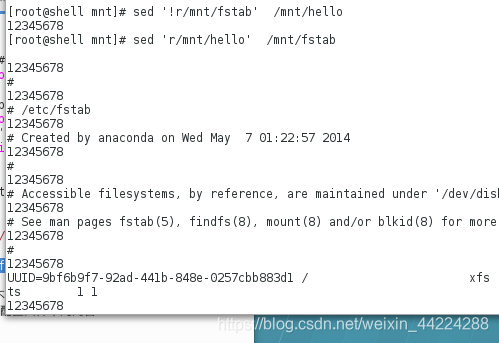
[root@shell mnt]# sed '6r /mnt/hello' /mnt/fstab ##/mnt/fstab的第六行添加/mnt/hello里面的内容

[root@shell mnt]# sed '!r/mnt/fstab'  /mnt/hello  ##/mnt/hello下的每一行都不添加/mnt/fstab里面的内容
[root@shell mnt]# sed 'r/mnt/hello'  /mnt/fstab  ##/mnt/fstab中的每一行添加/mnt/hello里面的内容
-
sed ‘s/27/67/g’ ifcfg-br0 ##替换并显示但不更改文件中的内容
-
sed ‘s/27/67/g’ -i ifcfg-br0 ##替换并且更改配置文件中的内容
[root@shell mnt]# sed -n '/^UUID/=' fstab  ##显示行号
[root@shell mnt]# sed -ne '/^UUID/=;/^UUID/p' fstab  ##显示内容并显示行号
[root@shell mnt]# sed -ne '/^UUID/=;/^UUID/p' fstab  | sed 'N;s/\n//g'  ##N提前提取模式空间的内容,即俩个的输入合并
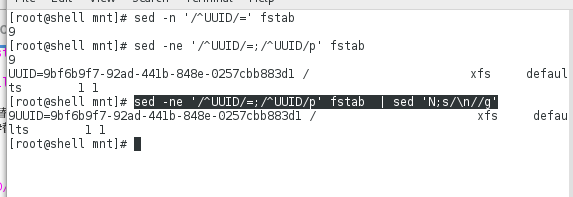
注:N表示提前提取模式空间的内容
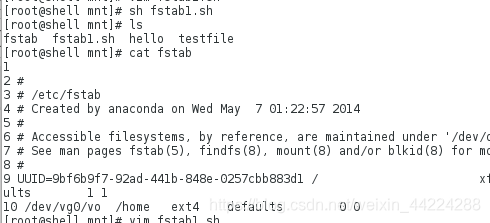
练习:写一个脚本,再/mnt/fstab中添加行号
[root@shell mnt]# vim fstab1.sh
脚本内容为:

验证如下:
(2)文件内容的修改,替换和添加
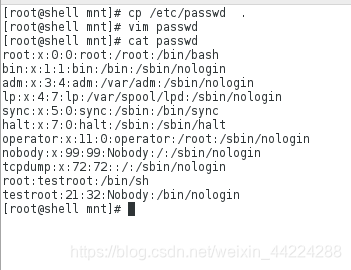
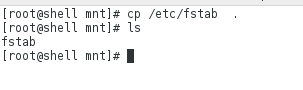
[root@shell mnt]# cp /etc/passwd .
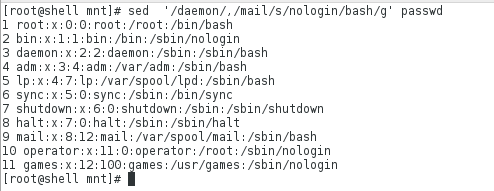
[root@shell mnt]# sed '/s/nologin/bash/g' passwd
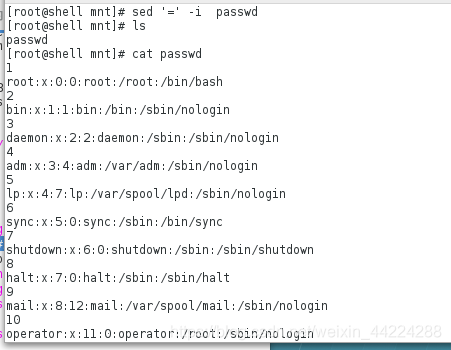
[root@shell mnt]# sed '=' -i passwd ##显示行号
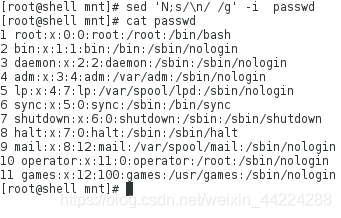
[root@shell mnt]# sed 'N;s/\n/ /g' -i passwd ##追加
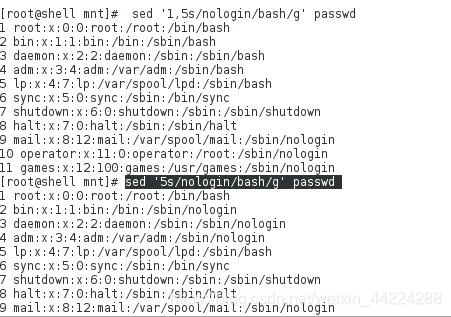
[root@shell mnt]# sed '1,5s/nologin/bash/g' passwd ##修改1到5行
[root@shell mnt]# sed '5s/nologin/bash/g' passwd ##修改第五行
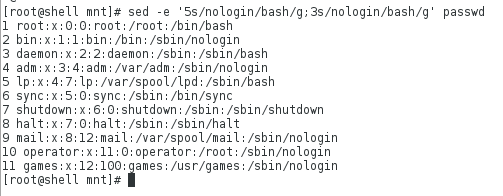
[root@shell mnt]# sed -e '5s/nologin/bash/g;3s/nologin/bash/g' passwd #修改第一行和第五行
[root@shell mnt]# sed '/daemon/,/mail/s/nologin/bash/g' passwd #修改以/daemon/到/mail中的内容
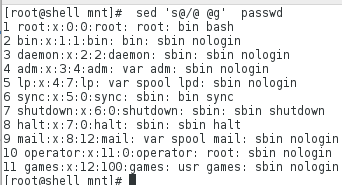
[root@shell mnt]# sed 's@/@ @g' passwd ##把该文件下的/换成空格
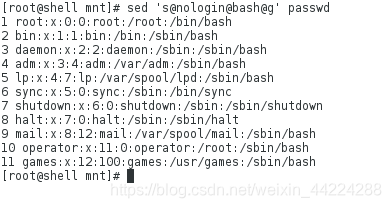
[root@shell mnt]# sed 's@nologin@bash@g' passwd ##替换全文的nologin为bash的另一种方法
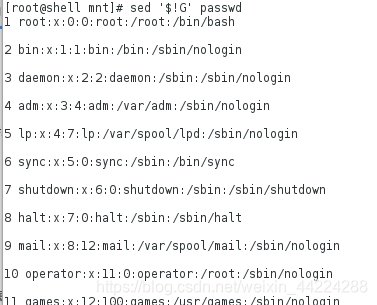
[root@shell mnt]# sed '$!G' passwd   ##每行后面都加空白行
[root@shell mnt]# sed -n '$p' passwd   ##打印最后一行

练习:
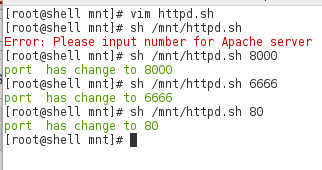
编辑脚本,当输出为8080,或6666时更改httpd的端口,当输出为空时显示要输入,输出不符合时显示错误
[root@shell mnt]# vim httpd.sh
脚本编辑内容为:
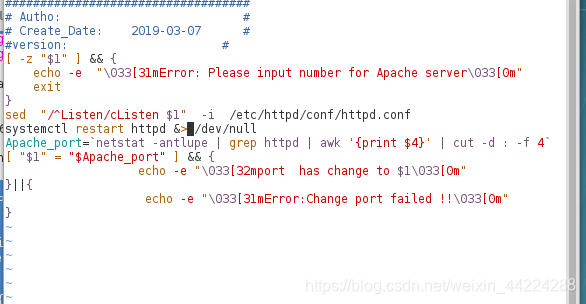
注意:$要用“”符号进行转换,=为绝对等于,而eq只是比较整数的大小
验证如下:
三.awk报告生成器
1.awk
awk处理机制:逐行处理文本,支持在处理第一行之前做一些准备工作,以及在处理完最后一行做一些总结性质的工作。
awk在命令格式上分别体现如下:
- BEGIN{}:读入第一行文本之前执行,一般用来初始化操作
- {}:逐行读入文本,执行相应的处理。是最常见的编辑指令块
- END{}:处理完最后以行文本后执行,一般用来输出处理结果
2.awk的使用
- 分隔符:-F 或 空格
- FILENAME:逐行处理
- 不加引号默认执行的动作
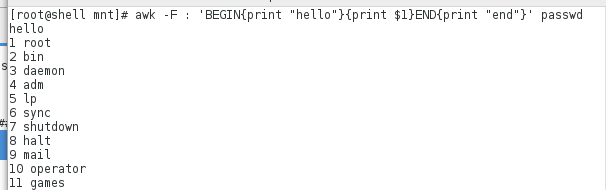
[root@localhost mnt]# awk -F : 'BEGIN{print "hello"}{print $1}END{print "end"}' passwd #在该文件下的第一列打印一hello开头以end结尾
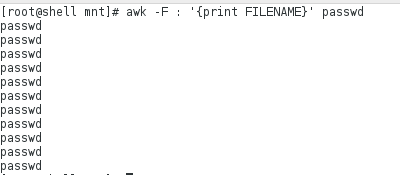
[root@localhost mnt]# awk -F : '{print FILENAME}' passwd #逐行处理该文件
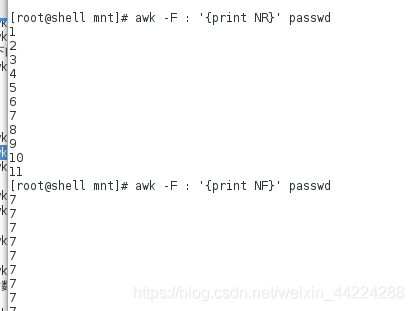
[root@localhost mnt]# awk -F : '{print NR}' passwd  #打印行
[root@localhost mnt]# awk -F : '{print NF}' passwd   #打印列
[root@localhost mnt]# awk -F : 'BEGIN{print "NAME"}'
NAME

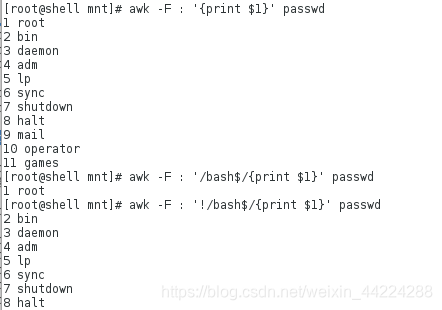
[root@localhost mnt]# awk -F : '{print $1}' passwd  #打印第一列
[root@localhost mnt]# awk -F : '/bash$/{print $1}' passwd  #以bash结尾的第一列
[root@localhost mnt]# awk -F : '!/bash$/{print $1}' passwd  #不以bash结尾的第一列
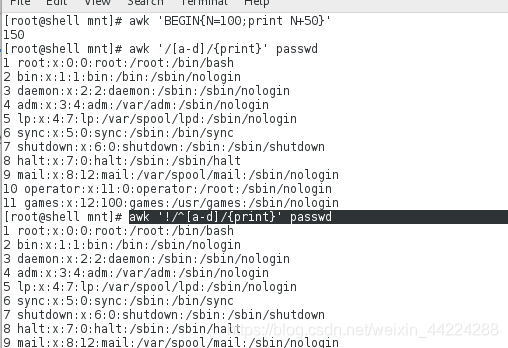
[root@localhost mnt]# awk 'BEGIN{N=0}/bash$/{N++}END{print N}' passwd #显示该文件中能登陆系统的用户的个数

[root@localhost mnt]# awk 'BEGIN{N=100;print N+50}'  ##100+50
[root@localhost mnt]# awk '/[a-d]/{print}' passwd #打印a-d的
[root@localhost mnt]# awk '/^[a-d]/{print}' passwd #以a-d开头的
[root@localhost mnt]# awk '!/^[a-d]/{print}' passwd  #不以a-d开头的
[root@localhost mnt]# awk '/^[^a-d]/{print}' passwd  #不以a-d开头的另一种表示
[root@localhost mnt]# awk '!/^[a-d]/{print}' passwd  #不以a-d开头的另一种表示
[root@localhost mnt]# awk '/^[!a-d]/{print}' passwd
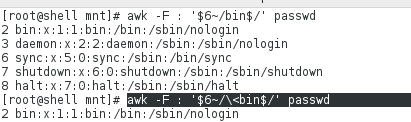
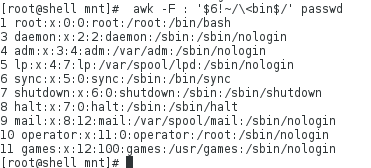
[root@localhost mnt]# awk -F : '$6~/bin$/' passwd  #第6列以bin结尾的,开头任意
[root@localhost mnt]# awk -F : '$6~/\<bin$/' passwd  #第6列以只为bin
[root@localhost mnt]# awk -F : '$6!~/\<bin$/' passwd  #第6列以不只为bin的打印出来
练习:
(1)用户的家目录不再home底下并且能登陆系统的用户,并且把这样的用户显示出来
[root@localhost mnt]# useradd -d /mnt/hello hello  ##建立hello家目录在/mnt下
[root@localhost mnt]# ls /home/
[root@localhost mnt]# awk -F : '$6!~/^\/home/&&/bash$/{print $1}'   /etc


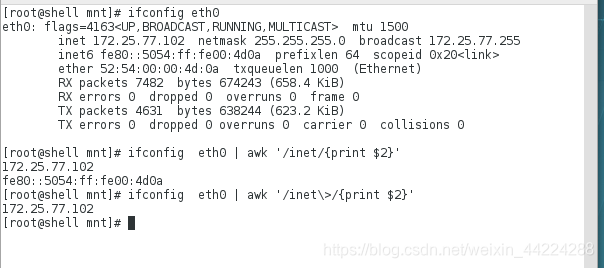
(2)抓取eth0网卡的ip
ifconfig
ifconfig  eth0 | awk '/inet\>/{print $2}'
四.find命令
find -name -type
(1)查找目录下的文件
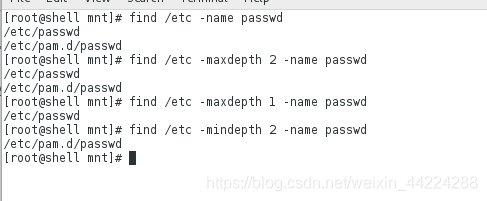
[root@localhost mnt]# find /etc -name passwd
[root@localhost mnt]# find /etc -maxdepth 2 -name passwd
[root@localhost mnt]# find /etc -maxdepth 1 -name passwd
[root@localhost mnt]# find /etc -mindepth 2 -name passwd
(2)根据文件的组及用户查找文件
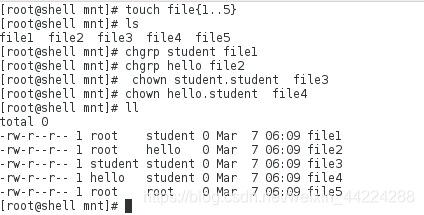
[root@localhost mnt]# find /mnt/ -group student
[root@localhost mnt]# find /mnt/ -user root
[root@localhost mnt]# find /mnt/ -user root -a -group student
[root@localhost mnt]# find /mnt/ -user root -o -group student
[root@localhost mnt]# find /mnt/ -user root -o  -not -group student

(3)根据文件大小来查找文件
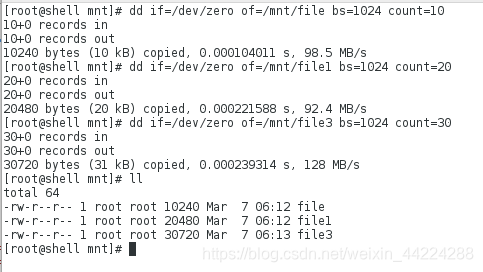
[root@localhost mnt]# find /mnt -size 20k
root@localhost mnt]# find /mnt -size -20k  #"-"表示小于
[root@localhost mnt]# find /mnt -size +20k #“+”表示大于
[root@localhost mnt]# find /mnt -size +20k -exec rm -rf {} \;  ##发现/mnt下的大于20k的文件并且删除,加\为转义,;为命令中的,如果不加转义,则表示为另一条命令。
 (3)根据文件权限查找文件
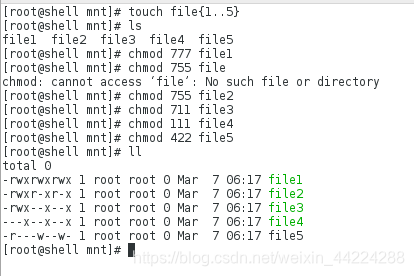
[root@localhost mnt]# find /etc -type l #发现/etc下的类型为链接的
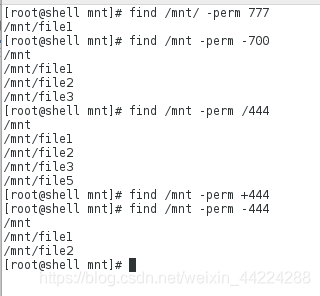
[root@localhost mnt]# find /mnt/ -perm 444 ##发现权限为444的
[root@localhost mnt]# find /mnt -perm -200 ##发现权限的三位都有大于2的文件,就指每一位必须有w的文件
[root@localhost mnt]# find /mnt -perm /444 ##三个里面只要有一个权限为4
[root@localhost mnt]# find /mnt -perm +444 ##与/的意思一样,但是是7以前的版本用的