关于Linux环境Nginx安装与调试以及PHP安装参考此文即可:http://blog.csdn.net/unix21/article/details/8544922
linux版本:64位CentOS 6.4
Nginx版本:nginx1.8.0
php版本:php5.5.28 & php5.4.44
所谓多版本多版本PHP就是php5.4和5.5以及其他版本在同一台服务器。
假如php5.5是主版本已经安装在/usr/local/php目录下,那么再安装其他版本的php再指定不同安装目录即可。
安装第二个版本的PHP
# wget http://cn2.php.net/get/php-5.4.44.tar.gz/from/this/mirror
# tar zxvf php-5.4.44.tar.gz
# cd php-5.4.44
#./configure --prefix=/usr/local/php5.4.44 \
--with-curl \
--with-freetype-dir \
--with-gd \
--with-gettext \
--with-iconv-dir \
--with-kerberos \
--with-libdir=lib64 \
--with-libxml-dir \
--with-mysql \
--with-mysqli \
--with-openssl \
--with-pcre-regex \
--with-pdo-mysql \
--with-pdo-sqlite \
--with-pear \
--with-png-dir \
--with-xmlrpc \
--with-xsl \
--with-zlib \
--enable-fpm \
--enable-bcmath \
--enable-libxml \
--enable-inline-optimization \
--enable-gd-native-ttf \
--enable-mbregex \
--enable-mbstring \
--enable-pcntl \
--enable-shmop \
--enable-soap \
--enable-sockets \
--enable-sysvsem \
--enable-xml \
--enable-zip
# make && make install
# cp -R ./sapi/fpm/php-fpm.conf /usr/local/php5.4.44/etc/php-fpm.conf
# cp php.ini-development /usr/local/php5.4.44/lib/php.ini
# cp -R ./sapi/fpm/php-fpm /etc/init.d/php-fpm5.4.44
修改php-fpm.conf的侦听端口为9001,因为主版本5.5.28是侦听9000。
; Note: This value is mandatory.
listen = 127.0.0.1:9001
启动php-fpm
# /etc/init.d/php-fpm5.4.44
php安装成功查看进程
#ps aux|grep php

这样就已经起好php-fpm了。
配置Nginx
增加一段新的端口8054的配置并指向到9001以及指定目录即可:
server {
listen 8054;
server_name localhost;
location / {
#root html;
root /usr/www5.4.44;
index index.html index.htm;
}
error_page 500 502 503 504 /50x.html;
location = /50x.html {
root html;
}
location ~ \.php$ {
root html;
fastcgi_pass 127.0.0.1:9001;
fastcgi_index index.php;
include fastcgi_params;
fastcgi_param SCRIPT_FILENAME /usr/www5.4.44$fastcgi_script_name;
}
}
nginx的配置文件nginx.conf在
# cd /usr/local/nginx/conf
完整的nginx配置如图:
#user  nobody;
worker_processes  4;

#error_log  logs/error.log;
#error_log  logs/error.log  notice;
#error_log  logs/error.log  info;

#pid        logs/nginx.pid;


events {
    worker_connections  1024;
}


http {
    include       mime.types;
    default_type  application/octet-stream;

    #log_format  main  '$remote_addr - $remote_user [$time_local] "$request" '
    #                  '$status $body_bytes_sent "$http_referer" '
    #                  '"$http_user_agent" "$http_x_forwarded_for"';

    #access_log  logs/access.log  main;

    sendfile        on;
    #tcp_nopush     on;

    #keepalive_timeout  0;
    keepalive_timeout  65;

    #gzip  on;

    server {
        listen       80;
        server_name  localhost;

        #charset koi8-r;

        #access_log  logs/host.access.log  main;

        location / {
            #root   html;
			root /usr/www;
            index  index.html index.htm;
        }

        #error_page  404              /404.html;

        # redirect server error pages to the static page /50x.html
        #
        error_page   500 502 503 504  /50x.html;
        location = /50x.html {
            root   html;
        }

        # proxy the PHP scripts to Apache listening on 127.0.0.1:80
        #
        #location ~ \.php$ {
        #    proxy_pass   http://127.0.0.1;
        #}

        # pass the PHP scripts to FastCGI server listening on 127.0.0.1:9000
        #
        #location ~ \.php$ {
        #    root           html;
        #    fastcgi_pass   127.0.0.1:9000;
        #    fastcgi_index  index.php;
        #    fastcgi_param  SCRIPT_FILENAME  /scripts$fastcgi_script_name;
        #    include        fastcgi_params;
        #}

		location ~ \.php$ {
		root html;
		fastcgi_pass 127.0.0.1:9000;
		fastcgi_index index.php;
		include fastcgi_params;
		fastcgi_param SCRIPT_FILENAME /usr/www$fastcgi_script_name;
		}

        # deny access to .htaccess files, if Apache's document root
        # concurs with nginx's one
        #
        #location ~ /\.ht {
        #    deny  all;
        #}
    }

	server {
        listen       8054;
        server_name  localhost;

        location / {
            #root   html;
			root /usr/www5.4.44;
            index  index.html index.htm;
        }

        error_page   500 502 503 504  /50x.html;
        location = /50x.html {
            root   html;
        }

		location ~ \.php$ {
		root html;
		fastcgi_pass 127.0.0.1:9001;
		fastcgi_index index.php;
		include fastcgi_params;
		fastcgi_param SCRIPT_FILENAME /usr/www5.4.44$fastcgi_script_name;
		}

    }


    # another virtual host using mix of IP-, name-, and port-based configuration
    #
    #server {
    #    listen       8000;
    #    listen       somename:8080;
    #    server_name  somename  alias  another.alias;

    #    location / {
    #        root   html;
    #        index  index.html index.htm;
    #    }
    #}


    # HTTPS server
    #
    #server {
    #    listen       443 ssl;
    #    server_name  localhost;

    #    ssl_certificate      cert.pem;
    #    ssl_certificate_key  cert.key;

    #    ssl_session_cache    shared:SSL:1m;
    #    ssl_session_timeout  5m;

    #    ssl_ciphers  HIGH:!aNULL:!MD5;
    #    ssl_prefer_server_ciphers  on;

    #    location / {
    #        root   html;
    #        index  index.html index.htm;
    #    }
    #}

}
重启nginx
# /usr/local/nginx/sbin/nginx -s reload
注意需要防火墙增加新端口的开启,不然无法访问:
防火墙配置
注意如果你希望在本地机器例如xp访问虚拟机的网页,如果是centos6需要修改防火墙启动80端口
# cd /etc/sysconfig
修改iptables文件,或者直接用vim编辑
# vim /etc/sysconfig/iptables
添加下面一行,打开防火墙80端口:
-A INPUT -m state --state NEW -m tcp -p tcp --dport 8054 -j ACCEPT
重启防火墙
# /etc/init.d/iptables restart
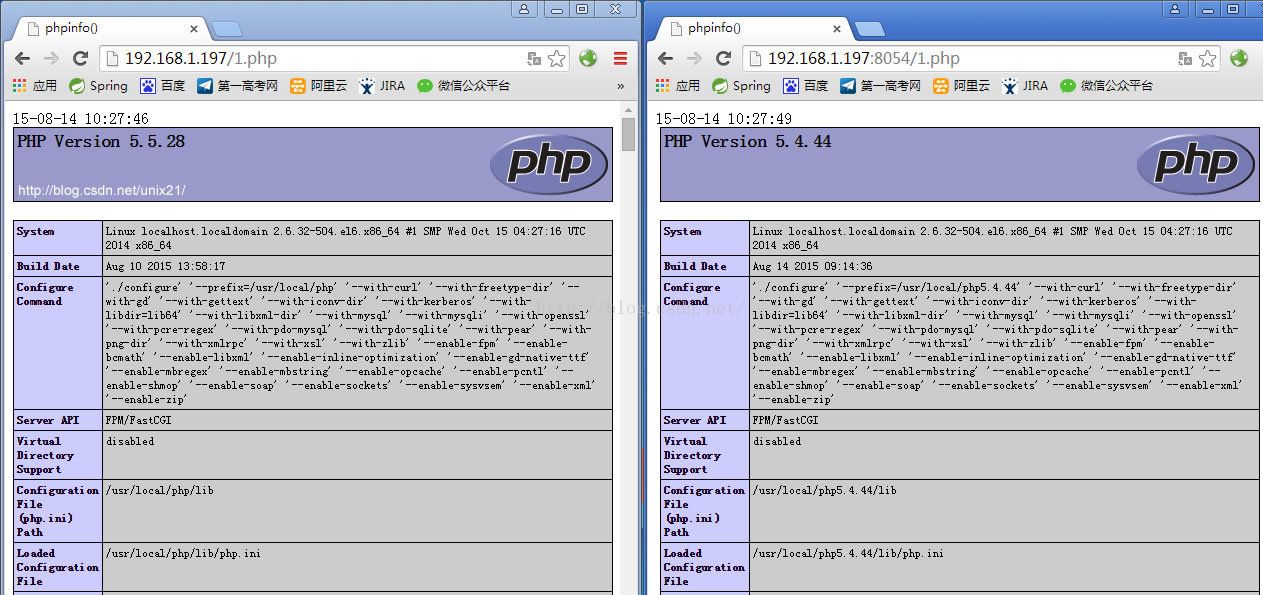
测试是否成功,查看phpinfo()
再分享一下我老师大神的人工智能教程吧。零基础!通俗易懂!风趣幽默!还带黄段子!希望你也加入到我们人工智能的队伍中来!http://www.captainbed.net