版权声明:欢迎交流,转载!保留文章链接即可。 https://blog.csdn.net/qq_21405949/article/details/82528947
轮番效果在很多的网站主页或者手机应用端都能看到,在微信小程序中使用swiper组件来实现图片轮番,今天的小例子效果如下:
为了方便演示我将动画切换的间隔调整为3s,现实项目中一般为5s,具体看项目需求而定。
实现图片轮番使用swiper滑块视图容器组件,页面结构文件代码如下:
<!--mySwiper.wxml-->
<view class="container">
    <swiper indicator-dots="{{indicatorDots}}"
    autoplay="{{autoplay}}" interval="{{interval}}" duration="{{duration}}">
        <block wx:for="{{imgUrls}}">
            <swiper-item>
               <image src="{{item}}" class="slide-image" width="355" height="150"/>
            </swiper-item>
        </block>
    </swiper>
</view>
忽略最外层的父容器view和组件属性,页面文件结构简化如下:
<swiper>
        <block wx:for="{{imgUrls}}">
            <swiper-item>
                <image/>
            </swiper-item>
        </block>
 </swiper>
以上代码看出,整个轮番图的代码是有一个swiper组件,包含着多个swiper-item组件形成的,其中swiper-item中放置的是image。
的作用是控制属性绑定一个imgUrls数组,使用数组中各项的数据重复渲染该组件。block标签并不会在页面中渲染,如需了解更多可进入官方文档:https://mp.weixin.qq.com/debug/wxadoc/dev/framework/view/wxml/list.html?t=201715
中了解更多关于 block wx:for 的内容。代码中看到 的 {{}} 符号是Mustache
语法,意思是将双大括号中的变量名中的数据取出,实现数据绑定,这些变量在同名文件的.js文件中data对象中声明,如下:
// mySwiper.js
Page({
  data:{
     imgUrls: [
      '/asserts/img/001.jpg',
      '/asserts/img/002.jpg',
      '/asserts/img/003.jpg'
    ],
    indicatorDots: true,
    autoplay: true,
    interval: 3000,
    duration: 1000
  },
  onLoad:function(options){
    // 生命周期函数--监听页面加载

  }
}
其中,
indicator-dots: 是否显示面板指示点,默认为false;
autoplay:是否自动切换,默认为false;
interval:自动切换时间间隔,默认5000ms;
duration: 滑动动画时长,默认为1000ms;
需要注意的是swiper组件需要给他一个宽度,不然swiper不显示,这里给了一个具体的宽高,并设置居中显示:
/* pages/mySwiper/mySwiper.wxss */ swiper{
margin: 0 auto;
height: 200px;
width: 300px; }
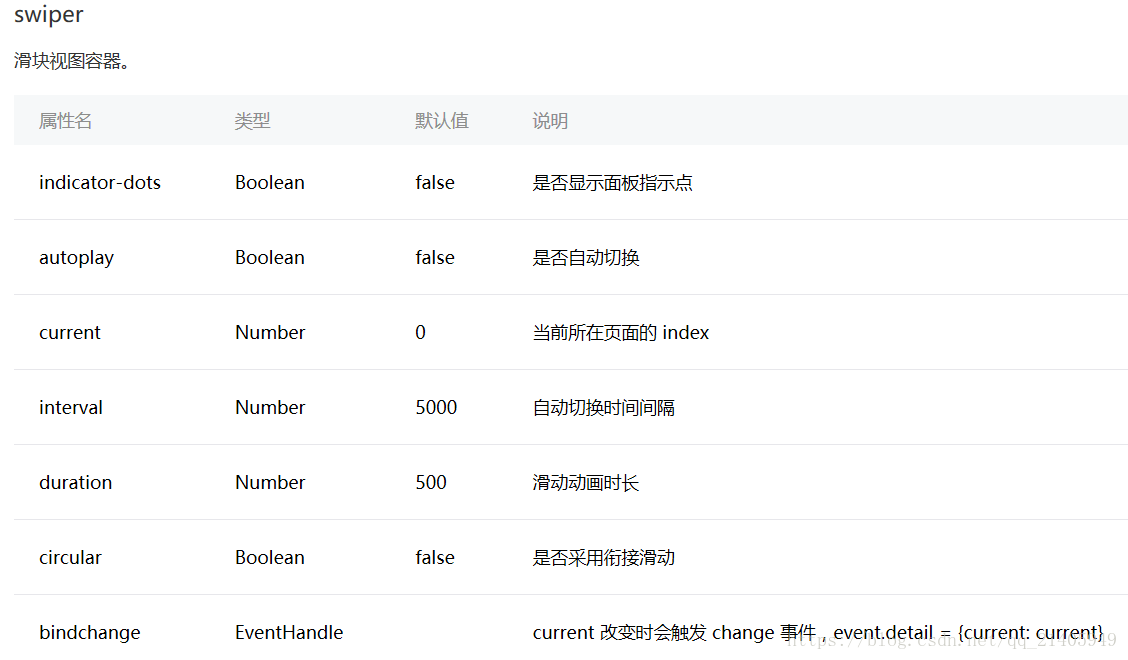
详细swiper属性说明如下: