1 nginx 介绍
Nginx官网 nginx.org,最新版1.13,最新稳定版1.12
Nginx应用场景:web服务、反向代理、负载均衡
Nginx著名分支,淘宝基于Nginx开发的Tengine,使用上和Nginx一致,服务名,配置文件名都一样,和Nginx的最大区别在于Tenging增加了一些定制化模块,在安全限速方面表现突出,另外它支持对js,css合并
Nginx核心+lua相关的组件和模块组成了一个支持lua的高性能web容器openresty
2 nginx 安装
cd /usr/local/src
wget http://nginx.org/download/nginx-1.12.1.tar.gz
tar zxf nginx-1.12.1.tar.gz
./configure --prefix=/usr/local/nginx
make && make install
vim /etc/init.d/nginx 写入以下内容
#!/bin/bash
. /etc/init.d/functions
Nginx Settings
NGINX_SBIN="/usr/local/nginx/sbin/nginx"
NGINX_CONF="/usr/local/nginx/conf/nginx.conf"
NGINX_PID="/usr/local/nginx/logs/nginx.pid"
RETVAL=0
prog="Nginx"
start()
{
    echo -n $"Starting $prog: "
    mkdir -p /dev/shm/nginx_temp
    daemon $NGINX_SBIN -c $NGINX_CONF
    RETVAL=$?
    echo
    return $RETVAL
}
stop()
{
    echo -n $"Stopping $prog: "
    killproc -p $NGINX_PID $NGINX_SBIN -TERM
    rm -rf /dev/shm/nginx_temp
    RETVAL=$?
    echo
    return $RETVAL
}
reload()
{
    echo -n $"Reloading $prog: "
    killproc -p $NGINX_PID $NGINX_SBIN -HUP
    RETVAL=$?
    echo
    return $RETVAL
}
restart()
{
    stop
    start
}
configtest()
{
    $NGINX_SBIN -c $NGINX_CONF -t
    return 0
}
case "$1" in
  start)
        start
        ;;
  stop)
        stop
        ;;
  reload)
        reload
        ;;
  restart)
        restart
        ;;
  configtest)
        configtest
        ;;
  *)
        echo $"Usage: $0 {start|stop|reload|restart|configtest}"
        RETVAL=1
esac
 exit $RETVAL
chmod 755 /etc/init.d/nginx
chkconfig --add nginx
chkconfig nginx on
cd /usr/local/nginx/conf/; mv nginx.conf nginx.conf.bak
vim nginx.conf
user nobody nobody;
worker_processes 2;
error_log /usr/local/nginx/logs/nginx_error.log crit;
pid /usr/local/nginx/logs/nginx.pid;
worker_rlimit_nofile 51200;
events
{
    use epoll;
    worker_connections 6000;
}
http
{
    include mime.types;
    default_type application/octet-stream;
    server_names_hash_bucket_size 3526;
    server_names_hash_max_size 4096;
    log_format combined_realip '$remote_addr $http_x_forwarded_for [$time_local]'
    ' $host "$request_uri" $status'
    ' "$http_referer" "$http_user_agent"';
    sendfile on;
    tcp_nopush on;
    keepalive_timeout 30;
    client_header_timeout 3m;
    client_body_timeout 3m;
    send_timeout 3m;
    connection_pool_size 256;
    client_header_buffer_size 1k;
    large_client_header_buffers 8 4k;
    request_pool_size 4k;
    output_buffers 4 32k;
    postpone_output 1460;
    client_max_body_size 10m;
    client_body_buffer_size 256k;
    client_body_temp_path /usr/local/nginx/client_body_temp;
    proxy_temp_path /usr/local/nginx/proxy_temp;
    fastcgi_temp_path /usr/local/nginx/fastcgi_temp;
    fastcgi_intercept_errors on;
    tcp_nodelay on;
    gzip on;
    gzip_min_length 1k;
    gzip_buffers 4 8k;
    gzip_comp_level 5;
    gzip_http_version 1.1;
    gzip_types text/plain application/x-javascript text/css text/htm
    application/xml;
    server
    {
        listen 80;
        server_name localhost;
        index index.html index.htm index.php;
        root /usr/local/nginx/html;
        location ~ \.php$
        {
            include fastcgi_params;
            fastcgi_pass unix:/tmp/php-fcgi.sock;
            fastcgi_index index.php;
            fastcgi_param SCRIPT_FILENAME /usr/local/nginx/html$fastcgi_script_name;
        }
    }
}
/usr/local/nginx/sbin/nginx -t
/etc/init.d/nginx start
ps aux |grep 80
3 默认虚拟主机
vim /usr/local/nginx/conf/nginx.conf //增加
include vhost/*.conf; //在主配置文件中打开虚拟主机配置文件功能
mkdir /usr/local/nginx/conf/vhost
cd !$; vim default.conf //加入如下内容
server
{
    listen 80 default_server;  // 有这个标记的就是默认虚拟主机
    server_name aaa.com;
    index index.html index.htm index.php;
    root /data/wwwroot/default;
}
mkdir -p /data/wwwroot/default/
echo “This is a default site.”>/data/wwwroot/default/index.html
/usr/local/nginx/sbin/nginx -t
/usr/local/nginx/sbin/nginx -s reload
curl localhost
curl -x127.0.0.1:80 123.com
4 用户认证:
vim /usr/local/nginx/conf/vhost/test.com.conf//写入如下内容
server
{
    listen 80;
    server_name test.com;
    index index.html index.htm index.php;
    root /data/wwwroot/test.com;

location  /
    {
        auth_basic              "Auth";  //打开认证
        auth_basic_user_file   /usr/local/nginx/conf/htpasswd;  //指定用户密码文件
    }
}
创建访问账号密码
这里我们可以yum install -y httpd 安装这个htpasswd工具,也可以用apache自带的
/usr/local/apache2.4/bin/htpasswd -c /usr/local/nginx/conf/htpasswd lv ,根据提示输入两次密码。
-t 和 -s reload //测试配置并重新加载
创建测试目录
mkdir /data/wwwroot/test.com
创建页面
echo "test.om" > /data/wwwroot/test.com/index.html
curl 测试
curl -x127.0.0.1:80 test.com/index.html 401
curl -u lv:123 -x127.0.0.1:80 test.com/index.html 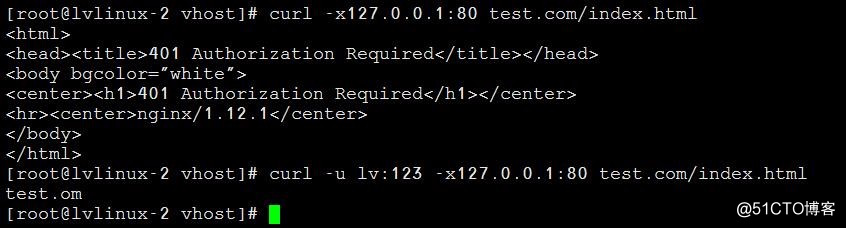
针对目录用户认证,继续编辑test.com.conf 配置文件
location 那里的根目录 更改为其他目录即可
locatiion / 改为 location /admin/
cd /data/wwwroot/test.com/
mkdir admin
cp index.html /admin/
继续测试 -t ,-s reload
curl -x127.0.0.1:80 test.com/index.html
curl -x127.0.0.1:80 test.com/admin/index.html
curl -u lv:123 -x127.0.0.1:80 test.com/admin/index.html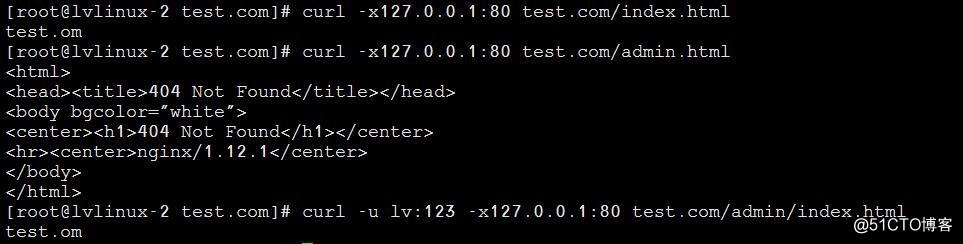
针对文件的用户认证
改为: location ~/admin/admin.php
测试方法同上
5 域名重定向
更改test.com.conf
server
{
    listen 80;
    server_name test.com test1.com test2.com; //可以认为域名跟域名别名放在一起
    index index.html index.htm index.php; //指定默认索引页
    root /data/wwwroot/test.com;
    if ($host != 'test.com' ) {
        rewrite  ^/(.*)$  http://test.com/$1  permanent;
    }
}
对比下apache 的rewrite
  RewriteCond %{HTTP_HOST} !^www.123.com$  //定义rewrite的条件,主机名(域名)不是www.123.com满足条件
        RewriteRule ^/(.*)$ http://www.123.com/$1 [R=301,L] //定义rewrite规则,当满足上面的条件时,这条规则才会执行
我们发现nginx的重定向条件语句使用了if 显得更简单。
-t -s reload
curl -x127.0.0.1:80 test1.com
server_name后面支持写多个域名,这里要和httpd的做一个对比
permanent为永久重定向,状态码为301,如果写redirect则为302
最后原谅我贴了两大段shell脚本,刚开始感觉要学的东东太多了。shell脚本还很陌生。