-
全景拼接原理简述
在同一位置拍摄的两幅或者多幅图片是单应性相关的,我们经常使用该约束将很多图像缝补起来,拼成一个全景图。
全景图像拼接最重要的两个步骤是:
1.特征匹配
2.图像拼接
在本次测试中,我使用的是sift特征匹配,在特征匹配之后,我们使用RANSAC算法求解得到单应性矩阵。其基本思想是,数据中包含正确的点和噪声点,合理的模型能够在描述正确数据点的同时摒弃噪声点,在这里的用途就是排除掉不符合大部分几何变换的匹配,而后使正确的点进行匹配,通过单应矩阵来对齐两张图片的内容。 -
针对不同场景做全景拼接
代码如下:
from pylab import *
from numpy import *
from PIL import Image

#If you have PCV installed, these imports should work
from PCV.geometry import homography, warp
from PCV.localdescriptors import sift

"""
This is the panorama example from section 3.3.
"""

#set paths to data folder
featname = ['zs'+str(i+1)+'.sift' for i in range(5)]
imname = ['zs'+str(i+1)+'.jpg' for i in range(5)]

#extract features and match
l = {}
d = {}
for i in range(5):
    sift.process_image(imname[i],featname[i])
    l[i],d[i] = sift.read_features_from_file(featname[i])

matches = {}
for i in range(4):
    matches[i] = sift.match(d[i+1],d[i])

#visualize the matches (Figure 3-11 in the book)
for i in range(4):
    im1 = array(Image.open(imname[i]))
    im2 = array(Image.open(imname[i+1]))
    figure()
    sift.plot_matches(im2,im1,l[i+1],l[i],matches[i],show_below=True)


#function to convert the matches to hom. points
def convert_points(j):
    ndx = matches[j].nonzero()[0]
    fp = homography.make_homog(l[j+1][ndx,:2].T)
    ndx2 = [int(matches[j][i]) for i in ndx]
    tp = homography.make_homog(l[j][ndx2,:2].T)

    # switch x and y - TODO this should move elsewhere
    fp = vstack([fp[1],fp[0],fp[2]])
    tp = vstack([tp[1],tp[0],tp[2]])
    return fp,tp


#estimate the homographies
model = homography.RansacModel()

fp,tp = convert_points(1)
H_12 = homography.H_from_ransac(fp,tp,model)[0] #im 1 to 2

fp,tp = convert_points(0)
H_01 = homography.H_from_ransac(fp,tp,model)[0] #im 0 to 1

tp,fp = convert_points(2) #NB: reverse order
H_32 = homography.H_from_ransac(fp,tp,model)[0] #im 3 to 2

tp,fp = convert_points(3) #NB: reverse order
H_43 = homography.H_from_ransac(fp,tp,model)[0] #im 4 to 3


#warp the images
delta = 2000 # for padding and translation

im1 = array(Image.open(imname[1]), "uint8")
im2 = array(Image.open(imname[2]), "uint8")
im_12 = warp.panorama(H_12,im1,im2,delta,delta)

im1 = array(Image.open(imname[0]), "f")
im_02 = warp.panorama(dot(H_12,H_01),im1,im_12,delta,delta)

im1 = array(Image.open(imname[3]), "f")
im_32 = warp.panorama(H_32,im1,im_02,delta,delta)

im1 = array(Image.open(imname[4]), "f")
im_42 = warp.panorama(dot(H_32,H_43),im1,im_32,delta,2*delta)


figure()
imshow(array(im_42, "uint8"))
axis('off')
show()
-
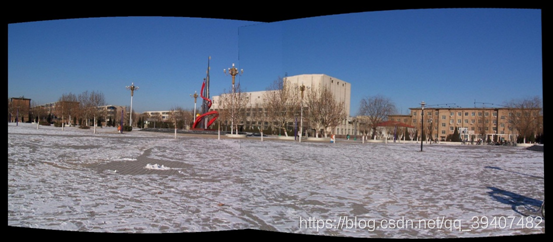
匹配结果
-
总结
要进行图像的无缝拼接,我们的目标就是了获得透视矩阵H,而为了获得透视矩阵,首先需要寻找图像的特征点(sift、surf等等),然后把两个图像中相同的特征点找出来,再根据匹配的特征点计算透视矩阵H。计算出透视矩阵H之后,剩下的就是把图2经过H矩阵进行透视变换,让图2在图1的坐标系下表示,这时再进行简单的平移拼接即可实现。