阶段介绍:
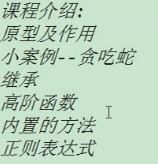
今天的内容:
一个常识:

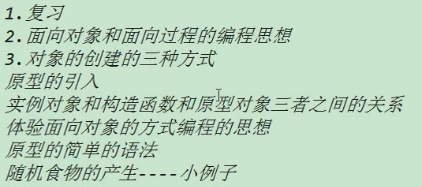
复习:


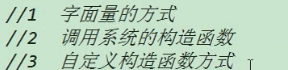
创建对象的三种方式:


 1 <!DOCTYPE html>
 2 <html lang="en">
 3     <head>
 4         <meta charset="UTF-8">
 5         <title>这是网页的标题</title>
 6     </head>
 7     <body>
 8
 9         <script src="js/common.js"></script>
10         <script>
11             // 1 使用字面量的方式
12             var person1 ={
13                 name:"tom",
14                 age:18,
15                 eat:function () {
16                     console.log("我爱吃东西");
17                 }
18             };
19             //2 使用系统的构造函数
20             var person2 = new Object();
21             person2.name = "alex";
22             person2.age = 30;
23             person2.eat =function () {
24                 console.log("我爱吃饭!");
25             };
26             //3 自定义构造函数
27             function Person(name, age) { //当名字是大写的时候就是类,小写的时候是函数
28                 this.name = name;
29                 this.age = age;
30                 this.eat = function () {
31                     console.log("我爱吃面!");
32                 };
33             }
34             var person3 = new Person("tom",18);
35             console.log(person3 instanceof Person);
36
37         </script>
38     </body>
39 </html>
第三种用的最多,也是最方便的方式。
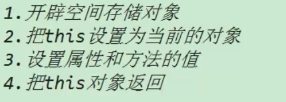
自定义构造函数 创建对象做的事情:
创建对象,也成实例化。
工厂方式创建对象:
 1 <!DOCTYPE html>
 2 <html lang="en">
 3     <head>
 4         <meta charset="UTF-8">
 5         <title>这是网页的标题</title>
 6     </head>
 7     <body>
 8
 9         <script src="js/common.js"></script>
10         <script>
11             //工厂方式创建对象  factory pattern
12             //通过工厂方式创建对象
13             function createObjByFactoryPattern(name,age) {
14                 var obj = new Object();
15                 obj.name = name;
16                 obj.age = age;
17                 obj.eat = function () {
18                     console.log("我爱吃饭");
19                 };
20                 return obj;
21             }
22             var p1 = createObjByFactoryPattern("tom",18);
23         </script>
24     </body>
25 </html>
工厂方式创建对象 和自定义构造函数方法创建对象 的区别:
 1 <!DOCTYPE html>
 2 <html lang="en">
 3     <head>
 4         <meta charset="UTF-8">
 5         <title>这是网页的标题</title>
 6     </head>
 7     <body>
 8
 9         <script src="js/common.js"></script>
10         <script>
11             //工厂方式创建对象  factory pattern
12             //通过工厂方式创建对象
13             function createObjByFactoryPattern(name,age) {
14                 var obj = new Object();
15                 obj.name = name;
16                 obj.age = age;
17                 obj.eat = function () {
18                     console.log("我爱吃饭");
19                 };
20                 return obj;
21             }
22             //自定义构造函数方式 创建对象
23             function Person(name, age) {
24                 this.name = name;
25                 this.age = age;
26                 this.eat = function () {
27                     console.log("我爱吃饭");
28                 };
29             }
30
31
32
33         </script>
34     </body>
35 </html>

注:我们一般都是使用自定义函数的方式来创建对象。其实可以将其理解为一个类,这里下面称之为类。
类(借用其他语言概念)和实例对象的关系:

是先有类,再有类的。
补:console.dir(obj) 可以将obj 的结构显示出来。
 1 <!DOCTYPE html>
 2 <html lang="en">
 3     <head>
 4         <meta charset="UTF-8">
 5         <title>这是网页的标题</title>
 6     </head>
 7     <body>
 8
 9         <script src="js/common.js"></script>
10         <script>
11             function Person(name,age) {
12                 this.name = name;
13                 this.age =age;
14                 this.eat = function () {
15                     console.log("我爱吃东西!");
16                 };
17             }
18             var p = new Person("tom",18);
19             console.dir(p);
20             console.dir(Person);
21
22             console.log(p.constructor == Person); //true   说明 p的构造器是 Person  .
23             console.log(p.__proto__.constructor == Person); //true
24             console.log(p.__proto__.constructor == Person.prototype.constructor) //true
25
26
27             console.log(Person.prototype.constructor == Person); //true ,说明Person的构造器是它自己。
28
29
30
31
32         </script>
33     </body>
34 </html>
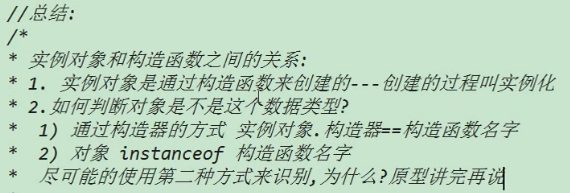
上面说的 构造函数也可以理解为 类。
原型prototype:
自定义构造函数创建对象带来的问题:
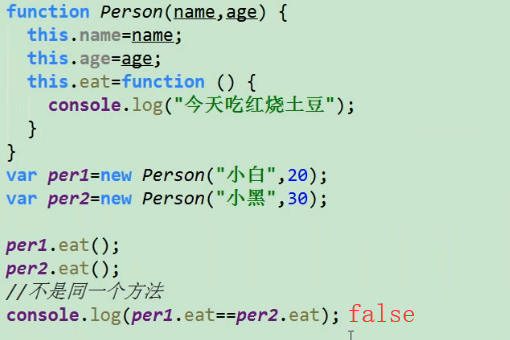
此时,如果这些方法都是完全相同的,这样就会浪费很多的内存空间。
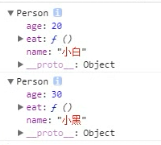
此时也可以通过console.dir() 查看per1 和 per2的结构,如下图:
可以通过下面有名函数方式解决。
 1 <!DOCTYPE html>
 2 <html lang="en">
 3     <head>
 4         <meta charset="UTF-8">
 5         <title>这是网页的标题</title>
 6     </head>
 7     <body>
 8
 9         <script src="js/common.js"></script>
10         <script>
11             function func() {
12                 console.log("我爱吃东西");
13             }
14
15             function Person(name,age) {
16                 this.name = name;
17                 this.age =age;
18                 this.eat = func;
19             }
20             var p1= new Person("tom",18);
21             var p2= new Person("egon",45);
22             console.log(p1.eat == p2.eat ); //此时是 true
23
24
25
26
27         </script>
28     </body>
29 </html>
可是,这种方式并不好,容易造成命名冲突的问题。
如下代码所示的命名冲突:
 1 <!DOCTYPE html>
 2 <html lang="en">
 3     <head>
 4         <meta charset="UTF-8">
 5         <title>这是网页的标题</title>
 6     </head>
 7     <body>
 8
 9         <script src="js/common.js"></script>
10         <script>
11             function func() {
12                 console.log("我爱吃东西");
13             }
14             func = 15; //造成了命名冲突
15             function Person(name,age) {
16                 this.name = name;
17                 this.age =age;
18                 this.eat = func;
19             };
20             var p1= new Person("tom",18);
21             var p2= new Person("egon",45);
22             console.log(p1.eat == p2.eat ); //此时是 true
23
24
25
26
27         </script>
28     </body>
29 </html>
那么问题来了,该如何解决呢?
此时就要用到原型了。
原型 作用之一 就是用来解决 数据共享,节省内存空间 这种问题的。
以上就是原型的引入。
原型的使用:
 1 <!DOCTYPE html>
 2 <html lang="en">
 3     <head>
 4         <meta charset="UTF-8">
 5         <title>这是网页的标题</title>
 6     </head>
 7     <body>
 8
 9         <script src="js/common.js"></script>
10         <script>
11             function Person(name,age) {
12                 this.name = name;
13                 this.age =age;
14             }
15             //通过 原型(prototype )来添加方法 ,可以实现数据共享,节省内存空间。
16             Person.prototype.eat = function () {
17                 console.log("我爱吃东西!");
18             };
19             var p1= new Person("tom",18);
20             var p2= new Person("egon",45);
21             console.log(p1.eat == p2.eat ); //此时是 true
22
23             //查看 两个对象的结构
24             console.dir(p1);
25             console.dir(p2);
26
27         </script>
28     </body>
29 </html>
原型它其实是将方法放到了 构造函数Person.prototype中了。
Person 作为他们的类,为他们共有。
 1 <!DOCTYPE html>
 2 <html lang="en">
 3     <head>
 4         <meta charset="UTF-8">
 5         <title>这是网页的标题</title>
 6     </head>
 7     <body>
 8
 9         <script src="js/common.js"></script>
10         <script>
11             function Person(name,age) {
12                 this.name = name;
13                 this.age =age;
14             }
15             //通过 原型(prototype )来添加方法 ,可以实现数据共享,节省内存空间。
16             Person.prototype.eat = function () {
17                 console.log("我爱吃东西!");
18             };
19             var p1= new Person("tom",18);
20             var p2= new Person("egon",45);
21             console.log(p1.eat == p2.eat ); //此时是 true
22
23
24             console.dir(p1);
25             console.dir(p2);
26             console.dir(Person);
27             //p1 和 p2的 eat 方法,都是在   Person.prototype中的。
28
29         </script>
30     </body>
31 </html>
总结:可以将 相同的方法,放入到Person.prototype (类属性中),以达到节省空间的目的。
实例对象的proto是有 下划线的,类对象没有。
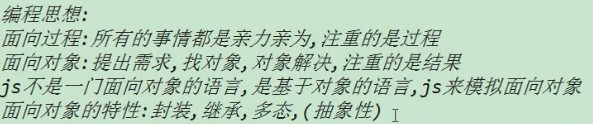
体会面向过程和面向对象的编程思想:
点击按钮,改变div 的背景颜色:
 1 <!DOCTYPE html>
 2 <html lang="en">
 3     <head>
 4         <meta charset="UTF-8">
 5         <title>这是网页的标题</title>
 6         <style>
 7             div{
 8                 width: 300px;
 9                 height: 400px;
10                 background-color: darkred;
11             }
12         </style>
13     </head>
14     <body>
15         <input type="button" value="点击" id="btn">
16         <div id="dv"></div>
17         <script>
18             //点击按钮,改变div 的背景颜色
19             document.getElementById("btn").onclick = function () {
20                 document.getElementById("dv").style.backgroundColor = "yellow";
21             };
22         </script>
23     </body>
24 </html>