到上一篇文章为止,我们已经完整地讨论了QR二维码生成的全部关键步骤和过程,从数据编码到RS码计算,到掩码的生成,再到数据的填充,在Excel中完成了QR的生成。在这篇文章中,我们将讨论一些前几篇文章所没有详细讨论的问题,同时讨论数据填充的另一种算法,寻址法。
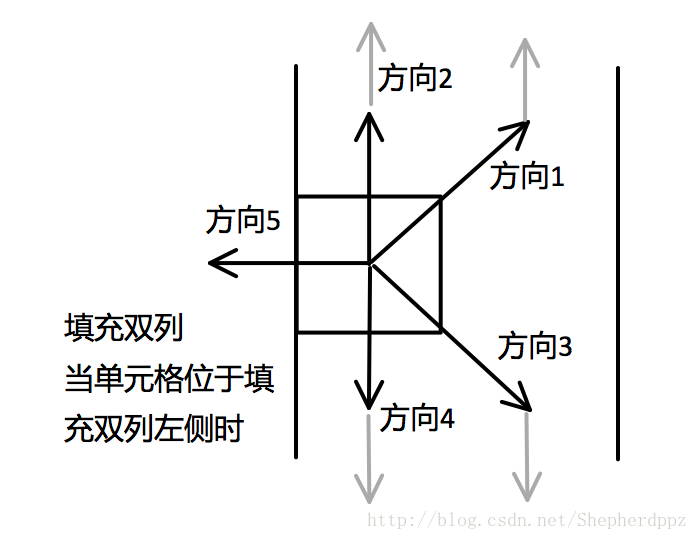
寻址法的基本思想很简单,从第一个单元格开始填充第一个数据字符位,填充完成后,从当前单元格开始搜索下一个单元格,然后填充下一个数据字符位。由于二维码填充时是以“双列”为单位逐列填充的,因此,在一般的情况下,当前单元格的位置确定后,可以很容易在固定的方向上找到下一个单元格。例如,若当前单元格位于当前“双列”的右侧时,下一个单元格只有可能位于三个不同的方向上,如下图所示:

搜索下一个单元格时,首先搜索第一个方向,如果第一个方向上的单元格不是非数据区域(除了功能图形、格式信息和版本信息以外的区域,在本算法中,数据区域已经事先填充了数字3),则第一个方向上的单元格就是下一个单元格,否则搜索第二个方向。在搜索第二个方向时,需要遍历第二个方向上所有的单元格,搜索到的第一个数据区域单元格就是下一个单元格,否则继续搜索第三个方向,直到找到下一个单元格。
以上算法需要区别当前单元格的位置,如果当前单元格位于当前“双列”的左侧时,搜索的方向和顺序是不同的,如下图所示》
根据上述算法,我们需要构造两个函数,分别定义为FindNextR1和FindNextR2,代表两种不同的搜索规则,分别对应着单元格位于双列的右侧和左侧两种情况,两个函数的代码如下:
搜索规则1:
Private Function findNextR1(arr() As Byte, cd As coordinate) As coordinate
Dim x As Long
Dim y As Long
Dim nextX As Long
Dim nextY As Long
Dim s As Long
Dim i As Long

    x = cd.c
    y = cd.r
    s = UBound(arr, 1)
' search direction 1
    nextX = x - 1
    nextY = y
    If arr(nextY, nextX) = 3 Then
        findNextR1.c = nextX
        findNextR1.r = nextY
        Exit Function
    End If
' search direction 2
    For i = 1 To y - 1
        nextX = x
        nextY = y - i
        If arr(nextY, nextX) = 3 Then
            findNextR1.c = nextX
            findNextR1.r = nextY
            Exit Function
        End If
    Next
' search direction 3
    If y < s Then
        For i = 1 To s - y
            nextX = x
            nextY = y + i
            If arr(nextY, nextX) = 3 Then
                findNextR1.c = nextX
                findNextR1.r = nextY
                Exit Function
            End If
        Next
    End If

End Function
搜索规则2:
Private Function findNextR2(arr() As Byte, cd As coordinate) As coordinate
Dim x As Long
Dim y As Long
Dim nextX As Long
Dim nextY As Long
Dim s As Long
Dim i As Long

    x = cd.c
    y = cd.r
    s = UBound(arr, 1)
' search direction 1 and 2
    For i = 1 To y - 1
        nextX = x + 1
        nextY = y - i
        If arr(nextY, nextX) = 3 Then
            findNextR2.c = nextX
            findNextR2.r = nextY
            Exit Function
        End If
' search direction 2
        nextX = x
        nextY = y - i
        If arr(nextY, nextX) = 3 Then
            findNextR2.c = nextX
            findNextR2.r = nextY
            Exit Function
        End If
    Next
' search direction 3 and 4
    If y < s Then
        For i = 1 To s - y
            nextX = x + 1
            nextY = y + i
            If arr(nextY, nextX) = 3 Then
                findNextR2.c = nextX
                findNextR2.r = nextY
                Exit Function
            End If
' search direction 4
            nextX = x
            nextY = y + i
            If arr(nextY, nextX) = 3 Then
                findNextR2.c = nextX
                findNextR2.r = nextY
                Exit Function
            End If
        Next
    End If
' search direction 5
    For i = 1 To 2
        nextX = x - i
        nextY = y
        If arr(nextY, nextX) = 3 Then
            findNextR2.c = nextX
            findNextR2.r = nextY
            Exit Function
        End If
    Next
' search direction 6
    nextX = x - 1
    nextY = y - 8
    If arr(nextY, nextX) = 3 Then
        findNextR2.c = nextX
        findNextR2.r = nextY
        Exit Function
    End If
    findNextR2.c = x
    findNextR2.r = y
End Function
为配合正式的填充算法,我们还需要定义一个函数判断当前单元格是位于左侧还是右侧(代码略),根据单元格的位置确定采用的具体规则,填充算法代码如下(这段代码可以直接粘贴在本文第五节所附的QR填充代码中QRFill):
    currCell.c = s
    currCell.r = s
    ' locate to the bottom right corner of QR array
    With currCell
        j = Val(Mid(bs, 1, 1))
        QRArray(.r, .c) = j Xor mask(m, currCell)
        For i = 2 To Len(bs)
            x = LeftOrRight(currCell)
            If x = 1 Then
                currCell = findNextR1(QRArray, currCell)
            Else
                currCell = findNextR2(QRArray, currCell)
            End If
            j = Val(Mid(bs, i, 1))
            QRArray(.r, .c) = j Xor mask(m, currCell)
        Next
    End With
与前一篇文章提供的逐列法填充算法相比,寻址法所构造的填充代码更简单,逻辑更加清晰,但是这段算法有一个问题,那就是在某些特殊位置上会导致寻址错误,例如下面这样的情况:当版本大于7时,在QR码矩阵的右上角位置探测图形左侧有一个3X6的版本信息矩阵。当采用寻址法填充矩阵到这个位置时,会发生寻址错误。如下图所示:
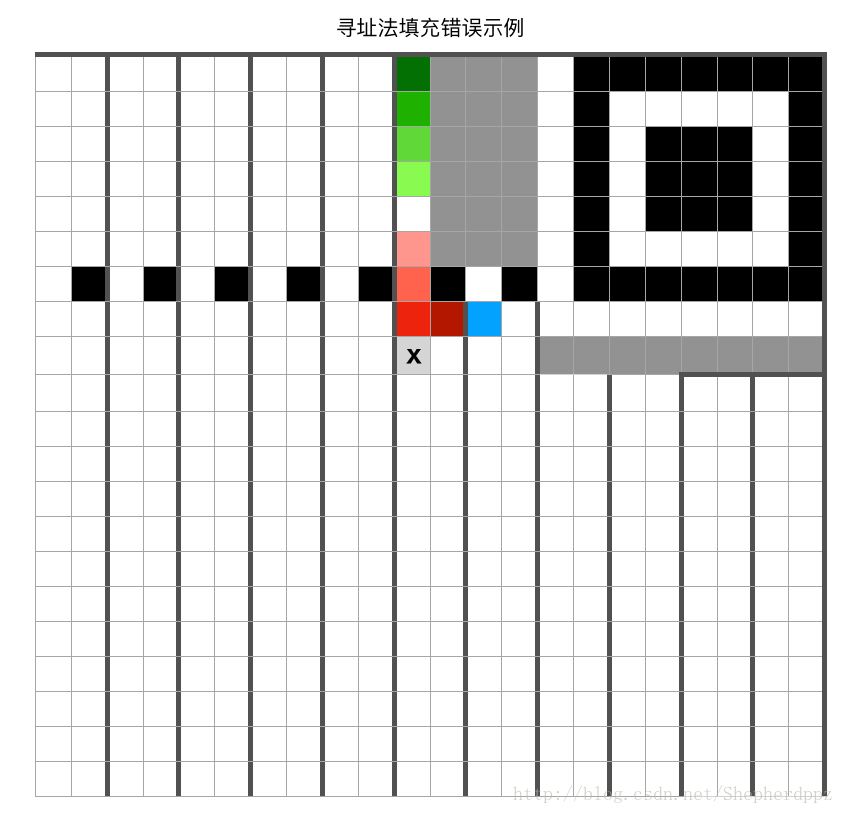
图中的蓝色单元格为当前单元格,在完成这个单元格的填充后,寻找下一个单元格时,正确的单元格应该是绿色单元格,并从绿色单元格开始向下填充(沿着绿色逐渐变浅的方向)。但是在这里寻址法会给出错误的结果:因为蓝色单元格对应的寻址规则为规则二,最后会搜索到深红色单元格为下一个单元格,并继续填充深红色单元格左边的红色单元格,然后向上填充,沿着红色变浅的方向一直填充到QR矩阵顶部,然后再掉头向下,从浅灰色“X”单元格开始继续正常填充。这样,使用寻址法会导致这个区域有一个数据码字无法正常填充。不过由于纠错码的存在,这样并不会影响到QR的解码,二维码仍然能够正常读取。
至此,我们已经完成了二维码生成的全部讨论,老虎二维码的完整.xlsm文件可以在这里找到,供大家参考,学习,欢迎大家提出宝贵意见!
