ELK 通过 Logstash 收集 Nginx 日志
1、安装部署Nginx
运维之道 | 企业级Nginx环境搭建
2、将nginx日志转换成json格式
[root@localhost ~]# vim /usr/local/nginx/conf/nginx.conf

http {
    include       mime.types;
    default_type  application/octet-stream;
													   ////在http{块里添加下面内容

log_format access_json '{"@timestamp":"$time_iso8601",'
                           '"host":"$server_addr",'
                           '"clientip":"$remote_addr",'
                           '"size":$body_bytes_sent,'
                           '"responsetime":$request_time,'
                           '"upstreamtime":"$upstream_response_time",'
                           '"upstreamhost":"$upstream_addr",'
                           '"http_host":"$host",'
                           '"url":"$uri",'
                           '"domain":"$host",'
                           '"xff":"$http_x_forwarded_for",'
                           '"referer":"$http_referer",'
                           '"status":"$status"}';

 access_log  /var/log/nginx/access.log  access_json;
.......
3、验证nginx配置是否正确
[root@localhost ~]# /usr/local/nginx/sbin/nginx -t
nginx: the configuration file /usr/local/nginx/conf/nginx.conf syntax is ok
nginx: configuration file /usr/local/nginx/conf/nginx.conf test is successful
4、重新加载 nginx 配置
[root@localhost ~]# /usr/local/nginx/sbin/nginx -s reload
5、访问nginx服务,产生访问数据
[root@localhost ~]# curl 192.168.182.10
I am villian
6、查看access.log日志
[root@localhost ~]# tail /var/log/nginx/access.log
{"@timestamp":"2020-01-22T17:25:12+08:00","host":"192.168.182.10","clientip":"192.168.182.10","size":13,"responsetime":0.000,"upstreamtime":"-","upstreamhost":"-","http_host":"192.168.182.10","url":"/index.html","domain":"192.168.182.10","xff":"-","referer":"-","status":"200"}
7、安装logstash并配置收集nginx日志
[root@node01 ~]# vim /etc/logstash/conf.d/nginx.conf
input {
    file {
        path => "/var/log/nginx/access.log"
        type => "nginx-accesslog"
        start_position => "beginning"
        stat_interval => "2"
        codec => json
    }
}

output {
    if [type] == "nginx-accesslog" {
        elasticsearch {
        hosts => ["192.168.182.10:9200"]
        index => "logstash-nginx-accesslog-30-%{+YYYY.MM.dd}"
        }
    }
}
8、检查配置文件语法是否有误并重启logstash
[root@localhost ~]# /usr/share/logstash/bin/logstash -f /etc/logstash/conf.d/nginx.conf -t
WARNING: Could not find logstash.yml which is typically located in $LS_HOME/config or /etc/logstash. You can specify the path using --path.settings. Continuing using the defaults
Could not find log4j2 configuration at path /usr/share/logstash/config/log4j2.properties. Using default config which logs errors to the console
[WARN ] 2020-01-22 17:48:41.009 [LogStash::Runner] multilocal - Ignoring the 'pipelines.yml' file because modules or command line options are specified
[INFO ] 2020-01-22 17:48:41.080 [LogStash::Runner] configpathloader - No config files found in path {:path=>"/etc/logstash/conf.d/nginx.conf"}
[ERROR] 2020-01-22 17:48:41.090 [LogStash::Runner] sourceloader - No configuration found in the configured sources.
Configuration OK
[INFO ] 2020-01-22 17:48:41.095 [LogStash::Runner] runner - Using config.test_and_exit mode. Config Validation Result: OK. Exiting Logstash
9、重启 logstash
[root@localhost ~]# systemctl restart logstash
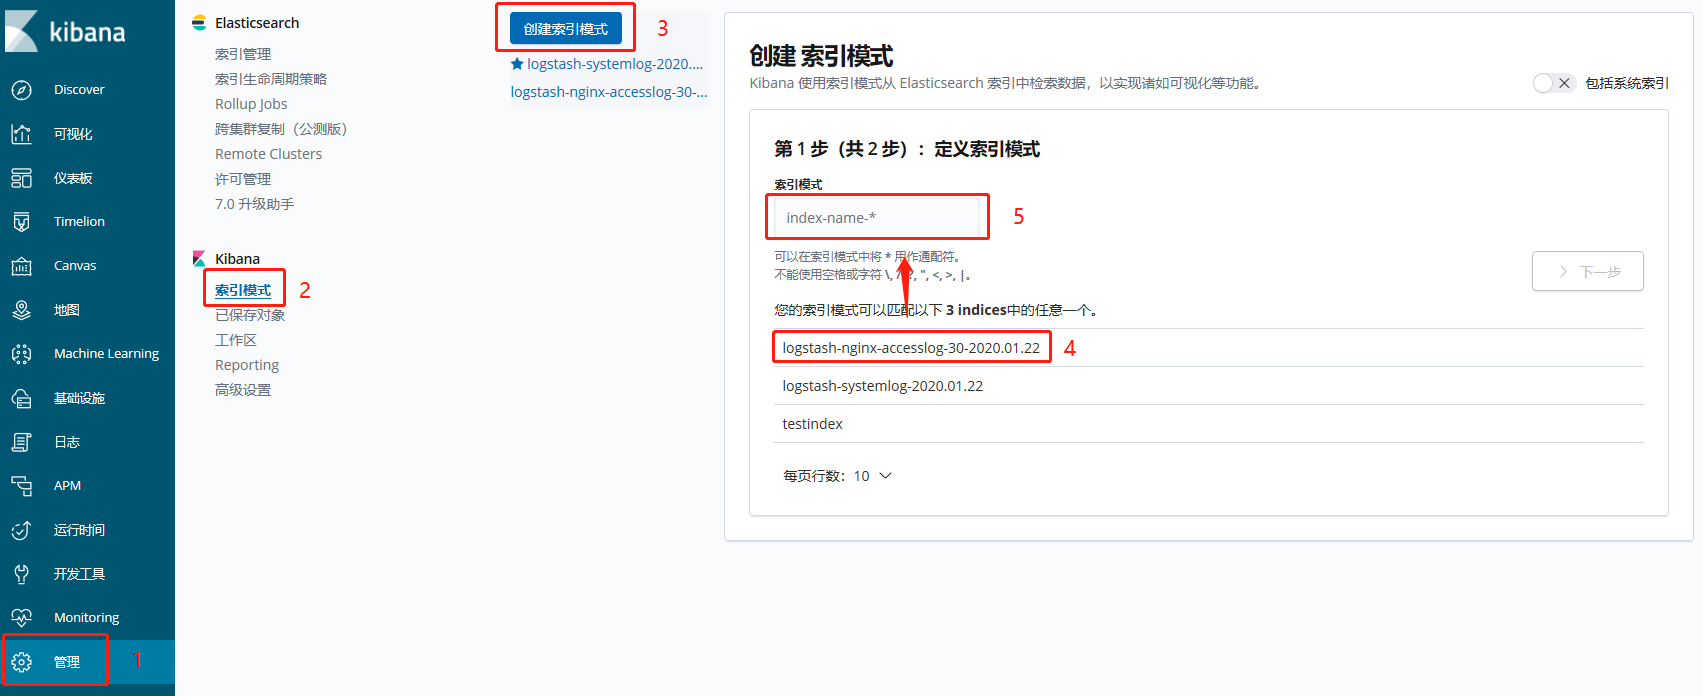
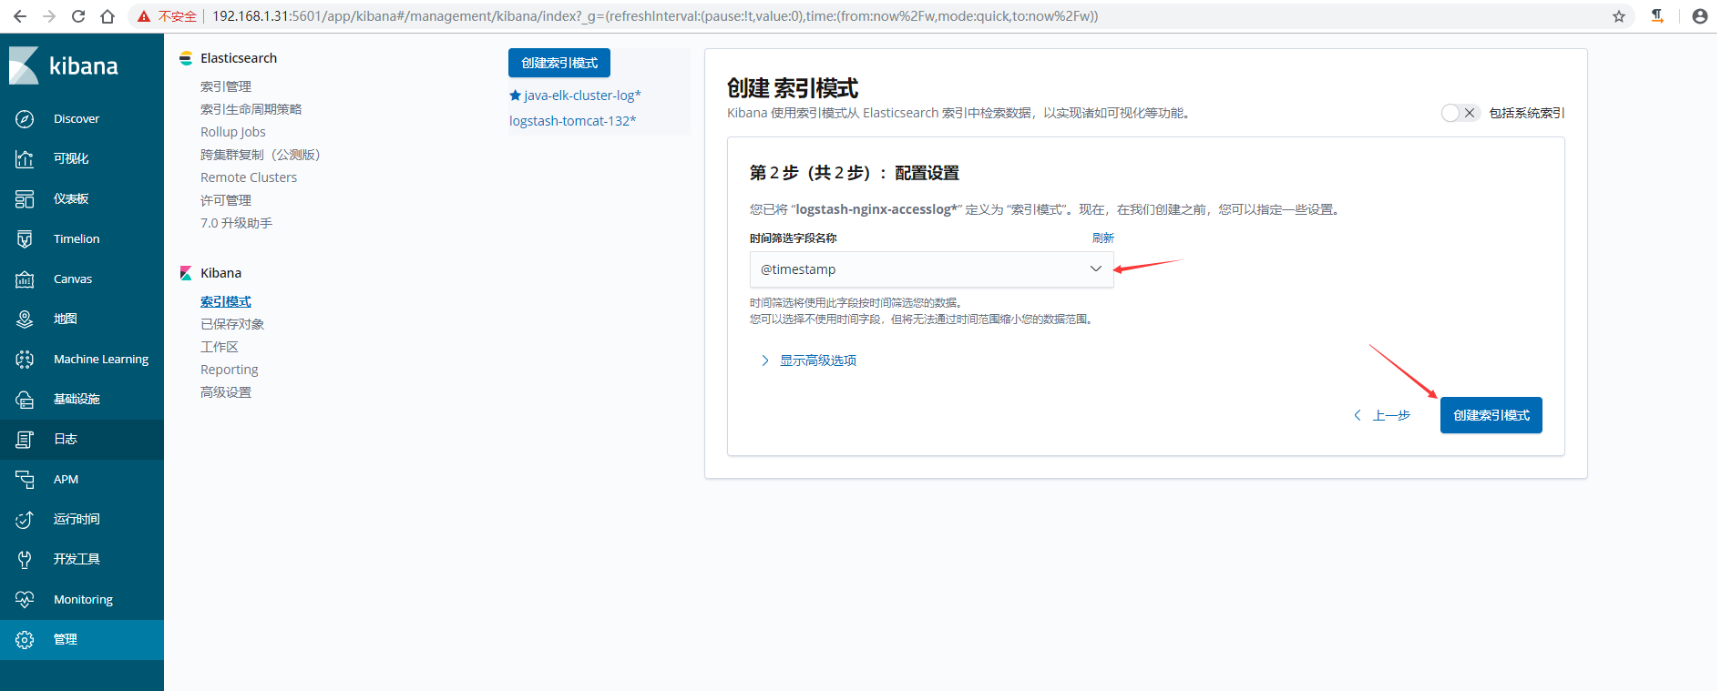
10、在kibana上添加索引验证模式

https://www.cnblogs.com/yanjieli/p/11187573.html#autoid-1-3-3
