Animation Clips
Animation Clip 在untiy中有两种方式创建:一种是从外边导入,另一种是在unity内部创建
Animation from External Sources
外部导入的animation可以有:
- Humanoid animations 人形动画
- Animations 通过3D软件创建的动画
- 来自第三方库的动画集 (eg, from Unity’s asset store)
- 从一个导入的时间轴上剪切和切片多个剪辑 timeline
.
Animation Created and Edited Within Unity
Unity’s 动画窗口还允许您创建和编辑动画剪辑。这些剪辑可以制作动画:
- 有位置,缩放,旋转动画
- 或者是一些组件的属性,比如材质球的颜色,灯光的强度,声音的大小
- 或者是你脚本的一些属性 scripts,包括float,integer, enum, vector and Boolean variables
- 还有脚本中调用方法的时间
Animation from external sources
可能是动画是特定于一个特定的模型,不能在其他模型上重用。例如,在你的游戏中,一个巨大的章鱼末端boss可能有独特的四肢和骨骼结构,以及它自己的一套动画
Viewing and copying data from imported animation files
在查看导入的动画关键帧时,动画窗口提供动画数据的只读视图。要编辑这个数据,在Unity中创建一个新的空白动画剪辑,然后选择,复制和粘贴动画数据从导入的动画剪辑到你新的,可写的动画剪辑。

Humanoid Avatars
Unity’s Animation System 具有处理 humanoid characters的功能. 因为类人角色在游戏中很常见,Unity提供了一个专门的工作流程和一个扩展的类人动画工具集 humanoid animations
The Avatar system 能够定义动画的那一部分对应人身体的哪一部分
因为人的身体结构都是相似的,所以,一个人的动画也可以映射到另一个人身上,叫做动画重定向和方向运动学 retargeting
and inverse kinematics__ (IK)__.
Animation Window Guide
动画窗口编辑器看可以编辑组件中的属性比入,材质的颜色,也可以声明在timeline当中使用的 Animation Events
Using the Animation view
Window > Animation
动画窗口有两种编辑观看模式:, Dopesheet and Curves.
![]()


.在curve状态下,按F键能够聚焦曲线,以最佳视图查看曲线
Playback and frame navigation controls
从左至右:
- Preview mode (toggle on/off)
- Record mode (toggle on/off) Note: Preview mode is always on if record mode is on
- 将播放头移动到剪辑的开头
- 移动播放头到前一个关键帧
- Play Animation
- 移动播放头到下一个关键帧
- 将播放头移动到剪辑的末端
快捷键:
- 按逗号(,)转到前一帧.
- 按周期(.)转到下一帧.
- 按住Alt键并按逗号(,)转到前面的关键帧
- 按住Alt键并按下句点(.)进入下一个关键帧。.
Locking the window
您可以锁定动画编辑器窗口,使它不会自动切换到反映当前选定的游戏对象在层次结构或场景。如果你想专注于一个特定游戏对象的动画,并且仍然能够选择和操作场景中的其他游戏对象,那么锁定窗口是非常有用的。
Creating keyframes in preview mode
添加关键帧的方法有三种:
第一种:右键

第二种:

第三种:快捷键
K为所有的动画都添加关键帧
这里有一些例子的许多事情,动画视图可以用于 Animation View :
- 使光的颜色和强度动起来,使它闪烁、闪烁或颤动.
- 使一个循环音源的音高和音量产生动画效果,为吹起的风、运转的引擎或流动的水带来生机,同时将声音资产的大小保持在最小.
- 使材料的纹理偏移产生动画效果,以模拟移动的带或轨迹、流水或特殊效果.
- 动画发射状态和速度的多个椭球粒子发射器创建壮观的烟花或喷泉显示.
- 动画您自己的脚本组件的变量,使事情随着时间的推移不同的行为.
Animation Parameters
Animation Parameters 是Animator Controller中的参数,可以通过脚本访问
比如, 一个 animation curve类型的参数,通过脚本访问它的值,就可以决定动画的变化
同样,脚本可以设置Mecanim获取的参数值. 例如,脚本可以设置一个参数来控制 Blend Tree.
Default parameter 它们可以有四种基本类型:
- Integer - a whole number
- Float - a number with a fractional part
- Bool - true or false value (represented by a checkbox)
- Trigger - 当转换完成时,重置该值 (represented by a circle button)
 void Update () {
        float h = Input.GetAxis("Horizontal");
        float v = Input.GetAxis("Vertical");
        bool fire = Input.GetButtonDown("Fire1");

        animator.SetFloat("Forward",v);
        animator.SetFloat("Strafe",h);
        animator.SetBool("Fire", fire);
    }

    void OnCollisionEnter(Collision col) {
        if (col.gameObject.CompareTag("Enemy"))
        {
            animator.SetTrigger("Die");//只设置值,在完成后,自动重置
        }
    }
State Machine Behaviours
State Machine Behaviour是一种特殊的脚本. 和(MonoBehaviours) 很像,要附加到游戏物体上 GameObjects
, 你可以把 StateMachineBehaviour 脚本添加到状态机中的某个状态上. 当状态机进入,退出,或者执行的时候,执行代码中的方法 ,这意味着你不用单独写自己的逻辑,去检测各个动画的状态.
一些例子有:
- 进入或退出状态时播放声音
- 只有在适当的状态下才进行某些测试(如地面检测)
- 激活和控制与特定状态相关的特殊效果
Sub-State Machines
如果一组状态一很多个动画,比如走路,跑步,跳跃,这几个总是一起出现,可以把他们作为子状态机出现,把他们单独打成一个组

右键创建一个sub-state,sub-state是以六边形表示的
 ,然后把这三个状态添加进去,此外sub-state中会有一个up state

它代表的是外面层的动画的状态,你可以看到sub-state里面new state和up有两个箭头,表示外面的状态连接到sub-state里面的哪个状态,sub-state里面的状态连接到外面的哪个状态

Animation Layers
Unity使用Animation Layers 来制作身体部位不同的动画.:举个例子,如果你有一个下身用于跳跃行走,而上身用于投掷物体/射击,你就可以通过创建两个单独的层来管理它。
点击层左上方的齿轮,来设置层的属性
每一个层,都有一个mask选项,用来控制mask. Override 表示覆盖其他层的动画,显示本层的动画, Additive 表示当前层的动画会添加到其他层的上面
Mask: 例如如果你想扮演一个扔动画模型的上半身,而让你的角色也能走路,跑步或者仍然站在同一时间,您将使用一个面具在层起上半身的投掷动画部分定义,像这样:
‘M’ 符号在图层侧边栏中可见,表示该图层应用了遮罩。
Animation Layer syncing:动画层同步
有时,能够在不同的层中重用相同的状态机是很有用的.例如,如果您想要模拟“受伤”行为,并将“受伤”动画用于步行/跑步/跳跃,而不是用于“健康”动画. 你可以点击其中一个图层上的“同步”复选框,然后选择你想要同步的图层.这样设置sync层的动画,就和source层的动画是一致的
sync 同步层 就是让该层复刻其他层的动画,它们的结构是相同的,但是各个状态的animation是可以不一样的,其他层可以从Source Layer 选择。Timing:当前层和Souurce层同一个状态使用的动画时间长度不一致时,不勾选timing那么复制的层按Source层的时间播放(效果就是复制层动画可能会变快或变慢,Source层动画播放速度不变),勾选timing则Source层按复制层的时间播放(效果就是Source层动画可能会变快或变慢,复制层动画播放速度不变),只有勾选sync,timing才可以勾选
比如:“Fatigued” 层同步base层. 状态机的结构布局和 base layer一样,
每个状态中使用的独立动画被替换为不同但适当的等效动画。
一个' S '是符号是可见的层侧边栏,以表明该层是一个同步层。
Solo and Mute functionality
在复杂状态机中,单独预览机器的某些部分的操作是有用的. 你可以使用 Mute and Solo functionality:
- Mute 禁用一个过渡.
- Solo 只播放哪一个过度.
你可以设置多个Solo 转换,只播放那些转换. 如果一个转换的solo打开, Unity 也会打开其它过度的Mute 如果Solo and Mute 都打开着 ,Mute 优先.
你可以从Transition Inspector, or the State Inspector设置 Mute and Solo
Unity显示Solo 为绿色, and Mute为红色
上面的图中,如果从State 0进入, 只能进入 State A 和State B .
已知问题:
- mute并不总是有效.
Target Matching:目标匹配
通常在游戏中,会出现一种情况,即角色必须以手或脚在特定时间停留在特定地点的方式移动. 例如,角色可能需要跳过垫脚石或跳过并抓住头顶的横梁。
你可以使用 Animator.MatchTarget function 来处理这种情况,例如,假设您想安排一个场景,其中角色跳到一个平台上,而您已经为它准备了一个名为Jump Up的动画剪辑. 首先,你需要在动画剪辑中找到角色开始跳起的地方, 注意它在动画里面是占用14.1%或者标准是间的0.141:
你还需要在动画剪辑中找到角色将要落地的地方, 在 78.0% or 0.78.
With this information, you can create a script that calls MatchTarget which you can attach to the model:-
using UnityEngine;
using System;

[RequireComponent(typeof(Animator))]
public class TargetCtrl : MonoBehaviour {

    protected Animator animator;

    //the platform object in the scene
    public Transform jumpTarget = null;
    void Start () {
        animator = GetComponent<Animator>();
    }

    void Update () {
        if(animator) {
            if(Input.GetButton("Fire1"))
                animator.MatchTarget(jumpTarget.position, jumpTarget.rotation, AvatarTarget.LeftFoot,
                                                       new MatchTargetWeightMask(Vector3.one, 1f), 0.141f, 0.78f);
//这个的作用就是左脚回在动画的0.141-0.78之间落到jumptarget的位置,旋转保持一致,weightmask的两个参数,一个是位置权重,一个是旋转权重,就是落到jumptarget的位置和旋转角度的比例
        }
    }
}
脚本将移动角色,使其从当前位置跳跃,并将左脚落在目标上。落地点要正确
Inverse Kinematics
大多数动画是通过旋转骨骼中关节来产生动画. 子关节的位置会随着父关节的旋转而改变,因此可以从其包含的各个关节的角度和相对位置来确定关节链的终点. 这个叫做 forward kinematics:前向运动学
通常向后决定关节的位置,当你想要一个角色在用户选择的点上触摸一个物体,或者在一个不平整的表面上令人信服地移动它的脚时,这是非常有用的.这叫 Inverse Kinematics (IK) 反向运动学,即子物体决定父物体的位置

如果为角色设置IK 你通常有一个角色与之交互的场景对象, 通过脚本设置 IK, 比如SetIKPositionWeight, SetIKRotationWeight, SetIKPosition, SetIKRotation, SetLookAtPosition, bodyPosition, bodyRotation
在上面的插图中,我们展示了一个人物抓着一个圆柱形的物体。我们如何才能做到这一点?
首先人物有一个 Avatar
接下来创建一个 Animator Controller,至少控制一个动画片段,点击层的cog设置图标,选中弹出的菜单中的IK Pass复选框

然后给该物体添加一个脚本控制IK,脚本就叫做 IKControl吧. 这个脚本设置角色右手的IK target,并设置 look position ,让角色看着手中的物体:
using UnityEngine;
using System;
using System.Collections;

[RequireComponent(typeof(Animator))]

public class IKControl : MonoBehaviour {

    protected Animator animator;

    public bool ikActive = false;
    public Transform rightHandObj = null;
    public Transform lookObj = null;

    void Start ()
    {
        animator = GetComponent<Animator>();
    }

    //在固定的方法里设置IK
    void OnAnimatorIK()
    {
        if(animator) {

            //if the IK is active, set the position and rotation directly to the goal.
            if(ikActive) {

                // Set the look __target position__, if one has been assigned
                if(lookObj != null) {
                    animator.SetLookAtWeight(1);
                    animator.SetLookAtPosition(lookObj.position);
                }

                // Set the right hand target position and rotation, if one has been assigned
                if(rightHandObj != null) {
                    animator.SetIKPositionWeight(AvatarIKGoal.RightHand,1);
                    animator.SetIKRotationWeight(AvatarIKGoal.RightHand,1);
                    animator.SetIKPosition(AvatarIKGoal.RightHand,rightHandObj.position);
                    animator.SetIKRotation(AvatarIKGoal.RightHand,rightHandObj.rotation);
                }

            }

            //if the IK is not active, set the position and rotation of the hand and head back to the original position
            else {
                animator.SetIKPositionWeight(AvatarIKGoal.RightHand,0);
                animator.SetIKRotationWeight(AvatarIKGoal.RightHand,0);
                animator.SetLookAtWeight(0);
            }
        }
    }
}
由于我们不打算让角色的手触及到物体内部的中心(圆柱体的枢轴点),所以我们将一个空的子对象(在本例中称为“圆柱体抓手”)放置在圆柱体上,并相应地旋转它。手的目标是这个子对象。

Enter play mode, and you should see the IK come to life. Observe the character grabbing and ungrabbing the object as you click the IKActive checkbox, and try moving the cylinder around in playmode to see the arm and hand follow the object.
Root Motion - how it works
Body Transform
Body Transform 使角色质量的中心,它用来重定向,提供了稳定的模型,The Body Orientation 是上身和下身的平均方向
The Body Transform and Orientation 存储在 Animation Clip (using the Muscle definitionsset up in the Avatar). They are the only world-space curves stored in the Animation Clip. Everything else: muscle curves and IK goals (Hands and Feet) are stored relative to the body transform.
Root Transform
The Root Transform是 Body Transform 在Y上面的投影面,每一帧后,计算Root Transform . 它会改变游戏物体的Transform,从而让游戏物体移动

下面的圈代表root transform
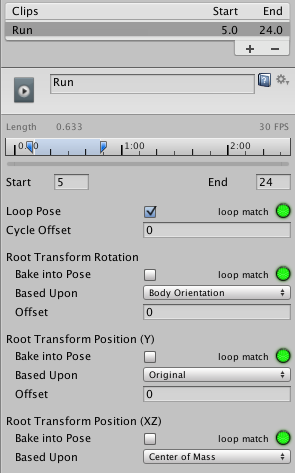
Animation Clip Inspector
在导入模型动画的时候,Root Transform Rotation, Root Transform Position (Y) and Root Transform Position (XZ) -让你来控制从Body Transform映射到Root Transform. Body Transform 可以转到 Root Transform. 例如,你可以决定是否要让运动Y位置成为根运动(轨迹)的一部分 or 部分姿态(身体变换)(body transform), 被称为 as Baked into Pose.
Root Transform Rotation
Bake into Pose: 方向和 body transform保持不变 . The Root Orientation 是常数,方向是恒等的,这意味着游戏对象不会被那个AnimationClip旋转。即角色不会因为动画旋转而旋转
AnimationClips ,只有动画的起始和停止root方向相似的AnimationClips才应该使用这个选项. 右边的灯为绿色表示 动画方向匹配的很好,比如直走,或跑步
Based Upon: 设置动画的方向. Body Orientation, 动画方向和人物的前方向保持一直. 这是默认的,大多数动画都可以应用,比如 walks, runs, and jumps, 但是当你的动画方向是垂直于身体的前方向时,就会失败 ,这时你可以使用Offset setting.默认使用 Original 自动找到偏移量.
Offset: used to enter the offset when that option is chosen for Based Upon.
Root Transform Position (Y)
Bake Into Pose: 运动的Y分量和 Body Transform 保持一致. Root Transform 的Y是常量,保持不变. 这意味着动画不会改变游戏物体的高度 ,你如果不勾选,则是能改变高度的
大多数都是都选上的,除了一些特定的动画,比如跳跃和跳下.
Note: Animator.gravityWeight是通过 Bake Into Pose position Y来控制的. 当打开的时候, gravityWeight = 1, 当disabled = 0. gravityWeight is blended for clips when transitioning between states.
Based Upon: In a similar way to Root Transform Rotation you can choose from Original or Mass Center (Body). There is also a Feet option that is very convenient for AnimationClips that change height (Bake Into Pose disabled). When using Feet the Root Transform Position Y will match the lowest foot Y for all frames. Thus the blending point always remains around the feet which prevents floating problem when blending or transitioning.
Offset: In a similar way to Root Transform Rotation, you can manually adjust the AnimationClip height using the Offset setting.
Root Transform Position (XZ)
Again, this uses same concepts described in Root Transform Rotation and Root Motion Position (Y).
Bake Into Pose will usually be used for “Idles” where you want to force the delta Position (XZ) to be 0. It will stop the accumulation of small deltas drifting after many evaluations. It can also be used for a Keyframed clip with Based Upon Original to force an authored position that was set by the artist.
Loop Pose
Loop Pose (like Pose Blending in Blend Trees or Transitions) happens in the referential of Root Transform. Once the Root Transform is computed, the Pose becomes relative to it. The relative Pose difference between Start and Stop frame is computed and distributed over the range of the clip from 0–100%.
Generic Root Motion and Loop Pose
This works in essentially the same as Humanoid Root Motion, but instead of using the Body Transform to compute/project a Root Transform, the transform set in Root Node
is used. The Pose (all the bones which transform below the Root Motion bone) is made relative to the Root Transform.
Tutorial: Scripting Root Motion for “in-place” humanoid animations
有时候你在场景中人物的动画,并不会移动角色的位置,或者说你需要在脚本中修改 “root motion”.下面是一个方法:
- 打开模型导入的属性面板,转到 Animation tab
- 确保角色有 Muscle Definition Avatar,比如有一个叫 Dude的Avatar
- 选择几个animation clip
- 勾选上 Loop Pose
- 可以看到,root transform rotation 和 root transform position 都没有勾选,所以,动画不会影响角色的移动
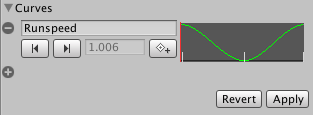
- 在当前面板的curve下,创建一个速度的曲线 (you can add a curve from the Animation Import inspector Curves-> +)
- 命名为“Runspeed”
- 创建一个Animator Controller, (let’s call it RootMotionController),至少包含一个state
-
添加一个和curve名字一样的参数,这样在脚本中访问参数值的时候,会从曲线中获取 (in this case, “Runspeed”)
-

- 把avatar Dude,RootMotionController 拖到Animator 组件上.
-
using UnityEngine;
using System.Collections;

[RequireComponent(typeof(Animator))]

public class RootMotionScript : MonoBehaviour {

//属于mono behavior的方法,用于更改root transform的回调,就是在这里面设置动画影响角色的移动
    void OnAnimatorMove()
    {
            Animator animator = GetComponent<Animator>();

            if (animator)
            {
     Vector3 newPosition = transform.position;
               newPosition.z += animator.GetFloat("Runspeed") * Time.deltaTime; //Runspeed的值会从之前定义的曲线中获取
     transform.position = newPosition;
            }
    }
}
最后,需要勾选Animator的 Apply Root Motion 属性,选择为 Handled by Script
