概述
其实本来不想写维度变换的相关内容,但它还是比较重要的,虽然简单,但是实际操作过程中需要时刻牢记于心。Tensorflow中的维度变化和numpy非常像,当然也包括pytorch等其他科学计算的包,维度变化大同小异,所用函数都是非常类似的。
维度变化
首先我们导包创建一下tensorflow中的各种数据结构(与numpy对比):
import numpy as np
import tensorflow as tf
a = tf.constant(1)  # tf.int32 常量类型
b = tf.constant(2, dtype=tf.int64) # tf.int64类型
c = tf.constant(1.23) # tf.float32
d = tf.constant(3.14, dtype=tf.float64) # tf.float64
e = tf.constant("hello world") #tf.string类型
f = tf.constant(True) # tf.bool
常量张量
#标量 0维张量
scalar = tf.constant(True)
print(scalar)
print(tf.rank(scalar))
print(scalar.numpy().ndim)

# 1维张量 向量
vector = tf.constant([1.0,2.0,3.0,4.0,5.0])
print(tf.rank(vector))
print(np.ndim(vector.numpy()))

# 2维张量 矩阵
matrix = tf.constant([[1.0,2.0], [3.0,4.0]])
print(tf.rank(matrix))
print(np.ndim(matrix))

# 3维张量
tensor3 = tf.constant([[[1.0,2.0],[3.0,4.0],[5.0,6.0]]])
print(tf.rank(tensor3))
print(np.ndim(tensor3.numpy()))

# 4维张量
tensor4 = tf.constant([[[[1.0,2.0]],[[3.0,4.0]]],[[[1.0,2.0]],[[3.0,4.0]]]])
print(tf.rank(tensor4))
print(np.ndim(tensor4.numpy()))

# 可以使用tf.cast可以改变张量数据类型
h = tf.constant([123,456], dtype=tf.int32)
f = tf.cast(h, tf.float32)
print(h)
print(f)
print(h.dtype)
print(f.dtype)

y = tf.constant([[1.0,2.0], [3.0,4.0]])
print(y.numpy())
print(y.shape)

u = tf.constant(u"你好,世界")
print(u.numpy())
print(u.numpy().decode('utf-8'))# 这里注意一下,tf编码是utf-8
变量张量
我们需要注意一下,常量的值是不可以改变的,如果将它改变,其实就是重新创建了内存空间。
c = tf.constant([1.0, 2.0])
print(c)
print(id(c))

c = c + tf.constant([3.0,4.0])
print(c)
print(id(c))

v = tf.Variable([1.0,2.0], name="v")
print(v)
print(id(v))

v.assign_add([3.0, 4.0])
print(v)
print(id(v))

变量创建方式
# 从列表中创建张量
a = [1, 2, 3, 4, 5]
tensor1 = tf.convert_to_tensor(a)

# 从数组中创建
arr = np.array([[1.,2.], [3., 4.]])
print(arr)
tensor2 = tf.convert_to_tensor(arr)
# 创建全0 或者全1的标量
tensor3 = tf.zeros([])
tensor4 = tf.ones([])
print(tensor3)
print(tensor4)

# 创建全0 或者全1向量
tensor5 = tf.zeros([3])
tensor6 = tf.ones([4])
print(tensor5)
print(tensor6)

# 创建全0 或者全1的矩阵
tensor7 = tf.zeros([2,2])
tensor8 = tf.ones([3,3])
print(tensor7)
print(tensor8)
# 创建与一个已有张量形状相同的张量
a = tf.ones([2,3])
b = tf.zeros_like(a)
print(a)
print(b)

a = tf.zeros([4,5])
b = tf.ones_like(a)
print(a)
print(b)

# 创建自定义数值张量 tf.fill(shape, value)
a = tf.fill([], 10) #创建-1的张量
print(a)

# 创建向量
b = tf.fill([3], 10)
print(b)

# 创建矩阵
c = tf.fill([2,2], 10)
print(c)

# 创建已知分布的张量,正态分布,均匀分布
# 通过tf.randm.normal(shape, mean=0.0, stddev=1.0)
a = tf.random.normal([3,3])
print(a)

# 创建均值为1,标准差为2的正态分布
b = tf.random.normal([2,2], mean=1.0, stddev=2.0)
print(b)

# 通过tf.random.uniform(shape, minval=0, maxval=None, dtype=tf.float32)
a = tf.random.uniform([2,2])
print(a)
# 创建采样区间[0,10)的均匀分布
b = tf.random.uniform([2,2], maxval=10)
print(b)
# 创建指定区间的均匀分布
c = tf.random.uniform([3,3], minval=5, maxval=20)
print(c)

# 创建序列 tf.range(limit, delta=1)
a = tf.range(10)
print(a)

# 创建0到10步长为2的整形序列
b = tf.range(10, delta=2)
print(b)
c = tf.range(6, 18, delta=2)
print(c)
切片和索引
我们创建一个未知张量
# 创建4D张量 [4,32,32,3] ,可以认为4张32*32大小的彩色图片
a = tf.random.normal([4,32,32,3])
a

# 取第一张图片数据 D张量 [4,32,32,3] 可以认为4张32*32大小的彩色图片
a[0]

# 取出第一张图片,第二行数据
a[0][1]

# 取第四张图片 第二行,第一列 B通道数据
a[3][1][0][1]

# 当维度比较高的时候,可以用简写方式 取出第二张, 第10行, 第3列数据
a[1,9,2]
#注意一下是从前往后数
索引切片都是和numpy类似的。
# 通过start:end:step
#取出第2,3两张图片
a[1:3]

# 取出第一张图片
a[0,::]
# 取出特定位置大小图
a[ : , 0:28,0:28, :]

# 逆序数据读取
x = tf.range(9)
x[8::-1] #从8渠道1,不含0
# 全部逆序
x[::-1]
# 逆序间隔采样
x[::-2]
维度变换
# reshpae改变形状
x = tf.range(36)
# 生成4d张量[2,2,3,3]
x = tf.reshape(x,[2,2,3,3])
# 通过张量的ndim和shape来获取张量维度和形状
print(x.ndim)
print(x.shape)
# 将后续维度变为1维相当于faltten
tf.reshape(x,[2,-1])
# 把中间的维度拉平
tf.reshape(x,[2,-1,3])
# 通过tf.expand_dims(x, axis)  可以在指定的axis轴前插入一个新的维度
x = tf.expand_dims(x, axis=2)
x = tf.random.uniform([28,28], maxval=10, dtype=tf.int32) #代表28*28一张图片
#在不同的位置插入一个维度
x = tf.expand_dims(x, axis=2)
x = tf.expand_dims(x, axis=0)
# 可以tf.squeeze(x, axis) 增加和删除都是维度为1
x = tf.squeeze(x, axis=0)
x = tf.squeeze(x)
# 维度交换
# 使用tf.transpose(x, perm)
# shape=(2,32,32,3) 图片数量,行,列,通道数, 索引 0,1,2,3
x = tf.random.normal([2,32,32,3])
tf.transpose(x, perm=[0,3,1,2]) #把第4列拿到第二列来了
#数据复制
#通过tf.tile(x, multiples) multiples分别制定在每个维度上复制的倍数,1对应的位置不复制,2表示按原长度复制一份
a = tf.constant([1,2]) # 创建一个向量 a
b = tf.expand_dims(a, axis=0)
b = tf.tile(b, multiples=[2,1])
c = tf.range(4)
d = tf.reshape(c, [2,2])
d = tf.tile(d, multiples=[1,2])
d = tf.tile(d, multiples=[2,1])
广播机制
在其他的科学计算工具中也非常常见,但是功能强大。
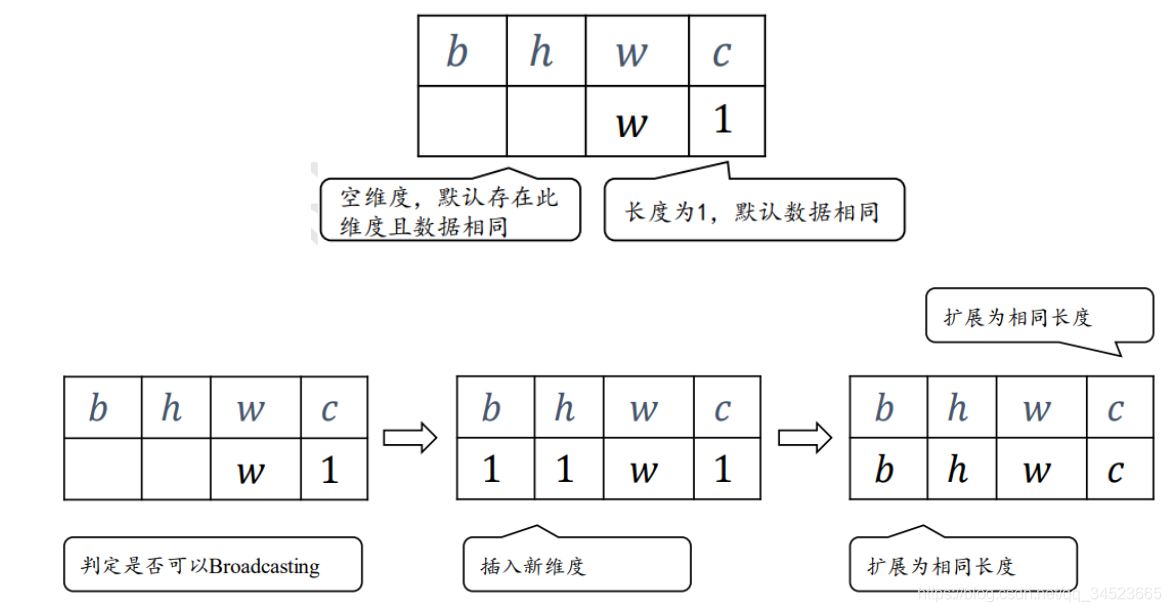 另一张图更清晰表明了这个过程。

# 通过tf.brocadcast_to(x, new_shape) 可以实现广播,实现自动扩展功能,将现有shape扩展成new_shape
A = tf.random.normal([32,1]) #创建矩阵
# 扩展为4D张量
tf.broadcast_to(A, [2,32,32,3])
