绪论

MNIST 手写数据集,作为一个经典的数据集,已经被大家所“嚼烂”, 无论是初学者还是高手,几乎都会用到它。那么接下来,我们将以MNIST数据集作为入门学习工具,从全连接网络到CNN,一步一步实现不同神经网络下的MNIST手写数据集分类,从而系统地学习和理解深度学习。
① 数据集安装
MNIST数据集的官网是Yann LeCun’s website。当然,你也可以通过下面这行代码,实现自动下载和安装,第一次执行程序可能需要花费些时间下载数据集,之后将不再需要,可以直接执行。
import  tensorflow.examples.tutorials.mnist.input_data
mnist = input_data.read_data_sets("MNIST_data/", one_hot=True)
② 数据集内容
下载下来的数据集被分成两部分:60000行的训练数据集(mnist.train)和10000行的测试数据集(mnist.test)。
每一个MNIST数据单元有两部分组成:一张包含手写数字的图片和一个对应的标签。我们把这些图片设为“xs”,把这些标签设为“ys”。
每一张图片包含28X28个像素点。我们可以用一个数字数组来表示这张图片:

我们把这二维矩阵展开成一个一维向量,长度是 28x28 = 784。
这样,在MNIST训练数据集中,训练数据集图片(mnist.train.images) 是一个形状为 [60000, 784] 的张量,第一个维度数字用来索引图片,第二个维度数字用来索引每张图片中的像素点。在此张量里的每一个元素,都表示某张图片里的某个像素的强度值,值介于0和1之间。

你可以把这个 [60000, 784]张量,想象成上图那样,6w张图片这样一片一片的按序排列,每张图都有784个像素点,故此构成这个二维矩阵。
之前我们说的都是每张图片(即:xs),现在我们来说说标签(即:ys)
相对应的MNIST数据集的标签是介于0到9的数字,用来描述给定图片里表示的数字。我们定义标签数据是”one-hot vectors”。 一个one-hot向量除了某一位的数字是1以外其余各维度数字都是0。所以在此教程中,数字n将表示成一个只有在第n维度(从0开始)数字为1的10维向量。比如,标签0将表示成([1,0,0,0,0,0,0,0,0,0,0])。因此,训练数据集标签(mnist.train.labels)是一个 [60000, 10] 的数字矩阵。

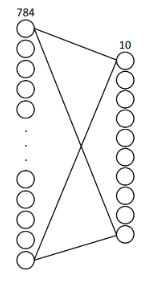
接下来,我们来实现一个非常简单的两层全连接网络来完成MNIST数据的分类问题,输入层784个神经元,对应每张图片784个像素点;输出层10个神经元,对应0-9这10个数字,实现分类。
目录
1、载入库和数据集
下载mnist数据集是直接调用了tensorflow提供的函数read_data_sets,输入两个参数,
第一个是下载到数据存储的路径,第二个one_hot表示是否要将类别标签进行独热编码。
它首先会去找制定目录下有没有这个数据文件,没有的话才去下载,有的话就直接读取。
所以第一次执行这个命令,速度会比较慢,所以我们一般直接在官网下载保存到MNIST_data中。
代码中的one_hot=True,表示将样本标签转化为one_hot编码。
举例来解释one_hot编码:假如一共有10类:0的one_hot为1000000000,1的ont_hot为0100000000,2的one_hot为0010000000,依次类推。只要有一个位为1,1所在的位置就代表着第几类。
import tensorflow as tf
import os
from tensorflow.examples.tutorials.mnist import input_data

mnist = input_data.read_data_sets("MNIST_data", one_hot=True)
2、准备好placeholder
x = tf.placeholder(tf.float32, [None, 784], name='x_input')
y = tf.placeholder(tf.float32, [None, 10], name='y_input')
keep_prob = tf.placeholder(tf.float32, name='keep_prob')
lr = tf.Variable(0.001, dtype=tf.float32, name='learning_rate')
global_step = tf.Variable(0, trainable=False)
- 在tf.placeholder()函数中传入了3个参数,第一个是定义数据类型为float32;第二个是数据的大小,特征数据是大小784的向量,标签数据是大小为10的向量,None表示不定死大小,到时候可以传入任何数量的样本;第3个参数是这个占位符的名称。
- TensorFlow中global_step的简单分析
global_step在滑动平均、优化器、指数衰减学习率等方面都有用到,这个变量的实际意义非常好理解:代表全局步数,比如在多少步该进行什么操作,现在神经网络训练到多少轮等等,类似于一个钟表,这在断点继训中有着重要的作用。
根据代码可以发现global_step的初始化值是0:
global_step=tf.Variable(0, trainable=False)
然后在tf.train.GradientDescentOptimizer(learning_rate).minimize(loss, global_step=global_steps),系统会自动更新这个参数的值,从1开始,每训练一次global_tep自动加1。
验证代码:
import tensorflow as tf
import numpy as np

x = tf.placeholder(tf.float32, shape=[None, 1], name='x')
y = tf.placeholder(tf.float32, shape=[None, 1], name='y')
w = tf.Variable(tf.constant(0.0))

global_steps = tf.Variable(0, trainable=False)


learning_rate = tf.train.exponential_decay(0.1, global_steps, 10, 2, staircase=False)
loss = tf.pow(w*x-y, 2)

train_step = tf.train.GradientDescentOptimizer(learning_rate).minimize(loss,global_step=global_steps)

with tf.Session() as sess:
    sess.run(tf.global_variables_initializer())
    for i in range(10):
        sess.run(train_step, feed_dict={x:np.linspace(1,2,10).reshape([10,1]),
            y:np.linspace(1,2,10).reshape([10,1])})
        print(sess.run(learning_rate))
        print(sess.run(global_steps))
输出为:

0.107177
1
0.11487
2
0.123114
3
0.131951
4
0.141421
5
0.151572
6
0.16245
7
0.17411
8
0.186607
9
0.2
10
如果把
train_step = tf.train.GradientDescentOptimizer(learning_rate).minimize(loss,global_step=global_steps)
后面部分的global_step=global_steps去掉,global_step的自动加一就会失效,输出如下:
0.1
0
0.1
0
0.1
0
0.1
0
0.1
0
0.1
0
0.1
0
0.1
0
0.1
0
0.1
0
因为指数衰减的学习率是伴随global_step的变化而衰减的,所以当global_step不改变时,学习率也变成一个定值。
综上所述:损失函数优化器的minimize()中global_step=global_steps能够提供global_step自动加一的操作。
3、初始化参数/权重
-创建初始化权重w的方法,生成大小等于传入的shape参数,标准差为0.1,正态分布的随机数,并且将它转换成tensorflow中的variable返回。
W1 = tf.Variable(tf.truncated_normal([784, 500], stddev=0.1), name='W1')
b1 = tf.Variable(tf.zeros([500]) + 0.1, name='b1')
L1 = tf.nn.tanh(tf.matmul(x, W1) + b1, name='L1')
L1_drop = tf.nn.dropout(L1, keep_prob)

W2 = tf.Variable(tf.truncated_normal([500, 300], stddev=0.1), name='W2')
b2 = tf.Variable(tf.zeros([300]) + 0.1, name='b2')
L2 = tf.nn.tanh(tf.matmul(L1_drop, W2) + b2, name='L2')
L2_drop = tf.nn.dropout(L2, keep_prob)

W3 = tf.Variable(tf.truncated_normal([300, 10], stddev=0.1), name='W3')
b3 = tf.Variable(tf.zeros([10]) + 0.1, name='b3')
prediction = tf.matmul(L2_drop, W3) + b3
5、计算损失值
# 计算所有样本交叉熵损失的均值
loss = tf.reduce_mean(tf.nn.softmax_cross_entropy_with_logits(labels=y, logits=prediction), name='loss')
6、初始化optimizer
梯度下降函数保持不变,使得loss函数的值取到极小值
optimizer = tf.train.AdamOptimizer(lr).minimize(loss, global_step=global_step, name='train')
7、计算准确率
分别将预测和真实的标签中取出最大值的索引,若相同则返回1(true),不同则返回0(false)
correct_prediction = tf.equal(tf.argmax(y, 1), tf.argmax(prediction, 1))
8、求均值即为准确率
- tf.reduce_mean 函数用于计算张量tensor沿着指定的数轴(tensor的某一维度)上的的平均值,主要用作降维或者计算tensor(图像)的平均值。
- tf.cast()函数的作用是执行 tensorflow 中张量数据类型转换,比如读入的图片如果是int8类型的,一般在要在训练前把图像的数据格式转换为float32。
- 这里的作用是计算每一轮中所有batch预测值的准确率。
accuracy = tf.reduce_mean(tf.cast(correct_prediction, tf.float32), name='accuracy')
9、求预测值
-
tf.argmax是tensorflow用numpy的np.argmax实现的,它能给出某个tensor对象在某一维上的其数据最大值所在的索引值,这样返回的值便是预测出的类别对应值。
-
tf.argmax()函数中有个axis参数(轴),该参数能指定按照哪个维度计算。
如 在矩阵的结构中,axis可被设置为0或1,分别表示
0:按列计算,1:行计算
preValue = tf.argmax(prediction, axis=1,name='predict')
完整代码:
import tensorflow as tf
import os
from tensorflow.examples.tutorials.mnist import input_data

mnist = input_data.read_data_sets("MNIST_data", one_hot=True)

'''
定义固定的超参数,方便待使用时直接传入。如果你问,这个超参数为啥要这样设定,如何选择最优的超参数?
这个问题此处先不讨论,超参数的选择在机器学习建模中最常用的方法就是“交叉验证法”。
另外,还要设置两个路径,第一个是数据下载下来存放的地方,一个是summary输出保存的地方。
'''
MODEL_SAVE_PATH = "model"  # 模型保存路径
MODEL_NAME = "mnist_model"  # 模型保存文件名
logdir = './graphs/mnist'  # 输出日志保存的路径
dropout = 0.6
learning_rate = 0.001
STEP = 30
# 每个批次的大小
batch_size = 100
# 计算一共有多少个批次
n_batch = mnist.train.num_examples // batch_size

x = tf.placeholder(tf.float32, [None, 784], name='x_input')
y = tf.placeholder(tf.float32, [None, 10], name='y_input')
keep_prob = tf.placeholder(tf.float32, name='keep_prob')
lr = tf.Variable(0.001, dtype=tf.float32, name='learning_rate')
global_step = tf.Variable(0, trainable=False)

image_shaped_input = tf.reshape(x, [-1, 28, 28, 1])

W1 = tf.Variable(tf.truncated_normal([784, 500], stddev=0.1), name='W1')
b1 = tf.Variable(tf.zeros([500]) + 0.1, name='b1')
L1 = tf.nn.tanh(tf.matmul(x, W1) + b1, name='L1')
L1_drop = tf.nn.dropout(L1, keep_prob)

W2 = tf.Variable(tf.truncated_normal([500, 300], stddev=0.1), name='W2')
b2 = tf.Variable(tf.zeros([300]) + 0.1, name='b2')
L2 = tf.nn.tanh(tf.matmul(L1_drop, W2) + b2, name='L2')
L2_drop = tf.nn.dropout(L2, keep_prob)

W3 = tf.Variable(tf.truncated_normal([300, 10], stddev=0.1), name='W3')
b3 = tf.Variable(tf.zeros([10]) + 0.1, name='b3')
prediction = tf.matmul(L2_drop, W3) + b3


# 计算所有样本交叉熵损失的均值
loss = tf.reduce_mean(tf.nn.softmax_cross_entropy_with_logits(labels=y, logits=prediction), name='loss')

optimizer = tf.train.AdamOptimizer(lr).minimize(loss, global_step=global_step, name='train')

# 计算准确率
# 分别将预测和真实的标签中取出最大值的索引,若相同则返回1(true),不同则返回0(false)
correct_prediction = tf.equal(tf.argmax(y, 1), tf.argmax(prediction, 1))

# 求均值即为准确率
accuracy = tf.reduce_mean(tf.cast(correct_prediction, tf.float32), name='accuracy')

preValue = tf.argmax(prediction, 1,name='predict')
saver = tf.train.Saver()  # 实例化saver对象
with tf.Session() as sess:
# 初始化变量
    init = tf.global_variables_initializer()
    sess.run(init)

    # 断点续训,如果ckpt存在,将ckpt加载到会话中,以防止突然关机所造成的训练白跑
    ckpt = tf.train.get_checkpoint_state(MODEL_SAVE_PATH)
    if ckpt and ckpt.model_checkpoint_path:
        saver.restore(sess, ckpt.model_checkpoint_path)

    for i in range(STEP):
        for batch in range(n_batch):
            batch_xs, batch_ys = mnist.train.next_batch(batch_size)
        opt, step = sess.run([optimizer, global_step], feed_dict={x: batch_xs, y: batch_ys, keep_prob: dropout})
        acc_train, step = sess.run([accuracy, global_step],
                                   feed_dict={x: mnist.train.images, y: mnist.train.labels, keep_prob: 1.0})

        # 记录训练集的summary
        acc_test = sess.run([accuracy], feed_dict={x: mnist.test.images, y: mnist.test.labels, keep_prob: 1.0})

        if i % 2 == 0:
            print("Iter" + str(step) + ", Testing accuracy:" + str(acc_test) + ", Training accuracy:" + str(acc_train))
