相关文章
《【SDIO】SDIO、SD卡、FatFs文件系统相关文章索引》
1. STM32 的 SDIO 功能框图
STM32 控制器有一个 SDIO,由两部分组成:SDIO 适配器和 APB2 接口,如下图所示。SDIO适配器提供 SDIO 主机功能,可以提供 SD时钟、发送命令和进行数据传输。APB2接口用于控制器访问 SDIO 适配器寄存器并且可以产生中断和 DMA 请求信号。
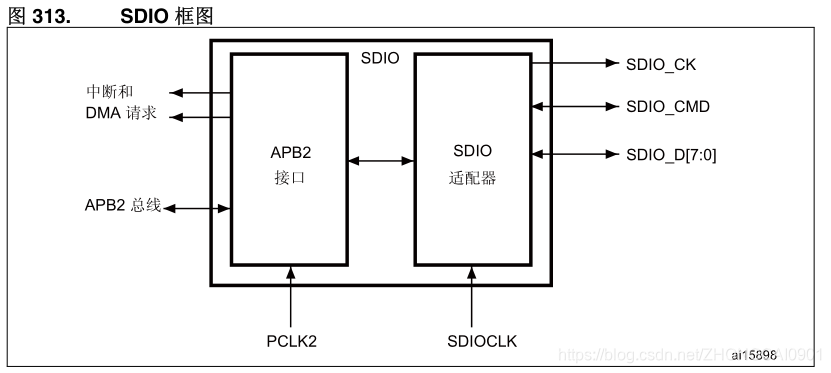
SDIO使用两个时钟信号,一个是 SDIO 适配器时钟(SDIOCLK=48MHz),另外一个是APB2总线时钟(PCLK2,一般为 90MHz)。
STM32控制器的 SDIO 是针对 MMC卡和 SD 卡的主设备,所以预留有 8 根数据线,对于 SD卡最多用四根数据线。
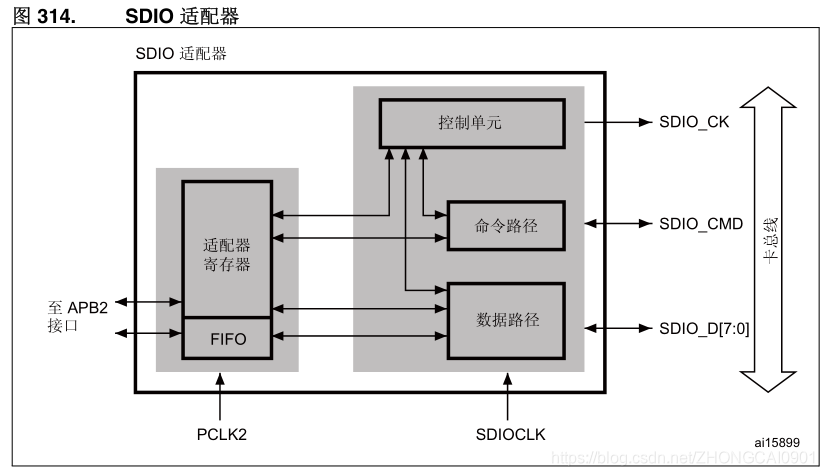
SDIO适配器由五个单元组成,分别为:(如下图所示)
- 控制单元
- 命令路径单元
- 数据路径单元
- 寄存器单元
- FIFO
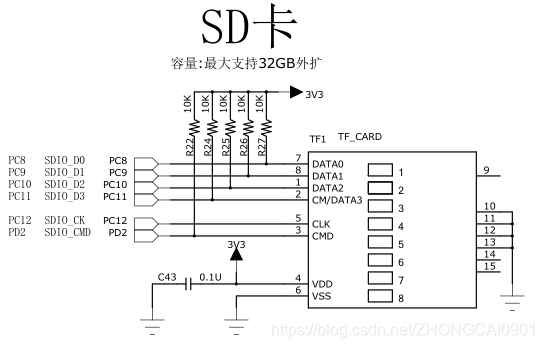
2. STM32 SD卡硬件设计
STM32控制器的 SDIO 引脚是被设计固定不变的,开发板设计采用四根数据线模式。对于命令线和数据线须需要加一个上拉电阻。
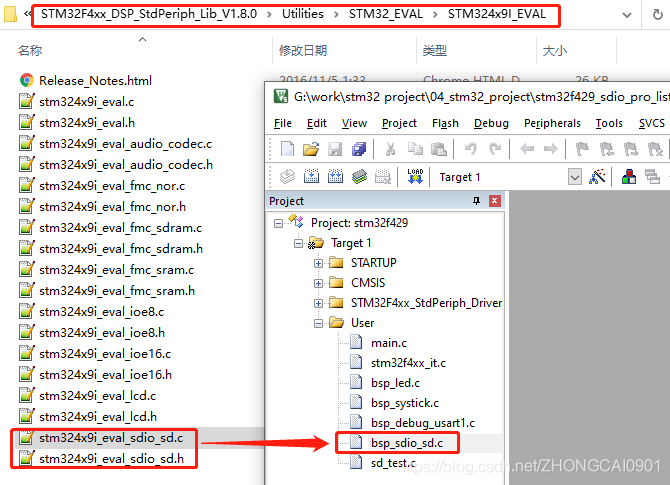
3. SD卡读写测试移植
在STM32平台上移植SD卡读写测试相对比较简单,我们可以直接参考标准库里面的SDIO demo进行移植。如:STM32F4xx_DSP_StdPeriph_Lib_V1.8.0\Project\STM32F4xx_StdPeriph_Examples\SDIO\SDIO_uSDCard
- 将
stm324x9i_eval_sdio_sd.c移植到当前工程,它提供了SD_Init()、SD_WriteBlock()和SD_ReadBlock()等SD卡操作函数,我们可以直接拿来使用。
- 编写
sd_test.c文件,实现SD卡的擦除测试、单块写操作测试和多块写操作测试。
/**
  * @brief  Configures SDIO IRQ channel.
  * @param  None
  * @retval None
  */
static void NVIC_Configuration(void)
{


  NVIC_InitTypeDef NVIC_InitStructure;

  /* Configure the NVIC Preemption Priority Bits */
  NVIC_PriorityGroupConfig(NVIC_PriorityGroup_1);

  NVIC_InitStructure.NVIC_IRQChannel = SDIO_IRQn;
  NVIC_InitStructure.NVIC_IRQChannelPreemptionPriority = 0;
  NVIC_InitStructure.NVIC_IRQChannelSubPriority = 0;
  NVIC_InitStructure.NVIC_IRQChannelCmd = ENABLE;
  NVIC_Init(&NVIC_InitStructure);
  NVIC_InitStructure.NVIC_IRQChannel = SD_SDIO_DMA_IRQn;
  NVIC_InitStructure.NVIC_IRQChannelPreemptionPriority = 1;
  NVIC_Init(&NVIC_InitStructure);
}

/**
  * @brief  Tests the SD card erase operation.
  * @param  None
  * @retval None
  */
static void SD_EraseTest(void)
{


	printf("\r\n---->Erase test is starting...\r\n");

	/*------------------- Block Erase ------------------------------------------*/
	if (Status == SD_OK)
	{


		/* Erase NumberOfBlocks Blocks of WRITE_BL_LEN(512 Bytes) */
		Status = SD_Erase(0x00, (BLOCK_SIZE * NUMBER_OF_BLOCKS));
	}

	if (Status == SD_OK)
	{


		Status = SD_ReadMultiBlocks(aBuffer_MultiBlock_Rx, 0x00, BLOCK_SIZE, NUMBER_OF_BLOCKS);

		/* Check if the Transfer is finished */
		Status = SD_WaitReadOperation();

		/* Wait until end of DMA transfer */
		while(SD_GetStatus() != SD_TRANSFER_OK);
	}

	/* Check the correctness of erased blocks */
	if (Status == SD_OK)
	{


		EraseStatus = eBuffercmp(aBuffer_MultiBlock_Rx, MULTI_BUFFER_SIZE);
	}

	if(EraseStatus == PASSED)
	{


		LED1(ON);
		printf("\tThe earase is successful.\r\n");
	}
	else
	{


		LED1(OFF);
		LED3(ON);
		printf("\tThe earase is fail!!!\r\n");
	}

	printf("<----Erase test is end.\r\n");
}

/**
  * @brief  Tests the SD card Single Blocks operations.
  * @param  None
  * @retval None
  */
static void SD_SingleBlockTest(void)
{


	printf("\r\n---->Single block test is starting...\r\n");

	/*------------------- Block Read/Write --------------------------*/
	/* Fill the buffer to send */
	Fill_Buffer(aBuffer_Block_Tx, BLOCK_SIZE, 0x320F);

	if (Status == SD_OK)
	{


		/* Write block of 512 bytes on address 0 */
		Status = SD_WriteBlock(aBuffer_Block_Tx, 0x00, BLOCK_SIZE);
		/* Check if the Transfer is finished */
		Status = SD_WaitWriteOperation();
		while(SD_GetStatus() != SD_TRANSFER_OK);
	}

	if (Status == SD_OK)
	{


		/* Read block of 512 bytes from address 0 */
		Status = SD_ReadBlock(aBuffer_Block_Rx, 0x00, BLOCK_SIZE);
		/* Check if the Transfer is finished */
		Status = SD_WaitReadOperation();
		while(SD_GetStatus() != SD_TRANSFER_OK);
	}

	/* Check the correctness of written data */
	if (Status == SD_OK)
	{


		TransferStatus1 = Buffercmp(aBuffer_Block_Tx, aBuffer_Block_Rx, BLOCK_SIZE);
	}

	if(TransferStatus1 == PASSED)
	{


		LED1(ON);
		printf("\tThe test is successful.\r\n");
	}
	else
	{


		LED1(OFF);
		LED3(ON);
		printf("\tThe test is fail!!!\r\n");
	}

	printf("<----Single block test is end.\r\n");

}

/**
  * @brief  Tests the SD card Multiple Blocks operations.
  * @param  None
  * @retval None
  */
static void SD_MultiBlockTest(void)
{


	printf("\r\n---->Multi block test is starting...\r\n");

	/* Fill the buffer to send */
	Fill_Buffer(aBuffer_MultiBlock_Tx, MULTI_BUFFER_SIZE, 0x0);

	if (Status == SD_OK)
	{


		/* Write multiple block of many bytes on address 0 */
		Status = SD_WriteMultiBlocks(aBuffer_MultiBlock_Tx, 0, BLOCK_SIZE, NUMBER_OF_BLOCKS);

		/* Check if the Transfer is finished */
		Status = SD_WaitWriteOperation();
		while(SD_GetStatus() != SD_TRANSFER_OK);
	}

	if (Status == SD_OK)
	{


		/* Read block of many bytes from address 0 */
		Status = SD_ReadMultiBlocks(aBuffer_MultiBlock_Rx, 0, BLOCK_SIZE, NUMBER_OF_BLOCKS);

		/* Check if the Transfer is finished */
		Status = SD_WaitReadOperation();
		while(SD_GetStatus() != SD_TRANSFER_OK);
	}

	/* Check the correctness of written data */
	if (Status == SD_OK)
	{


		TransferStatus2 = Buffercmp(aBuffer_MultiBlock_Tx, aBuffer_MultiBlock_Rx, MULTI_BUFFER_SIZE);
	}

	if(TransferStatus2 == PASSED)
	{


		LED1(ON);
		printf("\tThe test is successful.\r\n");
	}
	else
	{


		LED1(OFF);
		LED3(ON);
		printf("\tThe test is fail!!!\r\n");
	}

	printf("<----Multi block test is end.\r\n");

}


void SD_Test_Start(void)
{


	if(Status != SD_OK){


		return;
	}

	/*-------------------------- SD Erase Test ---------------------------- */
	SD_EraseTest();

	/*-------------------------- SD Single Block Test --------------------- */
	SD_SingleBlockTest();

	/*-------------------------- SD Multi Blocks Test --------------------- */
	SD_MultiBlockTest();
}

void SD_Test_Init(void)
{


	/* NVIC Configuration */
	NVIC_Configuration();

	/*------------------------------ SD Init ---------------------------------- */
	if((Status = SD_Init()) == SD_OK)
	{


		printf("The SD Card is successfully initialized!!!\r\n");
	}else{


		LED3(ON);
		printf("The SD Card is fail initialized!!!\r\n");
	}
}
- 在
main.c中调用SD卡读写测试。
int main(void)
{


	// ...

	SD_Test_Init();
	SD_Test_Start();

	while(1){


		// Do nothing!!!
	}

	//return 0;
}
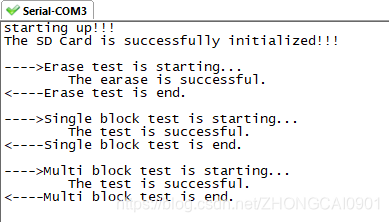
4. 验证测试
最后验证测试成功,如下:
5. 资料下载地址
移植成功的完整代码下载地址如下:
https://download.csdn.net/download/ZHONGCAI0901/15265756