1 Prosto简介
Presto是一个开源的、分布式SQL查询引擎、数据量支持GB到PB,主要用来处理秒级查询。
虽然Presto可以解析SQL,但它不是一个标准的数据库,不是MySQL的替代品,也不能用来处理在线事务。
1.1 Prosto架构
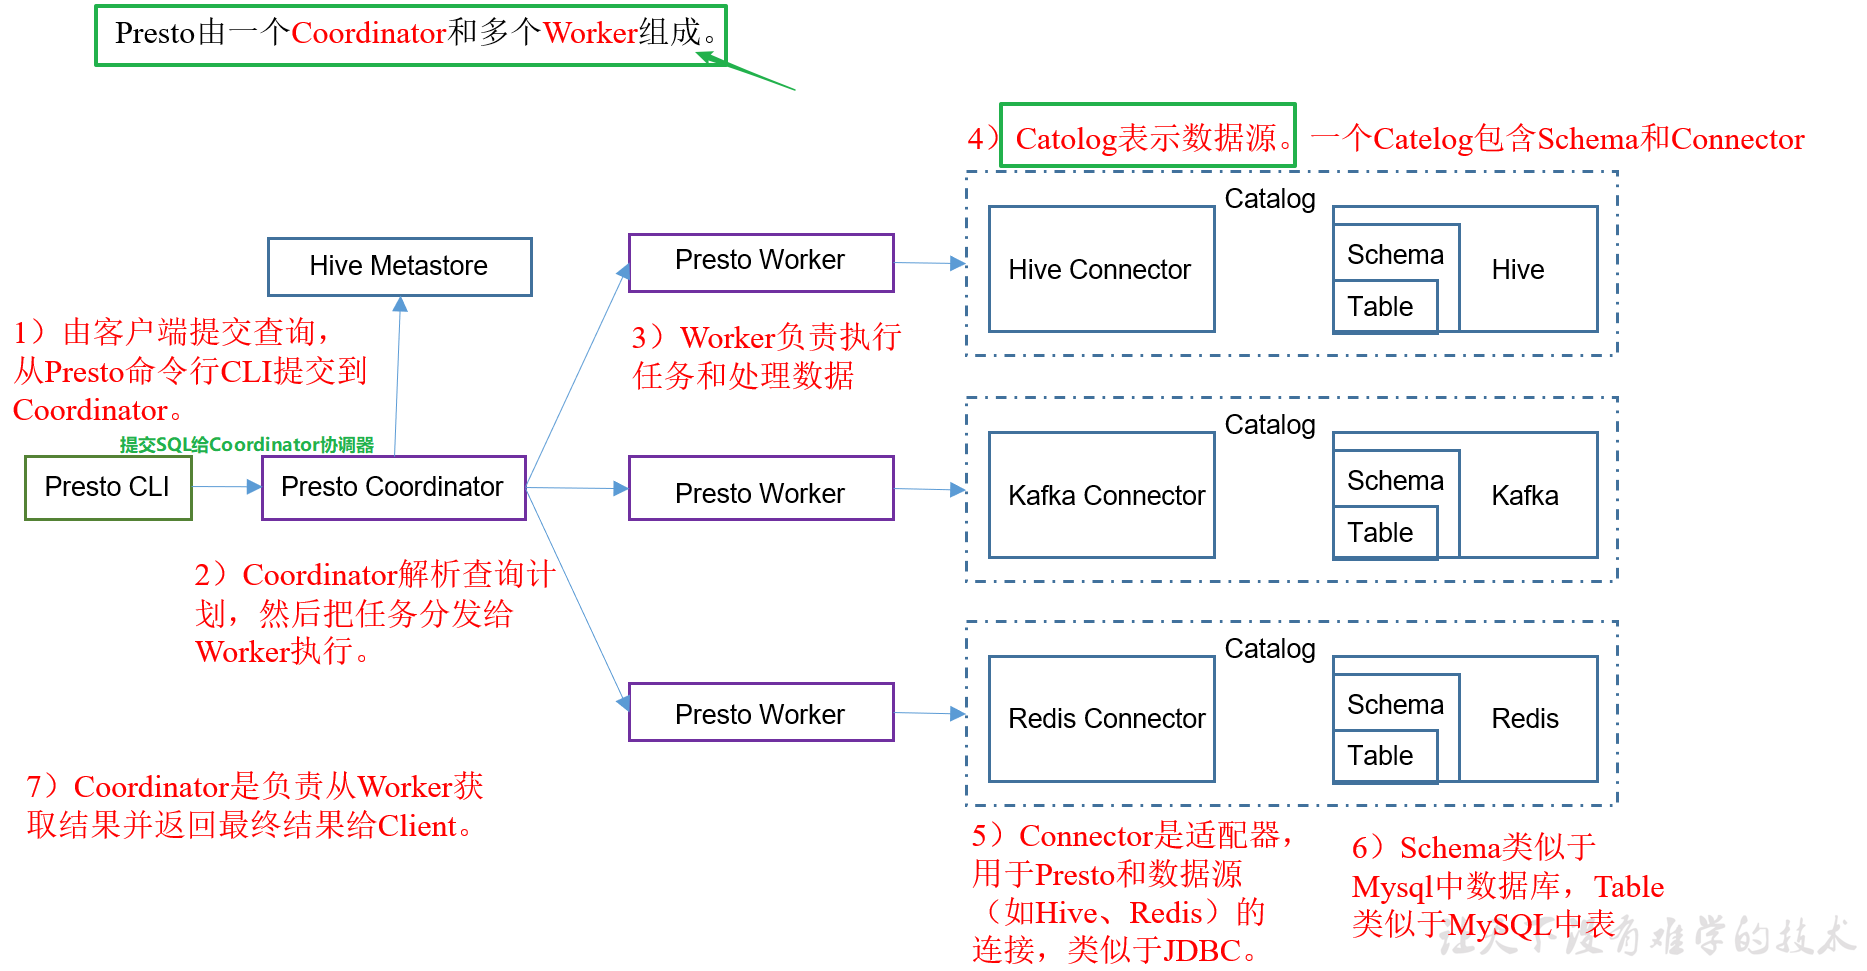
**Presto CLI **:Presto客户端,将执行的SQL发送给Presto Coordinator
Presto Coordinator:Presto协调器,接受客户端发来的SQL解析成任务发送给PrestoWorker去执行
Presto Worker:执行Coordinator发来的任务,处理数据。
Catalog:数据源。
-
Connector:连接器,对接不同的数据源,需要不同的连接器。
只要拿到Hive的元数据信息,就能查询数据。因为Hive的元数据存储了有哪些表,表在HDFS上的路径。
- 获取Hive的元数据的方式有两种:1是直连Hive,2通过Hive的metastore(Presto)
Kafka的话,只要拿到bootstrap server地址和topic,那就能够查询数据了
-
Schema:类似于mysql的数据库database
-
Table:表
Hive Metastore:Hive的metastore服务,启动了metastore服务,只要在Hive Connector中配置了metastore的地址,那么就能查询到元数据信息。能拿到元数据那就能查询到数据。
1.2 Presto查询数据流程
步骤1:Presto客户端执行查询SQL语句,发送给Presto Coordinator
步骤2:Presto Coordinator将SQL解析成任务,将任务发送给多个Presto Worker执行
步骤3:Presto Worker执行发来的任务,通过元数据信息,找到HDFS数据的位置,执行查询,并将结果返回给Presto Coordinator。
步骤4:Presto Coordinator将结果返回给Client客户端。
1.3 Presto优缺点
优点:
(1)Presto基于内存计算,减少了磁盘IO,计算更快
(2)Presto能够连接多个数据源,跨数据源连表查。
缺点:
Presto能够处理PB级别的海量数据分析,但Presto并不是把PB级别的数据放在内存中计算的。而是根据场景,边读数据边计算,再清理内存;再读数据再计算,这种消耗的内存不高。但是连表查询,就可能产生大量的临时数据,因此速度会变慢。
1.4 Presto和Impala性能比较
测试结论:Impala性能稍领先于Presto,但是Presto在数据源支持上非常丰富,包括Hive、图数据库、传统关系型数据库、Redis等。
2 Presto安装部署
2.1 Presto Server安装
服务端: Coordinator和worker
官网地址:https://prestodb.github.io/
下载地址:https://repo1.maven.org/maven2/com/facebook/presto/presto-server/0.196/presto-server-0.196.tar.gz
步骤1:将安装包上传到/opt/software/目录下,并解压到/opt/module/
[atguigu@hadoop102 software]$ tar -zxvf presto-server-0.196.tar.gz -C /opt/module/
# 修改名称
[atguigu@hadoop102 module]$ mv presto-server-0.196/ presto
步骤2:进入到/opt/module/presto/目录下,创建数据存储文件夹data
[atguigu@hadoop102 presto]$ mkdir data
步骤3:进入到/opt/module/presto/目录下,创建配置文件文件夹etc
[atguigu@hadoop102 presto]$ mkdir etc
步骤4:在/opt/module/presto/etc目录下添加jvm.config配置文件
[atguigu@hadoop102 etc]$ vim jvm.config
添加内容:
可以在官网https://prestodb.io/docs/current/installation/deployment.html找到
presto是基于内存计算的,所以在计算过程中,需要对内存回收,使用的是G1垃圾回收器
-server
-Xmx16G
-XX:+UseG1GC
-XX:G1HeapRegionSize=32M
-XX:+UseGCOverheadLimit
-XX:+ExplicitGCInvokesConcurrent
-XX:+HeapDumpOnOutOfMemoryError
-XX:+ExitOnOutOfMemoryError
步骤5:Presto支持多个数据源,在Presto中叫catalog,这里我们配置一个hive数据源
catalog数据源,需要在etc/catalog下创建hive数据源:hive.properties/kafka.properties
[atguigu@hadoop102 etc]$ mkdir catalog
[atguigu@hadoop102 catalog]$ vim hive.properties
添加内容:
- connector.name=hive-hadoop2 --连接器的名称,不能改!
- hive.metastore.uri=thrift://hadoop102:9083 --hive的metastore的服务地址,端口号,需要先启动hive的metastore服务
connector.name=hive-hadoop2
hive.metastore.uri=thrift://hadoop102:9083
步骤6:在hadoop102上分发presto到hadoop103、hadoop104
[atguigu@hadoop102 module]$ xsync presto
步骤7:分别进入到hadoop102、hadoop103、hadoop104三台主机的/opt/module/presto/etc的路径。配置node属性,node id每个节点都不一样。
- node.environment配置的是生产环境
- 保证每个节点的node.id不一样即可
- node.data-dir运行时产生的数据,日志
[atguigu@hadoop102 etc]$vim node.properties
node.environment=production
node.id=ffffffff-ffff-ffff-ffff-ffffffffffff
node.data-dir=/opt/module/presto/data

[atguigu@hadoop103 etc]$vim node.properties
node.environment=production
node.id=ffffffff-ffff-ffff-ffff-fffffffffffe
node.data-dir=/opt/module/presto/data

[atguigu@hadoop104 etc]$vim node.properties
node.environment=production
node.id=ffffffff-ffff-ffff-ffff-fffffffffffd
node.data-dir=/opt/module/presto/data
步骤8:Presto是由一个Coordinator节点和多个worker节点组成
hadoop102配置成coordinator,hadoop103、hadoop104配置成worker
# 在/opt/module/presto/etc下
[atguigu@hadoop102 etc]$ vim config.properties
添加内容:
- coordinator,是否是协调器
- discovery-server.enabled内置服务
coordinator=true
node-scheduler.include-coordinator=false
http-server.http.port=8881
query.max-memory=50GB
discovery-server.enabled=true
discovery.uri=http://hadoop102:8881
hadoop103、hadoop104配置成worker节点
[atguigu@hadoop103 etc]$ vim config.properties
[atguigu@hadoop104 etc]$ vim config.properties
添加内容:
coordinator=false
http-server.http.port=8881
query.max-memory=50GB
discovery.uri=http://hadoop102:8881
步骤9:在hadoop102上启动hive的metastore服务;用atguigu角色
[atguigu@hadoop102 hive]$
nohup bin/hive --service metastore >/dev/null 2>&1 &
步骤10:分别在hadoop102、hadoop103、hadoop104上启动Presto Server
# 启动方式1:前台启动Presto、控制台显示日志
[atguigu@hadoop102 presto]$ bin/launcher run
[atguigu@hadoop103 presto]$ bin/launcher run
[atguigu@hadoop104 presto]$ bin/launcher run
# 启动方式2:后台启动Presto
[atguigu@hadoop102 presto]$ bin/launcher start
[atguigu@hadoop103 presto]$ bin/launcher start
[atguigu@hadoop104 presto]$ bin/launcher start
步骤11:日志查看路径/opt/module/presto/data/var/log
2.2 Presto命令行Client安装
步骤1:下载Presto的客户端
https://repo1.maven.org/maven2/com/facebook/presto/presto-cli/0.196/presto-cli-0.196-executable.jar
步骤2:将presto-cli-0.196-executable.jar上传到hadoop102的/opt/module/presto文件夹下
[atguigu@hadoop102 presto]$ mv presto-cli-0.196-executable.jar /opt/module/presto
[atguigu@hadoop102 presto]$ mv presto-cli-0.196-executable.jar  prestocli
步骤3:给jar包增加可执行权限★
[atguigu@hadoop102 presto]$ chmod +x prestocli
步骤4:启动PrestoClient客户端
打开客户端,–server就是coordinator
–catalog是对接hive数据源
–schema是数据库,default库
[atguigu@hadoop102 presto]$ ./prestocli --server hadoop102:8881 --catalog hive --schema default
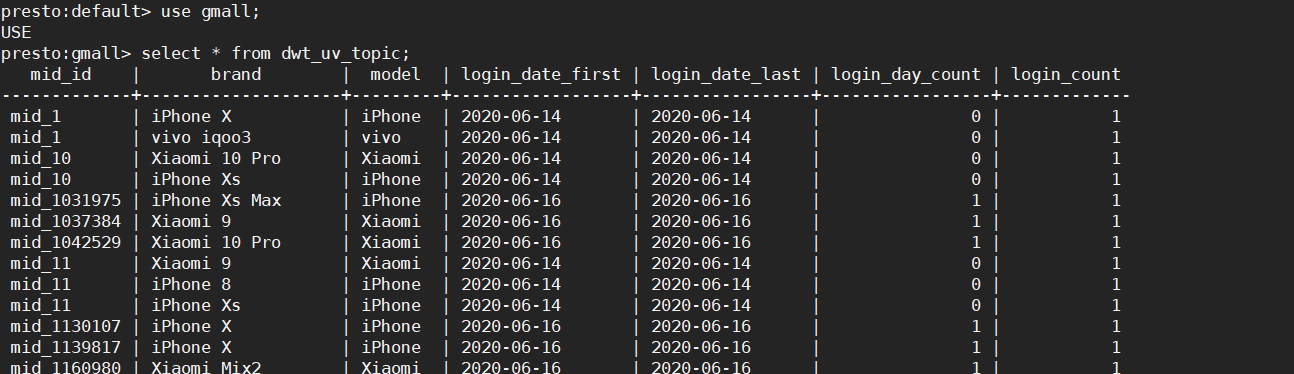
步骤5:Presto命令行操作
Presto的命令行操作,相当于Hive命令行操作。每个表必须要加上schema。
例如:
select * from schema.table limit 100

--查询的结果,如果太多并不会全部显示在控制台,和more和less显示的结果类似,按enter换行、按space翻页、按q退出。

①如何给jar包加可执行的权限
Presto Cli是一个自启动jar包文件
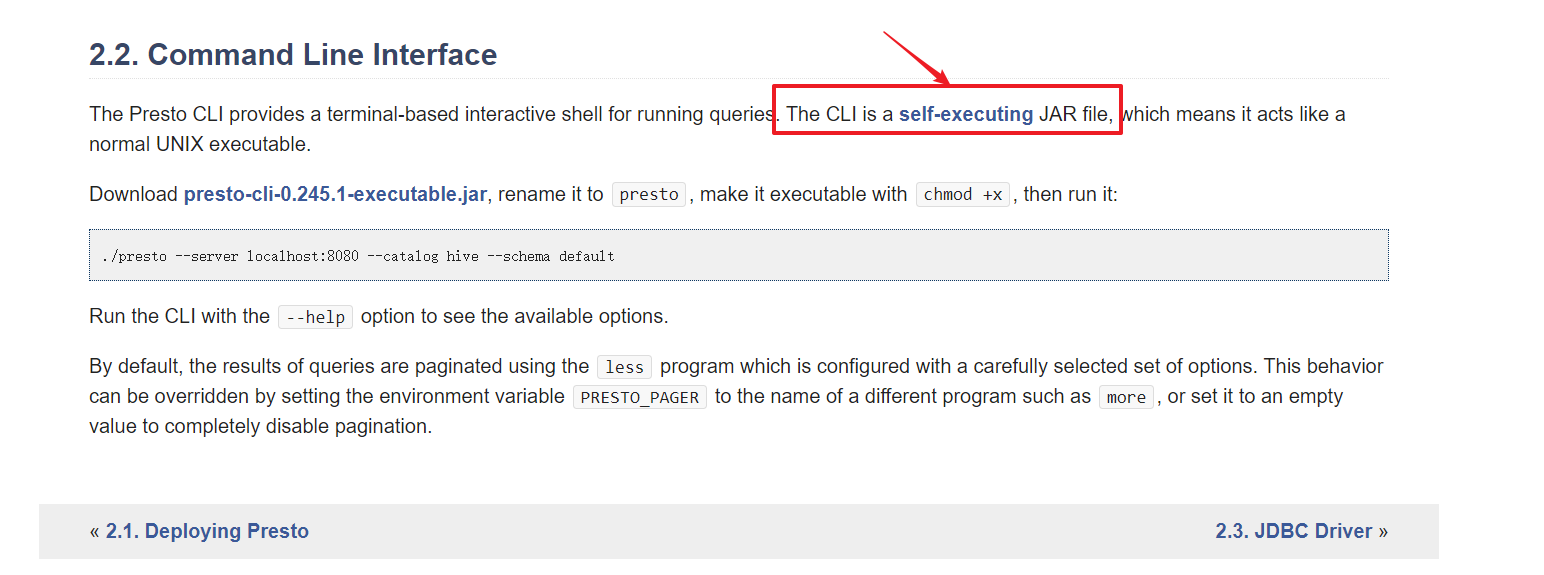
什么叫自启动jar包呢?
在java中可执行jar包有两种方式:
方式1:java -classpath asd.jar com.atguigu.Test arg0
方式2:java -jar asd.jar arg0 arg1		这种方式不用全类名
方式2这种jar包,包里面有一个文件,记录了main方法的全类名,这样的jar包就是可执行jar包
如何将jar包变成一个脚本一样可执行的文件?
https://skife.org/java/unix/2011/06/20/really_executable_jars.html
步骤1:在/opt/module/applog/下创建一个test.jar文件
添加内容:
$0是脚本本身
$@是所有的参数
#!/bin/sh

exec java -jar $0 "$@"
步骤2:将可执行jar包追加到这个文件中
[atguigu@hadoop102 applog]$ cat ./gmall2020-mock-log-2020-05-10.jar >> ./test.jar

步骤3:添加可执行权限
[atguigu@hadoop102 applog]$ chmod +x test.jar
步骤4:执行这个文件,和执行java -jar 一样
[atguigu@hadoop102 applog]$ ./test.jar
②Presto的lzo说明
Presto对lzo支持不太好,Presto是支持parquet的但是并不支持lzo压缩。
这是因为presto没有集成lzo的依赖。
1 使用presto查询ads层的表
可以查询出结果,这是因为ads层的表,没有列式存储、没有lzo压缩。

2 使用presto查询dwd、dws、dwt层的表
dwd层的表,是parquet列式存储、lzo压缩,presto并不支持lzo压缩文件 表的查询

配置presto支持lzo压缩:
步骤1:上传hadoop-lzo-0.4.20.jar到**/opt/module/presto/plugin/hive-hadoop2**
[atguigu@hadoop102 hive-hadoop2]$ cp /opt/module/hadoop-3.1.3/share/hadoop/common/hadoop-lzo-0.4.20.jar ./
步骤2:分发hadoop-lzo-0.4.20.jar到其他的节点
[atguigu@hadoop102 hive-hadoop2]$ xsync hadoop-lzo-0.4.20.jar
步骤3:重启presto的server
# 关闭presto server
[atguigu@hadoop102 hive-hadoop2]$ xcall /opt/module/presto/bin/launcher stop
# 启动presto server
[atguigu@hadoop102 hive-hadoop2]$ xcall /opt/module/presto/bin/launcher start
步骤4:启动prestoCli客户端
[atguigu@hadoop102 presto]$ ./prestocli --server hadoop102:8881 --catalog hive --schema default
presto:default>
步骤5:再次执行查询dwd、dwt和dws层的数据
使用presto查询ods层的表
ods层的表,是直接从HDFS路径导入的,当时导入到HDFS路径的时候,仅仅采用了LZO压缩。
让Presto直接去读取lzo压缩的文件,没有列式存储,是不行的!需要修改lzo文件的源码!
https://tech.meituan.com/2014/06/16/presto.html

③error断开的管道说明
因为Presto并不是一次性把数据查询出来的,是一边查看以便查询的。所以当没有查看完所有的数据,就按q退出,那么会报一个断开的管道error。不要紧!

2.3 Presto可视化Client安装
步骤1:将yanagishima-18.0.zip上传到hadoop102的/opt/software目录
步骤2:解压yanagishima-18.0.zip包,解压到/opt/module/下
unzip默认是没有安装的需要先安装一下unzip命令
其中unzip zip包 -d 目标路径,其中-d就和tar -C 一样是指明解压的目标路径
[atguigu@hadoop102 presto]$ yum install unzip

unzip yanagishima-18.0.zip -d /opt/module
步骤3:修改/opt/module/yanagishima-18.0/conf/下的yanagishima.properties
[atguigu@hadoop102 conf]$ cd /opt/module/yanagishima-18.0/conf/
[atguigu@hadoop102 conf]$ vim yanagishima.properties
在最后一行添加内容:
- jetty.port=7080,jetty就是一个类似tomcat的web容器,端口号7080
- presto.datasources声明presto数据源
- presto.coordinator.server.atguigu-presto的协调器的地址
- catalog.atguigu-presto的数据库
- sql.query.engines的sql引擎
jetty.port=7080
presto.datasources=atguigu-presto
presto.coordinator.server.atguigu-presto=http://hadoop102:8881
catalog.atguigu-presto=hive
schema.atguigu-presto=default
sql.query.engines=presto
步骤4:在/opt/module/yanagishima-18.0路径下启动yanagishima
[atguigu@hadoop102 yanagishima-18.0]$
nohup bin/yanagishima-start.sh >y.log 2>&1 &
步骤5:启动web页面
http://hadoop102:7080
打开web页面需要联网。
步骤6:查看表结构
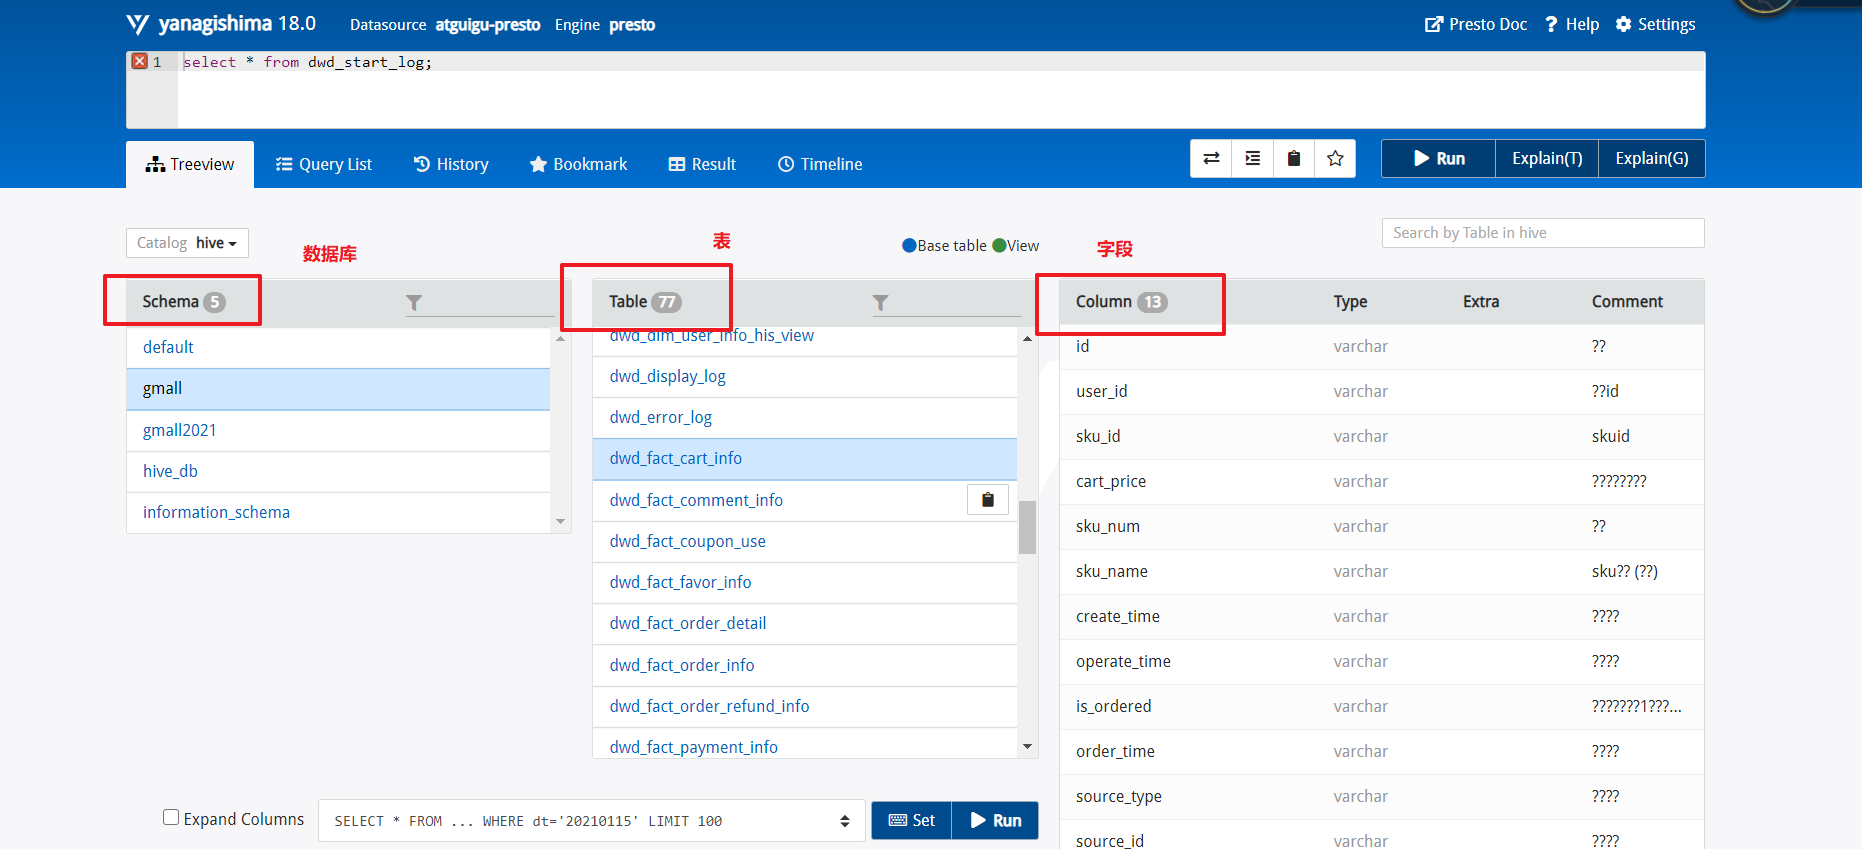
步骤7:查询表
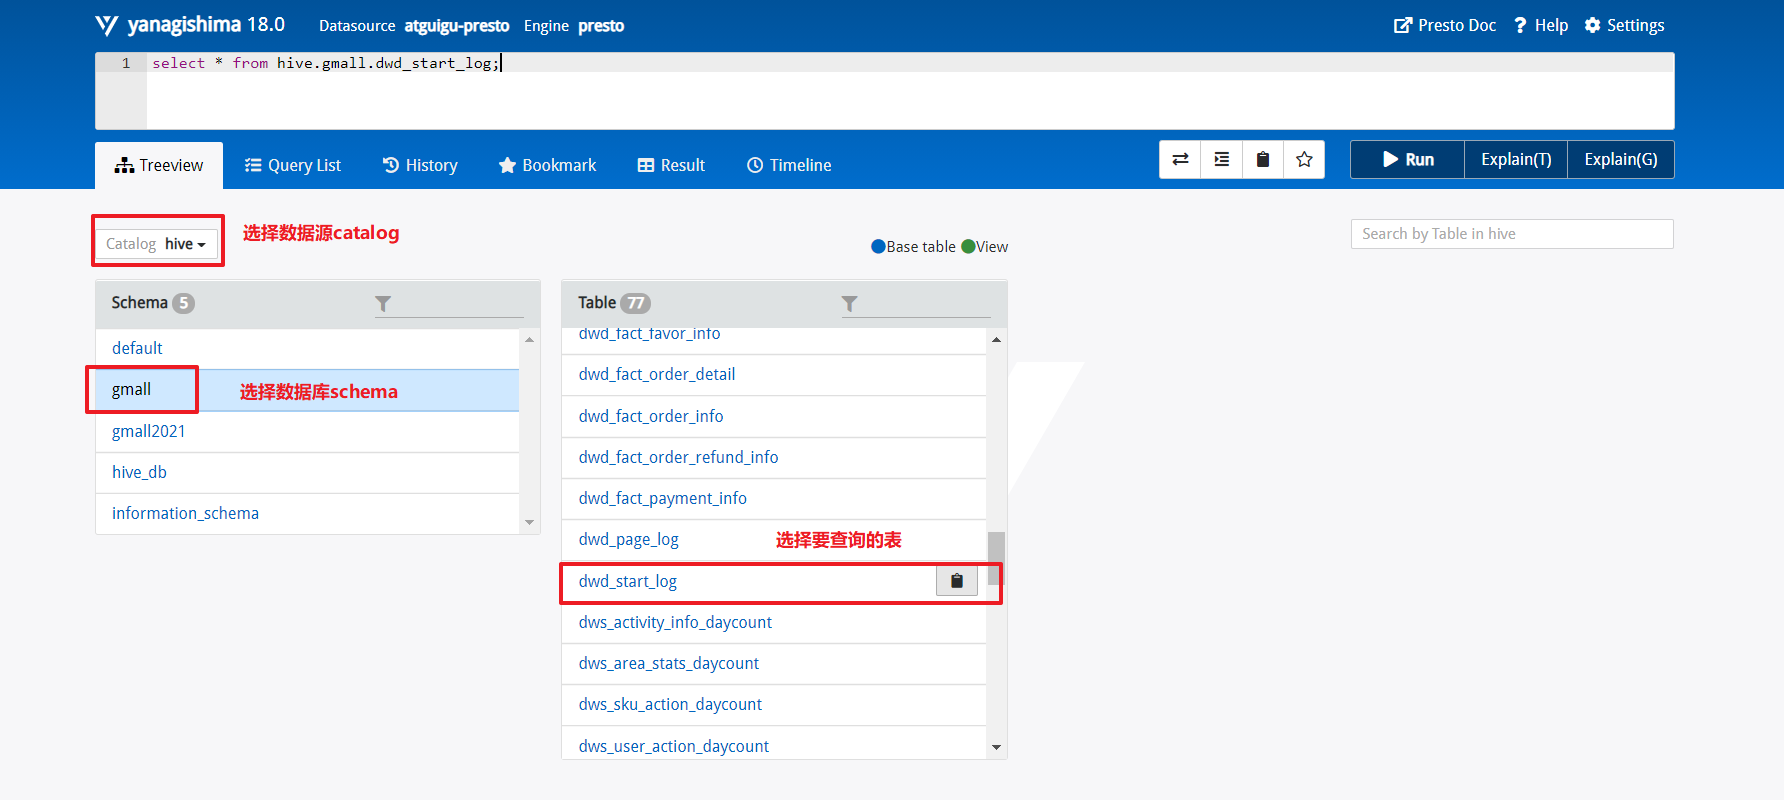
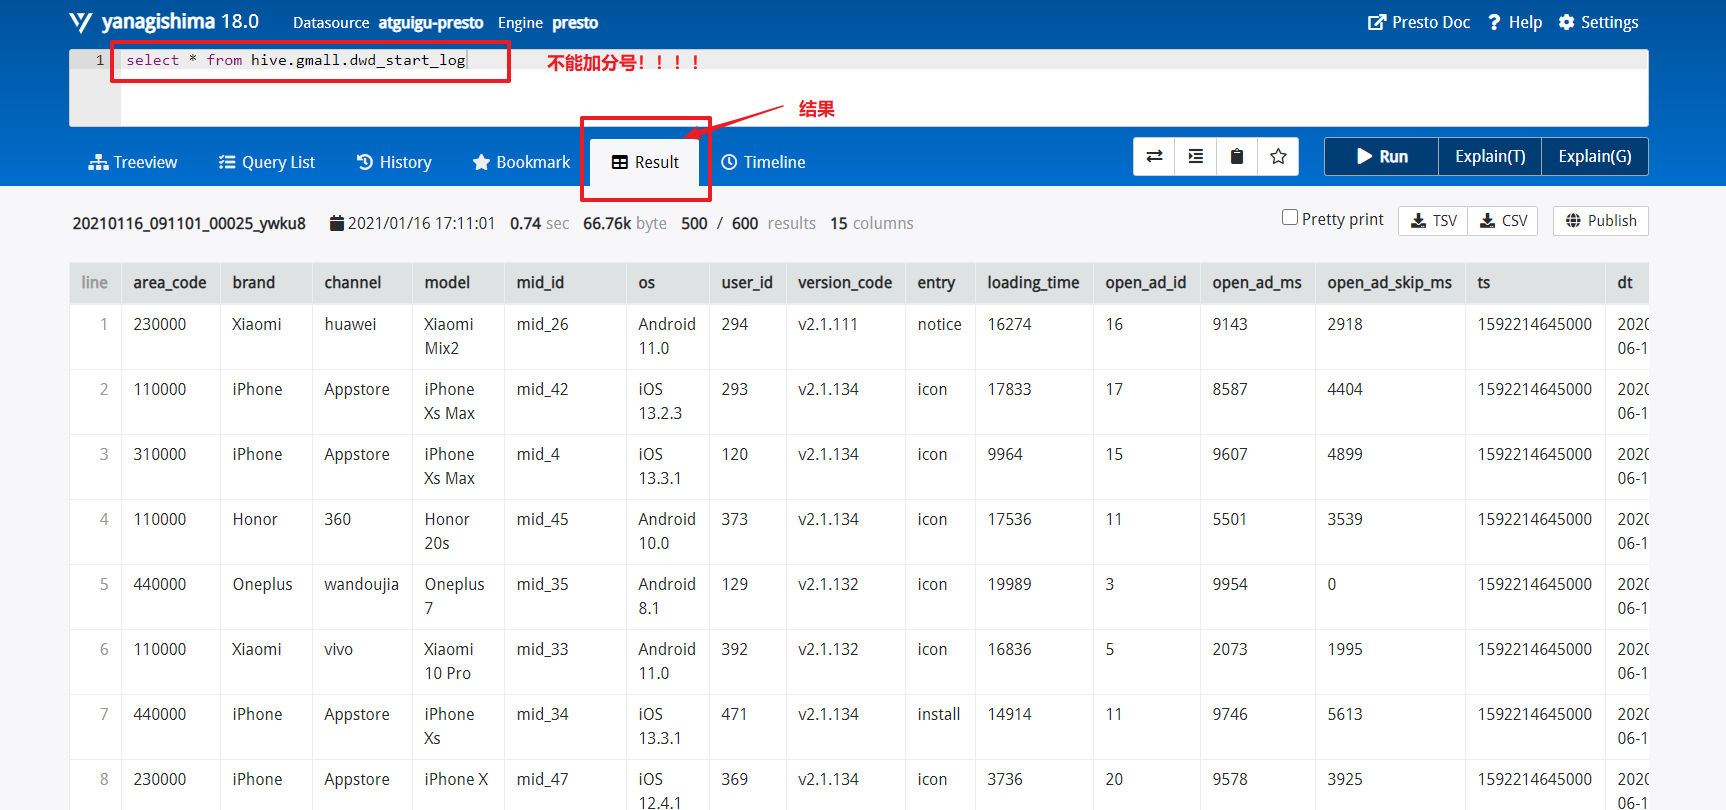
查询说明
直接查询会报错,因为并不知道是哪个presto数据源,并不知道是那个库中的表。
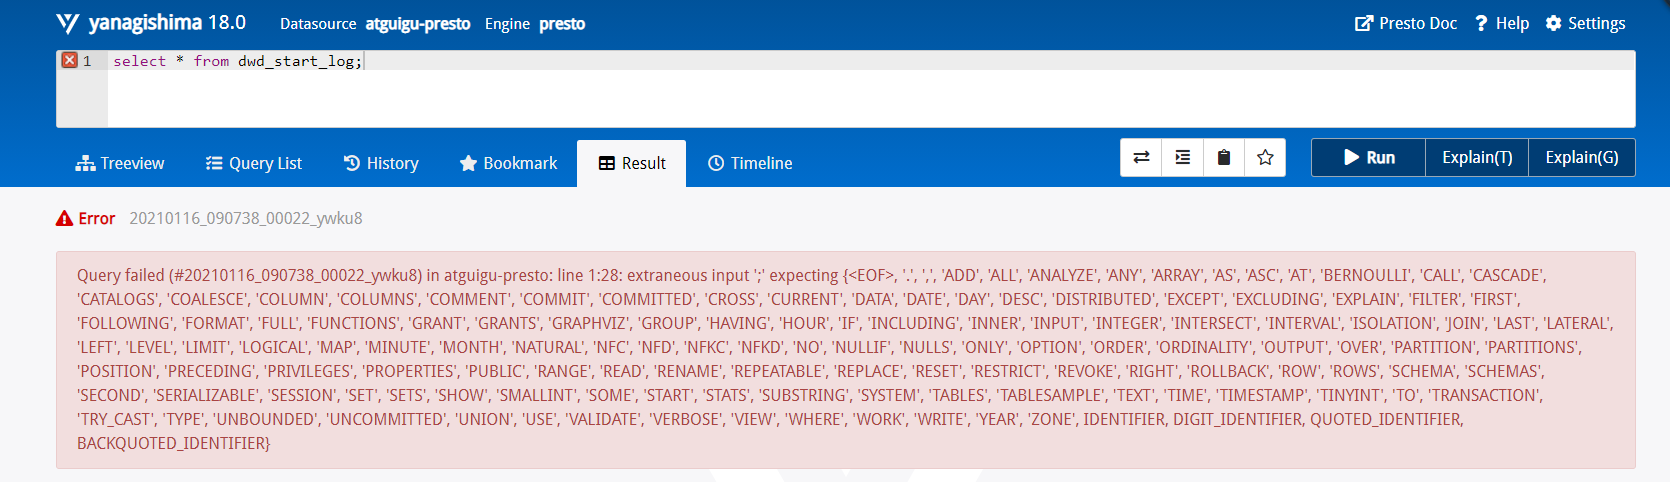
并且查询语句后面不能加分号;!!!!

3 Presto优化之数据存储
给Presto查询的表,建议使用ORC列式存储和Snappy压缩。
3.1 合理设置分区
Presto可以读取Hive的分区数据,分区的目的就是分区的数据 单独存在一个路径里,根据分区读取数据更快。
合理的设置分区能够减少Presto读取数据量,提高查询性能。
3.2 使用列式存储(ORC)
Presto对ORC文件做了特定优化,因此在Hive中创建Presto使用的表时,建议使用ORC列式存储。Presto对ORC支持要比Parquet好。
做分析的查询一般不是查几行,而是查询某几列,所以对数据进行列式存储,这样查询的时候效率会更高!
3.3 使用压缩(Snappy)
数据压缩可以减少节点间的数据传输对IO带宽压力。对即席查询来说需要快速解压,建议使用snappy压缩。
4 Presto优化之查询SQL
4.1 只选择使用的字段,避免使用*
[GOOD]: SELECT time, user, host FROM tbl

[BAD]:  SELECT * FROM tbl
4.2 过滤条件加上分区字段
对于有分区的表,where语句中优先使用分区字段进行过滤。acct_day是分区字段,visit_time是具体访问时间。
使用分区字段不用全表扫描~
[GOOD]: SELECT time, user, host FROM tbl where acct_day=20171101

[BAD]:  SELECT * FROM tbl where visit_time=20171101
4.3 Group By语句优化
合理安排group by后面的字段顺序,对性能有一定提升。按照字段的基数(distinct)降序排列
[GOOD]: SELECT GROUP BY uid, gender

[BAD]:  SELECT GROUP BY gender, uid
4.4 Order By时使用limit
Order by需要扫描数据到单个worker节点进行排序,导致单个worker需要大量内存。如果是查询Top N或者Bottom N,使用limit可减少排序计算和内存压力。
[GOOD]: SELECT * FROM tbl ORDER BY time LIMIT 100

[BAD]:  SELECT * FROM tbl ORDER BY time
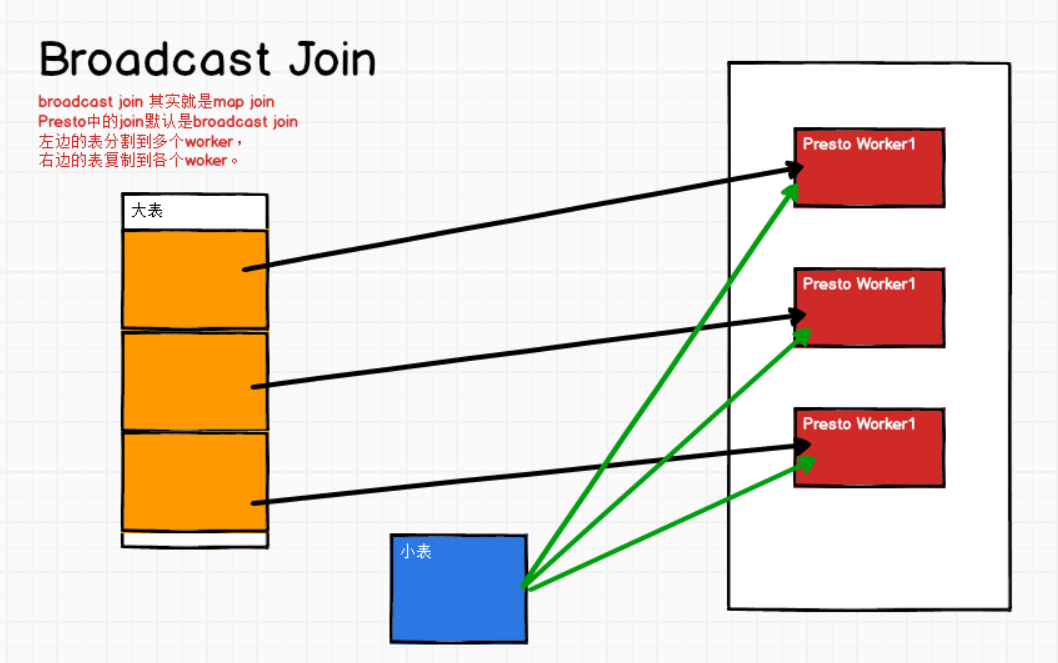
4.5 使用Join语句时将大表放在左边
大表join小表:
Presto中join的默认算法是broadcast join,即将join左边的表分割到多个worker,然后将join右边的表数据整个复制一份发送到每个worker进行计算。如果右边的表数据量太大,则可能会报内存溢出错误。
大表join大表:
那就不用broadcast join了,使用的是hash join。就不用考虑表和表的顺序了!
[GOOD] SELECT ... FROM large_table l join small_table s on l.id = s.id
[BAD] SELECT ... FROM small_table s join large_table l on l.id = s.id
5 注意事项
5.1 字段名引用
避免和关键字冲突:MySQL对字段加反引号`、Presto对字段加双引号分割
当然,如果字段名称不是关键字,可以不加这个双引号。
5.2 时间函数
对于Timestamp,需要进行比较的时候,需要添加Timestamp关键字,而MySQL中对Timestamp可以直接进行比较。
/*MySQL的写法*/
SELECT t FROM a WHERE t > '2017-01-01 00:00:00';

/*Presto中的写法*/
SELECT t FROM a WHERE t > timestamp '2017-01-01 00:00:00';
5.3 不支持insert overwrite语法
Presto中不支持insert overwrite语法,只能先delete,然后insert into。
Presto是用来做即席查询的,不支持insert也无所谓。
5.4 Parquet格式
Presto目前支持Parquet格式,支持查询,但不支持insert。
Presto是用来做即席查询的,不是用来导入数据的。