十三章:角色攻击系统
角色攻击是杀怪时的核心功能,攻击模式又可细分为普通攻击和技能攻击,其中技能攻击的信息存储在SkillInfoInList,本章节只涉及普通攻击部分。
为Magician添加一个PlayerAttack脚本,控制攻击
public enum PlayerState{
    normalWalk,
    normalAttack,
    skillAttack
}

    PlayerState state = PlayerState.normalWalk;    //默认为Walk状态,在PlayerMove脚本中也要通过Walk状态控制普通状态下的移动,当状态为Walk时,才能进行移动。
    public string aniName_normalAttack;    //攻击动画,这些属性与小狼类似
    public float normalPlayerAttackTime;
    private float playerAttackTimer = 0;
    public float minPlayerAttackDistance = 5;
    private Transform normalAttackTarget;    //攻击目标

    void Update()
    {
        if (Input.GetMouseButtonDown (1))    //点击右键攻击
        {
            Ray ray = Camera.main.ScreenPointToRay(Input.mousePosition);    //与主角移动类似,参考(链接)
            RaycastHit hitInfo;
            bool isCollider = Physics.Raycast(ray,out hitInfo);
            if(isCollider && hitInfo.collider.tag == Tags.enemy)    //目标为enemy
            {
                normalAttackTarget = hitInfo.collider.transform;    //传递目标
                state = PlayerState.normalAttack;    //切换攻击状态
            }
            else    //若点击别的地方,则切换为Walk状态
            {
                state = PlayerState.normalWalk;
                normalAttackTarget = null;
            }
        }

    }
13.1 普通攻击状态
清楚了基本的角色攻击状态后,本节实现当state == PlayerState.normalAttack时的攻击状态。
首先当主角进行攻击时,要判断主角和怪物的距离。若超出攻击距离,主角进行移动并攻击;若未超出,直接攻击。在PlayerAttack脚本中
        if(normalAttackTarget != null)    //选定目标后,判断距离
        {
            float distance = Vector3.Distance(transform.position,normalAttackTarget);
            if(distance > minPlayerAttackDistance)
            {
                 PlayerMove._instance.SimpleMove(normalAttackTarget.position);    //从PlayerMove中调用移动方法

            }
            else
            {
                  //直接攻击
            }
        }
其中SimpleMove()函数实现如下
    public void SimpleMove(Vector3 target)
    {
        transform.LookAt (target);
        controller.SimpleMove (transform.forward * speed);
    }
在攻击时,我们也有不同的动画,包括
处在攻击状态下的移动、攻击以及攻击休息时间的动画。因此需要对PlayerAttack脚本再添加AttackState状态,这三种状态对应三种不同的动画。
public enum AttackState{
    Moving,
    Idle,
    Attack
}
并在控制角色动画的PlayerAnimation脚本中通过当前AttackState的状态,分配不同的动画
if (attack.state == PlayerState.normalWalk)
{
if (move.state == PlayerWalkState.Moving)
{
PlayAnim ("Run"); //普通状态下的"Run"
}
else if (move.state == PlayerWalkState.Idle)
{
PlayAnim ("Idle");
}
}
else if (attack.state == PlayerState.normalAttack)
{
if(attack.atkState == AttackState.Moving)
{
PlayAnim("Run");
//攻击状态下的"Run"
}
}
在PlayerAttack下的if(distance > minPlayerAttackDistance)中加入攻击状态下的移动状态即可
if(distance > minPlayerAttackDistance)
            {
                atkState = AttackState.Moving;    //移动的过程中播放动画
                PlayerMove._instance.SimpleMove(normalAttackTarget.position);
            }
就实现了攻击状态下移动时的动画播放。
接下来实现攻击时的休息状态,添加两个string,用以切换攻击状态和休息状态
    public string aniName_idleOfRest;    //攻击间隔的休息动画
    public string aniName_now;    //当前攻击状态下的动画
当distance <= minPlayerAttackDistance,即进入攻击范围时,我们添加代码
                if(distance <= minPlayerAttackDistance)
                {
                transform.LookAt(normalAttackTarget);
                atkState = AttackState.Attack;    //切换到攻击状态下的攻击模式
                playerAttackTimer += Time.deltaTime;    //计时器开启
                animation.CrossFade(aniName_now);    //播放当前动画,默认为aniName_normalAttack
                if(playerAttackTimer >= normalPlayerAttackTime)
                {
                    aniName_now = aniName_idleOfRest;    //攻击效果结束后,当前状态为aniName_idleOfRest
                }
                if(playerAttackTimer >= 1f/attackRate)    //攻击间隔达到后,进入下一次攻击
                {
                    playerAttackTimer = 0;
                    aniName_now = aniName_normalAttack;
                }
            }
即可实现AttackState下的三种状态。
13.2 攻击指针与攻击特效
13.2.1 攻击指针
在攻击时,我们需要改变鼠标指针,并且在攻击动画播放完成后显示攻击特效。
我们参照4.3节(
链接)使用继承的方法,在鼠标放在小狼身上时出现不同的效果,有攻击图标和技能图标。
新建一个AttackCursor脚本,输入
    void OnMouseEnter()
    {
        MouseSetting._instance.SetNormalAttackCursor ();
    }

    void OnMouseExit()
    {
        MouseSetting._instance.SetNormalCursor ();
    }
并在MouseSetting中设置SetNormalAttackCursor(),如下
    public Texture2D cursor_attack;
    public void SetNormalAttackCursor()
    {
        Cursor.SetCursor (cursor_attack, hotspot, mode);
    }
之后让WolfBaby继承自AttackCursor脚本,即可实现鼠标的变换功能。
补充:考虑到使用技能时的攻击图标与普通攻击冲突,我们可以不用继承的方式,在WolfBaby上用
    void OnMouseEnter()
    {
        MouseSetting._instance.SetNormalAttackCursor ();
    }

    void OnMouseExit()
    {
        MouseSetting._instance.SetNormalCursor ();
    }
直接替换。
13.2.2 攻击特效
我们使用RPG——>Effect——>Prefabs中的Effect_Slash作为攻击时的闪光特效,在PlayerAttack中创建一个GameObject并导入特效的Prefab

并在攻击结束时创建
    private bool effectFlag = false;
                if(playerAttackTimer >= normalPlayerAttackTime)
                {
                    aniName_now = aniName_idleOfRest;
                    if(effectFlag == false)
                    {
                        effectFlag = true;
                        GameObject.Instantiate(effect,normalAttackTarget.position,Quaternion.identity);    //添加特效
                    }
                }
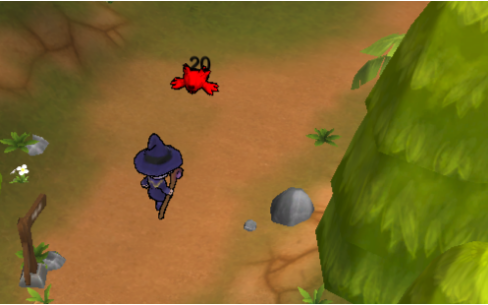
即可显示攻击闪光,如下图所示

在显示特效的同时造成伤害,需要访问PlayerStatus的人物攻击属性和Equipment中的装备加成属性。
    private PlayerStatus ps;
    void Awake()
    {
        ps = this.GetComponent<PlayerStatus> ();
    }
    public int GetAttack()
    {
        return Equipment._instance.attack + ps.attack + ps.attack_plus;    //装备、基础和加点攻击力
    }
之后在产生特效之后加入如下代码即可
normalAttackTarget.GetComponent<WolfBaby>().BeDamaged(GetAttack());
即可看到效果
13.3 野怪的自动生成
我们在Hierarchy中新建一个空的游戏物体,用作小狼的巢穴,命名为BabySpawn,为其添加脚本BabySpawn,源源不断地孵化小狼。
public static BabySpawn _instance;
    private int maxNumber = 5;    //最大数量与当前数量,控制是否继续添加小狼
    public int currentNumber = 0;
    private float createTimer = 3;    //创建的时间间隔
    private float timer = 0;
    public GameObject prefab;    //小狼的prefab

    void Awake()
    {
        _instance = this;
    }

    void Update()
    {
        if (currentNumber < maxNumber)    //满足创建条件
        {
            timer += Time.deltaTime;
            if(timer >= createTimer)
            {
                Vector3 pos = transform.position;    //创建时随机生成一个位置。
                pos.x += Random.Range(-3,3);
                pos.z += Random.Range(-5,5);
                GameObject.Instantiate(prefab,pos,Quaternion.identity);
                timer = 0;
                ++currentNumber;
            }
        }
    }
当小狼死亡时,即WolfBaby中hp<0时,调节currentNumber,即
BabySpawn._instance.currentNumber -= 1;
即可实现野怪的刷新功能。
13.4 怪物与状态的交互
杀死小狼时,我们要添加经验值等信息,并更新任务信息
我们调用PlayerStatus中的GetExp()函数和BarNPC中的PlusWolfKilledNumber()函数,实现如下
    public void GetExp(float exp)
    {
        this.expCurrent += exp;
        int totalExp = 100 + this.level * 30;
        while (this.expCurrent >= totalExp)
        {
            ++level;
            expCurrent -= totalExp;
            point_remain += 5;
            totalExp = 100 + this.level * 30;
        }
        EXPBar._instance.SetValue (this.expCurrent / totalExp);
    }

    public void PlusWolfKilledNumber()
    {
        if (isOnTask)
        {
            killWolfNumber += 1;
        }
    }
并在WolfBaby脚本中进行调用
if (hp <= 0)
            {
                UpdatePara();    //更新这些数据参数
                state = WolfBabyState.Death;
                Destroy (this.gameObject, 2);
                GameObject.Destroy(HUDTextGO);

            }
其中 UpdatePara()实现如下
    void UpdatePara()
    {
        BabySpawn._instance.currentNumber -= 1;
        ps.GetExp(exp);
        BarNPC._instance.PlusWolfKilledNumber();
    }

当任务完成后,我们需要获得奖励,如上右图所示,即点击上左图的OK按钮,提交任务,领取奖励。
    public void OnAcceptQuest()
    {
        Inventory._instance.EarnMoney (1000);
        isOnTask = true;
        ShowTaskProgress ();
    }
其中EarnMoney()函数实现如下
    public void EarnMoney(int money)
    {
        coinCount += money;
        coinNumberLabel.text = coinCount.ToString();    //更新显示
    }
至此,角色攻击系统以及与任务系统的交互就大体实现了。