十五章:主角受攻击效果以及场景切换
本篇博客将《黑暗之光》开发的最后工作做完,包括之前未实现的主角被击效果,以及实际运行中的场景切换。
15.1 主角的受攻击效果
我们参照WolfBaby中的受攻击效果(
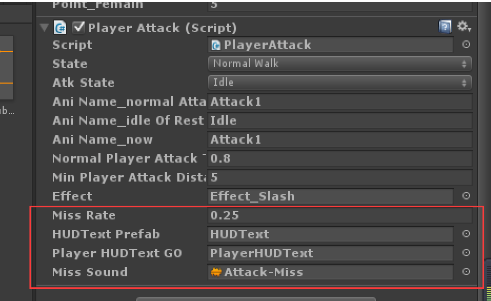
链接),制作主角的对应效果
    public float missRate = 0.25f;
    public GameObject HUDTextPrefab;
    private GameObject HUDTextGO;
    public GameObject playerHUDTextGO;
    private HUDText showText;
    private UIFollowTarget followTarget;
    public AudioClip missSound;

    public void BeDamage(int attackValue)
    {
        int defence = Equipment._instance.defense + ps.defense + ps.defense_plus;
        float damage = attackValue * (200 - defence)/200 ;
        //float damage = int.Parse (temp);
        if (damage <= 1)
        {
            damage = 1;
        }
        float value = Random.Range (0f, 1f);
        if (value < 0.5)
        {
            //damage
        }
        else
        {
            //miss
            AudioSource.PlayClipAtPoint(missSound,transform.position);
            showText.Add("Miss",Color.blue,1);
        }
    }
并对相应物体赋初值
伤害效果的设置如下
    public GameObject playerBody;    //指定角色body
    private Color normalColor;

    void Awake()
    {
        normalColor = playerBody.renderer.material.color;
    }

        if (value < 0.5)
        {
            //damage
            showText.Add("-" + damage,Color.black,1);
            ps.hp_remain -= damage;
            StartCoroutine (ShowPlayerRed ());
        }
    IEnumerator ShowPlayerRed()
    {
        playerBody.renderer.material.color = Color.red;
        yield return new WaitForSeconds (0.5f);
        playerBody.renderer.material.color = normalColor;
    }
15.2 主角的受伤和死亡效果
接下来实现角色的受伤效果,hp小于0时死亡。首先在PlayerAttack的PlayerState中添加死亡状态
public enum PlayerState{
    normalWalk,
    normalAttack,
    skillAttack,
    Death    //死亡状态
}
并在hp小于0时
            if(ps.hp_remain <= 0)
            {
                state = PlayerState.Death;
            }
在Update()中,当state = PlayerState.Death时,我们有
        else if(state == PlayerState.Death)
        {
            animation.CrossFade(aniName_death);
        }
之后我们在WolfBaby的AutoAttack()中攻击主角并调用主角的BeDamage()函数,
if(aniName_nowAttack == aniName_normalAttack)
                {
                    if(attackTimer >= normalAttackTime)
                    {
                        target.GetComponent<PlayerAttack>().BeDamage(attackValue);    //访问Bedamage造成伤害
                        aniName_nowAttack = aniName_idle;
                        animation.CrossFade(aniName_idle);
                    }
                }
                else if(aniName_nowAttack == aniName_crazyAttack)
                {
                    if(attackTimer >= crazyAttackTime)
                    {
                        target.GetComponent<PlayerAttack>().BeDamage(attackValue);
                        aniName_nowAttack = aniName_idle;
                        animation.CrossFade(aniName_idle);
                    }
                }
即实现了主角的受伤效果

在每次攻击完毕之后,我们要调用人物面板的FaceUI的SetFaceProperty()属性,以更新状态。在AutoAttack()函数,我们添加
FaceUI._instance.SetFaceProperty ();
就可以生效,并且当角色死亡时,我们需要取消怪物的攻击以及人物的移动功能,因此在AutoAttack中加入
PlayerState playerAttackState = target.GetComponent<PlayerAttack> ().state;    //用playerAttackState,避免与state重名
            if (playerAttackState == PlayerState.Death)
            {
                target = null;
                state = WolfBabyState.Idle;
                return;
            }
以及PlayerDirection的Update()中
if (pa.state == PlayerState.Death) return;
即可实现受伤以及死亡效果。
15.3场景间的切换
最后一步是将整个流程连接起来,通过初始化载入界面——>角色创建界面——>实际游戏场景,也就是Scene之间的切换。在开始动画里,我们有New Game和Load Game两个功能。
在File——>Build Setting中,导入场景
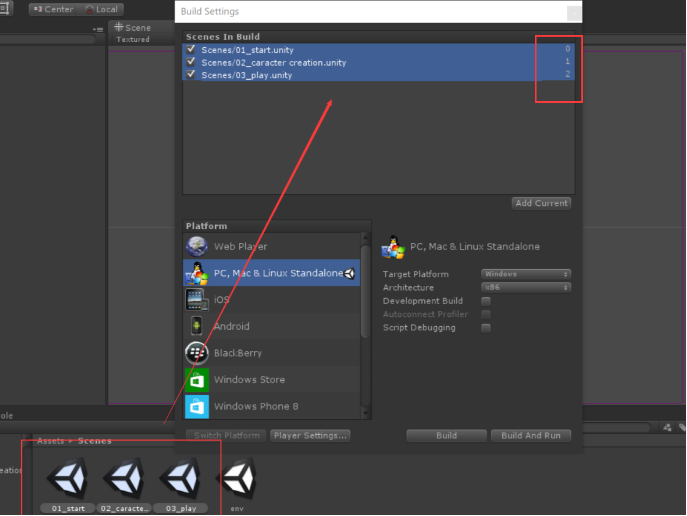
在控制New Game的按键脚本中,添加
    public void PressNewGame()
    {
        PlayerPrefs.SetInt("dataFromSave",0);
        Application.LoadLevel (1);    //加载上图红框中的1场景
    }
即可进入角色创建界面
在角色创建场景中,需要保存所选角色和角色名,因此在OK按钮脚本中添加
    public void PressConfirmButton()
    {
        PlayerPrefs.SetString ("storeName", nameInput.value);    //存储名字
        PlayerPrefs.SetInt ("storeCurrentIndex", selectedIndex);    //存储角色
        Application.LoadLevel (2);    //加载下一个场景

    }
在GameSetting中创建一个脚本为LoadRole,控制加载
public class LoadRole : MonoBehaviour {

    public GameObject magicianPrefab;    //获取两个角色的prefab
    public GameObject swordmanPrefab;

    void Awake()
    {
        int index = PlayerPrefs.GetInt ("storeCurrentIndex");    //得到输入的名字和角色
        string name = PlayerPrefs.GetString ("storeName");
        GameObject playerGO = null;
        if(index == 0)
        {
            playerGO = GameObject.Instantiate(magicianPrefab) as GameObject;    //实例化
        }
        else if(index == 1)
        {
            playerGO = GameObject.Instantiate(swordmanPrefab) as GameObject;
        }

        playerGO.GetComponent<PlayerStatus> ().name = name;    //通过实例化的  playerGO修改名字信息
    }

}
就可以正常创建,角色名称等信息也正常显示。

总结:学习完110节的教程后,基本实现了整个游戏框架的基本功能。之后也会扩展一些教程中没有的玩法,比如怪物攻城等。敬请期待!