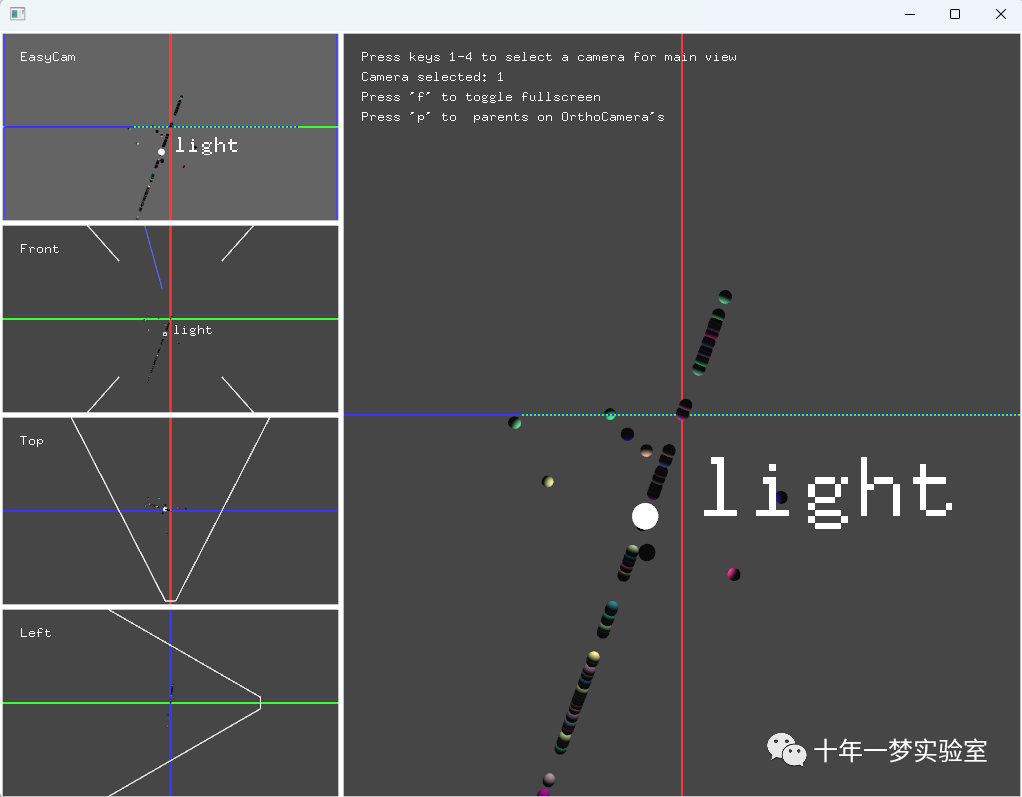
主界面截图

程序框架
视频演示
部分代码
初始化粒子群
void swarm::init(int nParticles, float positionDispersion, float velocityDispersion){
  // 检查我们是否已经初始化Check if we've already initialised
  if(particles.size() != 0){
    //清除旧数据 clear out old data
    ofLogWarning("swarm") <<  "Swarm: Already initialised";
    particles.clear();//清空旧粒子
  }
  ofSeedRandom();//随机种子
  //
  glm::vec3 position, velocity;//位置 速度
  ofColor color;//颜色
  for(int i = 0; i < nParticles; i++){//初始化粒子
    position.x = (ofRandom(1.0f) - 0.5f)  * positionDispersion;
    position.y = (ofRandom(1.0f) - 0.5f)  * positionDispersion;
    position.z = (ofRandom(1.0f) - 0.5f)  * positionDispersion;


    velocity.x = (ofRandom(1.0f) - 0.5f)  * velocityDispersion;
    velocity.y = (ofRandom(1.0f) - 0.5f)  * velocityDispersion;
    velocity.z = (ofRandom(1.0f) - 0.5f)  * velocityDispersion;


    color.r = ofRandom(255.0f);
    color.g = ofRandom(255.0f);
    color.b = 150.0f;
    color.a = 255.0f;


    particle newParticle;
    newParticle.position = position;
    newParticle.velocity = velocity;
    newParticle.color = color;


    // add our new particle to the vector
    particles.push_back(newParticle);
  }
}
更新每个粒子位置、速度
void swarm::update(){
  //计算每帧过去的时间 Calculate time past per frame
  float dt = ofGetLastFrameTime();


  // 更新位置、速度 Update positions, velocities
  for(unsigned int i = 0; i < particles.size(); i++){


    //  MOTION MATHS
    //
    //    'Simple Harmonic Motion' + a little extra
    // [1] apply velocity to postion
    //  (i.e. integrate velocity)
    //
    //  v = dx / dt (*)
    //  x = x + dx [every frame]
    //
    // therefore
    //  x = x + v * dt (*)
    // (velcotity is taken from previous frame)
    particles[i].position += particles[i].velocity * dt;
    // [2]对速度施加弹簧力 apply spring force to velocity
    //  (i.e. integrate acceleration)
    //
    //  a = -k * x (this is the shm restoring force, aka spring force)
    //  a = dv / dt
    //
    // therefore from (*)s above
    //  (v = v + dv)
    //
    //  v = v + (dt * a)
    //  v = v + (dt * -k * x)
    //
    particles[i].velocity += -SPRING_CONSTANT * particles[i].position * dt;//修改速度:-弹簧系数*位置*dt
    // [3] to get a super simple kind of 'flocking' behaviour
    //  we add a second spring force to velocity relative
    //  to the position of the light
    // NOTICE: THIS ISN'T REAL FLOCKING!获得一种超级简单的“簇拥”行为
    // 我们将第二个弹簧力添加到相对速度
    // 到灯的位置
    // 注意:这不是真正的簇拥!
    particles[i].velocity += -SPRING_CONSTANT * (particles[i].position - light.getPosition()) * dt;
    // [4]强制最大速度 Force a maximum velocity
    if(glm::length(particles[i].velocity) > MAX_VELOCITY){
      particles[i].velocity /= glm::length(particles[i].velocity) * MAX_VELOCITY;// 数组v*(1/3*max)
    }
  }
}
绘制粒子群:
void swarm::customDraw(){
  // We run the update ourselves manually. ofNode does
  //  not do this for us.我们自己手动运行更新。ofNode 不会为我们做这些。
  update();
  // 绘制粒子Draw particles
  // We use the position of the first
  //  particle as the position of the
  //  light. 我们使用第一个粒子的位置作为光的位置。
  ofPushStyle();//在调用后保存 ofGraphics 的当前样式设置。
  light.enable();//启用光源:绘制带材质的球体
  light.setPosition(particles[0].position);//设置光源位置


  for(unsigned int i = 0; i < particles.size(); i++){
    //ofPushStyle();
    //ofSetColor(particles[i].color);
    material.setDiffuseColor(particles[i].color);//设置材质颜色


    material.begin();
    ofDrawSphere(particles[i].position, 1.0);//绘制粒子球体
    //ofPopStyle();
  }
  material.end();//结束材质
  light.disable();//禁用光源
  ofDisableLighting();//禁用光照
  //将光源渲染为白色球体 Render light as white sphere
  ofSetColor(255, 255, 255); //白色
  ofDrawSphere(light.getPosition(), 2.0);//绘制球体
  /*设置位图绘制模式 有效模式:OF BITMAPMODE SCREEN:这是默认模式。它将 3d prositionl 投影到屏幕上,因此字母看起来总是相同大小,但可以定位在任何 3d 坐标中。
  OF BITMAPMODE VIEWPORT:与屏幕相同,但如果不同,则使用当前视口而不是整个窗口。OF_BITMAPMODE_MODEL:使用真实的 3d 坐标,因此如果文本不在 z=0 中,则文本看起来会缩放
  OF BITMAPMODE MODEL BILLBOARD:使用真实的 3d 坐标,但文本始终面向相机。OF BITMAPMODE SIMPLE:l 只做 2d 而 z 坐标只是被丢弃,所以如果 z 不是 O,它绘制的位置将是错误的。*/
  ofSetDrawBitmapMode(OF_BITMAPMODE_MODEL);//
  ofDrawBitmapString(" light", particles[0].position);//绘制文本:light
  ofPopStyle();//恢复以前的样式设置。需要在 ofPushStyle 之后调用。
}相机节点设置父节点与取消父节点
if(key == 'p'){
    if(bCamParent){
      camFront.clearParent();//删除父节点链接。
      camTop.clearParent();
      camLeft.clearParent();


      bCamParent = false;
    }
    else{
      camFront.setParent(nodeSwarm.light);//为节点设置父节点。该camFront节点将从 parent(nodeSwarm.light) 继承变换
      camTop.setParent(nodeSwarm.light);
      camLeft.setParent(nodeSwarm.light);


      bCamParent = true;
    }
  }
绘制注释
ofPushStyle();
  ofDisableDepthTest();//禁用深度测试  :绘制边框和gui  文本时 禁用。绘制3D场景时启用


  // 绘制一些标签draw some labels
  ofSetColor(255, 255, 255);//白色
  //在主视口左上角显示文本
  ofDrawBitmapString("Press keys 1-4 to select a camera for main view", viewMain.x + 20, 30);
  ofDrawBitmapString("Camera selected: " + ofToString(iMainCamera + 1), viewMain.x + 20, 50);
  ofDrawBitmapString("Press 'f' to toggle fullscreen", viewMain.x + 20, 70);
  ofDrawBitmapString("Press 'p' to 切换 parents on OrthoCamera's", viewMain.x + 20, 90);
  //侧边视口显示文本
  ofDrawBitmapString("EasyCam",   viewGrid[0].x + 20, viewGrid[0].y + 30);
  ofDrawBitmapString("Front",     viewGrid[1].x + 20, viewGrid[1].y + 30);
  ofDrawBitmapString("Top",       viewGrid[2].x + 20, viewGrid[2].y + 30);
  ofDrawBitmapString("Left",      viewGrid[3].x + 20, viewGrid[3].y + 30);


  //绘制侧边视口矩形 draw outlines on views
  ofSetLineWidth(5);
  ofNoFill();//使用当前绘制颜色将形状绘制为轮廓。
  ofSetColor(255, 255, 255);


  for(int i = 0; i < N_CAMERAS; i++){
    ofDrawRectangle(viewGrid[i]);//绘制四个矩形框
  }
  ofDrawRectangle(viewMain);//主视口矩形框


  // restore the GL depth function
  ofPopStyle();//恢复GL深度函数
调整窗口大小
void ofApp::setupViewports(){
// 每当我们调整窗口大小时调用这里 call here whenever we resize the window
// Define viewports
float xOffset = ofGetWidth() / 3;
float yOffset = ofGetHeight() / N_CAMERAS;
//主视口矩形
viewMain.x = xOffset;
viewMain.y = 0;
viewMain.width = xOffset * 2;
viewMain.height = ofGetHeight();
//4个侧边视口矩形框 的数组:最左侧
for(int i = 0; i < N_CAMERAS; i++){
viewGrid[i].x = 0;
viewGrid[i].y = yOffset * i;
viewGrid[i].width = xOffset;
viewGrid[i].height = yOffset;
}
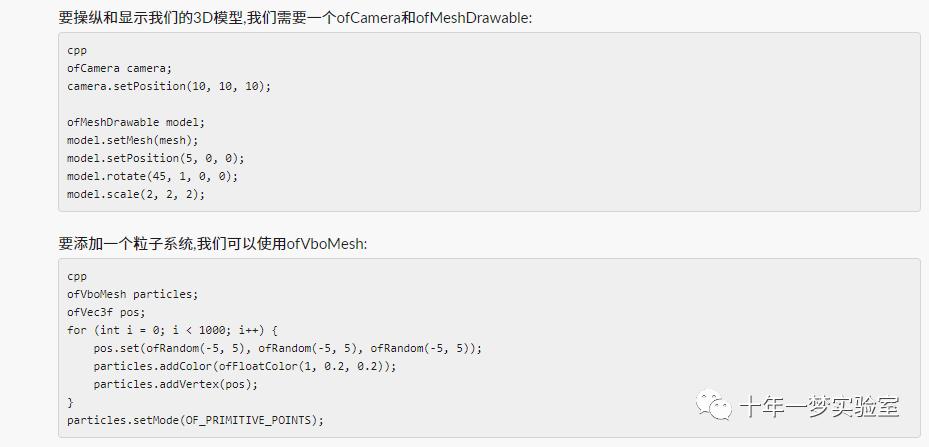
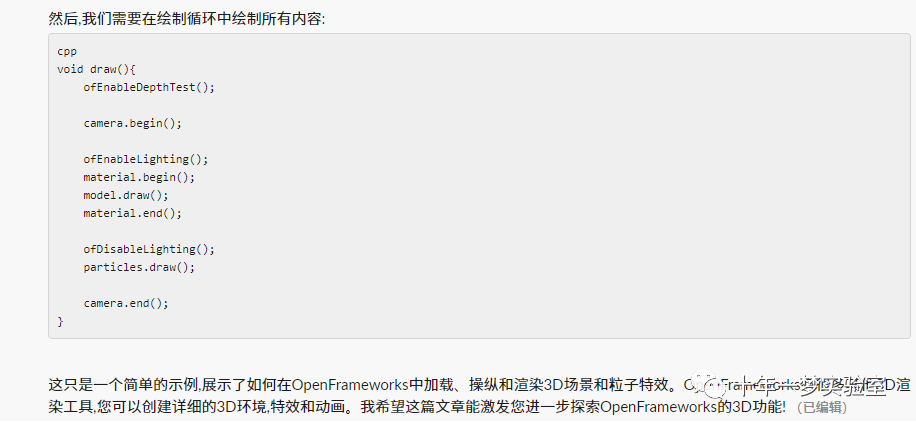
}附:Claude写的OF高级3D应用示例文章

The End