目录
Setup 1: 创建文件
- 创建新建11-rgb-rotate-warp文件夹
- 用vscode打开该文件夹
- 新建一个main.py 文件
Setup 2: 安装依赖
安装依赖前需要先创建和激活虚拟环境,我这里已经创建了虚拟环境OAKenv,在终端中输入cd…退回到OAKenv的根目录,输入 OAKenv\Scripts\activate激活虚拟环境
安装pip依赖项:
pip install numpy opencv-python depthai blobconverter --user
Setup 3: 导入需要的包
在main.py中导入项目需要的包
import depthai as dai
import cv2
import numpy as np
Setup 4: 定义变量
keyRotateDecr = 'z'
keyRotateIncr = 'x'
keyResizeInc = 'v'
keyWarpTestCycle = 'c'
def printControls():
    print("=== Controls:")
    print(keyRotateDecr, "-rotated rectangle crop, decrease rate")
    print(keyRotateIncr, "-rotated rectangle crop, increase rate")
    print(keyWarpTestCycle, "-warp 4-point transform, cycle through modes")
    print(keyResizeInc, "-resize cropped region, or disable resize")
    print("h -print controls (help)")

rotateRateMax = 5.0
rotateRateInc = 0.1

resizeMaxW = 800
resizeMaxH = 600
resizeFactorMax = 5
代码比较简单,就不解释了
Setup 5: 定义旋转矩形的四个顶点坐标
P0 = [0, 0]  # top-left
P1 = [1, 0]  # top-right
P2 = [1, 1]  # bottom-right
P3 = [0, 1]  # bottom-left
P0表示矩形的左上角顶点,坐标为(0, 0)。P1表示矩形的右上角顶点,坐标为(1, 0)。P2表示矩形的右下角顶点,坐标为(1, 1)。P3表示矩形的左下角顶点,坐标为(0, 1)。
这四个顶点按照顺时针顺序排列,并且P0被映射到输出图像的左上角,P1被映射到输出图像的右上角,P2被映射到输出图像的右下角,P3被映射到输出图像的左下角。
warpList = [
    [[P0, P1, P2, P3], True, "1. passthrough"],
    [[P3, P0, P1, P2], True, "2. rotate 90"],
    [[P2, P3, P0, P1], True, "3. rotate 180"],
    [[P1, P2, P3, P0], True, "4. rotate 270"],
    [[P1, P0, P3, P2], True, "5. horizontal mirror"],
    [[P3, P2, P1, P0], True, "6. vertical flip"],
    [[[-0.1, -0.1], [1.1, -0.1], [1.1, 1.1], [-0.1, 1.1]], True, "7. add black borders"],
    [[[-0.3, 0], [1, 0], [1.3, 1], [0, 1]], True, "8. parallelogram transform"],
    [[[-0.2, 0], [1.8, 0], [1, 1], [0, 1]], True, "9. trapezoid transform"],
]
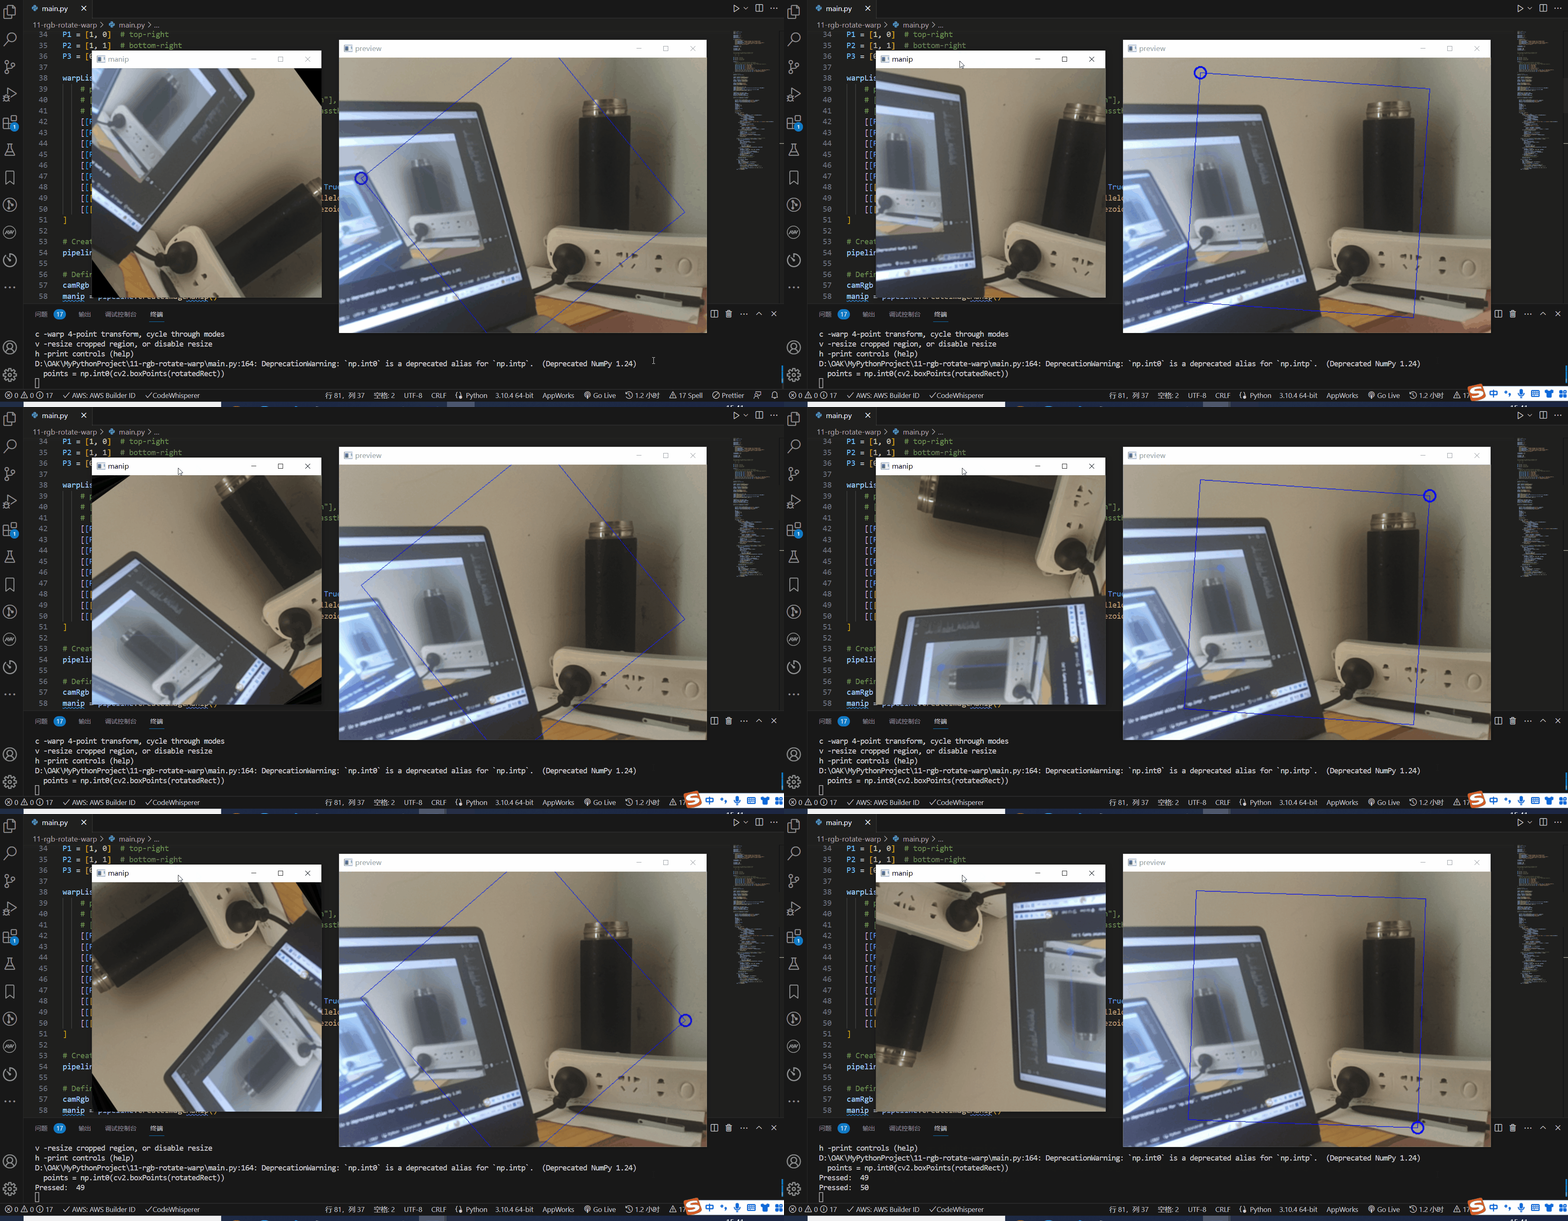
定义了一个名为warpList的列表,其中包含了不同的扭曲变换操作。
每个变换操作都是一个列表,包含以下元素:
- 变换操作的顶点顺序,使用归一化坐标表示。
- 一个布尔值,表示是否启用运行时边界检查。
- 描述变换操作的字符串。
这些变换操作包括:
1. passthrough:顶点顺序为[[P0, P1, P2, P3], True],表示不进行任何变换直接传递图像。2. rotate 90:顶点顺序为[[P3, P0, P1, P2], True],表示顺时针旋转90度。3. rotate 180:顶点顺序为[[P2, P3, P0, P1], True],表示顺时针旋转180度。4. rotate 270:顶点顺序为[[P1, P2, P3, P0], True],表示顺时针旋转270度。5. horizontal mirror:顶点顺序为[[P1, P0, P3, P2], True],表示水平镜像变换。6. vertical flip:顶点顺序为[[P3, P2, P1, P0], True],表示垂直翻转变换。7. add black borders:顶点顺序为[[[-0.1, -0.1], [1.1, -0.1], [1.1, 1.1], [-0.1, 1.1]], True],表示在图像周围添加黑色边框。8. parallelogram transform:顶点顺序为[[[-0.3, 0], [1, 0], [1.3, 1], [0, 1]], True],表示平行四边形变换。9. trapezoid transform:顶点顺序为[[[-0.2, 0], [1.8, 0], [1, 1], [0, 1]], True],表示梯形变换。
通过使用这个warpList列表,可以在图像处理过程中选择不同的变换操作来实现不同的效果。
Setup 6: 创建pipeline
pipeline = dai.Pipeline()
Setup 7: 创建节点
camRgb = pipeline.createColorCamera()
manip = pipeline.createImageManip()

camOut = pipeline.createXLinkOut()
manipOut = pipeline.createXLinkOut()
manipCfg = pipeline.createXLinkIn()

camOut.setStreamName("preview")
manipOut.setStreamName("manip")
manipCfg.setStreamName("manipCfg")
创建了camRgb、manip、camOut、manipOut和manipCfg等对象,并为它们设置了流名称。
camRgb代表创建的彩色相机对象。manip代表创建的图像处理对象。camOut代表创建的输出对象,用于将相机图像流发送到外部。manipOut代表创建的输出对象,用于将处理后的图像流发送到外部。manipCfg代表创建的输入对象,用于接收图像处理的配置信息。
Setup 8: 设置属性
camRgb.setPreviewSize(640, 480)
camRgb.setResolution(dai.ColorCameraProperties.SensorResolution.THE_1080_P)
camRgb.setInterleaved(False)
camRgb.setColorOrder(dai.ColorCameraProperties.ColorOrder.BGR)
manip.setMaxOutputFrameSize(2000 * 1500 * 3)
设置相机和图像处理的相关参数和配置信息:
camRgb.setPreviewSize(640, 480)设置相机的预览大小为640x480像素。camRgb.setResolution(dai.ColorCameraProperties.SensorResolution.THE_1080_P)设置相机的分辨率为1080p。camRgb.setInterleaved(False)设置相机输出的图像数据不是交错形式。camRgb.setColorOrder(dai.ColorCameraProperties.ColorOrder.BGR)设置相机输出的颜色顺序为BGR。manip.setMaxOutputFrameSize(2000 * 1500 * 3)设置图像处理的最大输出帧大小。
Setup 9: 建立链接
camRgb.preview.link(camOut.input)
camRgb.preview.link(manip.inputImage)
manip.out.link(manipOut.input)
manipCfg.out.link(manip.inputConfig)
这段代码建立了相机图像流和图像处理流之间的链接:
camRgb.preview.link(camOut.input)将相机的预览图像流链接到camOut的输入流。这样可以将相机图像预览发送到外部。camRgb.preview.link(manip.inputImage)将相机的预览图像流链接到manip的输入图像流。这样可以将相机图像数据传递给图像处理模块进行处理。manip.out.link(manipOut.input)将图像处理模块的输出图像流链接到manipOut的输入流。这样可以将处理后的图像数据发送到外部。manipCfg.out.link(manip.inputConfig)将图像处理模块的配置信息输出流链接到manip的输入配置流。这样可以通过manipCfg输入对象向图像处理模块发送配置信息。
Setup 10: 连接设备并启动管道
with dai.Device(pipeline) as device:
Setup 11: 创建与DepthAI设备通信的输入队列和输出队列
    qPreview = device.getOutputQueue(name="preview", maxSize=4)
    qManip = device.getOutputQueue(name="manip", maxSize=4)
    qManipCfg = device.getInputQueue(name="manipCfg")

    key = -1
    angleDeg = 0
    rotateRate = 1.0
    resizeFactor = 0
    resizeX = 0
    resizeY = 0
    testFourPt = False
    warpIdx = -1

    printControls()
创建用于接收相机预览和图像处理结果的输出队列以及配置信息的输入队列:
qPreview = device.getOutputQueue(name="preview", maxSize=4)创建一个名为preview的输出队列qPreview,用于接收相机预览的图像数据。maxSize=4表示队列最大容量为4帧。qManip = device.getOutputQueue(name="manip", maxSize=4)创建一个名为manip的输出队列qManip,用于接收图像处理的结果。maxSize=4表示队列最大容量为4帧。qManipCfg = device.getInputQueue(name="manipCfg")创建一个名为manipCfg的输入队列qManipCfg,用于接收图像处理的配置信息。
Setup 12:循环监听键盘操作相关代码
    while key != ord('q'):
        if key > 0:
            print("Pressed: ", key)
            if key == ord(keyRotateDecr) or key == ord(keyRotateIncr):
                if key == ord(keyRotateDecr):
                    if rotateRate > -rotateRateMax:
                        rotateRate -= rotateRateInc
                if key == ord(keyRotateIncr):
                    if rotateRate < rotateRateMax:
                        rotateRate += rotateRateInc
                testFourPt = False
                print("Crop rotated rectangle, rate per frame: {:.1f} degrees".format(rotateRate))
            elif key == ord(keyResizeInc):
                resizeFactor += 1
                if resizeFactor > resizeFactorMax:
                    resizeFactor = 0
                    print("Crop region not resized")
                else:
                    resizeX = resizeMaxW // resizeFactor
                    resizeY = resizeMaxH // resizeFactor
                    print("Crop region resized to: ", resizeX, 'x', resizeY)
            elif key == ord(keyWarpTestCycle):
                # Disable resizing initially
                resizeFactor = 0
                warpIdx = (warpIdx + 1) % len(warpList)
                testFourPt = True
                testDescription = warpList[warpIdx][2]
                print("Warp 4-point transform: ", testDescription)
            elif key == ord('h'):
                printControls()

        # Send an updated config with continuous rotate, or after a key press
        if key >= 0 or (not testFourPt and abs(rotateRate) > 0.0001):
            cfg = dai.ImageManipConfig()
            if testFourPt:
                test = warpList[warpIdx]
                points, normalized = test[0], test[1]
                point2fList = []
                for p in points:
                    pt = dai.Point2f()
                    pt.x, pt.y = p[0], p[1]
                    point2fList.append(pt)
                cfg.setWarpTransformFourPoints(point2fList, normalized)
            else:
                angleDeg += rotateRate
                rotatedRect = ((320, 240), (400, 400), angleDeg)
                rr = dai.RotatedRect()
                rr.center.x, rr.center.y = rotatedRect[0]
                rr.size.width, rr.size.height = rotatedRect[1]
                rr.angle = rotatedRect[2]
                cfg.setCropRotatedRect(rr, False)
            if resizeFactor > 0:
                cfg.setResize(resizeX, resizeY)
            # cfg.setWarpBorderFillColor(255, 0, 0)
            # cfg.setWarpBorderReplicatePixels()
            qManipCfg.send(cfg)

        for q in [qPreview, qManip]:
            pkt = q.get()
            name = q.getName()
            shape = (3, pkt.getHeight(), pkt.getWidth())
            frame = pkt.getCvFrame()
            if name == "preview" and not testFourPt:
                # Draw RotatedRect cropped area on input frame
                points = np.int0(cv2.boxPoints(rotatedRect))
                cv2.drawContours(frame, [points], 0, (255, 0, 0), 1)
                # Mark top-left corner
                cv2.circle(frame, tuple(points[1]), 10, (255, 0, 0), 2)
            cv2.imshow(name, frame)
        key = cv2.waitKey(1)
Setup 13:运行程序
在终端中输入如下指令运行程序
python main.py
