ply las pcd等一些常见的基本点云文件格式的读写方法
一、文本(txt)
1.1、存储结构
使用文本格式存储的点云数据文件结构比较简单,每个点是一行记录,点的信息存储格式为 x y z或者 x y z r g b。
1.2、读取
读取文本格式的点云数据时,可以按照一般的文本读取方法,这里记录一下如何使用open3d读取txt格式的点云数据
import open3d as o3d
txt_file=r"D:\test_data\bildstein_station1_xyz_intensity_rgb.txt"

pcd=o3d.io.read_point_cloud(txt_file,format='xyz')
o3d.visualization.draw([pcd])
二、PCD格式
一个PCD文件是文件头部分和数据部分组成
| 字段名 | 字段解释 |
|---|---|
| VERSION | 指定PCD文件版本 |
| FIELDS | 指定一个点可以有的每一个维度和字段的名字 |
| SIZE | 用字节数指定每一个维度的大小 |
| TYPE | 用一个字符指定每一个维度的类型 |
| COUNT | 指定每一个维度包含的元素数据 |
| WIDTH | 无序点的数量或者有序点一行中点的数目 |
| HEIGHT | 无序点云中设置为1,有序点云中表示行数 |
| POINTS | 点云中点的总数 |
| DATA | 数据类型,二进制或者ASCII |
1.2、读写
1.2.1、open3d读写(python)
读取pcd点云文件
import open3d as o3d
import numpy as np
#读取pcd数据并可视化
pcd_file=r""
pcd=o3d.io.read_point_cloud(pcd_file,format='pcd')
#将点云的坐标和颜色转换为numpy格式
points=np.array(pcd.points)
colors=np.array(pcd.colors)
#可视化
o3d.visualization.draw([pcd])
#######保存pcd点云文件
#写入pcd格式
save_file="test2.pcd"
#手动定义点云
points=np.array([[8,5,3],
[9,0,1],
[2,5,3],
[0,4,2],
[7,2,9],
[8,8,4],
[9,5,8],
[2,5,9],
[0,7,5],
[11,2,8],
[10,9,0]
])
colors=np.array([[255,0,0],
[255,0,0],
[0,255,0],
[0,255,0],
[0,0,255],
[0,0,255],
[255,0,255],
[255,0,255],
[255,255,0],
[255,255,0],
[255,255,0]
])
colors=colors/255
pcd=o3d.geometry.PointCloud()
pcd.points=o3d.utility.Vector3dVector(points)
pcd.colors=o3d.utility.Vector3dVector(colors)
#可视化
o3d.visualization.draw_geometries([pcd])
#使用draw方法可视化需要将颜色归一化到0-1之间
# o3d.visualization.draw([pcd])
#保存
#o3d.io.write_point_cloud(save_file,pcd,write_ascii=True) #以ascii格式存储点数据集部分
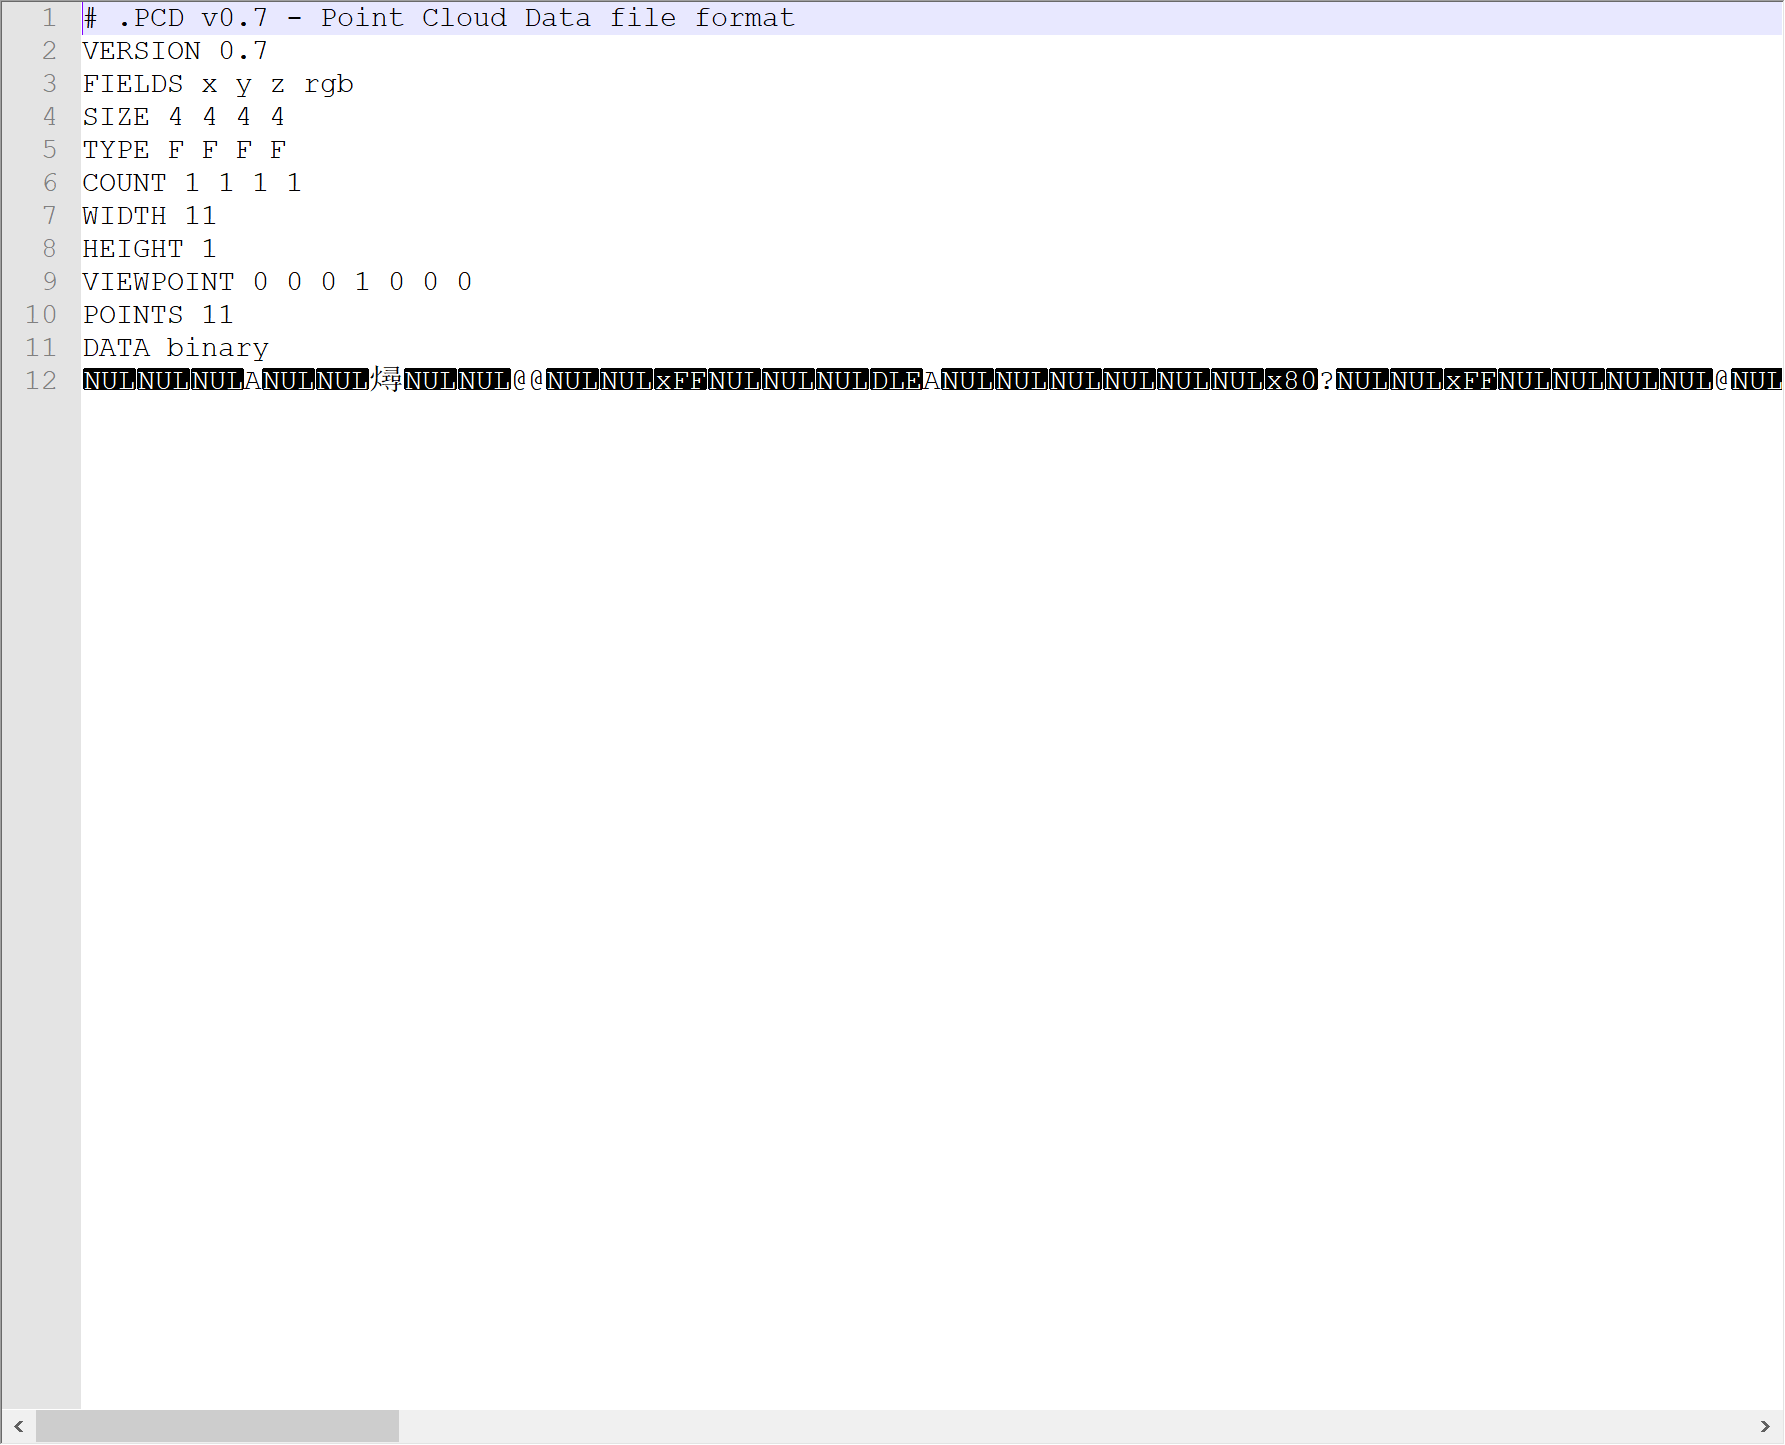
o3d.io.write_point_cloud(save_file,pcd)#以二进制格式存储点数据集部分

pcd点数据集部分保存为ASCII格式
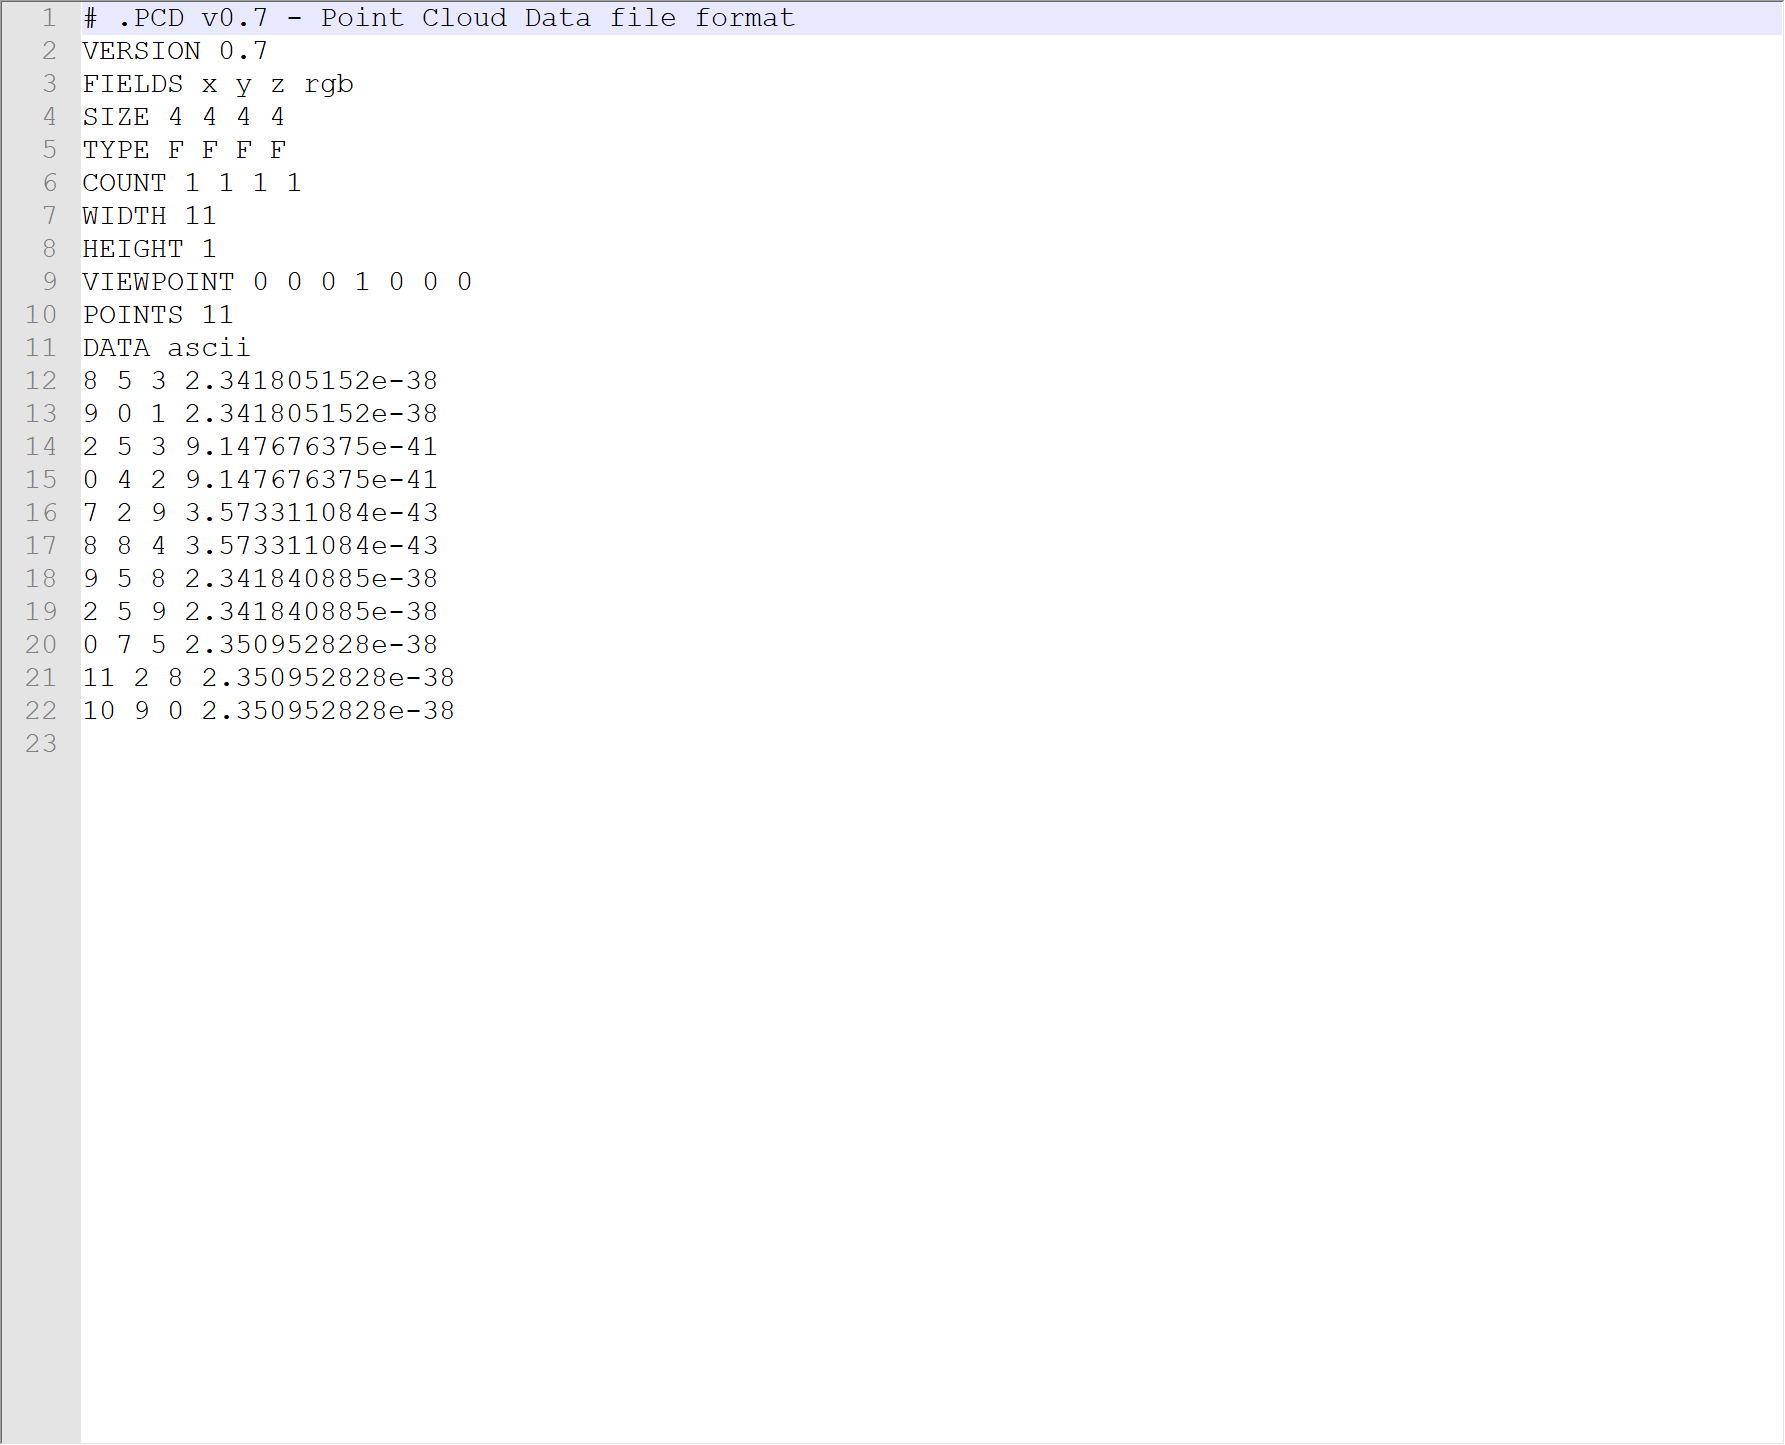
需要注意的是:如果pcd点数据集部分保存为二进制格式,那么其中rgb是用位存储的方式写入的。
1.2.2、PCL读写(C++)
可以用上面生成的pcd文件来测试
#include<iostream>
#include<pcl/io/pcd_io.h>
#include<pcl/point_types.h>
using namespace std;
int main()
{
string pcd_file = "D:\\project\\Python\\PointCloud\\test2.pcd";
//pcl::PointCloud<pcl::PointXYZ>::Ptr cloud(new pcl::PointCloud<pcl::PointXYZ>);
pcl::PointCloud<pcl::PointXYZRGB>::Ptr cloud(new pcl::PointCloud<pcl::PointXYZRGB>);
if (pcl::io::loadPCDFile<pcl::PointXYZRGB>(pcd_file,*cloud)==-1)
{
PCL_ERROR("couldn't read file\n");
return(-1);
}
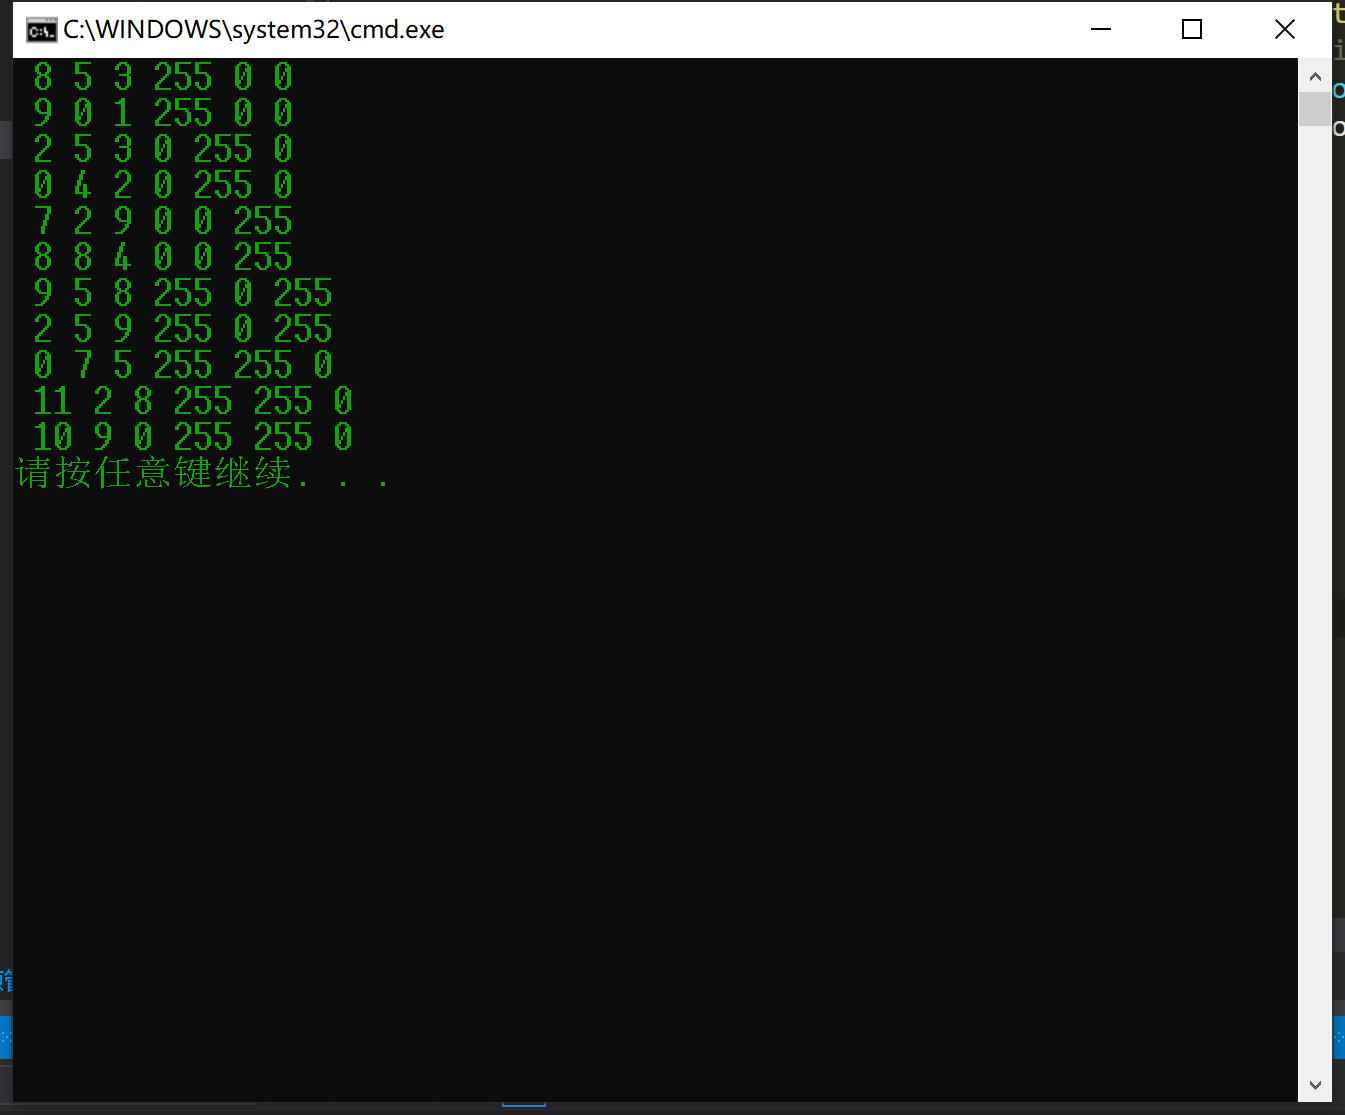
for (size_t i=0;i<cloud->points.size();++i)
{
cout << " " << cloud->points[i].x << " " <<
cloud->points[i].y << " " <<
cloud->points[i].z << " " <<
(int)cloud->points[i].r<< " "<<
(int)cloud->points[i].g<<" "<<
(int)cloud->points[i].b<< endl;
}
return 0;
}
windows环境编写程序运行结果
将结果保存为pcd文件
#include <iostream>

#include <pcl/io/pcd_io.h>
#include <pcl/point_types.h>

using namespace std;
int main()
{


	string pcd_file = "test2.pcd";
	pcl::PointCloud<pcl::PointXYZRGB> cloud;

	int data[11][6] = {


		{

    8,5,3,255,0,0},
		{

    9,0,1,255,0,0},
		{

    2,5,3,0,255,0},
		{

    0,4,2,0,255,0},
		{

    7,2,9,0,0,255},
		{

    8,8,4,0,0,255},
		{

    9,5,8,255,0,255},
		{

    2,5,9,255,0,255},
		{

    0,7,5,255,255,0},
		{

    11,2,8,255,255,0},
		{

    10,9,0,255,255,0}};

	cloud.width = 11;
	cloud.height = 1;
	cloud.is_dense = false;
	cloud.points.resize(cloud.width*cloud.height);


	for (size_t i = 0; i < cloud.points.size(); ++i)
	{


		cloud.points[i].x = data[i][0];
		cloud.points[i].y = data[i][1];
		cloud.points[i].z = data[i][2];
		cloud.points[i].r = data[i][3];
		cloud.points[i].g = data[i][4];
		cloud.points[i].b = data[i][5];
	}

	pcl::io::savePCDFileASCII(pcd_file, cloud);
	//pcl::io::savePCDFileBinary(pcd_file, cloud);
	return 0;
}
打开pcl::io::savePCDFileASCII(pcd_file, cloud); 输出的pcd文件 test2.pcd。
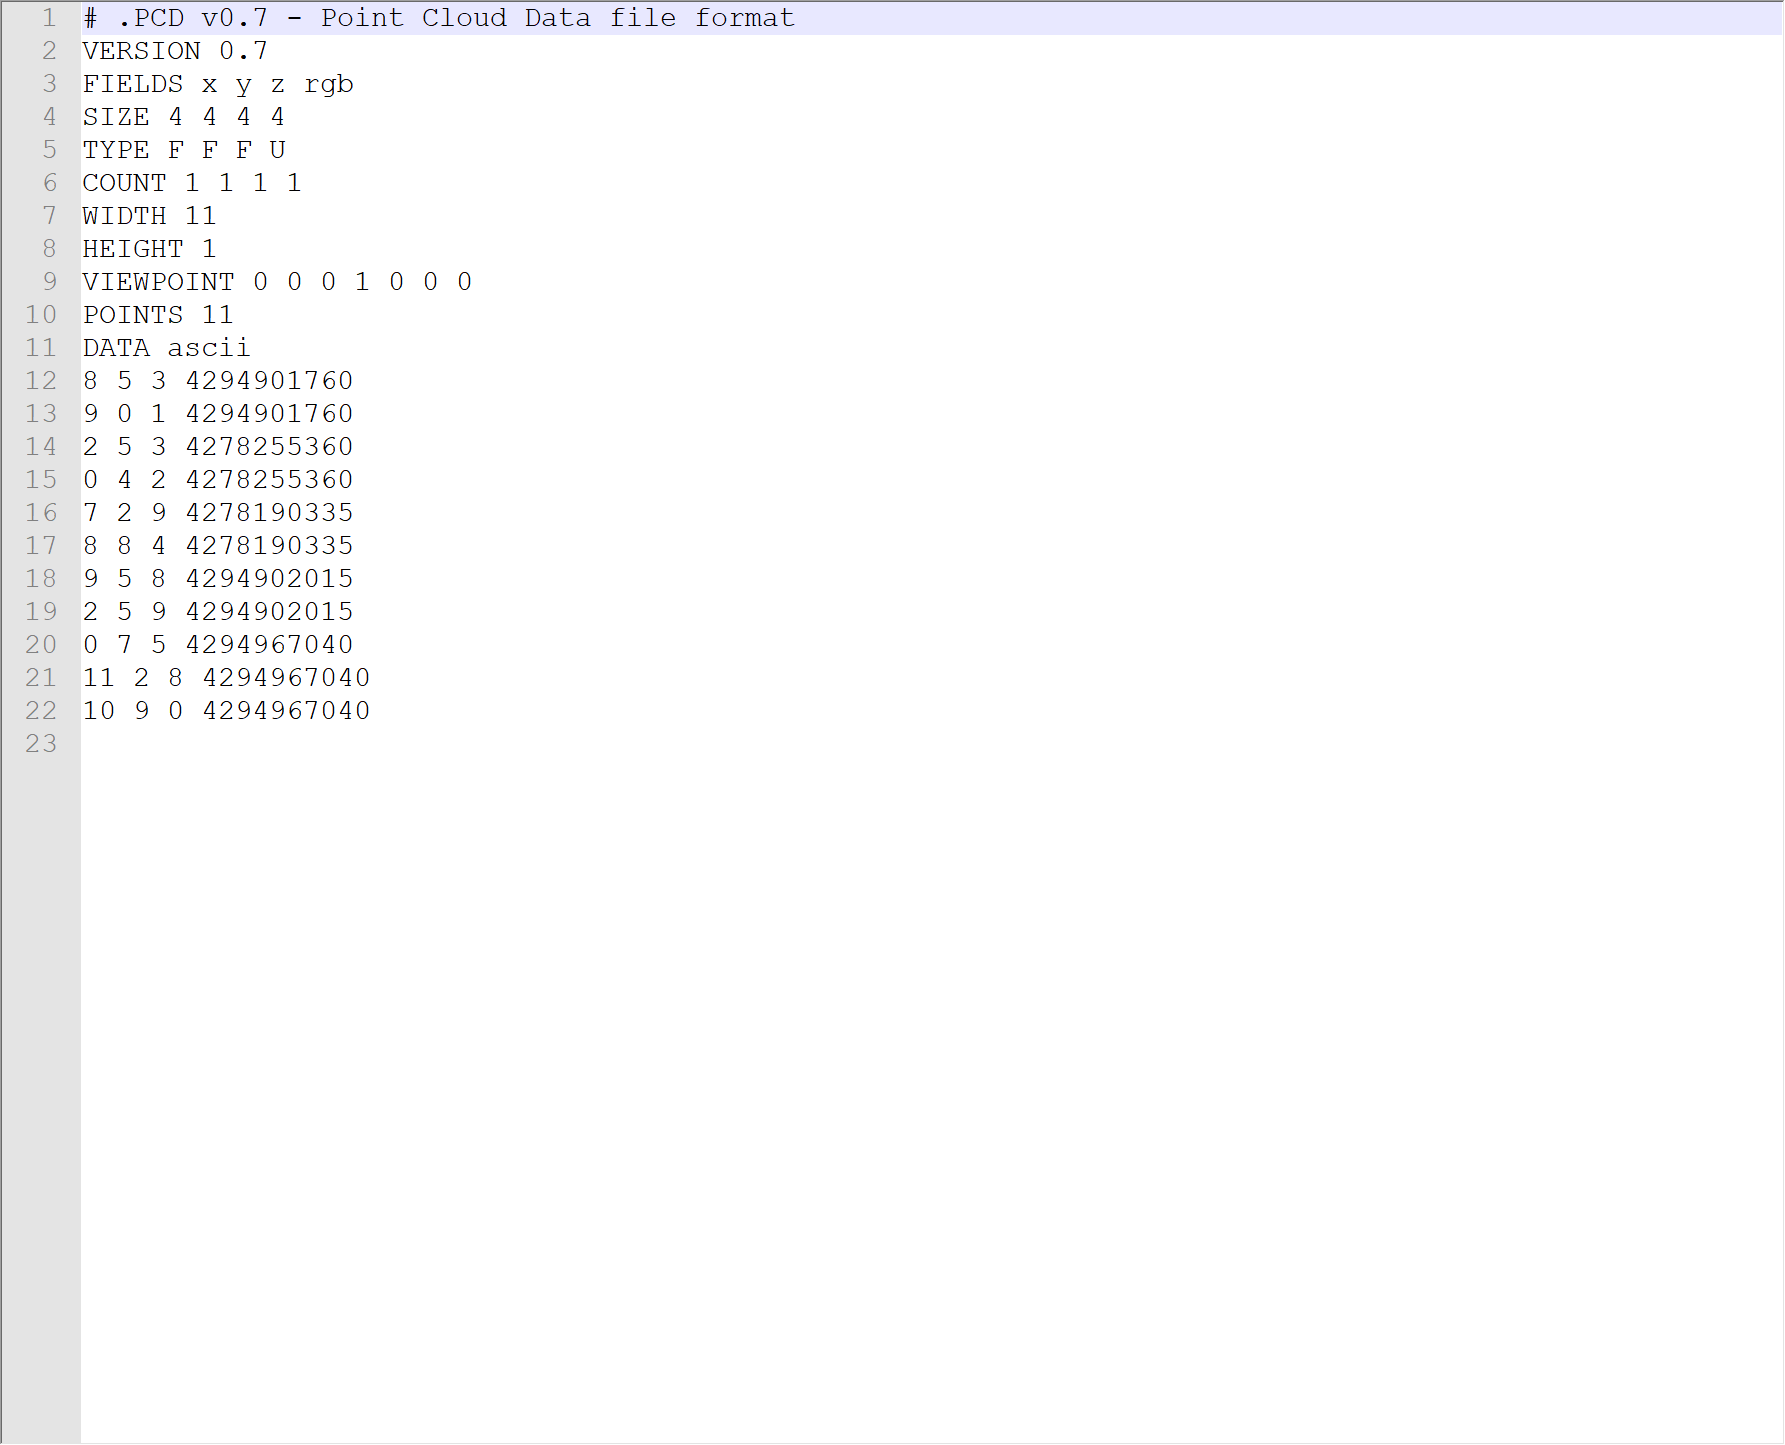
pcl生成的pcd点云文件与open3d生成的点云文件在颜色部分不一致,主要是数据存储类型导致的,pcl1.7之后颜色部分会保存成整型。下面有比较详细的参考解释。
https://blog.csdn.net/weixin_37835423/article/details/105363615
问题解决
方案一:
直接根据点云保存的类型切换系统的pcl环境,如果点云rgb字段保存为float类型,则直接将pcl版本切换成pcl-1.9之前的版本,否则将pcl版本切换成pcl-1.9版本
方案二(推荐):
系统的pcl版本一旦确定就很少去改动它,因为有很多先前的项目都是基于这个版本开发的,一旦改动版本,可能会出现"牵一发而动全身"问题,因此推荐直接对pcd文件进行更改,以适应系统的pcl版本.
将rgb字段uint类型转换为float类型:
#include <iostream>
#include <fstream>
#include <pcl/point_types.h>
#include <pcl/io/pcd_io.h>
#include <sstream>

using PointT = pcl::PointXYZRGB;
using namespace std;

int main(int argc, char** argv)
{
    ifstream in_file("temp_1_9.pcd");
    if (!in_file){
        cout<<"couldnt open file !!!!!!"<<endl;
        return 0;
    }

    string str;
    uint32_t row_num = 0;
    ofstream out_file("1_9_to_1_7.pcd");
    while (getline(in_file, str)){
        row_num++;
        // change rgb type in header
        if (row_num == 5){
            out_file<<"TYPE"<<" "<<"F"<<" "<<"F"<<" "<<"F"<<" "<<"F"<<endl;
            continue;
        }
        // skip header
        if (row_num < 12){
            out_file<<str<<endl;
            continue;
        }
        // read line data
        stringstream ss(str);
        float tmp_value = 0;
        vector<float> line_datas;
        line_datas.clear();
        while (ss >> tmp_value){
            line_datas.push_back(tmp_value);
        }

        if (line_datas.size() != 4){
            cout<<"line "<<row_num<<" format has problem"<<endl;
            return 0;
        }
        out_file<<line_datas[0]<<" "<<line_datas[1]<<" "<<line_datas[2]<<" ";
        // change rgb data
        uint32_t raw_rgb = static_cast<uint32_t>(line_datas[3]);
        uint8_t r = (raw_rgb >> 16) & 0x0000ff;
        uint8_t g = (raw_rgb >> 8)  & 0x0000ff;
        uint8_t b = (raw_rgb)     & 0x0000ff;
        uint32_t rgb = ((uint32_t)r << 16 | (uint32_t)g << 8 | (uint32_t)b);
        float cha_rgb = *reinterpret_cast<float*>(&rgb);
        out_file<<cha_rgb<<endl;
    }

    return 0;
}
运行修改程序后的结果
cat 1_9_to_1_7.pcd
# .PCD v0.7 - Point Cloud Data file format
VERSION 0.7
FIELDS x y z rgb
SIZE 4 4 4 4
TYPE F F F F
COUNT 1 1 1 1
WIDTH 10
HEIGHT 1
VIEWPOINT 0 0 0 1 0 0 0
POINTS 10
DATA ascii
0 0 0 0
1 1 1 9.21942e-41
2 2 2 1.84388e-40
3 3 3 2.76583e-40
4 4 4 3.68777e-40
5 5 5 4.60971e-40
6 6 6 5.53165e-40
7 7 7 6.4536e-40
8 8 8 7.37554e-40
9 9 9 8.29748e-40
与temp_1_9.pcd文件内容一致,转换成功.
三、LAS格式
3.1、存储结构
LAS是一种存储点云的公开数据格式,主要用来存储雷达点云数据,LAZ是对LAS格式的无损压缩。
最新的LAS规格版本是LAS 1.4。laspy库可以支持1.2~1.4版本的LAS文件。
https://laspy.readthedocs.io/en/latest/index.html
一个LAS文件有三部分组成:文件头区(Header)、可变长记录区(VLRs)、点集记录区(Point Records)
文件头包含数据版本,点的格式(每个点存储的不同维度)等信息;可变长记录包括一些元信息,如坐标系信息,额外的维度等信息;点集记录区是las文件的核心,记录点的x、y、z坐标信息和r、g、b、classification、intensity等其他属性信息。
点的格式共有11个版本,其中第0版为基础,其他后续版本在第0版的基础上增加了其他字段,具体字段可以参考官方网站解释
https://laspy.readthedocs.io/en/latest/intro.html

3.2、读写
3.2.1、使用laspy 读写(Python)
import laspy
import numpy as np

las_file=r""
las=laspy.read(las_file)
#获取文件头
header=las.header
#点类型
point_format=las.point_format
print(point_format.id)
#属性字段名
dimension_names=point_format.dimension_names
print(list(dimension_names))

#点集的外边框
print(header.mins)
print(header.maxs)

#点个数
point_num=header.point_count

#获取坐标和颜色
las_x=np.array(las.x)
las_y=np.array(las.y)
las_z=np.array(las.z)
las_r=np.array(las.red)
las_g=np.array(las.green)
las_b=np.array(las.blue)

#组合
pt=np.stack([las_x,las_y,las_z],axis=1)
colors=np.stack([las_r,las_g,las_b],axis=1)
使用laspy写las文件
save_las_file=r"save_las.las"

#以x y z r g b的方式定义点云数据
my_data=np.array([[8,5,3,255,0,0],
                 [9,0,1,255,0,0],
                 [2,5,3,0,255,0],
                 [0,4,2,0,255,0],
                 [7,2,9,0,0,255],
                 [8,8,4,0,0,255],
                 [9,5,8,255,0,255],
                 [2,5,9,255,0,255],
                 [0,7,5,255,255,0],
                 [11,2,8,255,255,0],
                 [10,9,0,255,255,0]
                 ])

 #创建点云文件
 las=laspy.create(file_version="1.2",points_format=3)
 las.x=my_data[:,0]
 las.y=my_data[:,1]
 las.z=my_data[:,2]
 las.red=my_data[:,3]
 las.green=my_data[:,4]
 las.blue=my_data[:,5]

 #保存las文件
 las.write(save_las_file)
3.2.2、使用laslib读写(C++)
使用C++操作las文件可以使用laslib库。
#include <iostream>
#include "lasreader.hpp"
#include "laswriter.hpp"
using namespace std;
int main()
{
	const string las_file="";

	LASreadOpener lasreadopener;
	lasreadopener.set_file_name(las_file.data());

	LASreader* lasreader=lasreadopener.open();

	LASheader header=lasreader->header;
	lasreader->header.unlink();

	int nbPoints = header.number_of_point_records;

	float x,y,z;
	int r,g,b;

	while(lasreader->read_point())
	{
		LASpoint& pointReader= lasreader->point;

		x=pointReader.get_x();
		y=pointReader.get_y();
		z=pointReader.get_z();

		r=pointReader.get_R();
		g=pointReader.get_G();
		b=pointReader.get_B();
	}
	delete lasreader;
}
写入las文件
#include <iostream>
#include "lasreader.hpp"
#include "laswriter.hpp"
using namespace std;
int main()
{
	const string las_file="test.las";

	int data[11][6] = {
			{8,5,3,255,0,0},
			{9,0,1,255,0,0},
			{2,5,3,0,255,0},
			{0,4,2,0,255,0},
			{7,2,9,0,0,255},
			{8,8,4,0,0,255},
			{9,5,8,255,0,255},
			{2,5,9,255,0,255},
			{0,7,5,255,255,0},
			{11,2,8,255,255,0},
			{10,9,0,255,255,0}
			};
	LASwriteOpener laswriteropener;
	laswriteropener.set_file_name(las_file.data());

	LASheader header;
	header.point_data_format=3;
	header.point_data_record_length=34;
	header.number_of_point_records=11;

	LASWriter* laswriter = laswriteropener.open(&header);
	LASpoint point;
	point.init(&header,header.point_data_format,header.point_data_record_length,&header);

	double minx=DBL_MAX,miny=DBL_MAX,minz=DBL_MAX;
	double maxx=-DBL_MAX,maxy=-DBL_MAX,maxz=-DBL_MAX;

	for(size_t i=0;i<header.point_data_record_length;++i)
	{
		point.set_x(data[i][0]);
		point.set_y(data[i][1]);
		point.set_z(data[i][2]);
		point.set_R(data[i][3]);
		point.set_G(data[i][4]);
		point.set_B(data[i][5]);

		if(data[i][0]<minx)
		{
			minx=data[i][0];
		}
		if(data[i][1]<miny)
		{
			minx=data[i][1];
		}
		if(data[i][2]<minz)
		{
			minx=data[i][2];
		}
		if(data[i][0]>maxx)
		{
			maxx=data[i][0];
		}
		if(data[i][1]>maxy)
		{
			maxy=data[i][1];
		}
		if(data[i][2]>maxz)
		{
			maxx=data[i][2];
		}

		laswriter->write_point(&point);
		laswriter->update_inventory(&point);
	}

	header.set_bounding_box(minx,miny,minz,maxx.maxy.maxz);
	laswriter->update_header(&header);
	I64 total_bytes=laswriter->close();
	delete laswriter;
}
四、PLY格式
4.1、存储结构
PLY(Polygon File Format)是一种常见的点云存储格式,由斯坦福大学开发,其最早主要用于存储三维扫描仪器的点云数据。
PLY文件是由文件头和数据区两部分组成。
文件头(header)
其中文件头记录的是点云文件中的注释、元素类别和属性,以ply开头,以end header结尾。
ply
...
...
end header
文件头的第二行是文件的存储方式和版本,以format开头,依次是编码方式、版本。编码方式有三种分别是ascii、binary_little_endian 、binary_big_endian。目前PLY只有1.0版本。
ply
format ascii 1.0
...
...
end header
format之后跟注释信息,以comment开头,制作者可以添加一些作者信息,点云基本信息。
ply
format ascii 1.0
comment made by anonymous
comment this file is a cube
...
end header
注释信息comment之后是element元素信息+该种元素的property属性信息,element元素信息包括种类、个数,property属性信息包括属性字段的存储类型和属性名。PLY文件中的元素一般包括顶点(vertex)、面(face)、边(edge)等。元素信息和属性信息应该组合出现,格式如下
element <element name> <number in file>
property <data_type> <property name 1>
property <data_type> <property name 2>
property <data_type> <property name 3>
1234
我们定义一个包含6个顶点和8个面元素的ply文件,文件头如下,
ply
format ascii 1.0
comment made by anonymous
comment this file is a cube
element vertex 6
property float32 x
property float32 y
property float32 z
property uchar red
property uchar green
property uchar blue
element face 8
property list uint8 int32 vertex_index
end_header
1234567891011121314
数据区域
在文件头后直接开始存储数据,存储形式分为ASCII和二进制。以ASCII为例,先按行记录每个点,全部点记录完成后再按行记录每个面。
0 0 0 0 0 0 (开始记录点,按照x,y,z,r,g,b方式排列)
0 100 0 0 0 0
100 100 0 0 0 0
100 0 0 0 0 0
50 50 75 255 255 255
50 50 -75 255 255 255
3 0 1 4 (开始记录面,按照点个数,点的序号排列,3表示这个面由3个点组成,0,1,4代表该面由第0,1,4个点组成)
3 1 2 4
3 2 3 4
3 0 3 4
3 0 1 5
3 1 2 5
3 2 3 5
3 0 3 5
1234567891011121314
一个完整的ply文件
ply
format ascii 1.0
comment made by anonymous
comment this file is a cube
element vertex 6
property float32 x
property float32 y
property float32 z
property uchar red
property uchar green
property uchar blue
element face 8
property list uint8 int32 vertex_index
end_header
0 0 0 0 0 0
0 100 0 0 0 0
100 100 0 0 0 0
100 0 0 0 0 0
50 50 75 255 255 255
50 50 -75 255 255 255
3 0 1 4
3 1 2 4
3 2 3 4
3 0 3 4
3 0 1 5
3 1 2 5
3 2 3 5
3 0 3 5
4.2、读写
4.2.1、使用plyfile读写(Python)
使用plyfile读取ply文件
from plyfile import PlyData,PlyElement

file=r"C:\Users\123\Desktop\test2.ply"
plydata=PlyData.read(file)

print(plydata)
print("*************************************************")
#第一种读取方法
elements=plydata.elements
for element in elements:
    for data in element.data:
        print(data)
print("*************************************************")
#第二种读取方法
vertex_data=elements[0].data
face_data =elements[1].data
print(vertex_data)
print(face_data)
打印结果
ply
format ascii 1.0
comment made by anonymous
comment this file is a cube
element vertex 6
property float x
property float y
property float z
property uchar red
property uchar green
property uchar blue
element face 8
property list uchar int vertex_index
end_header
*************************************************
(0., 0., 0., 0, 0, 0)
(0., 100., 0., 0, 0, 0)
(100., 100., 0., 0, 0, 0)
(100., 0., 0., 0, 0, 0)
(50., 50., 75., 255, 255, 255)
(50., 50., -75., 255, 255, 255)
(array([0, 1, 4]),)
(array([1, 2, 4]),)
(array([2, 3, 4]),)
(array([0, 3, 4]),)
(array([0, 1, 5]),)
(array([1, 2, 5]),)
(array([2, 3, 5]),)
(array([0, 3, 5]),)
*************************************************
[(  0.,   0.,   0.,   0,   0,   0) (  0., 100.,   0.,   0,   0,   0)
 (100., 100.,   0.,   0,   0,   0) (100.,   0.,   0.,   0,   0,   0)
 ( 50.,  50.,  75., 255, 255, 255) ( 50.,  50., -75., 255, 255, 255)]
[(array([0, 1, 4]),) (array([1, 2, 4]),) (array([2, 3, 4]),)
 (array([0, 3, 4]),) (array([0, 1, 5]),) (array([1, 2, 5]),)
 (array([2, 3, 5]),) (array([0, 3, 5]),)]
使用plyfile写入ply文件
def write_ply(output_file,text=True):
    points=[
        (0,0,0),
        (0,100,0),
        (100,100,0),
        (100,0,0),
        (50,50,75)
    ]

    face=np.array([
        ((0,1,2),255,0,0),
        ((0,2,3),255,0,0),
        ((0, 1, 4),0,255,0),
        ((1,2,4),0,0,255),
        ((2,3,4),255,255,0),
        ((0,3,4),0,0,0)],
        dtype=[('vertex_index','i4',(3,)),
               ('red','u1'),('green','u1'),
               ('blue','u1')]
    )
    print(face)
    vertex = np.array(points, dtype=[('x', 'f4'), ('y', 'f4'), ('z', 'f4')])
    el = PlyElement.describe(vertex, 'vertex')
    face = PlyElement.describe(face, 'face')
    PlyData([el,face], text=text).write(out_file)
ply文件一般可以使用MESHLAB软件打开查看

4.2.2、使用pcl读写(C++)
读取ply点云文件
#include <iostream>

#include <pcl-1.8/pcl/io/pcd_io.h>
#include <pcl-1.8/pcl/point_types.h>
#include <pcl-1.8/pcl/visualization/cloud_viewer.h>
#include <pcl-1.8/pcl/io/ply_io.h>

using namespace std;
int main()
{


	string ply_file = "C:\\Users\\123\\Desktop\\test7.ply";
	pcl::PointCloud<pcl::PointXYZ>::Ptr cloud(new pcl::PointCloud<pcl::PointXYZ>);

  	if (pcl::io::loadPLYFile<pcl::PointXYZ>(ply_file,*cloud)==-1)
  	{


  		return (-1);
  	}

  	cout << cloud->width << " " << cloud->height << endl;

	for (size_t i=0;i<cloud->points.size();++i)
	{


		cout << cloud->points[i].x << " " << cloud->points[i].y << " " << cloud->points[i].z << endl;
	}

  	return	(0);
}
保存ply点云文件
#include <iostream>

#include <pcl/io/ply_io.h>
#include <pcl/point_types.h>

using namespace std;
int main()
{


	string ply_file = "test2.ply";
	pcl::PointCloud<pcl::PointXYZRGB> cloud;

	int data[11][6] = {


		{

    8,5,3,255,0,0},
		{

    9,0,1,255,0,0},
		{

    2,5,3,0,255,0},
		{

    0,4,2,0,255,0},
		{

    7,2,9,0,0,255},
		{

    8,8,4,0,0,255},
		{

    9,5,8,255,0,255},
		{

    2,5,9,255,0,255},
		{

    0,7,5,255,255,0},
		{

    11,2,8,255,255,0},
		{

    10,9,0,255,255,0}};

	cloud.width = 11;
	cloud.height = 1;
	cloud.is_dense = false;
	cloud.points.resize(cloud.width*cloud.height);


	for (size_t i = 0; i < cloud.points.size(); ++i)
	{


		cloud.points[i].x = data[i][0];
		cloud.points[i].y = data[i][1];
		cloud.points[i].z = data[i][2];
		cloud.points[i].r = data[i][3];
		cloud.points[i].g = data[i][4];
		cloud.points[i].b = data[i][5];
	}


	pcl::io::savePLYFile(ply_file, cloud);

	return 0;
}