今天看到一个视频教学
Godot4 | 实现简单AI | Utility AI 插件_哔哩哔哩_bilibili
就看了一下。吸引我的不是插件,是AI这两个字母。这AI与Godot怎么结合?感觉还是离线使用,值得一看。
视频时间不长,15分钟左右,看得我云山雾罩,不过演示项目能直接下载(AI Demo.zip官方版下载丨最新版下载丨绿色版下载丨APP下载-123云盘)
下载下来,能运行,是个小游戏,不过逻辑没大看明白,可能以后看明白后会觉得很简单,但初接触,里面的弯弯绕那么多,一时不好理。
看介绍里还有一个插件自带Demo(godot-utility-ai-examples.zip官方版下载丨最新版下载丨绿色版下载丨APP下载-123云盘),感觉会简单一些。下载打开一看,果然简单很多。
插件自带Demo
因为Demo就一个场景AgentExample,且子节点就两个,这样就清爽了。

不过运行一下,感觉没啥吸引力,就几个数字在那里变来变去。怎么能与AI挂上钩?
肯定是我理解的问题,再看一下
主场景的脚本很简单
func _ready():
	var needs: AgentNeeds = $Agent.needs
	needs.food_changed.connect(%FoodBar._on_needs_changed)
	needs.fun_changed.connect(%FunBar._on_needs_changed)
	needs.energy_changed.connect(%EnergyBar._on_needs_changed)

	$Agent.state_changed.connect(%StateLabel._on_state_changed)
就是把几个进度条的显示与needs的相应信号绑定到一起了,每个显示的处理逻辑都是一样的
func _on_needs_changed(p_value: float) -> void:
	value = p_value
这好象没啥,数据正常显示。
哦,数据怎么来的?这个needs变量是AgentNeeds类型,从agent_needs.gd来看,这是一个Resource。
# Copyright (c) 2023 John Pennycook
# SPDX-License-Identifier: 0BSD
class_name AgentNeeds
extends Resource


signal food_changed(value)
signal fun_changed(value)
signal energy_changed(value)


@export var food := 0.5 : set = _set_food
@export var fun := 0.5 : set = _set_fun
@export var energy := 0.5 : set = _set_energy


func _set_food(p_food: float) -> void:
	food = clamp(p_food, 0.0, 1.0)
	food_changed.emit(food)


func _set_fun(p_fun: float) -> void:
	fun = clamp(p_fun, 0.0, 1.0)
	fun_changed.emit(fun)


func _set_energy(p_energy: float) -> void:
	energy = clamp(p_energy, 0.0, 1.0)
	energy_changed.emit(energy)
Godot有点意思,在资源里还带有逻辑。这不闹嘛,还是脚本。在理解的领域,把资源与脚本画一个约等于符号。
这个资源有三个属性,对应三个写方法,然后会触发三个相应的信号。仅此而已。这还是没有看到数据的起源。
再看一下脚本情况,还剩下一个agent.gd,是绑定到Agent节点的脚本。难道这里还有入口?
哦,看到Agent节点下还有一个Timer节点,那想必应该一定是这个Timer节点在不断做啥事。打开脚本看下,果然
# Copyright (c) 2023 John Pennycook
# SPDX-License-Identifier: 0BSD
class_name Agent
extends Node2D


signal state_changed(state)


enum State {
	NONE,
	EATING,
	SLEEPING,
	WATCHING_TV,
}


@export var needs: AgentNeeds
var state: State = State.EATING


var _time_until_next_decision: int = 1


@onready var _options: Array[UtilityAIOption] = [
	UtilityAIOption.new(
		preload("res://examples/agents/eat.tres"), needs, eat
	),
	UtilityAIOption.new(
		preload("res://examples/agents/sleep.tres"), needs, sleep
	),
	UtilityAIOption.new(
		preload("res://examples/agents/watch_tv.tres"), needs, watch_tv
	),
]


func eat():
	state = State.EATING
	_time_until_next_decision = 5
	state_changed.emit(state)


func sleep():
	state = State.SLEEPING
	_time_until_next_decision = 10
	state_changed.emit(state)


func watch_tv():
	state = State.WATCHING_TV
	_time_until_next_decision = 1
	state_changed.emit(state)


func _on_timer_timeout():
	# Adjust the agent's needs based on their state.
	# In a real project, this would be managed by something more sophisticated!
	if state == State.EATING:
		needs.food += 0.05
	else:
		needs.food -= 0.025

	if state == State.SLEEPING:
		needs.energy += 0.05
	else:
		needs.energy -= 0.025

	if state == State.WATCHING_TV:
		needs.fun += 0.05
	else:
		needs.fun -= 0.025

	# Check if the agent should change state.
	# Utility helps the agent decide what to do next, but the rules of the game
	# govern when those decisions should happen. In this example, each action
	# takes a certain amount of time to complete, but the agent will abandon
	# eating or sleeping when the associated needs bar is full.
	if (
		(state == State.SLEEPING and needs.energy == 1)
		or (state == State.EATING and needs.food == 1)
	):
		_time_until_next_decision = 0

	if _time_until_next_decision > 0:
		_time_until_next_decision -= 1
		return

	# Choose the action with the highest utility, and change state.
	var decision := UtilityAI.choose_highest(_options)
	decision.action.call()
在Timer的时钟事件中,根据当前的状态,修改相应属性值,这样界面上的数据就不断变化。
看代码时,发现还有个_time_until_next_decision变量,看名字其作用就是下决定的时间。真实逻辑是
	if _time_until_next_decision > 0:
		_time_until_next_decision -= 1
		return

	# Choose the action with the highest utility, and change state.
	var decision := UtilityAI.choose_highest(_options)
	decision.action.call()
即,_time_until_next_decision <= 0的情况下,会进行decision计算,否则不计算,保持现状。大概应该是这个意思。
但decision计算是要干啥?UtilityAI.choose_highest(_options),应该是在几个选项中选最优先的项,或者说是最紧要的项,最重要的项。可以看到_options的定义
@onready var _options: Array[UtilityAIOption] = [
	UtilityAIOption.new(
		preload("res://examples/agents/eat.tres"), needs, eat
	),
	UtilityAIOption.new(
		preload("res://examples/agents/sleep.tres"), needs, sleep
	),
	UtilityAIOption.new(
		preload("res://examples/agents/watch_tv.tres"), needs, watch_tv
	),
]
就三项,对于就eat、sleep、watch_tv三个逻辑,这些逻辑最终都会发出信号state_changed,该信号绑定到主场景脚本中的%StateLabel._on_state_changed,简单显示一下内容
func _on_state_changed(state: Agent.State) -> void:
	match state:
		Agent.State.EATING:
			text = "Eat"
		Agent.State.SLEEPING:
			text = "Sleep"
		Agent.State.WATCHING_TV:
			text = "Watch TV"
这下,基本弄明白了,核心就是定义_options选项,然后用UtilityAI.choose_highest(_options)取得目标选项,触发相应逻辑。
好象明白了,又好象没明白,仔细再琢磨一下,才发现,UtilityAI.choose_highest(_options)这个最重要的函数,它是怎么工作的?它凭啥能选出最紧要、重要的选项,这个过程,程序员能设计些什么?
这个答案肯定不能在UtilityAI的代码中去找,因为UtilityAI肯定是通用的处理方式,刚才这些选项是业务相关的,应该是程序员处理的事
回过头再看下_options的定义,里面有几个UtilityAIOption,带有一个tres参数。跟进查看源码,UtilityAIOption一共有三个参数:behavior、context、action
func _init(
	p_behavior: UtilityAIBehavior = null,
	p_context: Variant = null,
	p_action: Variant = null
):
	behavior = p_behavior
	context = p_context
	action = p_action
而UtilityAI.choose_highest(_options)是一个类函数
static func choose_highest(
	options: Array[UtilityAIOption], tolerance: float = 0.0
) -> UtilityAIOption:
	# Calculate the scores for every option.
	var scores := {}
	for option in options:
		scores[option] = option.evaluate()

	# Identify the highest-scoring options by sorting them.
	options.sort_custom(func(a, b): return scores[a] < scores[b])

	# Choose randomly between all options within the specified tolerance.
	var high_score: float = scores[options[len(options) - 1]]
	var within_tolerance := func(o): return (
		absf(high_score - scores[o]) <= tolerance
	)
	return options.filter(within_tolerance).pick_random()
它分别通过各选项的option.evaluate()计算出各选项的实时值。然后从低到高排序,如果有容许误差(tolerance),则过滤筛选,可能结果不止一个,则pick_random随机选一个。
所以,还得看各选项option.evaluate()是如何工作的。
func evaluate() -> float:
	return behavior.evaluate(context)
func evaluate(context: Variant) -> float:
var scores: Array[float] = []
for consideration in considerations:
var score := consideration.evaluate(context)
scores.append(score)
return _aggregate(scores)各个behavior根据context进行计算,其各个考虑因子consideration(UtilityAIConsideration)分别计算得到结果,成为一个数列scores: Array[float],再根据aggregation类型确定最终结果的生成逻辑
func _aggregate(scores: Array[float]) -> float:
	match aggregation:
		AggregationType.PRODUCT:
			return scores.reduce(func(accum, x): return accum * x)

		AggregationType.AVERAGE:
			return scores.reduce(func(accum, x): return accum + x) / len(scores)

		AggregationType.MAXIMUM:
			return scores.max()

		AggregationType.MINIMUM:
			return scores.min()

	push_error("Unrecognized AggregationType: %d" % [aggregation])
	return 0
这里用到Array.reduce函数,以前没用过这个函数,所以不太清楚这些代码的结果。但问下ChatGPT,了解了:

所以,最终的问题是:behavior中的各consideration是啥,怎么来的?
回到_options的定义
@onready var _options: Array[UtilityAIOption] = [
	UtilityAIOption.new(
		preload("res://examples/agents/eat.tres"), needs, eat
	),
	UtilityAIOption.new(
		preload("res://examples/agents/sleep.tres"), needs, sleep
	),
	UtilityAIOption.new(
		preload("res://examples/agents/watch_tv.tres"), needs, watch_tv
	),
]
应该从这三个tres中找答案。比如eat.tres
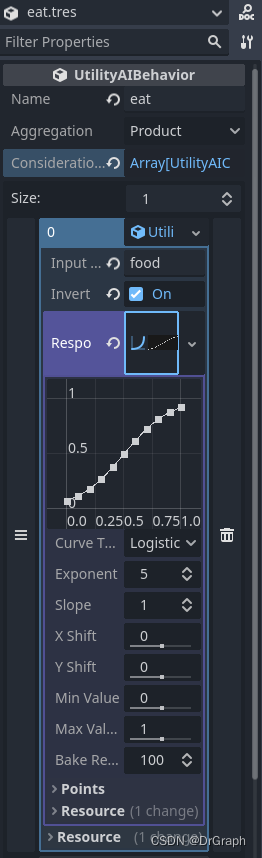
这就对上了,原来在这里定义了各要素:Aggregation为Product,表示最终结果连乘。不过只有一个Consideration,所以连不连的也就一样了。
sleep.tres、watch_tv.tres也同样理解。
这里面还有一点,就是各Consideration的定义,它是用图表示出来的,看起来很直观,其实不太好定量理解,这个既然是算法逻辑,那还是精确一些好理解,但画成图形,尤其是还有一大堆参数可调,就感觉不好控制了。不过目前暂看图形曲线,能看到IO大概关系,参数什么的暂不关心。
到此,整个流程清晰了:
1. Agent的Timer周期性(1s)处理:
1.1 每秒根据状态,调整needs的food、energy、fun三个属性,从而触发needs的三个信号。这三个信号绑定到界面的三个进度条,从而三个进度条显示相应属性值大小
1.2 决策时刻(秒)减1。如果<=0,则进行决策,决策结果会影响状态。而决策过程就是UtilityAI.choose_highest(_options),即各选项自行根据输入计算得到自己的输出,然后由UtilityAI筛选出目标选项。确定后,触发目标选项的action(分别动态赋值为agent.gd中的eat、sleep、watch_tv函数),更新相应状态并触发信号,由主场景的_on_state_changed函数显示相应的状态信息。
B站AI Demo
现在回来看B站的Demo项目。现在回来,直接看重点:agent的tres
一共有三个tres:attack、chase、run_away,那应该会有三个状态,结果是4个
enum State {
	IDLE,
	CHASE,
	RUN_AWAY,
	ATTACK,
}
这也不能说是理解错误,反而是十分正确与准确。
attack.tres是Product模式,一个Consideration,嗯,很好理解

chase.tres是Product模式,三个Considerations,run_away.tres是Product模式,四个Considerations,同样好理解。这些就是在各选项的实时计算时的依据。
下来就是看各选项的定义,肯定会与这三个tres有关
@onready var _options: Array[UtilityAIOption] = [
	UtilityAIOption.new(
		preload("res://Enemy/agent/attack.tres"), needs, attack
	),
	UtilityAIOption.new(
		preload("res://Enemy/agent/chase.tres"), needs, chase
	),
	UtilityAIOption.new(
		preload("res://Enemy/agent/run_away.tres"), needs, run_away
	)
]
果真如此。这里的needs为输入,第三个参数将在相应的选项被选中后调用。
func idle():
	state = State.IDLE
	state_changed.emit(state)


func chase():
	state = State.CHASE
	state_changed.emit(state)


func run_away():
	state = State.RUN_AWAY
	state_changed.emit(state)


func attack():
	state = State.ATTACK
	state_changed.emit(state)
一看就是熟悉的味道。不过翻遍了代码,也没看到state_changed的绑定处理函数。难道是没有用这个信号?原来视频里提醒过了:信号没有使用。那好吧,这就是只改变内部的状态,外部不需要显示或处理这个信号。
同样,不用猜,还会有一个Timer来处理。该Timer的时钟周期为0.4s:
func _on_timer_timeout() -> void:
	var needs_info = get_parent().get_ai_needs()

	for key in needs_info.keys():
		needs.set(key, needs_info[key])

	var decision := UtilityAI.choose_highest(_options)
decision.action.call()与自带Demo的区别在于,这里的_options中的needs输入,是从父场景中取得的get_parent().get_ai_needs(), 相当于父场景提供实时输入数据
func get_ai_needs() -> Dictionary:
	return {
		"my_hp": hp / enemy_hp,
		"player_hp": _player_node.hp / _player_node.max_hp,
		"partners": 1.0 if _partners > 3 else _partners / 3,
		"could_hit_player": _could_hit_player,
		"could_run_away": _could_run_away,
	}
这个UtilityAI的任务好象就完成了:时钟中获取实时数据,判断目标选项,调用目标选项的action,其中完成内部的状态改变。
这是什么AI?感觉就是一个简单的逻辑
再看了一下Demo项目,感觉内容比较多,主要是碰撞相关内容处理、动画效果展示,还有就是路径规划。呃,路径规划_make_path,是不是AI的工作呢,看看源码,原来是NavigationAgent2D的功劳,与AI无关。
@onready var nav_agent: NavigationAgent2D = $NavigationAgent2D

func _make_path() -> void:
	match $Agent.state:
		1:
			nav_agent.target_position = _player_node.global_position
		2:
			var _partner_nodes = get_tree().get_nodes_in_group("enemy")
			if len(_partner_nodes) == 1:
				_could_run_away = 0.0
			else:
				var _partner = [null, INF]
				for _pt in _partner_nodes:
					if _pt == self:
						continue

					var _partner_distance = global_position.distance_to(_pt.global_position)
					if _partner_distance < _partner[1]:
						_partner[0] = _pt
						_partner[1] = _partner_distance

					nav_agent.target_position = _partner[0].global_position
					_could_run_away = 1.0
但,好吧,说是AI就是AI吧,毕竟那些输出都是计算机算出来的