一、MQ介绍
MQ并不是python内置的模块,而是一个需要你额外安装(在上一篇博客有介绍)的程序,安装完毕后可通过python中内置的pika模块来调用MQ发送或接收队列请求,我们可以通过官方文档查看创建消息队列应用程序的基本知识。
二、hello消息队列
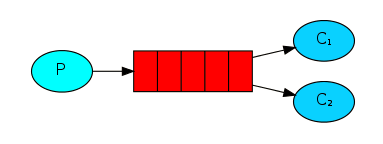
1、原理图
P:producer
hello:消息队列(MQ)
C:consumer

producer生产出把数据放入到队列中,consumer可以从里面取出数据!!!
2、代码
官网链接:http://www.rabbitmq.com/tutorials/tutorial-one-python.html
(1)send.py
import pika
connection = pika.BlockingConnection(pika.ConnectionParameters('localhost'))
channel = connection.channel()
channel.queue_declare(queue='hello')

channel.basic_publish(exchange='',
                      routing_key='hello',
                      body='Hello World!')
print(" [x] Sent 'Hello World!'")
connection.close()
(2)receive.py
import pika
connection = pika.BlockingConnection(pika.ConnectionParameters(host='localhost'))
channel = connection.channel()

### 声明二次是为了程序能够正常运行,因为不知道那个程序会先启动
channel.queue_declare(queue='hello')

### ch:管道内存地址
def callback(ch, method, properties, body):
    print(" [x] Received %r" % body)

### callback:收到消息,调用callback函数处理消息
channel.basic_consume(callback,
                      queue='hello',
                      no_ack=True)

print(' [*] Waiting for messages. To exit press CTRL+C')
channel.start_consuming()
运行send.py后,在运行receive.py就会接收到send发送的数据,我们不知道数据接收后是否完成了处理(接收数据的机器是否出问题),因此我们可以加入确定信号!!!
3、优化代码
在callback中加入sleep,我们开启多个receive,发送消息后,关闭接收消息的那个,消息会自动发送到另外一个receive中,我们可以在shell中使用 rabbitmqctl list_queues,查看队列!!!
(1)send.py
import pika
connection = pika.BlockingConnection(pika.ConnectionParameters('localhost'))
channel = connection.channel()
channel.queue_declare(queue='hello')

channel.basic_publish(exchange='',
                      routing_key='hello',
                      body='Hello World!')
print(" [x] Sent 'Hello World!'")
connection.close()
(2)receive.py
import pika,time

connection = pika.BlockingConnection(pika.ConnectionParameters(host='localhost'))
channel = connection.channel()

### 声明二次是为了程序能够正常运行,因为不知道那个程序会先启动
channel.queue_declare(queue='hello')

### ch:管道内存地址,ch.basic_ack这样才完成确定
def callback(ch, method, properties, body):
    print(" [x] Received %r" % body)
    time.sleep(10)
    ch.basic_ack(delivery_tag=method.delivery_tag)

### callback:收到消息,调用callback函数处理消息
### no_ack=True:不收到回信
channel.basic_consume(callback,
                      queue='hello',
                      # no_ack=True
                      )

print(' [*] Waiting for messages. To exit press CTRL+C')
channel.start_consuming()
结果:
[root@python ~]# rabbitmqctl list_queues
Listing queues
hello   1

[root@python ~]# rabbitmqctl list_queues
Listing queues
hello   0
这样虽然可以保证数据的完整性,但是MQ服务down了就不行了!!!
三、Work Queues
实现消息持久化!!!
1、原理图
2、代码
官网链接:http://www.rabbitmq.com/tutorials/tutorial-two-python.html
(1)send.py
import pika
connection = pika.BlockingConnection(pika.ConnectionParameters('localhost'))
channel = connection.channel()

### 声明为持久化消息队列
channel.queue_declare(queue='hello1',durable=True)

channel.basic_publish(exchange='',
                      routing_key='hello1',
                      body='Hello World!',
                      properties = pika.BasicProperties(
                        delivery_mode=2,  # make message persistent
                      )
                      )
print(" [x] Sent 'Hello World!'")
connection.close()
(2)receive.py
import pika,time

connection = pika.BlockingConnection(pika.ConnectionParameters(host='localhost'))
channel = connection.channel()

### 声明二次是为了程序能够正常运行,因为不知道那个程序会先启动
channel.queue_declare(queue='hello1',durable=True)

### ch:管道内存地址
def callback(ch, method, properties, body):
    print(" [x] Received %r" % body)
    # time.sleep(10)
    ch.basic_ack(delivery_tag=method.delivery_tag)

### 最多只能收到一条
channel.basic_qos(prefetch_count=1)

### callback:收到消息,调用callback函数处理消息
channel.basic_consume(callback,
                      queue='hello1',
                      # no_ack=True
                      )

print(' [*] Waiting for messages. To exit press CTRL+C')
channel.start_consuming()
结果:
 ### 先运行send和receive,在过程中关闭掉MQ,可以发现端口都不存在了
[root@python ~]# netstat -lntup|grep -E "5672|25672|15672"
[root@python ~]# rabbitmq-server -detached             ###开启MQ
[root@python ~]# netstat -lntup|grep -E "5672|25672|15672"
tcp        0      0 0.0.0.0:15672           0.0.0.0:*               LISTEN      7922/beam
tcp        0      0 0.0.0.0:25672           0.0.0.0:*               LISTEN      7922/beam
tcp6       0      0 :::5672                 :::*                    LISTEN      7922/beam
[root@python ~]# rabbitmqctl list_queues
Listing queues
hello1  2
四、Publish/Subscribe
1、发布/订阅介绍
- 消息发布:类似广播的效果,所有的消息队列都能搜索到!!!
- Exchange类型:
- fanout:所有bind到此exchange的queue都可以接受消息
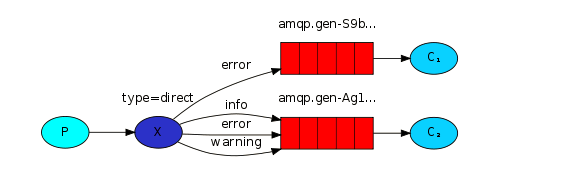
- direct:通过routingKey和exchange决定的那个唯一的queue可以接收消息
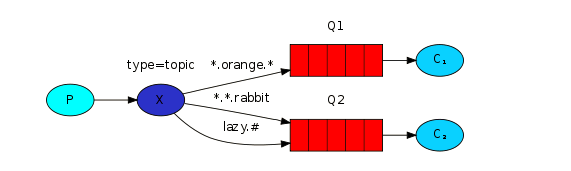
- topic:所有符合routingKey(可以是一个表达式)的routingKey所bind的queue可以接收消息
2、fanout
官网链接:http://www.rabbitmq.com/tutorials/tutorial-three-python.html
(1)原理图
X:exchange中间件,通过exchange转发消息!!!

(2)fanout_send.py
import pika
import sys

connection = pika.BlockingConnection(pika.ConnectionParameters(host='localhost'))
channel = connection.channel()

channel.exchange_declare(exchange='logs',
                         exchange_type='fanout')

message = ' '.join(sys.argv[1:]) or "info: Hello World!"
channel.basic_publish(exchange='logs',
                      routing_key='',
                      body=message)
print(" [x] Sent %r" % message)
connection.close()
(3)fanout_receive.py
import pika
connection = pika.BlockingConnection(pika.ConnectionParameters(host='localhost'))
channel = connection.channel()

channel.exchange_declare(exchange='logs',
                         exchange_type='fanout')

result = channel.queue_declare(exclusive=True)       ###exclusive:排他的,没有连接时,会自动删除掉
queue_name = result.method.queue

channel.queue_bind(exchange='logs',
                   queue=queue_name)

print(' [*] Waiting for logs. To exit press CTRL+C')

def callback(ch, method, properties, body):
    print(" [x] %r" % body)

channel.basic_consume(callback,
                      queue=queue_name,
                      no_ack=True)

channel.start_consuming()
结果:
进行连接的消息队列可以收到广播,消息是实时的(即如果之前发送的消息,consumer没有启动就接收不到)!!!
3、direct
官网链接:http://www.rabbitmq.com/tutorials/tutorial-four-python.html
(1)原理图
(2)direct_send.py
import pika
import sys
connection = pika.BlockingConnection(pika.ConnectionParameters(host='localhost'))
channel = connection.channel()

channel.exchange_declare(exchange='direct_logs',
                         exchange_type='direct')

severity = sys.argv[1] if len(sys.argv) > 1 else 'info'
message = ' '.join(sys.argv[2:]) or "Hello World!"
channel.basic_publish(exchange='direct_logs',
                      routing_key=severity,
                      body=message)
print(" [x] Sent %r" % message)
connection.close()
(3)direct_receive.py
import pika,sys
connection = pika.BlockingConnection(pika.ConnectionParameters(host='localhost'))
channel = connection.channel()

channel.exchange_declare(exchange='direct_logs',
                         exchange_type='direct')

result = channel.queue_declare(exclusive=True)       ###exclusive:排他的,没有连接时,会自动删除掉
queue_name = result.method.queue

severities = sys.argv[1:]
if not severities:
    ### sys.stderr用来重定向标准错误信息
    sys.stderr.write("Usage: %s [info] [warning] [error]\n" %(sys.argv[0]))
    sys.exit(1)

for severity in severities:
    channel.queue_bind(exchange='direct_logs',
                        queue=queue_name,
                       routing_key=severity)

print(' [*] Waiting for logs. To exit press CTRL+C')

def callback(ch, method, properties, body):
    print(" [x] %r" % body)

channel.basic_consume(callback,
                      queue=queue_name,
                      no_ack=True)

channel.start_consuming()
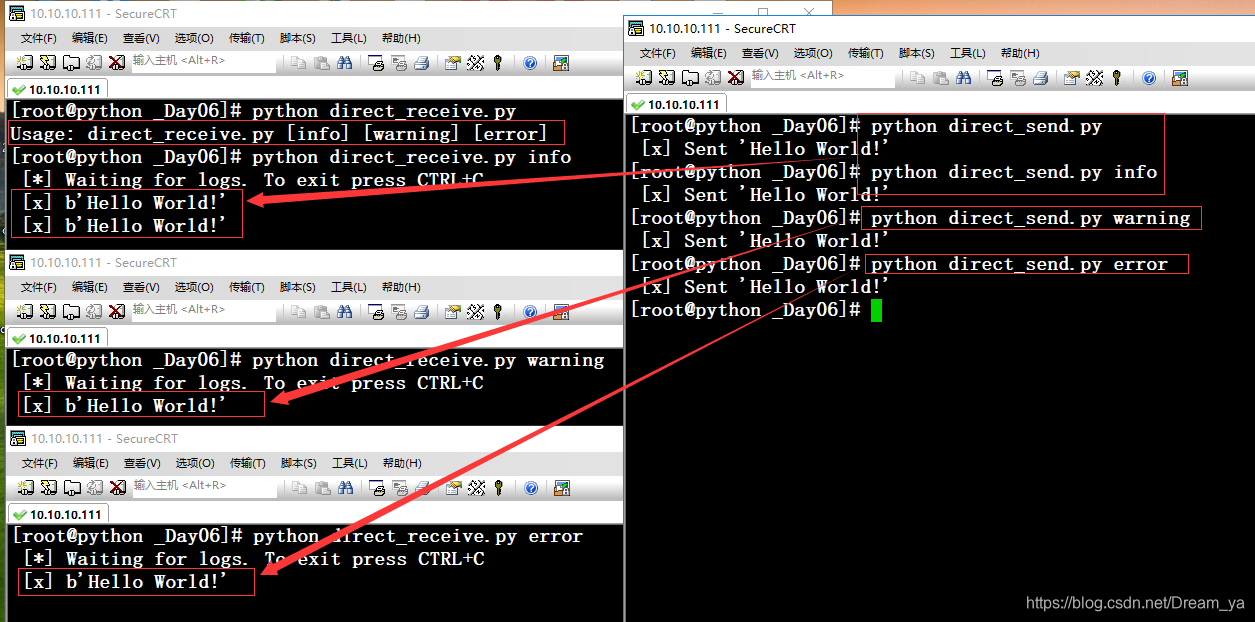
结果:
开多个shell执行
producer:python  direct_send.py error
consumer:python direct_receive.py info,python direct_receive.py warning,python direct_receive.py error
可以发现这样收取的话还是不够细分的!!!
4、topic
官网链接:http://www.rabbitmq.com/tutorials/tutorial-five-python.html
(1)原理图
实现更细致的消息过滤!!!
(2)topic_send.py
import pika
import sys

connection = pika.BlockingConnection(pika.ConnectionParameters(host='localhost'))
channel = connection.channel()

channel.exchange_declare(exchange='topic_logs',
                         exchange_type='topic')

routing_key = sys.argv[1] if len(sys.argv) > 1 else 'anonymous.info'
message = ' '.join(sys.argv[2:]) or 'Hello World!'
channel.basic_publish(exchange='topic_logs',
                      routing_key=routing_key,
                      body=message)
print(" [x] Sent %r:%r" % (routing_key, message))
connection.close()
(3)topic_receive.py
import pika
import sys

connection = pika.BlockingConnection(pika.ConnectionParameters(host='localhost'))
channel = connection.channel()

channel.exchange_declare(exchange='topic_logs',
                         exchange_type='topic')

result = channel.queue_declare(exclusive=True)
queue_name = result.method.queue

binding_keys = sys.argv[1:]
if not binding_keys:
    sys.stderr.write("Usage: %s [binding_key]...\n" % sys.argv[0])
    sys.exit(1)

for binding_key in binding_keys:
    channel.queue_bind(exchange='topic_logs',
                       queue=queue_name,
                       routing_key=binding_key)

print(' [*] Waiting for logs. To exit press CTRL+C')

def callback(ch, method, properties, body):
    print(" [x] %r:%r" % (method.routing_key, body))

channel.basic_consume(callback,
                      queue=queue_name,
                      no_ack=True)

channel.start_consuming()
结果:
consumer(receive)也可以后面接
#实现收取所有消息:python topic_receive.py “#”!!!
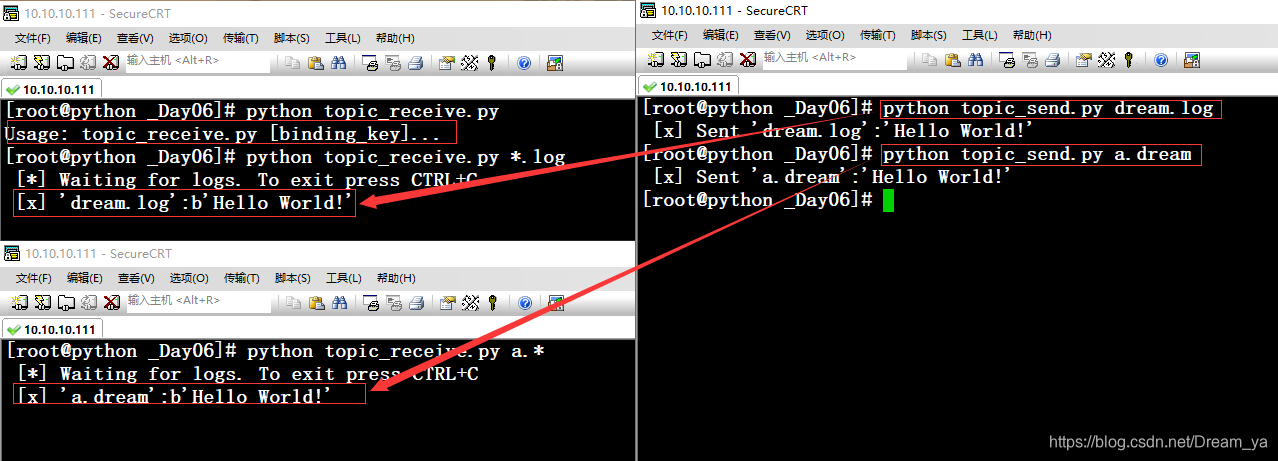
可以发现通过不同的文件名进行消息队列消息收取!!!
五、RPC
1、原理图
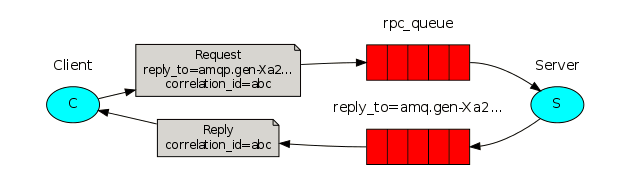
简单来说就是实现了返回server端处理client后的结果,之前我们只是返回了状态罢了,通过uuid来确定唯一性,从而实现数据结果转发!!!
2、代码
官网链接:http://www.rabbitmq.com/tutorials/tutorial-six-python.html
(1)rpc-server.py
import pika

connection = pika.BlockingConnection(pika.ConnectionParameters(host='localhost'))

channel = connection.channel()

channel.queue_declare(queue='rpc_queue')

### 斐波那契数列
def fib(n):
    if n == 0:
        return 0
    elif n == 1:
        return 1
    else:
        return fib(n-1) + fib(n-2)
### 收到了消息就会进行调用,props:返回给消费者的参数
def on_request(ch, method, props, body):
    n = int(body)

    print(" [.] fib(%s)" % n)
    response = fib(n)

    ch.basic_publish(exchange='',
                     routing_key=props.reply_to,
                     properties=pika.BasicProperties(correlation_id = \
                                                         props.correlation_id),
                     body=str(response))
    ### 手动响应,确保执行完成
    ch.basic_ack(delivery_tag = method.delivery_tag)

channel.basic_qos(prefetch_count=1)
### 收到消息就调用on_request
channel.basic_consume(on_request, queue='rpc_queue')

print(" [x] Awaiting RPC requests")
channel.start_consuming()
(2)rpc-client.py
import pika
import uuid

class FibonacciRpcClient(object):
    def __init__(self):
        self.connection = pika.BlockingConnection(pika.ConnectionParameters(host='localhost'))

        self.channel = self.connection.channel()

        ### 生成独一的随机queue
        result = self.channel.queue_declare(exclusive=True)
        self.callback_queue = result.method.queue

        ### 收到消息就调用self.on_response
        self.channel.basic_consume(self.on_response, no_ack=True,
                                   queue=self.callback_queue)

    def on_response(self, ch, method, props, body):
        if self.corr_id == props.correlation_id:
            self.response = body

    def call(self, n):
        self.response = None

        ### 生成一个随机uuid
        self.corr_id = str(uuid.uuid4())
        self.channel.basic_publish(exchange='',
                                   routing_key='rpc_queue',
                                   properties=pika.BasicProperties(
                                         reply_to = self.callback_queue,
                                         correlation_id = self.corr_id,
                                         ),
                                   body=str(n))
        while self.response is None:
            ### 没有消息不堵塞
            self.connection.process_data_events()
        return int(self.response)

fibonacci_rpc = FibonacciRpcClient()

print(" [x] Requesting fib(30)")
response = fibonacci_rpc.call(30)
print(" [.] Got %r" % response)