之前我们提到的netty都是基于netty3版本的,现在我们用5来尝试下netty的客户端和服务端,与3还是存在部分差别的。
下面是具体的代码,注解在代码中
- pom文件
<?xml version="1.0" encoding="UTF-8"?>
<project xmlns="http://maven.apache.org/POM/4.0.0"
         xmlns:xsi="http://www.w3.org/2001/XMLSchema-instance"
         xsi:schemaLocation="http://maven.apache.org/POM/4.0.0 http://maven.apache.org/xsd/maven-4.0.0.xsd">
    <modelVersion>4.0.0</modelVersion>

    <groupId>com.xiyou</groupId>
    <artifactId>netty-test-5</artifactId>
    <version>1.0-SNAPSHOT</version>

    <dependencies>
        <dependency>
            <groupId>io.netty</groupId>
            <artifactId>netty-all</artifactId>
            <version>5.0.0.Alpha2</version>
        </dependency>
    </dependencies>

</project>
- 服务端server
package com.xiyou.test.netty5;

import io.netty.bootstrap.ServerBootstrap;
import io.netty.channel.*;
import io.netty.channel.nio.NioEventLoopGroup;
import io.netty.channel.socket.nio.NioServerSocketChannel;
import io.netty.handler.codec.string.StringDecoder;
import io.netty.handler.codec.string.StringEncoder;

/**
 * 用netty5实现服务端
 */
public class Server {
    public static void main(String[] args) {
        // 创建一个服务类
        ServerBootstrap serverBootstrap = new ServerBootstrap();
        // 创建woker和boss线程池组
        // netty5创建的并不是连接池,而是用本身封装好的方法,其实现是ScheduledExecutor连接池
        EventLoopGroup boss = new NioEventLoopGroup();
        EventLoopGroup worker = new NioEventLoopGroup();
        try {
            // 设置线程池
            serverBootstrap.group(boss, worker);

            // 设置nioSocket工厂,和三有不同
            serverBootstrap.channel(NioServerSocketChannel.class);

            // 设置管道工厂,和3也有不同
            serverBootstrap.childHandler(new ChannelInitializer<Channel>() {

                @Override
                protected void initChannel(Channel channel) throws Exception {
                    channel.pipeline().addLast("encoder", new StringEncoder());
                    channel.pipeline().addLast("decoder", new StringDecoder());
                    channel.pipeline().addLast("serverHandler", new ServerHandler());
                }
            });

            // 设置参数,TCP参数
            // serverSocketChannel的设置,连接缓冲池的大小,accept的最大连接数
            serverBootstrap.option(ChannelOption.SO_BACKLOG, 2048);
            // socketChannel的设置,维持连接的活跃,清除无用的死连接
            serverBootstrap.childOption(ChannelOption.SO_KEEPALIVE, true);
            // socketChannel的设置,关闭延迟发送(就是关闭缓冲池)
            serverBootstrap.childOption(ChannelOption.TCP_NODELAY, true);

            // 绑定端口
            ChannelFuture future = serverBootstrap.bind(10101);

            System.out.println("服务端正常启动!!");

            // 等待服务端关闭, 该方法会阻塞在这里, 关闭后执行
            // 该管道是serverSocketChannel
            future.channel().closeFuture().sync();
        }catch (Exception e){
            e.printStackTrace();
        }finally {
            // 关闭boss和worker
            boss.shutdownGracefully();
            worker.shutdownGracefully();
        }
    }
}
- 服务端的Handler
package com.xiyou.test.netty5;

import io.netty.channel.Channel;
import io.netty.channel.ChannelHandlerContext;
import io.netty.channel.SimpleChannelInboundHandler;

/**
 * 该泛型表示接受到的信息的类型
 * 解码器成功解码后,不再是Object类型,而直接就是一个String类型
 */
public class ServerHandler extends SimpleChannelInboundHandler<String> {

    /**
     * 接收客户端发送的数据
     * @param channelHandlerContext
     * @param msg
     * @throws Exception
     */
    protected void messageReceived(ChannelHandlerContext channelHandlerContext, String msg) throws Exception {
        System.out.println("messageReceived: " + msg);
        // 得到回写到客户端的channel
        Channel channel = channelHandlerContext.channel();
        channel.write("服务端接受到的消息是: " + msg + "from server");
        // 这里必须flush,否则客户端收不到消息(不会立刻发送,如果不进行flush)
        channel.flush();
        /*
        // 可以直接调用该方法,该方法相当于write+flush
        channel.writeAndFlush(msg);
        // 也可以用下面的方法,都是同一个方法
        channelHandlerContext.writeAndFlush(msg);
        */
    }

    /**
     * 客户端接入
     */
    @Override
    public void channelActive(ChannelHandlerContext ctx) throws Exception {
        System.out.println("channelActive");
        super.channelActive(ctx);
    }

    /**
     * 客户端断开(相当于3的disConnected)
     */
    @Override
    public void channelInactive(ChannelHandlerContext ctx) throws Exception {
        System.out.println("channelInactive");
        super.channelInactive(ctx);
    }

    /**
     * 异常处理
     * @param ctx
     * @param cause
     * @throws Exception
     */
    @Override
    public void exceptionCaught(ChannelHandlerContext ctx, Throwable cause) throws Exception {
        super.exceptionCaught(ctx, cause);
    }
}
- 客户端client
package com.xiyou.test.netty5;

import io.netty.bootstrap.Bootstrap;
import io.netty.channel.*;
import io.netty.channel.nio.NioEventLoopGroup;
import io.netty.channel.socket.nio.NioSocketChannel;
import io.netty.handler.codec.string.StringDecoder;
import io.netty.handler.codec.string.StringEncoder;

import java.io.BufferedReader;
import java.io.InputStreamReader;

/**
 * netty5实现的客户端
 */
public class Client {
    public static void main(String[] args) {
        // 服务类
        Bootstrap bootstrap = new Bootstrap();
        // worker
        // 这里只建worker用来监听数据的交互,因为是客户端,所以无需监听端口,监听accept操作
        EventLoopGroup worker = new NioEventLoopGroup();
        try {

            // 设置线程池
            bootstrap.group(worker);
            // 设置socket工厂
            bootstrap.channel(NioSocketChannel.class);
            // 设置管道
            bootstrap.handler(new ChannelInitializer<Channel>() {

                @Override
                protected void initChannel(Channel channel) throws Exception {
                    channel.pipeline().addLast("encoder", new StringEncoder());
                    channel.pipeline().addLast("decoder", new StringDecoder());
                    channel.pipeline().addLast("clientHandler", new ClientHandler());
                }
            });

            // 连接服务端
            ChannelFuture future = bootstrap.connect("127.0.0.1", 10101);
            // 得到通道,给服务端写数据
            Channel channel = future.channel();
            channel.writeAndFlush("hello");

            BufferedReader bufferedReader = new BufferedReader(new InputStreamReader(System.in));
            while (true){
                String line = bufferedReader.readLine();
                if(!"stop".equals(line)){
                    System.out.println("请输入:");
                    future.channel().writeAndFlush(line);
                }
                else {
                    break;
                }
            }

        }catch (Exception e){
            e.printStackTrace();
        }finally {
            worker.shutdownGracefully();
        }
    }
}
- 客户端Handler
package com.xiyou.test.netty5;

import io.netty.channel.ChannelHandlerContext;
import io.netty.channel.SimpleChannelInboundHandler;

/**
 * 该泛型表示接受到的信息的类型
 * 解码器成功解码后,不再是Object类型,而直接就是一个String类型
 */
public class ClientHandler extends SimpleChannelInboundHandler<String> {

    /**
     * 接收客户端发送的数据
     * @param channelHandlerContext
     * @param msg
     * @throws Exception
     */
    @Override
    protected void messageReceived(ChannelHandlerContext channelHandlerContext, String msg) throws Exception {
        System.out.println("接收到的客户端发送的消息:" + msg);
    }

    /**
     * 客户端接入
     */
    @Override
    public void channelActive(ChannelHandlerContext ctx) throws Exception {
        System.out.println("channelActive");
        super.channelActive(ctx);
    }

    /**
     * 客户端断开(相当于3的disConnected)
     */
    @Override
    public void channelInactive(ChannelHandlerContext ctx) throws Exception {
        System.out.println("channelInactive");
        super.channelInactive(ctx);
    }

    /**
     * 异常处理
     * @param ctx
     * @param cause
     * @throws Exception
     */
    @Override
    public void exceptionCaught(ChannelHandlerContext ctx, Throwable cause) throws Exception {
        super.exceptionCaught(ctx, cause);
    }
}
下面我们研究下多连接客户端的启动类,其实简单的理解就是类似连接池,直接建立好多个连接,然后保存起来
那么我们应该如何保存这些连接呢?
- 这里我们给出两种策略:
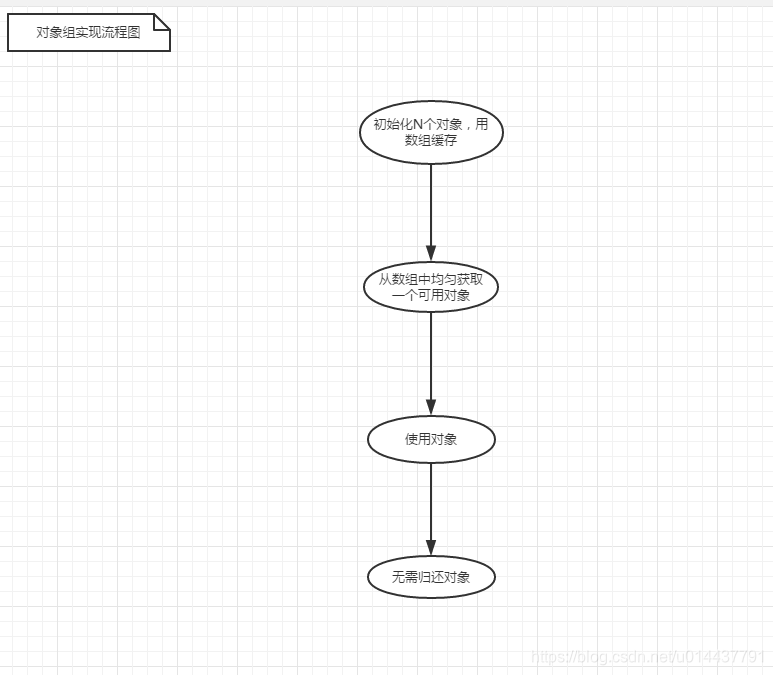
(1)使用对象组去保存,这样子线程安全,并且不会产生阻塞效应(对象组就是一个数组或者列表去保存)
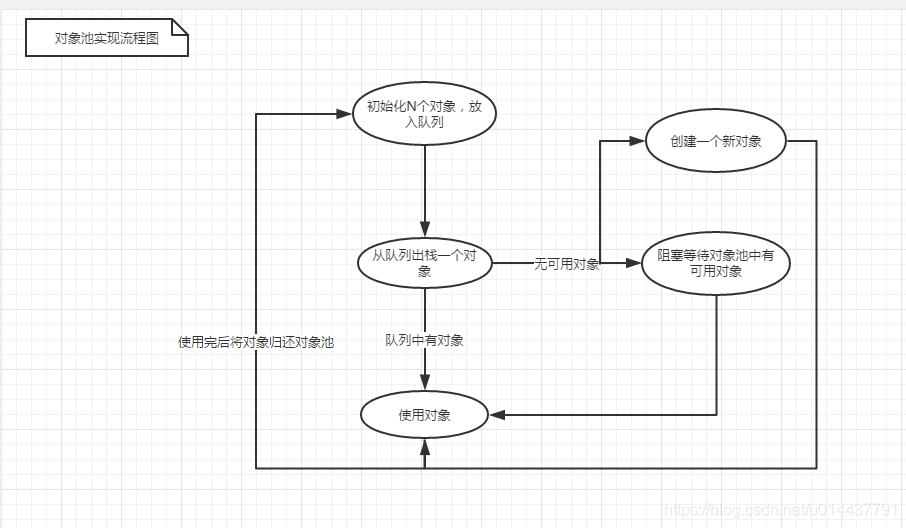
(2)使用对象池去保存,线程不安全,会产生阻塞效应(阻塞的原因是,池子中没有可用的连接)
我们可以理解下一个thread+队列其实就是一个单线程线程池。也就是线程安全的。所以netty5的channel对象是单线程线程池实现的,因此是线程安全的,因此我们可以使用对象组的形式来完成单客户端的多连接。
多连接客户端代码实现:
- 启动类:
package com.xiyou.test.netty5;

import io.netty.bootstrap.Bootstrap;
import io.netty.channel.Channel;
import io.netty.channel.ChannelFuture;
import io.netty.channel.ChannelInitializer;
import io.netty.channel.EventLoopGroup;
import io.netty.channel.nio.NioEventLoopGroup;
import io.netty.channel.socket.nio.NioSocketChannel;
import io.netty.handler.codec.string.StringDecoder;
import io.netty.handler.codec.string.StringEncoder;

import java.util.ArrayList;
import java.util.List;
import java.util.concurrent.atomic.AtomicInteger;

/**
 * 多连接的客户端
 */
public class MultClient {
    // 服务类的声明
    private Bootstrap bootstrap = new Bootstrap();
    // 集合,用来保存会话列表
    private List<Channel> channels = new ArrayList<>();
    // 引用计数器,用来循环遍历列表中的channel
    // 默认是从0开始
    private final AtomicInteger index =  new AtomicInteger();

    /**
     * 初始化
     */
    public void init(int count){
        // worker
        // 定义一个线程组,这里只声明了worker的作用是我们客户端无需监听accrpt的类型,只用监听数据的读写
        EventLoopGroup worker = new NioEventLoopGroup();
        // 设置线程池
        bootstrap.group(worker);
        // 设置socket工厂
        bootstrap.channel(NioSocketChannel.class);
        // 设置管道
        bootstrap.handler(new ChannelInitializer<Channel>() {
            @Override
            protected void initChannel(Channel channel) {
                // 向管道中赋值对应的过滤器
                channel.pipeline().addLast(new StringDecoder());
                channel.pipeline().addLast(new StringEncoder());
                channel.pipeline().addLast(new ClientHandler());
            }
        });

        // 建立连接
        for (int i = 0; i < count; i++){
            ChannelFuture future = bootstrap.connect("127.0.0.1", 10101);
            // 将建立好的通道放到列表中,该通道就是SocectChannel,客户端的channel
            channels.add(future.channel());
        }

    }

    /**
     * 用来获取下一个通道
     * @return
     */
    public Channel nextChannel(){
        return getActiveChannel(0);
    }

    /**
     * 获得一个可用的channel
     * 这个方法设计的不好
     * @param count
     * @return
     */
    private Channel getActiveChannel(int count){
        // 得到从列表中轮训的channel
        Channel channel = channels.get(Math.abs(index.getAndIncrement() % channels.size()));
        // 如果当前通道不可用
        if(!channel.isActive()){
            System.out.println("连接不可用");
            // 重连
            reconnect(channel);
            if(count >= channels.size()){
                throw new RuntimeException("没有可用的连接");
            }
            return getActiveChannel(count + 1);
        }
        return channel;
    }

    /**
     * 重连机制,找到之前的channel在列表中的位置,然后新建一个channl,替换他
     */
    private void reconnect(Channel channel){
        synchronized (channel){
            // 如果在列表中找不到该channel
            if(channels.indexOf(channel) == -1){
                return;
            }
            // 新建立连接
            Channel newChannel = bootstrap.connect("127.0.0.1", 10101).channel();
            // 在列表的指定位置赋值
            channels.set(channels.indexOf(channel), newChannel);
        }
    }

}
- 客户端
package com.xiyou.test.netty5;

import java.io.BufferedReader;
import java.io.IOException;
import java.io.InputStreamReader;

/**
 * 多连接客户端的启动类
 */
public class MultStart {
    public static void main(String[] args) {
        MultClient client = new MultClient();
        // 表示一开始就建立5个客户端连接,放到list中
        client.init(5);
        BufferedReader bufferedReader = new BufferedReader(new InputStreamReader(System.in));
        while(true){
            try {
                System.out.println("请输入:");
                String line = bufferedReader.readLine();
                if(!"stop".equals(line)){
                    client.nextChannel().writeAndFlush(line);
                }
                else {
                    break;
                }
            } catch (IOException e) {
                e.printStackTrace();
            }
        }
    }
}
- 服务端
服务端和之前的一样,我们就不再贴出代码