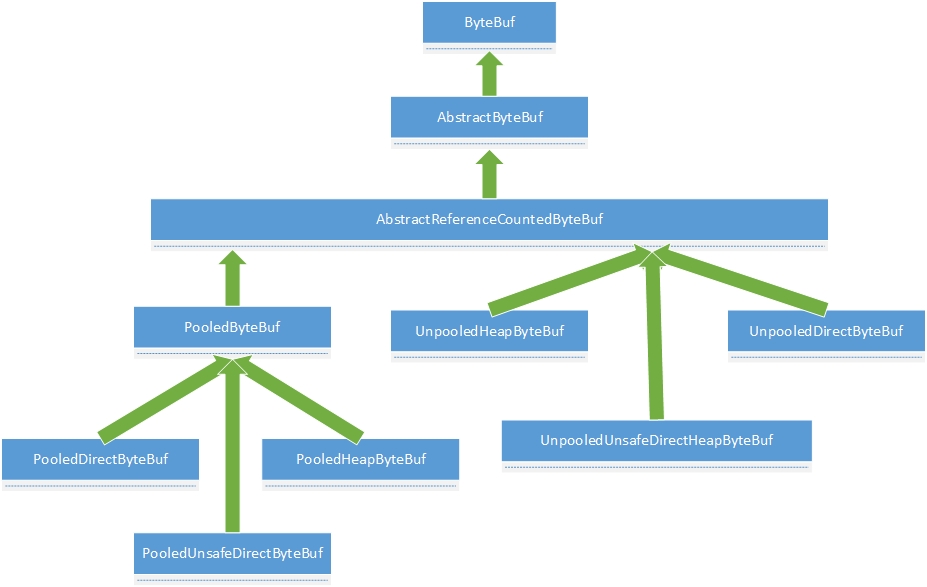
还是放上ByteBuf的类图,没图没有安全感。默默的感觉到这图会陪伴长久有木有
这里还是推荐下一个自己做得netty+spring的集成方案,优化netty配置启动,并提供基础服务器搭建的配置+极少代码的实现方案。
http://download.csdn.net/detail/jackieliyido/9497093
昨天主要对ByteBuf的注释做了一个翻译,在大体上对ByteBuf有了初步了解,关键点还是在readerIndex以及writerIndex在各个方法下的状态。这两个关键索引也将会贯穿接下来几个类的始末。
今天咱们再来看下AbstractByteBuf. 在这里有了ByteBuf最初的实现(不知道为啥,脑子里出现了EVA场景,人类补完)。本人的思路是一步一步来,现在的书都太快进了,一步直接跨越到heapByteBuf啥啥,从过去一年多来,至少自己是深深体会到了自学时的困难。
正题开始:先看AbstractByteBuf的第一段代码
/**
 * A skeletal implementation of a buffer.
 */
public abstract class AbstractByteBuf extends ByteBuf {

    static final ResourceLeakDetector<ByteBuf> leakDetector = new ResourceLeakDetector<ByteBuf>(ByteBuf.class);

    int readerIndex;
    int writerIndex;
    private int markedReaderIndex;
    private int markedWriterIndex;

    private int maxCapacity;

    private SwappedByteBuf swappedBuf;

    protected AbstractByteBuf(int maxCapacity) {
        if (maxCapacity < 0) {
            throw new IllegalArgumentException("maxCapacity: " + maxCapacity + " (expected: >= 0)");
        }
        this.maxCapacity = maxCapacity;
}ResourceLeakDetector 是netty自带的内存泄漏管理器。笔者粗粗看了下里面的逻辑,嗯,比较麻烦,决定在看完所有ByteBuf后回头再来看这个管理器。
看成员变量,两个熟悉的读写索引,一个上一篇提到的mark索引,最大容量(注意不是当前容量),swappedByteBuf. 嗯,最后一个是什么鬼?查下源码:
/**
 * Wrapper which swap the {@link ByteOrder} of a {@link ByteBuf}.
 */
public class SwappedByteBuf extends ByteBuf {

    private final ByteBuf buf;
    private final ByteOrder order;

    public SwappedByteBuf(ByteBuf buf) {
        if (buf == null) {
            throw new NullPointerException("buf");
        }
        this.buf = buf;
        if (buf.order() == ByteOrder.BIG_ENDIAN) {
            order = ByteOrder.LITTLE_ENDIAN;
        } else {
            order = ByteOrder.BIG_ENDIAN;
        }
    }
嗯,接下来比较纠结,1000多行代码,全部说篇幅太长了,只能像书里一样略过很多了。不过这里追加一些就是。
代码中有很多方法实现内容仅仅是对我们的索引做修改并返回this或索引值,此类只需要明白ByteBuf的读写操作范围由索引决定即可。举个例子:
    @Override
    public ByteBuf setIndex(int readerIndex, int writerIndex) {
        if (readerIndex < 0 || readerIndex > writerIndex || writerIndex > capacity()) {
            throw new IndexOutOfBoundsException(String.format(
                    "readerIndex: %d, writerIndex: %d (expected: 0 <= readerIndex <= writerIndex <= capacity(%d))",
                    readerIndex, writerIndex, capacity()));
        }
        this.readerIndex = readerIndex;
        this.writerIndex = writerIndex;
        return this;
    }

    @Override
    public ByteBuf clear() {
        readerIndex = writerIndex = 0;
        return this;
    }

    @Override
    public boolean isReadable() {
        return writerIndex > readerIndex;
    }

    @Override
    public boolean isReadable(int numBytes) {
        return writerIndex - readerIndex >= numBytes;
}关于marked,也需要提一下,看相关代码:
 @Override
    public ByteBuf markReaderIndex() {
        markedReaderIndex = readerIndex;
        return this;
    }

    @Override
    public ByteBuf resetReaderIndex() {
        readerIndex(markedReaderIndex);
        return this;
}==========比较重要的分割线==========
复杂的上来了,还记得在上一篇中有说discardReaderIndex,么?就是这个图:
 *  BEFORE discardReadBytes()
 *
 *      +-------------------+------------------+------------------+
 *      | discardable bytes |  readable bytes  |  writable bytes  |
 *      +-------------------+------------------+------------------+
 *      |                   |                  |                  |
 *      0      <=      readerIndex   <=   writerIndex    <=    capacity
 *
 *
 *  AFTER discardReadBytes()
 *
 *      +------------------+--------------------------------------+
 *      |  readable bytes  |    writable bytes (got more space)   |
 *      +------------------+--------------------------------------+
 *      |                  |                                      |
* readerIndex (0) <= writerIndex (decreased) <= capacity @Override
public ByteBuf discardReadBytes() {
ensureAccessible();
if (readerIndex == 0) {
return this;
}
if (readerIndex != writerIndex) {
setBytes(0, this, readerIndex, writerIndex - readerIndex);
writerIndex -= readerIndex;
adjustMarkers(readerIndex);
readerIndex = 0;
} else {
adjustMarkers(readerIndex);
writerIndex = readerIndex = 0;
}
return this;
}/**
* Should be called by every method that tries to access the buffers content to check
* if the buffer was released before.
*/
protected final void ensureAccessible() {
if (refCnt() == 0) {
throw new IllegalReferenceCountException(0);
}
}继续往下看,readerIndex==0,return this; 如果readerIndex已经在0了,就不再处理直接返回。
readerIndex!=writerIndex时,setBytes(0, this, readerIndex, writerIndex - readerIndex);
看下ByteBuf中对setBytes方法的定义。
/**
     * Transfers the specified source buffer's data to this buffer starting at
     * the specified absolute {@code index}.
     * This method does not modify {@code readerIndex} or {@code writerIndex}
     * of both the source (i.e. {@code this}) and the destination.
     *
     * @param srcIndex the first index of the source
     * @param length   the number of bytes to transfer
     *
     * @throws IndexOutOfBoundsException
     *         if the specified {@code index} is less than {@code 0},
     *         if the specified {@code srcIndex} is less than {@code 0},
     *         if {@code index + length} is greater than
     *            {@code this.capacity}, or
     *         if {@code srcIndex + length} is greater than
     *            {@code src.capacity}
     */
public abstract ByteBuf setBytes(int index, ByteBuf src, int srcIndex, int length);在AbstractByteBuf中没有发现此方法的实现,因此我们等会儿向下索求。
接下来将写索引减去读索引,同时调整mark并将readerIndex置为0。
protected final void adjustMarkers(int decrement) {
        int markedReaderIndex = this.markedReaderIndex;
        if (markedReaderIndex <= decrement) {
            this.markedReaderIndex = 0;
            int markedWriterIndex = this.markedWriterIndex;
            if (markedWriterIndex <= decrement) {
                this.markedWriterIndex = 0;
            } else {
                this.markedWriterIndex = markedWriterIndex - decrement;
            }
        } else {
            this.markedReaderIndex = markedReaderIndex - decrement;
            markedWriterIndex -= decrement;
        }
}我们细致研究下setBytes怎么实现的。向下检索ByteBuf子类。
一直到UnpooledDirectByteBuf这一级,我们才发现有具体的实现,此时也突然清醒,ByteBuf在实现上大致分为HeapByteBuf以及DirectByteBuf,也就是堆内存和直接内存,不同的实现方式导致ByteBuf操作的代码各有不同。这里我们以UnpooledDirectByteBuf为例分析下setBytes到底做了什么事情。
 @Override
    public ByteBuf setBytes(int index, ByteBuf src, int srcIndex, int length) {
        checkSrcIndex(index, length, srcIndex, src.capacity());
        if (src.nioBufferCount() > 0) {
            for (ByteBuffer bb: src.nioBuffers(srcIndex, length)) {
                int bbLen = bb.remaining();
                setBytes(index, bb);
                index += bbLen;
            }
        } else {
            src.getBytes(srcIndex, this, index, length);
        }
        return this;
}src.nioBufferCount()>0,也就是包含至少一个java.nio.ByteBuffer, 此时,遍历nio buffer,并通过setBytes(int index, ByteBuffer src)创建新的ByteBuffer,然后循环过程中通过index +=bbLen控制在新的ByteBuffer后面追加数据。关键就在这,setBytes(int index, ByteBuffer src)做了什么?是copy么?看源码:
@Override
    public ByteBuf setBytes(int index, ByteBuffer src) {
        ensureAccessible();
        ByteBuffer tmpBuf = internalNioBuffer();
        if (src == tmpBuf) {
            src = src.duplicate();
        }

        tmpBuf.clear().position(index).limit(index + src.remaining());
        tmpBuf.put(src);
        return this;
    }
    private ByteBuffer internalNioBuffer() {
        ByteBuffer tmpNioBuf = this.tmpNioBuf;
        if (tmpNioBuf == null) {
            this.tmpNioBuf = tmpNioBuf = buffer.duplicate();
        }
        return tmpNioBuf;
    }
继续往下看,如果不含java.nio.Buffer 则调用getBytes(int index, ByteBuf dst, int dstIndex, int length);
@Override
    public ByteBuf getBytes(int index, ByteBuf dst, int dstIndex, int length) {
        checkDstIndex(index, length, dstIndex, dst.capacity());
        if (dst.hasArray()) {
            getBytes(index, dst.array(), dst.arrayOffset() + dstIndex, length);
        } else if (dst.nioBufferCount() > 0) {
            for (ByteBuffer bb: dst.nioBuffers(dstIndex, length)) {
                int bbLen = bb.remaining();
                getBytes(index, bb);
                index += bbLen;
            }
        } else {
            dst.setBytes(dstIndex, this, index, length);
        }
        return this;
}好吧,到此为止我们明白了 setBytes(0, this, readerIndex, writerIndex - readerIndex);具体怎么操作的,大致上可以认为:使用中间变量对原来的buffer做一个duplicate,然后读取原buffer的指定内容至的tempBuf中。
======WriteBytes=====
 @Override
    public ByteBuf writeBytes(byte[] src, int srcIndex, int length) {
        ensureAccessible();
        ensureWritable(length);
        setBytes(writerIndex, src, srcIndex, length);
        writerIndex += length;
        return this;
    }
ensureWritable(length),确认是否可写,如果写入长度小于当前Byte可写的字节数,则说明可以成功写入,不需要扩展,如果大于最大容量的剩余可写字节数,则抛出IndexOutOfBoundException。如果大于可写字节数,又小于最大容量下的可写字节数,就进行扩容。
 @Override
    public ByteBuf ensureWritable(int minWritableBytes) {
        if (minWritableBytes < 0) {
            throw new IllegalArgumentException(String.format(
                    "minWritableBytes: %d (expected: >= 0)", minWritableBytes));
        }

        if (minWritableBytes <= writableBytes()) {
            return this;
        }

        if (minWritableBytes > maxCapacity - writerIndex) {
            throw new IndexOutOfBoundsException(String.format(
                    "writerIndex(%d) + minWritableBytes(%d) exceeds maxCapacity(%d): %s",
                    writerIndex, minWritableBytes, maxCapacity, this));
        }

        // Normalize the current capacity to the power of 2.
        int newCapacity = alloc().calculateNewCapacity(writerIndex + minWritableBytes, maxCapacity);

        // Adjust to the new capacity.
        capacity(newCapacity);
        return this;
}在这里,还有一个新的方法:ByteBufAllocator.calculateNewCapacity()
/**
     * Calculate the new capacity of a {@link ByteBuf} that is used when a {@link ByteBuf} needs to expand by the
     * {@code minNewCapacity} with {@code maxCapacity} as upper-bound.
     */
int calculateNewCapacity(int minNewCapacity, int maxCapacity);=====skipBytes=====
skip较为简单了,校验是否具有length数量的可读字节,如果有则将readerIndex +=length.
这一块与《netty权威指南》又有出入,也不知道是不是netty版本问题
@Override
    public ByteBuf skipBytes(int length) {
        checkReadableBytes(length);
        readerIndex += length;
        return this;
    }
到此为止,AbstractByteBuf几个重要方法看完了。基础是对于索引的操作,以及discard和write上。
下一篇我们继续看他的子类,AbstractReferenceCountedByteBuf.