一,实验目的:
1. 掌握 OSPFv3 的配置方法
2. 掌握在帧中继环境下 OSPFv3 的配置方法
3. 掌握 OSPFv3 NSSA 的配置方法
4. 掌握外部路由汇总的配置
5. 掌握区域间路由的汇总配置
二,实验拓扑及地址表:
Ipv4部分:

Ipv4地址表(学号尾数为59):
| R1 |
f0/0 |
10.59.1.1/24 |
| f0/1 |
10.59.2.1/24 |
|
| R2 |
f0/0 |
10.59.1.2/24 |
| s1/0 |
10.59.3.1/24 |
|
| R3 |
f0/0 |
10.59.1.3/24 |
| s1/2 |
192.168.59.3/24 |
|
| R5 |
s1/1 |
192.168.59.5/24 |
| R6 |
s1/0 |
192.168.59.6/24 |
| R7 |
f0/0 |
10.59.4.7/24 |
| f0/1 |
10.59.2.2/24 |
|
| s1/0 |
10.59.3.2/24 |
|
| R8 |
f0/0 |
10.59.4.8/24 |
三,实验配置:
1.开启帧中继交换功能
R4#conf t
R4(config)#frame-relay switching // 把该路由器当成帧中继交换机
R4(config)#interface s1/2
R4(config-if)#no shutdown
R4(config-if)#clock rate 128000
R4(config-if)#encapsulation frame-relay // 接口封装帧中继
R4(config)#int s1/1
R4(config-if)#no shutdown
R4(config-if)#clock rate 128000
R4(config-if)#encapsulation frame-relay
R4(config-if)#int s1/0
R4(config-if)#no shutdown
R4(config-if)#clock rate 128000
R4(config-if)#encapsulation frame-relay
2.配置LMI类型
R4(config-if)#int s1/2
R4(config-if)#frame-relay lmi-type cisco
R4(config-if)#frame-relay intf-type dce
R4(config-if)#int s1/1
R4(config-if)#frame-relay lmi-type cisco
R4(config-if)#frame-relay intf-type dce
R4(config-if)#int s1/0
R4(config-if)#frame-relay lmi-type cisco
R4(config-if)#frame-relay intf-type dce
3.配置帧中继交换表
R4(config-if)#int s1/2
R4(config-if)#frame-relay route 103 interface s1/1 301
R4(config-if)#frame-relay route 104 intterface s1/0 401
R4(config)#int serial 1/1
R4(config-if)#frame-relay route 301 interface serial 1/2 103
R4(config-if)#int s1/0
R4(config-if)#frame-relay route 401 interface serial 1/2 104
R4(config-if)#end
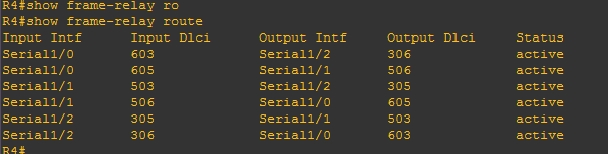
查看(show frame-relay route)

4.配置动态映射
R3(config)#interface s1/2
R3(config-if)#ip address 192.168.59.3 255.255.255.0
R3(config-if)#no shutdown
R3(config-if)#encapsulation frame-relay
R3(config-if)#frame-relay lmi-type cisco
R5(config)#interface s1/1
R5(config-if)#ip address 192.168.59.5 255.255.255.0
R5(config-if)#no shutdown
R5(config-if)#encapsulation frame-relay
R6(config)#int s1/0
R6(config-if)#ip address 192.168.59.6 255.255.255.0
R6(config-if)#no shutdown
R6(config-if)#encapsulation frame-relay
5.Ping通测试 R3pingR5和R6
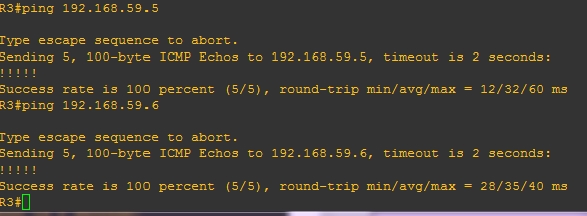
由上图可知,R3能ping通R5和R6,即帧中继成功配好
- OSPFf配置和NSSA配置
(R1,R2,R3,R7配置相近,故只用R1的配置命令为例):
R1#conf terminal
R1(config)#int f0/0
R1(config-if)#no shutdown
R1(config-if)#ip address 10.59.1.1 255.255.255.0
R1(config-if)#int f0/1
R1(config-if)#no shutdown
R1(config-if)#ip address 10.59.2.1 255.255.255.0
R1(config-if)#exit
R1(config)#interface loopback 0
R1(config-if)#ip address 1.1.1.1 255.255.255.0
R1(config)#router ospf 1
R1(config-router)#area 1 nssa // 配置区域 1 为 NSSA 区域
R1(config-router)#router-id 1.1.1.1
R1(config-router)#network 1.1.1.0 0.0.0.255 area 0
R1(config-router)#network 10.59.1.0 0.0.0.255 area 0
R1(config-router)#network 10.59.2.0 0.0.0.255 area 1
- 帧中继下ospf配置
因为前面配置过帧中继所以部分步骤打过可以跳过,R4因为配置过所以不用再配了。
R3
R3(config)#interface loopback 0
R3(config-if)#ip address 3.3.3.3 255.255.255.0
R3(config-if)#ip ospf network point-to-point
R3(config-if)#int s1/2
R3(config-if)#ip ospf network non-broadcast
R3(config-if)#ip ospf priority 255
R3(config-if)#no frame-relay inverse-arp
R3(config-if)#frame-relay map ip 192.168.59.5 103 broadcast
R3(config-if)#frame-relay map ip 192.168.59.6 103 broadcast
R3(config-if)#exit
R3(config)#router ospf 1
R3(config-router)#network 3.3.3.0 0.0.0.255 area 2
R3(config-router)#network 192.168.59.0 0.0.0.25 area 2
R3(config-router)#neighbor 192.168.59.5 priority 3
R3(config-router)#neighbor 192.168.59.6
R3(config-router)#end
R5
R5(config)#interface loopback 0
R5(config-if)#ip address 5.5.5.5 255.255.255.0
R5(config-if)#ip ospf network point-to-point
R5(config-if)#int s1/1
R5(config-if)#ip ospf network non-broadcast
R5(config-if)#ip ospf priority 3
R5(config-if)#no frame-relay inverse-arp
R5(config-if)#frame-relay map ip 192.168.59.3 301 broadcast
R5(config-if)#frame-relay map ip 192.168.59.6 301 broadcast
R5(config-if)#exi
R5(config)#router ospf 1
R5(config-router)#network 192.168.59.0 0.0.0.255 area 2
R5(config-router)#network 5.5.5.0 0.0.0.255 area 2
R5(config-router)#neighbor 192.168.59.3
R5(config-router)#neighbor 192.168.59.6
R5(config-router)#end
R6
R6(config)#interface loopback 0
R6(config-if)#ip address 6.6.6.6 255.255.255.0
R6(config-if)#ip ospf network point-to-point
R6(config-if)#int s1/0
R6(config-if)#ip ospf network non-broadcast
R6(config-if)#ip ospf priority 0
R6(config-if)#frame-relay map ip 192.168.59.3 401 broadcast
R6(config-if)#frame-relay map ip 192.168.59.5 401 broadcast
R6(config-if)#no ip ospf network non-broadcast
R6(config-if)#exi
R6(config)#router ospf 1
R6(config-router)#network 6.6.6.0 0.0.0.255 area 2
R6(config-router)#network 192.168.59.0 0.0.0.255 area 2
R6(config-router)#neighbor 192.168.59.3
R6(config-router)#neighbor 192.168.59.5
R6(config-router)#end
- Ping通测试
R3pingR7
R3#ping 10.59.3.2
R3pingr5
R3#ping 192.168.59.5

能通。
查看R1的邻居
R1#show ip ospf neighbor

- 路由注入和路由汇总
(1)首先在R7,R8配置RIPv2,
R7(config)#int f0/0
R7(config-if)#ip add
R7(config-if)#ip address 10.59.4.7 255.255.255.0
R7(config-if)#exi
R7(config)#router ospf 1
R7(config-router)#redistribute rip subnets //将 RIP 路由重分布到 OSPF 中(路由注入)
R7(config-router)#exit
R7(config)#router rip
R7(config-router)#version 2
R7(config-router)#no auto-summary
R7(config-router)#network 10.59.4.0
R3(config-router)# redistribute ospf 1 metric 2 //将 OSPF 路由重分布到 RIP 中(路由注入)
R8(config)#int f0/0
R8(config-if)#ip address 10.59.4.8 255.255.255.0
R8(config-if)#exit
R8(config)#router rip
R8(config-router)#version 2
R8(config-router)#no auto-summary
R8(config-router)#network 4.0.0.0
R8(config-router)#network 10.59.4.0
R8(config)#interface loopback 0 // 四个环回接口
R8(config-if)#ip address 4.4.0.4 255.255.255.0
R8(config-if)#int lo1
R8(config-if)#ip address 4.4.1.4 255.255.255.0
R8(config-if)#int lo2
R8(config-if)#ip address 4.4.2.4 255.255.255.0
R8(config-if)#int lo3
R8(config-if)#ip address 4.4.3.4 255.255.255.0
(2)在R3配置四个环回接口,并加入路由表。
R3(config)#interface loopback 1
R3(config-if)#ip address 1.1.4.1 255.255.255.0
R3(config-if)#int lo2
R3(config-if)#ip address 1.1.5.1 255.255.255.0
R3(config-if)#int lo3
R3(config-if)#ip address 1.1.6.1 255.255.255.0
R3(config-if)#int lo4
R3(config-if)#ip address 1.1.7.1 255.255.255.0
R3(config)#router ospf 1
R3(config-router)#network 1.1.4.0 255.255.252.0 area 2
(3)配置区域间路由汇总
R1(config)#router ospf 1
R1(config-router)#area 2 range 1.1.4.0 255.255.252.0
(4)配置外部自治系统路由汇总
R7(config)#router ospf 1
R7(config-router)#summary-address 4.4.0.0 255.255.252.0
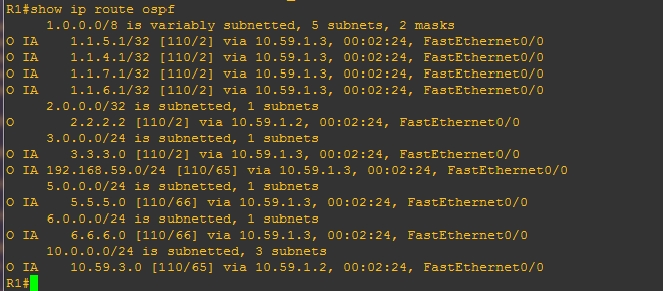
(5)查看路由表
用“show ip route ospf”查看R1路由表。
(6)ping通测试。

总结:ipv4配置已经配好,从上图可以知道,R8(局外路由)能ping通上面的各个路由器,实现了全网互通。
Ipv6部分:
拓扑图:由于要求与ipv4的一样,故这里不再重复拓扑图,ipv6的拓扑图就是上文ipv4的图。
Ipv6地址表:
| R1 |
f0/0 |
2123::59:1/64 |
| f0/1 |
2124::59:1/64 |
|
| R2 |
f0/0 |
2123::59:2/64 |
| s1/0 |
2027::59:2/64 |
|
| R3 |
f0/0 |
2123::59:3/64 |
| s1/2 |
2356::59:3/64 |
|
| R5 |
s1/1 |
2056::59:5/64 |
| R6 |
s1/0 |
2356::59:6/64 |
| R7 |
f0/0 |
2078::59:7/64 |
| f0/1 |
2124::59:7/64 |
|
| s1/0 |
2027::59:7/64 |
|
| R8 |
f0/0 |
2078::59:8/64 |
在配置映射R5的link-local 地址和R6的link-local 地址时,需要在R5,R6上查看本地链路地址,再进行配置。
R3#conf t
R3(config)#ipv6 unicast-routing
R3(config)#interface loopback 0
R3(config-if)#ipv6 address 2033::1/128
R3(config-if)#exi
R3(config)#interface f0/0
R3(config-if)#ipv6 address 2120::59:3/64
R3(config-if)#no shutdown
R3(config-if)#int s1/2
R3(config-if)#encapsulation frame-relay
R3(config-if)#no shutdown
R3(config-if)#exit
R3(config)#interface serial 1/2.1 multipoint
R3(config-subif)#ipv6 address 2356::59:3/64
R3(config-subif)#frame-relay map ipv6 2356::59:5 305 broadcast
R3(config-subif)#frame-relay map ipv6 2356::59:6 306 broadcast
R3(config-subif)#frame-relay map ipv6 2356::59:3 306 broadcast
R3(config-subif)#frame-relay map ipv6 FE80::CE05:FFF:FE64:0 305 broadcast
R3(config-subif)#frame-relay map ipv6 FE80::CE06:1AFF:FE14:0 306 broadcast
R3(config-subif)#
R5(config)#ipv6 unicast-routing
R5(config)#interface loopback 0
R5(config-if)#ipv6 address 2055::1/128
R5(config-if)#exi
R5(config)#interface s1/1
R5(config-if)#encapsulation frame-relay
R5(config-if)#no shutdown
R5(config)#interface s1/1.1 multipoint
R5(config-subif)#ipv6 address 2356::20:5/64
R5(config-subif)#frame-relay map ipv6 2356::59:3 503 broadcast
R5(config-subif)#frame-relay map ipv6 2356::59:6 503 broadcast
R5(config-subif)#frame-relay map ipv6 2356::59:5 503 broadcast
R5(config-subif)#frame-relay map ipv6 FE80::CE06:1AFF:FE14:0 304 broadcast
R5(config-subif)#frame-relay map ipv6 FE80::CE03:1BFF:FE44:0 503 broadcast
R6(config)#ipv6 unicast-routing
R6(config)#interface loopback 0
R6(config-if)#ipv6 address 2066::1/128
R6(config-if)#exi
R6(config)#interface s1/0
R6(config-if)#encapsulation frame-relay
R6(config-if)#no shutdown
R6(config-if)#exi
R6(config)#interface serial 1/0.1 multipoint
R6(config-subif)#ipv6 address 2356::20:6/64
R6(config-subif)#frame-relay map ipv6 2356::59:3 603 broadcast
R6(config-subif)#frame-relay map ipv6 2356::59:5 603 broadcast
R6(config-subif)#frame-relay map ipv6 2356::59:6 603 broadcast
R6(config-subif)#frame-relay map ipv6 FE80::CE05:FFF:FE64:0 403 broadcast
R6(config-subif)#frame-relay map ipv6 FE80::CE03:1BFF:FF44:0 603 broadcast
R6(config-subif)#
R4这里只打出帧中继交换表的配置,其他部分和ipv4相同,省略
R4(config-if)#int s1/2
R4(config-if)#frame-relay route 305 interface s1/1 503
R4(config-if)#frame-relay route 306 interface s1/0 603
R4(config-if)#int s1/1
R4(config-if)#frame-relay route 503 interface s1/2 305
R4(config-if)#frame-relay route 506 interface serial 1/0 605
R4(config-if)#int s1/0
R4(config-if)#frame-relay route 603 interface s1/2 306
R4(config-if)#frame-relay route 605 interface serial 1/1 506
OSPF和NSSA
R1(config)#ipv6 unicast-routing
R1(config)#ipv6 router ospf 1
R1(config-rtr)#router-id 1.1.1.1
R1(config-rtr)#area 1 nssa // NSSA
R1(config-rtr)#exit
R1(config)#interface f0/0
R1(config-if)#ipv6 enable
R1(config-if)#no shutdown
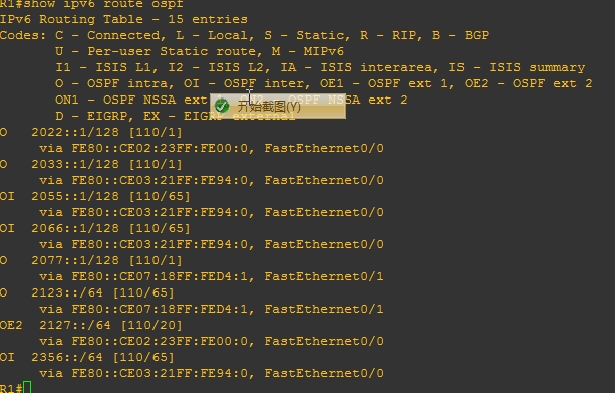
查看R1的route ospf
查看R1的邻居

查看R3的邻居

查看R4帧中继
Ping通测试
R8pingR7
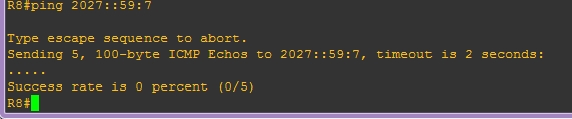
R3pingR5

总结:ipv6的配置配好之后,路由ping不通,查看其它路由的配置时,发现不出有哪里有问题,可能在配置路由汇总时出现问题,但我自己改不了。
四,实验总结:
在配置ipv4时,自己能通过查看网络,老师发送的文档里找到相应的命令,用时虽然有点长,但最后还是能ping通。但到ipv6时,由于自己的能力有限,且时间也不多了,最终没能ping通,希望自己能在课余时间,把问题找出来并解决。通过这次作业,加深了对帧中继的印象,还有ospf的配置,获益不少。