一.实验目的
1. 掌握 OSPFv3 的配置方法
2. 掌握在帧中继环境下 OSPFv3 的配置方法
3. 掌握 OSPFv3 NSSA 的配置方法
4. 学会查看 OSPFv3 数据库
5. 掌握外部路由汇总的配置
6. 掌握区域间路由的汇总配置
7. 掌握虚链路的配置
8. 掌握往 OSPFv3 区域注入一条缺省路由的方法
9. 掌握修改 OSPFv3 网络类型的方法
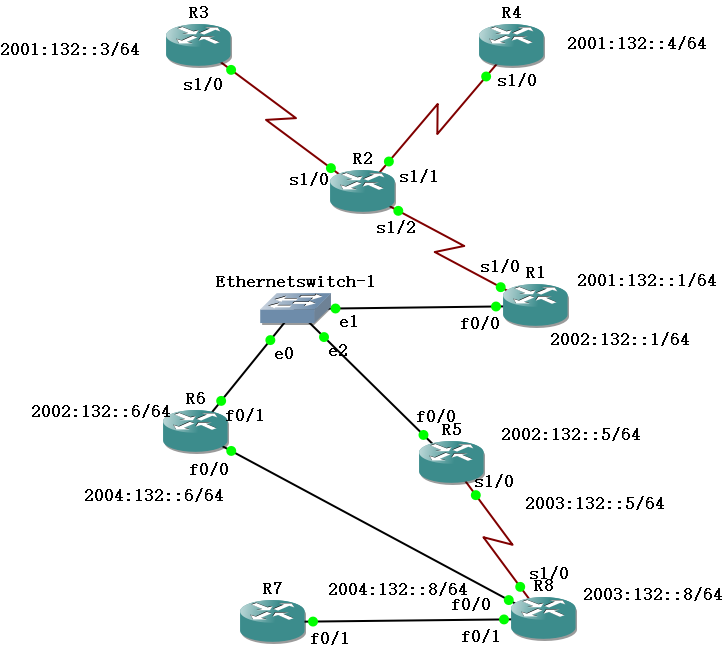
二.实验拓扑图
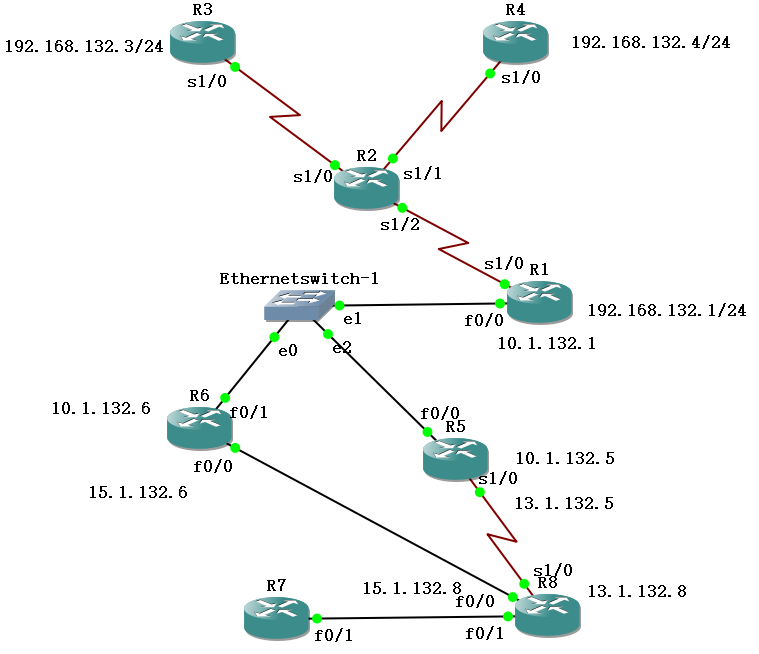
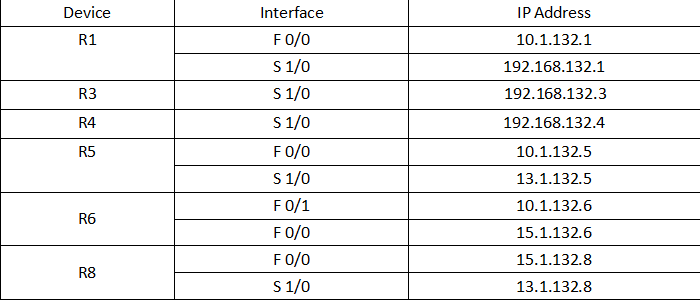
IPv4地址表
1:开启帧中继交换功能
R2(config)#frame-relay switching
2:配置接口封装
R2(config)#int s 1/2
R2(config-if)#no shutdown
R2(config-if)#clock rate 128000
R2(config-if)#encapsulation frame-relay
R2(config)#int s 1/0
R2(config-if)#no shutdown
R2(config-if)#clock rate 128000
R2(config-if)#encapsulation frame-relay
R2(config)#int s 1/1
R2(config-if)#no shutdown
R2(config-if)#clock rate 128000
R2(config-if)#encapsulation frame-relay
3:配置LMI类型
R2(config)#int s 1/2
R2(config-if)#frame-relay lmi-type cisco
R2(config-if)#frame-relay intf-type dce
R2(config)#int s 1/0
R2(config-if)#frame-relay lmi-type cisco
R2(config-if)#frame-relay intf-type dce
R2(config)#int s 1/1
R2(config-if)#frame-relay lmi-type cisco
R2(config-if)#frame-relay intf-type dce
4:配置帧中继交换表
R2(config)#int s 1/2
R2(config-if)#frame-relay route 305 interface s 1/0 503
R2(config-if)#frame-relay route 306 interface s 1/1 603
R2(config)#int Serial 1/0
R2(config-if)#frame-relay route 503 interface Serial1/2 305
R2(config)#int Serial 1/1
R2(config-if)#frame-relay route 603 interface Serial1/2 306
检查帧中继交换机是否正常“show frame-relay route”

5:配置R1、R3、R4,互相ping通
R1(config)#int s 1/0
R1(config-if)#ip address 192.168.132.1 255.255.255.0
R1(config-if)#no shutdown
R1(config-if)#encapsulation frame-relay
R1(config-if)#frame-relay lmi-type cisco
R1(config-if)#no frame-relay inverse-arp
R1(config-if)#frame-relay map ip 192.168.132.3 305 broadcast
R1(config-if)#frame-relay map ip 192.168.132.4 306 broadcast
R3(config)#int s 1/0
R3(config-if)#ip address 192.168.132.3 255.255.255.0
R3(config-if)#no shutdown
R3(config-if)#encapsulation frame-relay
R3(config-if)#no frame-relay inverse-arp
R3(config-if)#frame-relay map ip 192.168.132.1 503 broadcast
R4(config)#int s 1/0
R4(config-if)#ip address 192.168.132.4 255.255.255.0
R4(config-if)#no shutdown
R4(config-if)#encapsulation frame-relay
R4(config-if)#no frame-relay inverse-arp
R4(config-if)#frame-relay map ip 192.168.132.1 603 broadcast
进行ping命令测试
从R1ping到R3
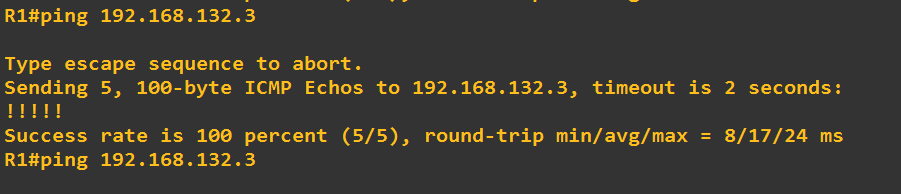
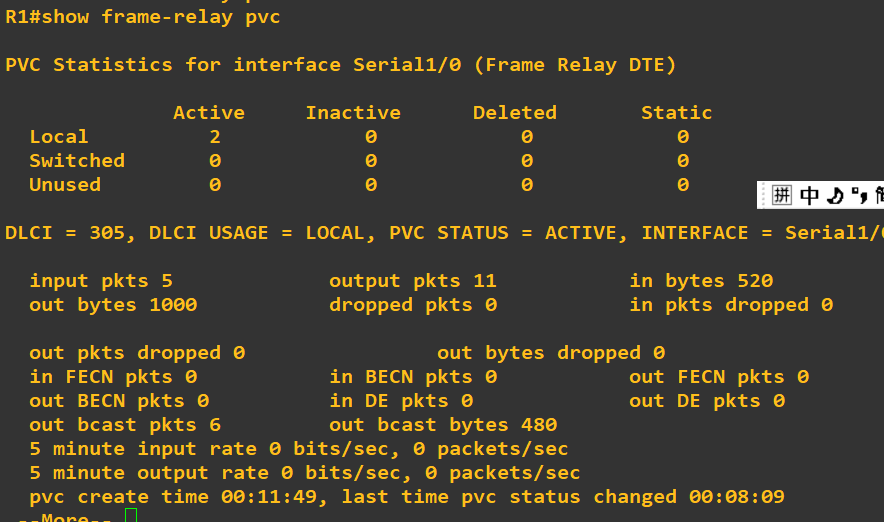
R1#show frame-relay pvc发现已有两条本地连接

6:开始配置ospf (R6、R1为例,R5.R8同理)
先配置外部路由器ospf
R6(config)#router ospf 1
R6(config-router)#router-id 6.6.6.6
R6 (config-router)#area 1 nssa――配置区域 1 为 NSSA 区域
R6(config)#interface loopback 0
R6(config-if)#ip add 6.6.6.6 255.255.255.255
R6(config)#int f 0/0
R6(config-if)#ip add 10.1.132.6 255.255.255.0
R6(config-if)#no shut
R6(config-if)#ip ospf 1 area 0
R6(config-if)#int f 0/1
R6(config-if)#ip add 11.1.132.6 255.255.255.0
R6(config-if)#no shut
R6(config-if)#ip ospf 1 area 1
R6(config)#router ospf 1
R6(config-router)#network 6.6.6.6 0.0.0.0 area 0
R6(config-router)#network 10.1.132.0 0.0.0.255 area 0
R6(config-router)#network 11.1.132.0 0.0.0.255 area 1
R1(config)#router ospf 1
R1(config-router)#router-id 1.1.1.1
R1(config)#interface loopback 0
R1(config-if)#ip add 1.1.1.1 255.255.255.255
R1(config)#int f 0/0
R1(config-if)#ip add 10.1.132.1 255.255.255.0
R1(config-if)#no shut
R1(config-if)#ip ospf 1 area 0
R1(config-if)#int s 1/0
R1(config-if)#ip ospf 1 area 0
R1(config)#router ospf 1
R1(config-router)#network 1.1.1.1 0.0.0.0 area 0
R1(config-router)#network 10.1.132.0 0.0.0.255 area 0
R1(config-router)#network 192.168.132.0 0.0.0.255 area 2
R1(config-router)#neighbor 192.168.132.3
R1(config-router)#neighbor 192.168.132.4
7:配置帧中继中路由器的ospf (R3为例,R4同理)
R3(config)#router ospf 1
R3(config-router)#router-id 3.3.3.3
R3(config-router)#ex
R3(config)#int loopback 0
R3(config-if)#ip add 3.3.3.3 255.255.255.255
R3(config-if)#ip ospf 1 area 2
R3(config-if)#int s 1/0
R3(config-if)# ip ospf 1 area 2
R3(config-if)# ip ospf priority 0
R3(config)#router ospf 1
R3(config-router)#network 3.3.3.3 0.0.0.0 area 2
R3(config-router)#network 192.168.132.0 0.0.0.255 area 2
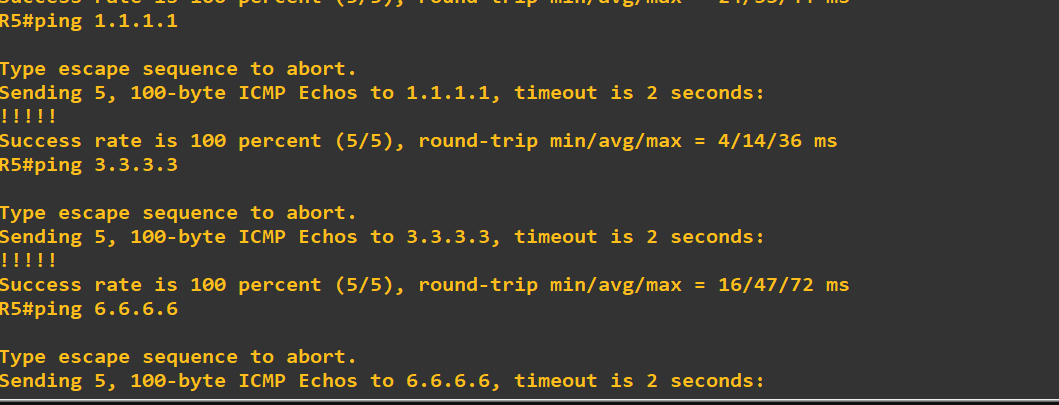
测试路由通断情况
在R5上测试得出结果如下(从内部到外部皆ping通,实验完成)
OSPFV3配置
实验拓扑图
IPv6地址表

帧中继R2配置与ospfv2相同。
1.完成接口 IPv6 地址的配置(包括回环接口loopback 0)
R1(config)#ipv6 unicast-routing ―――全局打开 IPv6 路由功能
R1config)#interface loopback 0
R1(config-if)#ipv6 enable
R1(config-if)#ipv6 address 2011::1/128―――配置 loopback0 接口地址
R1(config-if)#int f 0/0
R1(config-if)#ipv6 enable
R1(config-if)# ipv6 address 2002:132::1/64
R1(config-if)#no shut
R1(config-if)#int s 1/0
R1(config-if)#ipv6 enable
R1(config-if)# encapsulation frame-relay
R1(config-if)#no shut
R1(config-if)#ipv6 address 2001:132::1/64
R1(config-if)#frame-relay map ipv6 2001:132::3 305 broadcast
R1(config-if)#frame-relay map ipv6 2001:132::4 306 broadcast
R1(config-if)#frame-relay map ipv6 2001:132::1 306 broadcast
R1(config-if)#frame-relay map ipv6 FE80::C806:1CFF:FE48:8 306 broadcast
R1(config-if)#frame-relay map ipv6 FE80::C805:1CFF:FE48:8 305 broadcast
R3(config)#ipv6 unicast-routing
R3(config)#interface loopback 0
R3(config-if)#ipv6 address 2033::1/128
R3(config-if)#int s 1/0
R3(config-if)#ipv6 enable
R3(config-if)# encapsulation frame-relay
R3(config-if)#no shutdown
R3(config-if)#ipv6 address 2001:132::3/64
R3(config-if)#frame-relay map ipv6 2001:132::1 503 broadcast
R3(config-if)#frame-relay map ipv6 2001:132::4 503 broadcast
R3(config-if)#frame-relay map ipv6 2001:132::3 503 broadcast
R3(config-if)#frame-relay map ipv6 FE80::C806:1CFF:FE48:8 506 broadcast
R3(config-if)#frame-relay map ipv6 FE80::C803:1CFF:FE48:8 503 broadcast
R4(config)#ipv6 unicast-routing
R4(config)#interface loopback 0
R4(config-if)#ipv6 address 2044::1/128
R4(config-if)#int s 1/0
R4(config-if)#ipv6 enable
R4(config-if)# encapsulation frame-relay
R4(config-if)#no shutdown
R4(config-if)#ipv6 address 2001:132::4/64
R4(config-if)#frame-relay map ipv6 2001:132::1 603 broadcast
R4(config-if)#frame-relay map ipv6 2001:132::4 603 broadcast
R4(config-if)#frame-relay map ipv6 2001:132::3 603 broadcast
R4(config-if)#frame-relay map ipv6 FE80::C805:1CFF:FE48:8 605 broadcast
R4(config-if)#frame-relay map ipv6 FE80::C803:1CFF:FE48:8 603 broadcast
试R1上ping通 R3.

用show frame-relay pvc命令查看,帧中继配置完成
2.完成 OSPFv3 的基本配置。区域 1 为 NSSA 区域。(R6为例,R5,R8同理)
R6(config)#ipv6 unicast-routing
R6(config)#ipv6 router ospf 1
R6(config-rtr)#router-id 6.6.6.6
R6(config-rtr)#area 1 nssa
R6(config-rtr)#int f 0/0
R6(config-if)#ipv6 enable
R6(config-if)# ipv6 ospf 1 area 0
R6(config-if)#no shutdown
R6(config-if)#int loopback 0
R6(config-if)#ipv6 enable
R6(config-if)#ipv6 address 2066::1/128
R6(config-if)# ipv6 ospf 1 area 0
R6(config-if)#int f 0/1
R6(config-if)#ipv6 enable
R6(config-if)# ipv6 ospf 1 area 1
R6(config-if)#no shutdown
R1(config)#ipv6 unicast-routing
R1(config)#ipv6 router ospf 1―――启动 OSPFv3 进程
R1(config-rtr)#router-id 1.1.1.1
R1(config-rtr)#int f 0/0
R1(config-if)#ipv6 enable
R1(config-if)# ipv6 ospf 1 area 0
R1(config-if)#no shutdown
R1(config-if)#int loopback 0
R1(config-if)#ipv6 enable
R1(config-if)#ipv6 address 2011::1/128
R1(config-if)# ipv6 ospf 1 area 0
R1(config-if)#int s 1/0
R1(config-if)#ipv6 enable
R1(config-if)# ipv6 ospf 1 area 2
R1(config-if)#ipv6 ospf neighbor FE80::C805:1CFF:FE48:8
R1(config-if)#ipv6 ospf neighbor FE80::C806:1CFF:FE48:8
R3(config)#ipv6 router ospf 1
R3(config-rtr)#router-id 5.5.5.5
R3(config-rtr)#int loopback 0
R3(config-if)#ipv6 enable
R3(config-if)#ipv6 address 2033::1/128
R3(config-if)# ipv6 ospf 1 area 2
R3(config-if)#int s 1/0
R3(config-if)#ipv6 enable
R3(config-if)# ipv6 ospf 1 area 2
R3(config-if)# ipv6 ospf priority 0
R3(config-subif)# ipv6 address FE80::C805:1CFF:FE48:8 link-local
R4config)#ipv6 router ospf 1
R4config-rtr)#router-id 4.4.4.4
R4config-rtr)#int loopback 0
R4config-if)#ipv6 enable
R4(config-if)#ipv6 address 2044::1/128
R4(config-if)# ipv6 ospf 1 area 2
R4(config-if)#int s 1/0
R4(config-if)#ipv6 enable
R4(config-if)# ipv6 ospf 1 area 2
R4(config-if)# ipv6 ospf priority 0
R4(config-if)# ipv6 address FE80::C806:1CFF:FE48:8 link-local
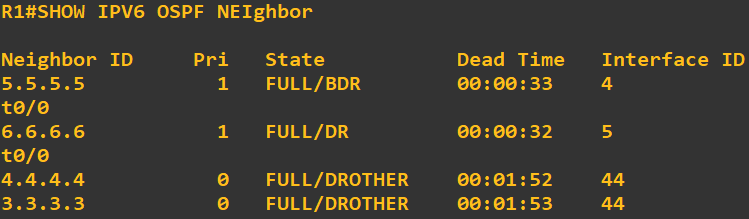
3.检查 OSPFv3 的邻居关系
在 R31上检查,可以看到邻居的 Router-ID 都是用 IPv4 的地址格式标识
R1#show ipv6 ospf neighbor
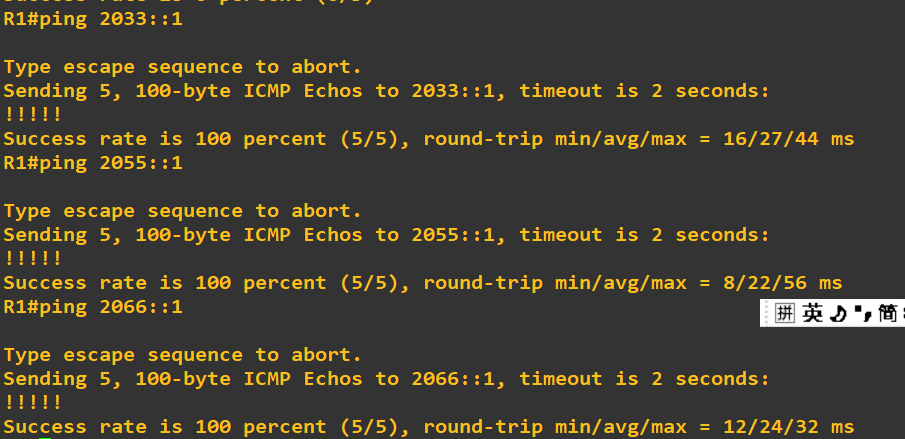
4.测试路由通断情况在R3测试。Ospfv3配置成功。
配置R7到R8 RIPng部分并且重分布到ospfv3
R7(config)#ipv6 unicast-routing
R7(config)#ipv6 router rip 1
R7(config)#int f1/0
R7(config-if)#ipv6 enable
R7(config-if)#ipv6 address 2005:132::7/64
R7(config-if)#ipv6 rip 1 enable
R7(config-if)#no shutdown
R8:
R8(config)#ipv6 router rip 1
R8(config)#int fastEthernet 0/1
R8(config-if)#ipv6 enable
R8(config-if)#ipv6 address 2005:132::8/64
R8(config-if)#ipv6 rip 1 enable
R8(config-if)#no shutdown
R8(config-if)#exit
R8(config)#ipv6 router ospf 1
R8(config-rtr)#redistribute rip 1
R8(config-rtr)#redistribute connected
R8(config-rtr)#exit
R8(config)#ipv6 router rip 1
R8(config-rtr)#redistribute ospf 1
R8(config-rtr)#redistribute connected
进行ping测试area1区域内R6路由器。

实验总结:通过本次实验,我学习到了两个版本的ospf与其所相关的知识点,了解到了ospf与ospfv3原理上的差别,ospfv3比ospf配置更加便捷,其通过路由器的链路本地地址建立邻居,所以配置中开启了帧中继的部分要设置关于
链路本地地址的静态dicl映射,还要是该部分的区域间路由作为DR,否则邻居即使建立成功也无法多路发送”hello”包。在操作实验过程中,其实有遇到很多问题,也有请教会的同学,经过同学的讲解,和自己一步一步的去摸索,其实
主要还是在于它的原理,弄懂原理后就能明白很多。此次实验,让我通过实践充分理解理论知识,并达到学以致用。