1.rxjs
1.1.安装和引入
1.1.1.安装
npm install rxjs
1.1.2.引入
//5.1.0版本的引入
import {

     Observable } from "rxjs/Observable";

//6.4.0版本之后的引入
import {

     Observable , of} from 'rxjs';
import {

    catchError, map, timeout} from 'rxjs/operators';
1.2.Observable的使用
用来封装返回的数据,是http返回的类型
saveFormPostHttp(sq: string
                   ): Observable<{

    }> {

                 // <>中可以时具体的类,而{}是指的是返回的时json格式
}
1.2.map/timeout/catch的使用
1.3.1.版本6.4.0
this.http.post(url, params, options).pipe(
      map(this.handleData),
      timeout(15000),    //number
      catchError((error) => this.hanldeSomeError(error))  //handleSomeError为自定义的方法
    );

private handleData(res: Response) {


    if (res['_body'] === '' || res['_body'] == null) {

     return null; }
    const body = res.json();
    return body || {

    };
  }

private hanldeSomeError(err: any) {


    console.log(error);
    if (error.error instanceof ErrorEvent) {


      console.log(' error occurred:', error.error.message);
    } else {


      console.log(`${

      error.status}-${

      error.statusText}`);
    }
    return Observable.throw('Error!');
    // 或者使用 return throwError(new Error('Server Error!'));
  }
1.3.2.版本5.1.0
getXXX(url:string): Observable<{

    }> {


    url = this.host + url;
    return this.http.get(url)
      .map(this.handleData)
      .timeout(15000)
      .catch(this.hanldeSomeError);    //handleSomeError为自定义的方法
  }
2.路由
2.1.路由传递参数
情景说明:父页面通过路由向子页面跳转时,需要传递部分参数时,需要使用路由进行参数的传递。
2.1.1.通过queryParams传递
父页面TS
import {

    Router} from '@angular/router';

export class fuComponent implements OnInit {


	testActivatedRoute = 'test';
	constructor(
	    private router: Router
	  ) {

     }

	jumpMenufunction(){


		this.router.navigate(['/menu-right'], {

    queryParams: {

     testActivatedRoute: this.testActivatedRoute } });
	}
}
子页面TS
import {

    ActivatedRoute} from '@angular/router';

export class ziComponent implements OnInit {


	constructor(
	    private aRoute: ActivatedRoute
	  ) {

     }

	ngOnInit() {


	    this.aRoute.queryParams.subscribe(params => {


	      console.log(params['testActivatedRoute']);
	    });
	  }
}
跳转后页面路径:
http://localhost:4200/menu-right?testActivatedRoute=test
2.1.2.通过params传递
路由的配置:使用冒号
{


    path: 'menu-right/:testActivatedRoute',
    component: MenuRightComponent
}
父页面
import {

    Router} from '@angular/router';

export class fuComponent implements OnInit {


	testActivatedRoute = 'test';
	constructor(
	    private router: Router
	  ) {

     }

	jumpMenufunction(){


		this.router.navigate(['/menu-right', this.testActivatedRoute]);
	}
}
子页面
import {

    ActivatedRoute} from '@angular/router';

export class ziComponent implements OnInit {


	constructor(
	    private aRoute: ActivatedRoute
	  ) {

     }

	ngOnInit() {


	    this.aRoute.params.subscribe(params => {


	      console.log(params['testActivatedRoute']);
	    });
	  }
}
跳转后路径:
http://localhost:4200/menu-right/test
2.2.子路由
前提:必须先创建带有子路由的模块,再创建组件
2.2.1.生成模块
生成一个带有子路由的模块的命令
ng g m app-child --routing
说明:g—>generate;m------>module;–routing(带有路由)
生成的结构如下:
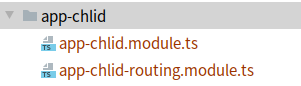
这个时候,在app-child-routing.module.ts中会出现如下代码:
@NgModule({


  imports: [RouterModule.forChild(childRoutes)],
  exports: [RouterModule]
})
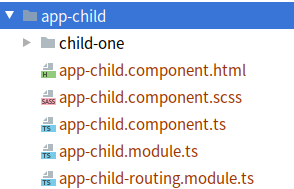
2.2.2.生成组件
ng g c app-chlid --no-spec
结构如下:
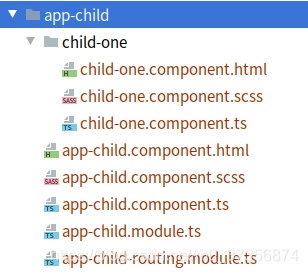
2.2.3.生成子组件
在该模块下生成一个组件
ng g c child-one --no-spec
说明:g------>generate;c------>component
生成的结构如下:
2.2.4.子路由的使用
2.2.4.1.子路由添加路径
在子路由的app-child-routing.module.ts中添加路径
const childRoutes: Routes = [
  {

     path: 'child',
    component: AppChildComponent,
    children: [
      {

     path: 'one',
        component: ChildOneComponent
      }
    ]
  }
];
2.2.4.2.子路由的html中添加路由标签
在app-child.component.html中添加
<router-outlet></router-outlet>
说明:该路由控制 3.2.4.1中children下路径的显示;
2.2.4.3.主路由添加子路由
在主路由模块app-routing.module.ts中添加app-child.module.ts模块
说明:添加的是app-child.module.ts,而不是app-child-routing.module.ts,不然会出现:Component AppChlidComponent is not part of any NgModule or the module has no 错误
import {

    AppChildModule} from './app-child/app-child.module';
@NgModule({


  imports: [
    RouterModule.forRoot(routes),
    AppChildModule    //添加模块
  ],
  exports: [RouterModule]
})
2.2.4.4.结果显示
输入http://localhost:4200/child

输入http://localhost:4200/child/one
