在项目开发中,尽管 springboot 提供了很多 starter,可以实现很多功能,不过也是不可能应付所有需求的。但是,根据我们自己的业务,我们可以自定义 starter 来实现项目中复用度高的业务,让别的模块能很方便的引入使用。
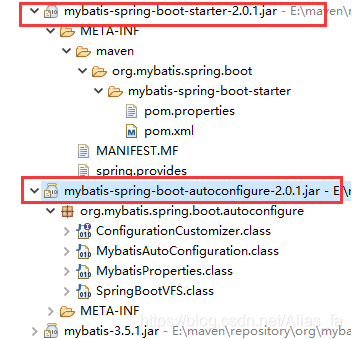
仿照 mybatis 的 starter,命名采用 xxx-spring-boot-starter,根据 jar 包的目录结构可以看到,starter 里面其实没有内容,里面主要是一个依赖传递,起了依赖保护的作用;autoconfigure 里面才是干货,是真正实现功能的地方。
因此,我们自定义 starter 时,首先创建一个 xxx-autoconfigure 的 maven 工程,在这个工程实现功能,再是创建一个 xxx-starter 的 maven 工程,引入 xxx-autoconfigure 依赖,其他就不需要了。在使用 starter 时,只要引入 xxx-starter 依赖即可使用自定义的 starter 功能了。
创建 xxx-autoconfigure 工程
引入相关依赖 pom.xml
<project xmlns="http://maven.apache.org/POM/4.0.0" xmlns:xsi="http://www.w3.org/2001/XMLSchema-instance" xsi:schemaLocation="http://maven.apache.org/POM/4.0.0 http://maven.apache.org/xsd/maven-4.0.0.xsd">
  <modelVersion>4.0.0</modelVersion>
  <groupId>com.xiao.starter</groupId>
  <artifactId>luckynum-spring-boot-starter-autoconfigure</artifactId>
  <version>0.0.1-SNAPSHOT</version>

  <parent>
  	<groupId>org.springframework.boot</groupId>
  	<artifactId>spring-boot-starter-parent</artifactId>
  	<version>2.1.4.RELEASE</version>
  </parent>

  <dependencies>
    <!-- 所有 starter 的基本配置 -->
  	<dependency>
  	  <groupId>org.springframework.boot</groupId>
  	  <artifactId>spring-boot-starter</artifactId>
  	</dependency>
  </dependencies>

</project>
写一个配置类
获取配置文件中以 xiao.luckynum 开头的配置,绑定到该类的对应属性中。即该类属性可通过配置文件更改
@ConfigurationProperties(prefix="xiao.luckynum")
public class LuckyNumProperties {


	private Integer range;

	public Integer getRange() {


		return range;
	}

	public void setRange(Integer range) {


		this.range = range;
	}

}
service 类,写自定义 starter 的实现功能,里面写的方法供使用时调用
获取到配置文件的属性值,作为业务逻辑的参数实现相关功能
public class LuckyNumberService {


	LuckyNumProperties luckyNumPro;

	public LuckyNumProperties getLuckyNumPro() {


		return luckyNumPro;
	}
	public void setLuckyNumPro(LuckyNumProperties luckyNumPro) {


		this.luckyNumPro = luckyNumPro;
	}

	public String getLuckyNum(String name) {


		Random random = new Random();
		return name+",你的幸运数字为 " + random.nextInt(luckyNumPro.getRange());
	}
}
自动配置类,使配置生效,并且把服务注入到容器中
@Configuration
@ConditionalOnWebApplication // web应用生效
@EnableConfigurationProperties(LuckyNumProperties.class) // 使属性文件类生效
public class LuckyNumAutoConfiguration {


	@Autowired
	LuckyNumProperties luckyNumPro;

	@Bean
	public LuckyNumberService luckyNumberService() {


		LuckyNumberService luckyNumberService = new LuckyNumberService();
		luckyNumberService.setLuckyNumPro(luckyNumPro);
		return luckyNumberService;
	}
}
创建 spring.factories ,把我们自定义的 starter 自动配置加入的 spring 工厂
在 src/java/resources 目录下新建 META-INF 文件夹,创建 spring.factories 文件,内容如下:把自己的自动配置类路径加入
org.springframework.boot.autoconfigure.EnableAutoConfiguration=com.xiao.starter.LuckyNumAutoConfiguration
以上,自定义 starter 就写完了
创建 xxx-starter 工程
在这个工程,只要引入 xxx-autoconfigure 依赖就行,没有内容
<project xmlns="http://maven.apache.org/POM/4.0.0" xmlns:xsi="http://www.w3.org/2001/XMLSchema-instance" xsi:schemaLocation="http://maven.apache.org/POM/4.0.0 http://maven.apache.org/xsd/maven-4.0.0.xsd">
  <modelVersion>4.0.0</modelVersion>
  <groupId>com.xiao.starter</groupId>
  <artifactId>luckynum-spring-boot-starter</artifactId>
  <version>0.0.1-SNAPSHOT</version>

  <!-- starter -->
  <dependencies>
    <!-- 引入 atuoconfiger -->
  	<dependency>
  	  <groupId>com.xiao.starter</groupId>
	  <artifactId>luckynum-spring-boot-starter-autoconfigure</artifactId>
	  <version>0.0.1-SNAPSHOT</version>
  	</dependency>
  </dependencies>
</project>
使用自定义 xxx-starter
在使用自定义 starter 之前,先要把 xxx-autoconfigure 和 xxx-starter 打成 jar 包
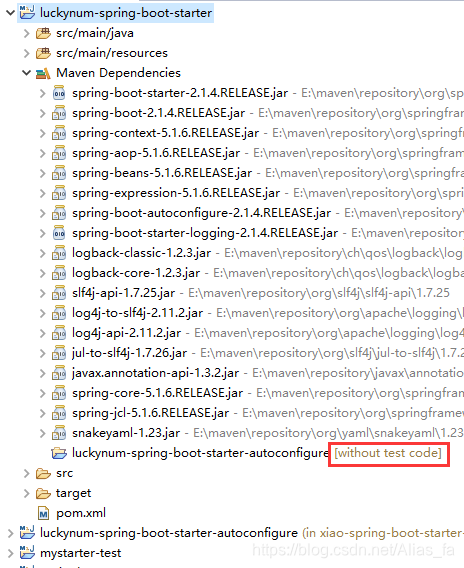
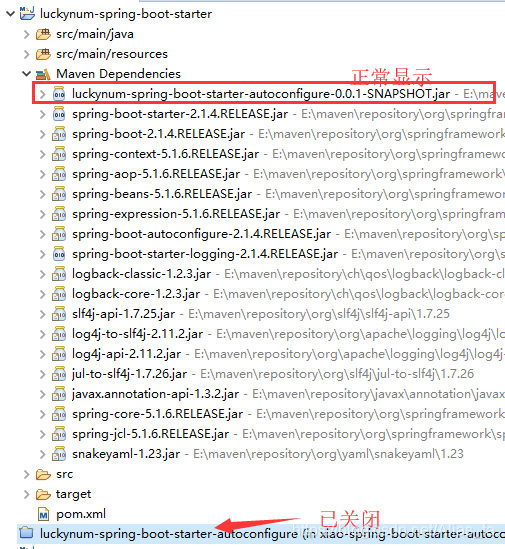
在 eclipse 中,右键项目 Run As > Maven install 即可。这时你可能会发现,在项目的maven依赖目录下,被引入的 xxx-autoconfigure 显示 without test code。当然,在测试工程引入的 xxx-starter 也是一样。
解决办法:很简单,把被引入的工程关闭。项目右键 Close Project 即可
测试
创建一个测试工程
引入自定义的 starter,同时引入 web 模块,因为自定义 starter 是在 web 应用才生效
<project xmlns="http://maven.apache.org/POM/4.0.0" xmlns:xsi="http://www.w3.org/2001/XMLSchema-instance" xsi:schemaLocation="http://maven.apache.org/POM/4.0.0 http://maven.apache.org/xsd/maven-4.0.0.xsd">
  <modelVersion>4.0.0</modelVersion>
  <groupId>com.xiao</groupId>
  <artifactId>mystarter-test</artifactId>
  <version>0.0.1-SNAPSHOT</version>

  <parent>
  	<groupId>org.springframework.boot</groupId>
  	<artifactId>spring-boot-starter-parent</artifactId>
  	<version>2.1.4.RELEASE</version>
  </parent>

  <dependencies>
  	<dependency>
  		<groupId>org.springframework.boot</groupId>
  		<artifactId>spring-boot-starter-web</artifactId>
  	</dependency>
    <!-- 引入自定义starter -->
  	<dependency>
  	  <groupId>com.xiao.starter</groupId>
	  <artifactId>luckynum-spring-boot-starter</artifactId>
	  <version>0.0.1-SNAPSHOT</version>
  	</dependency>
  </dependencies>
</project>
配置自定义 starter 中可用的属性
xiao.luckynum.range=10
在 controller 中调用自定义 starter 中的方法
@RestController
public class LuckyNumController {


	@Autowired
	LuckyNumberService numService;

	@GetMapping("/getLuckyNum/{name}")
	public String getLuckyNum(@PathVariable("name") String name) {


		return numService.getLuckyNum(name);
	}
}
启动项目,输入 getLuckyNum 请求。
注意,我的自定义的 starter 的业务中并不是直接显示属性值,我取的是这个范围内的某个随机数,可多执行几次看看随机数出现的范围。
