初学Vue
脚手架Vue-cli
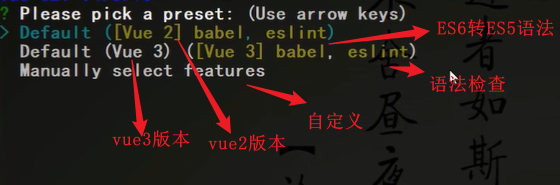
1、定义
Vue脚手架时Vue官方提供的标准化开发工具(开发平台),CLI全名Command Line Interface,命令行接口工具。
2、使用
第一步:全局安装脚手架,该步骤电脑只需执行一次:
npm install -g @vue/cli
第二步:切换到要创建项目的目录下,使用命令创建项目:
vue create xxx项目名
第三步:启动项目,在项目所在目录下执行如下命令:
npm run serve
补充:
配置淘宝镜像加速下载:npm config set registry https://registry.npm.taobao.org
Vue脚手架隐藏了所有webpack相关的配置,想查看具体的webpack配置可以执行vue inspect > output.js
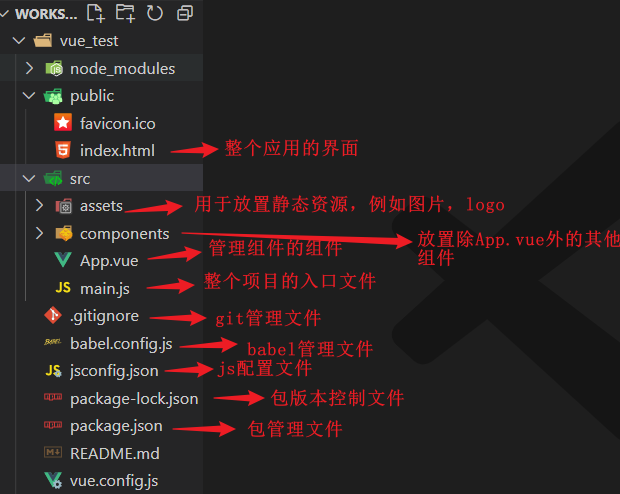
3、脚手架目录结构
main.js入口文件内容及介绍
// 导入vue
import Vue from 'vue'
// 导入App组件,它是所有组件的父组件
import App from './App.vue'

// 关闭vue的生产提示
Vue.config.productionTip = false

// 创建Vue实例对象vm
new Vue({


	// 下面一行代码的作用是:将App组件放入到容器中
  render: h => h(App),
}).$mount('#app')

// $mount('#app')相当于el:"#app"
index.js文件内容及介绍
<!DOCTYPE html>
<html lang="">
  <head>
    <meta charset="utf-8">
    <!-- 针对IE浏览器的一个特殊配置,含义是让IE浏览器以最高的渲染级别渲染页面-->
    <meta http-equiv="X-UA-Compatible" content="IE=edge">
    <!--开启移动端的理想视图-->
    <meta name="viewport" content="width=device-width,initial-scale=1.0">
    <!--配置页面图标,其中<%= BASE_URL %>代表了public目录,方便引入其下的内容-->
    <link rel="icon" href="<%= BASE_URL %>favicon.ico">
    <!--配置网页标题,会自动到package.json中找到名字作为网站的标题-->
    <title><%= htmlWebpackPlugin.options.title %></title>
  </head>
  <body>
    <!--如果浏览器不支持js,那么就会显示下面的呢内容-->
    <noscript>
      <strong>We're sorry but <%= htmlWebpackPlugin.options.title %> doesn't work properly without JavaScript enabled. Please enable it to continue.</strong>
    </noscript>
    <div id="app"></div>
    <!-- built files will be auto injected -->
    <!--脚手架已经自动引入main.js文件,所以不用再手动引入-->
  </body>
</html>
4、render函数介绍
- 1、不同大小的vue.js文件介绍
在node-modules目录下找到vue文件夹,打开dist目录,可以看到其下有诸多vue相关的js文件,如下:

(1)最完整的vue.js主要由vue核心代码和模板解析器组成,其中模板解析器用于解析模板,解析器大小占了vue.js大小的1/3。
(2)此外包含runtime的是运行时vue文件,只包含vue中的核心代码,去除了模板解析器,也就是说导入这类文件并不会解析模板,但大大减小了vue文件的体积。
(3)vue.esm.js中的esm是ES语法模板的意思
- 2、当使用脚手架创建项目,但不使用render函数时,项目中默认使用的是运行时vue,也就是vue.runtime.js,而运行时vue没有模板解析器,所以需要使用render函数接收到的createElement函数u指定具体内容。
假设main.js文件内容如下,使用普通方式来指定模板
// 通过脚手架默认引入的是运行时vue,无模板解析器
import Vue from 'vue'
import App from './App.vue'

Vue.config.productionTip = false

// 创建一个vue实例(未使用render函数时)
new Vue({


  el:"#app",
  template:`
    <App></App>
  `,
  // 注册组件
  components:{

    App}
})
用运行时vue并且没有使用render函数时则会报如下错误

You are using the runtime-only build of Vue where the template compiler is not available.
这句警告的大致意思是你使用的是运行时vue,没有模板解析。同时它也会提供解决思路:
Either pre-compile the templates into render functions, or use the compiler-included build.,第一种方法就是引入完整版vue.js,第二种方式就是使用render函数,说明render函数提供了模板解析器。
3、render的使用(普通函数形式+箭头函数简写)
- 普通函数形式
// 通过脚手架默认引入的是运行时vue,无模板解析器
import Vue from 'vue'
// 引入App组件
import App from './App.vue'

Vue.config.productionTip = false

// 创建一个vue实例,使用render函数
new Vue({


  el:"#app",
  render(createElement){

     // 传递的参数是createElement函数,用于创建元素
    // 创建h1元素并添加内容,最后返回创建的元素
    return createElement("h1","你好呀")
  }
})
- 箭头函数形式
import Vue from 'vue'
// 通过脚手架默认引入的是运行时vue,无模板解析器
import App from './App.vue'

Vue.config.productionTip = false

// 创建一个vue实例
new Vue({


  el:"#app",
  // 这里还可以传入一个App组件
  render:h=>h(App)
})

// 上面等同于下面这串代码
// new Vue({


//	 render:h => h(App),
// }).$mount('#app')
5、_ref属性
1、被用来给元素或者子组件注册引用信息(可以看成id的替代者)
2、应用在html标签上获取的是真实的DOM元素,应用再组件标签上获取的是组件实例对象vc
3、使用:
(1)标签上打表识:html标签< h1 ref=“xxx” > 或者 组件< School ref=“xxx”> < /School>
(2)通过this.$refs.xxx获取元素
示例:
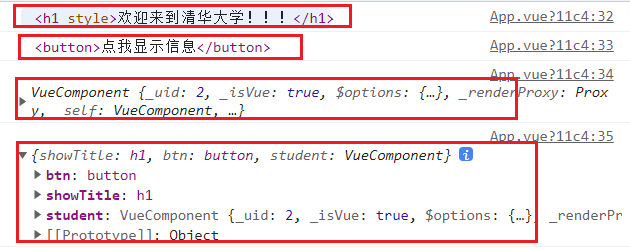
下面是App.vue组件
<template>
  <div>
      <h1 v-show="msg" ref="showTitle">欢迎来到清华大学!!!</h1>
      <button @click="showMsg" ref="btn">点我显示信息</button>
      <Student ref="student"></Student>
  </div>
</template>

<script>
import Student from "./components/Student"

export default {


    name:"App",
    components:{

      Student},
    data(){


      return{


        msg:false
      }
    },
    methods:{


      showMsg(){


        this.msg = true // 显示h1标签中的内容

        console.log(this.$refs.showTitle) //<h1>欢迎来到清华大学!!!</h1>
        console.log(this.$refs.btn); // <button>点我显示信息</button>
        console.log(this.$refs.student); // VueComponent实例对象,如果用的是id,则会返回组件模板的结构

        console.log(this.$refs) // 整个refs中的对象
      }
    }
}
</script>
6、props配置项
作用:让组件接收外部传过来的数据,可以做到让组件复用,但接收的值可以不同。
(1)传递数据
例如:
< Demo name="xxx"/>
(2)接收数据
第一种方式(只接收):
// 这是一个数组类型
prop:['name']
第二种方式(限制类型):
props:{
name:Number
}
第三种方式(限制类型、限制必要性、指定默认值):
props:{
	name:{
		type:String, // 指定类型
		required:true, // 必要性
		default:'老王' // 默认值
		}
}
props是只读的,vue底层会监视对props的修改,如果进行了修改就会发出警告,如果确实由需要进行修改,那么可以赋值props的内容到data中,然后去修改data中的数据。
使用
第一种方式:只接收
App.vue组件
<template>
<div>
<!-- 将外部的数据传递到props配置中 -->
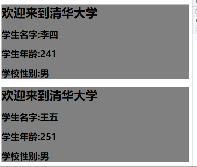
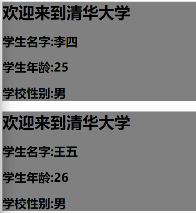
<Student name="李四" age="24" sex="男"></Student>
<Student name="王五" age="25" sex="男"></Student>
</div>
</template>
<script>
import Student from "./components/Student"
export default {
name:"App",
components:{
Student},
}
</script>
Student.vue组件
<template>
  <div class="student">
      <h1>{

   {msg}}</h1>
      <h2>学生名字:{

   {name}}</h2>
      <h2>学生年龄:{

   {age}}</h2>
      <h2>学生性别:{

   {sex}}</h2>
  </div>
</template>

<script>
export default {


    data() {


        return {


            msg:"欢迎来到清华大学",
        }
    },
    // 接收传进来的值,传递给模板
    props:['name','age','sex']
}
</script>

<style>
    .student{


        background-color: grey;
    }
</style>

如果要求接收到age的值之后再对其结果加1,那么可以怎么做?
(1)只在模板中age+1,则得到的不是我们想要的结果,如下:
因为此时age中的类型是字符串类型,age+1就相当于字符串拼接。
(2)接下里可以在age前面再使用v-bind进行绑定,这样age中的就是个表达式,可以进行计算,如下:<div> <!-- 将外部的数据传递到props配置中 --> <Student name="李四" :age="24" sex="男"></Student> <Student name="王五" :age="25" sex="男"></Student> </div>
注意点:
(1)< Student name="李四" :age="24" sex="男">< /Student>中xxx="xxx"是固定形式,等号右边必须加引号
(2)如果data中有和props同名的属性,那么优先取props中的值。
第二种方式:限制接收的类型,如果不是需要的类型则会发出警告。
App.vue组件
<template>
  <div>
      <!-- 将外部的数据传递到props配置中 -->
      <Student name="李四" age="24" sex="男"></Student>
  </div>
</template>

<script>
import Student from "./components/Student"

export default {


    name:"App",
    components:{

      Student},
}
</script>
Student.vue组件
<template>
  <div class="student">
      <h1>{

   {msg}}</h1>
      <h2>学生名字:{

   {name}}</h2>
      <h2>学生年龄:{

   {age}}</h2>
      <h2>学生性别:{

   {sex}}</h2>
  </div>
</template>

<script>
export default {


	name:"Student",
    data() {


        return {


            msg:"欢迎来到清华大学",
        }
    },
    // 接收并限制类型
    props:{


        name:String, // 限制接收类型为字符串类型
        age:Number, // 限制接收类型为Number类型
        sex:String // 限制接收类型为字符串类型
    }
}
</script>

<style>
    .student{


        background-color: grey;
    }
</style>
当传入的数据类型没满足要求时,但会爆出如下警告,age需要的是Number类型,但接收到的是String类型:
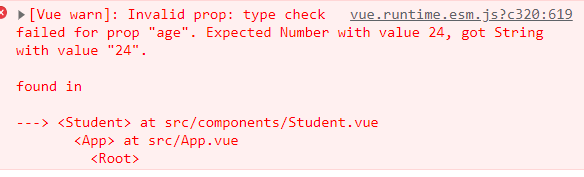
可以用来提醒你用到的数据的数据类型有误,需要修改数据类型。这里的解决方式就是在age前面绑定v-bind,<Student name="李四" :age="24" sex="男"></Student>,转换为表达式
第三种方式:限制接收的类型+必须性+默认值
App.vue组件
<template>
  <div>
      <!-- 将外部的数据传递到props配置中 -->
      <Student name="李四" :age="24" sex="男"></Student>
  </div>
</template>

<script>
import Student from "./components/Student"

export default {


    name:"App",
    components:{

      Student},
}
</script>
Student.vue组件
<template>
  <div class="student">
      <h1>{

   {msg}}</h1>
      <h2>学生名字:{

   {name}}</h2>
      <h2>学生年龄:{

   {age}}</h2>
      <h2>学生性别:{

   {sex}}</h2>
  </div>
</template>

<script>
export default {


	name:"Student",
    data() {


        return {


            msg:"欢迎来到清华大学",
        }
    },
    // 接收并限制类型+必须性+默认值
    props:{


        name:{


            type:String, // name类型必须是字符串类型
            required:true, // 名字是必要的
        },
        age:{


            type:Number, // age类型必须是Number类型
            default:30, // 不传age则给定一个默认值
        },
        sex:{


            type:String, // sex
            required:true, // 性别是必要的
        },
    }
}
</script>

<style>
    .student{


        background-color: grey;
    }
</style>
7、mixins配置–混入
功能:
可以把多个组件公用的配置提取成一个混入对象(js文件)
使用方式:
第一步:定义混合
{
	data(){...},
	methods:{...},
	...
}
第二步:使用混入
(1)全局混入,在main.js中使用Vue.mixin(xxx)
(2)局部混入,在拥有相同配置的组件中添加mixins配置项,例如:mixins:[‘xxx’](这是一个数组)
例如:有两个组件Student.vue和School.vue,其中有部分配置项的内容相同,将其使用混入的方式放到一个js文件中,各自添加要给配置项mixins。
mixin.js定义混入
// 注意暴露该文件
export const hunru = {


    methods:{


        showName(){


            alert(this.name)
        }
    }
},
// 还可以定义多个混入对象
export const hunru2 = {

    ...}
App.vue组件
<template>
  <div>
      <Student></Student>
      <School></School>
  </div>
</template>

<script>
import Student from "./components/Student"
import School from "./components/School"

export default {


    name:"App",
    components:{

      Student,School},
}
</script>
Student.vue组件
<template>
  <div class="student">
      <h1>{

   {msg}}</h1>
      <h2 @click="showName">学生名字:{

   {name}}</h2>
      <h2>学生年龄:{

   {age}}</h2>
  </div>
</template>

<script>
// 引入mixin.js中的hunru对象,{}中可以有多个对象
import {

      hunru} from "../mixin"

export default {


    data() {


        return {


            msg:"欢迎来到清华大学",
            name:"小明",
            age:"21",
            sex:"男"
        }
    },
    // 使用混入的配置项mixins
    mixins:[hunru],
}
</script>

<style>
    .student{


        background-color: grey;
    }
</style>
School.vue组件
<template>
  <div>
      <h1>{

   {msg}}</h1>
      <h2 @click="showName">学校名字:{

   {name}}</h2>
      <h2>学校地址:{

   {address}}</h2>
  </div>
</template>

<script>
// 引入mixin.js中的hunru对象
import {

      hunru} from "../mixin"
export default {


    data() {


        return {


            msg:"欢迎来到清华大学",
            name:"清华大学",
            address:"北京"
        }
    },
    mixins:[hunru],
}
</script>