目录
2.1.2 @GetMapping 和 @PostMapping
2.2.4 后端参数重命名@RequestParam(后端参数映射)
2.3.1 返回静态页面 (不加@ResponseBody 注解)
2.3.5 forward 和 redirect 的具体区别
1. 什么是Spring MVC
1.1 MVC 定义
MVC 是 Model View Controller 的缩写,它是软件⼯程中的⼀种软件架构模式,它把软件系统分
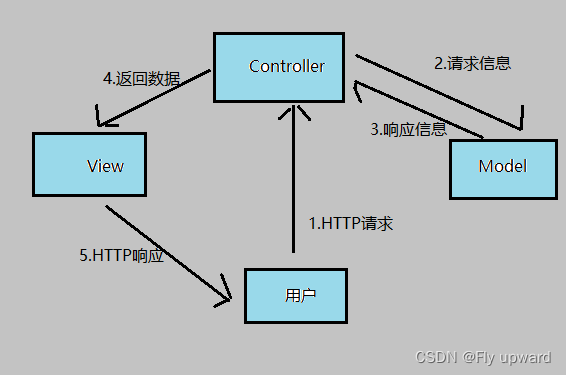
1)Model (模型)是应用程序中用于处理应用程序数据逻辑的部分通常模型对象负责在数据库中 存取数据。
2)View(视图)是应⽤程序中处理数据显示的部分。通常视图是依据模型数据创建的。
3)Controller(控制器)是应⽤程序中处理⽤户交互的部分。通常控制器负责从视图读取数据,
1.2 MVC 和 Spring MVC 的关系
2. Spring MVC 需要掌握的功能
1.连接功能:实现用户和程序的映射(在浏览器输入 URL 地址之后,能够在程序中匹配到相应的方法)。
2.获取参数的功能:服务器要得到用户的请求参数。
3. 输出数据功能:服务器端将结果返回给用户(前端)。
2.1 Spring MVC 创建和连接
@Controller //让spring启动时,加载
@ResponseBody //返回一个非静态页面的数据,text/HTML等。不加的话会返回默认静态页面
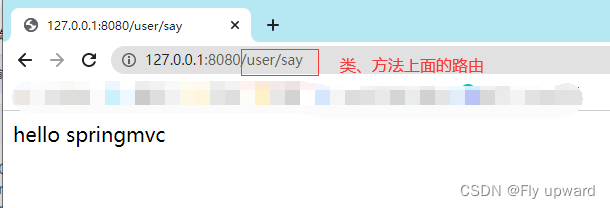
@RequestMapping("/user") //路由
public class UserController {
@RequestMapping("/say") //路由
public String say() {
return "hello springmvc";
}
}
连接成功并获取
2.1.1 @RequestMapping 注解
路由映射:所谓的路由映射指的是,当⽤户访问⼀个 url 时,将⽤户的请求对应到程序中某个类的某个⽅法的过程就叫路由映射
@RequestMapping 基础使用:
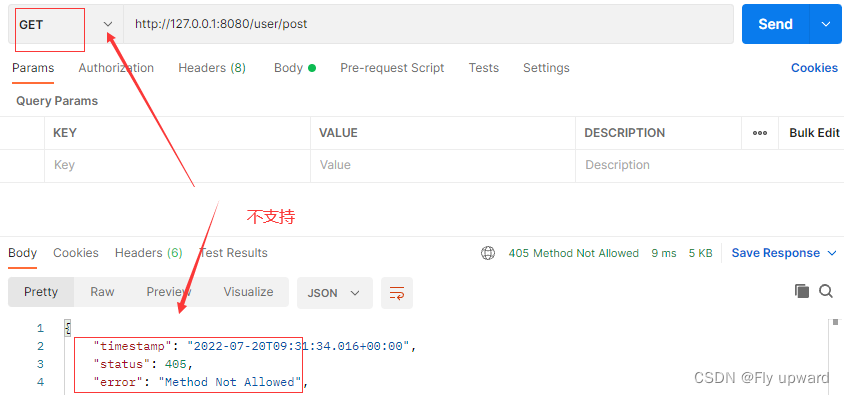
即可修饰类,也可以修饰⽅法即支持GET 请求,也指出POST 请求,但默认情况下是GET 请求
我们可以显示的指定 @RequestMapping 来接收 POST 的情况,如下所示
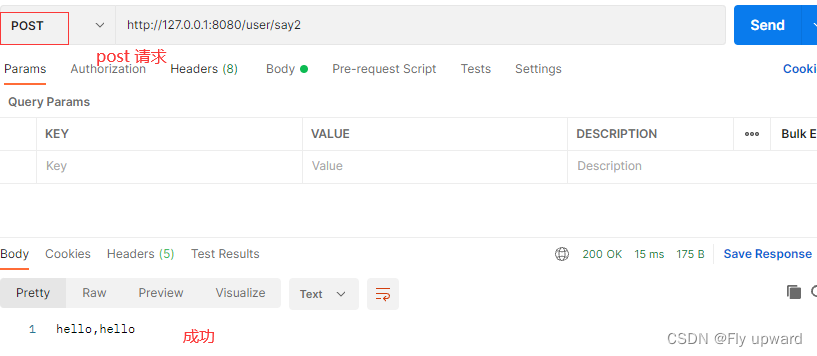
    @RequestMapping(method = RequestMethod.POST,value = "say2")
    public String say2() {
        return "hello,hello";
    }
通过 postman 来验证
post请求
get请求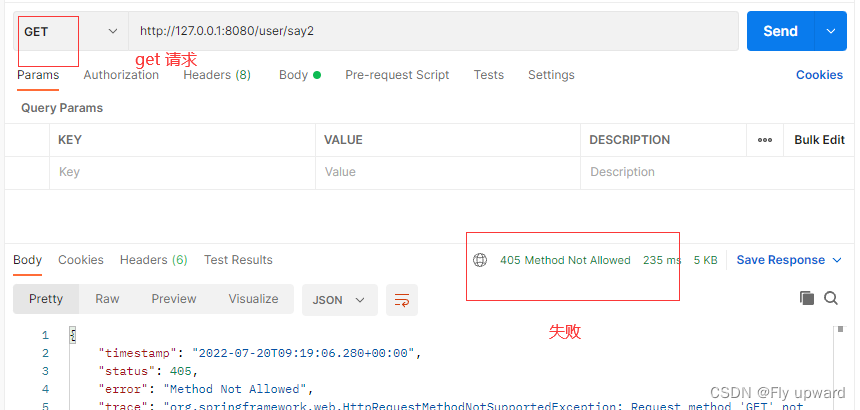
从上面可以指定,当通过 meth 指定请求方式之后,是不能用另一种方式来访问的
2.1.2 @GetMapping 和 @PostMapping
1)get请求,有三种写法
// 写法1
@RequestMapping("/index")
// 写法2
@RequestMapping(method = RequestMethod.GET,value = "/index",)
// 写法3
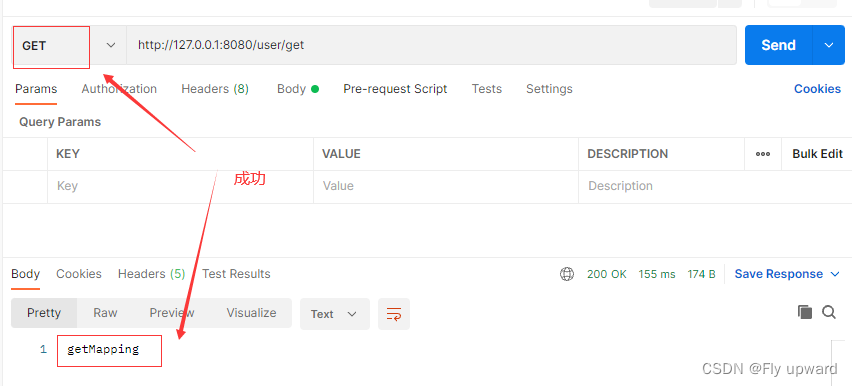
@GetMapping("/index")@GetMapping
    @GetMapping("/get")
    public String say3() {
        return "getMapping";
    }
在使用get请求时
在使用post请求时

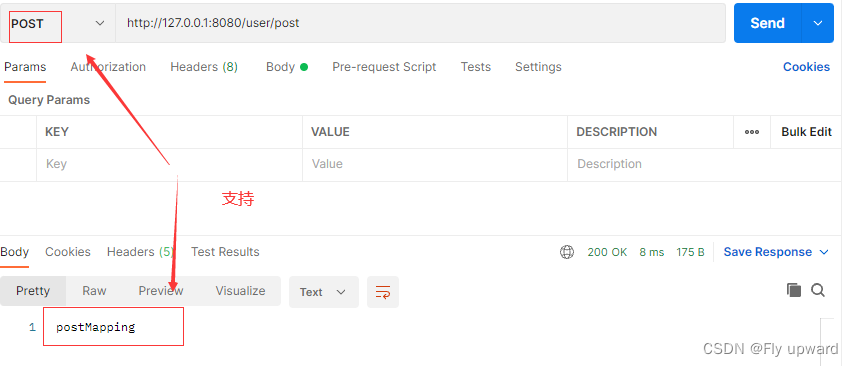
2)post请求,两种写法
// 写法1
@RequestMapping(method = RequestMethod.POST,value = "/index")
// 写法2
@PostMapping("/index")
@PostMapping
    @PostMapping
    public String say4() {
        return "postMapping";
    }
get请求
 2.2 获取参数
2.2.1 传递单个参数
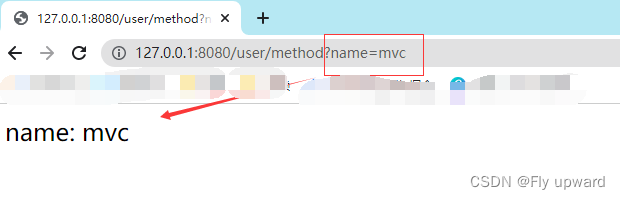
    @RequestMapping("/method")
    public Object method(String name) {
        System.out.println("name: " + name);
        return "name: " + name;
    }
获取结果
2)创建一个对象类
@Data
public class UserInfo {
    private int id;
    private String username;
    private String password;
    private int age;
}
在容器类 UserController 中获取
    @RequestMapping("/getuserbyid")
    public UserInfo getUserById(Integer id) {
        UserInfo userInfo = new UserInfo();
        userInfo.setId(id);
        userInfo.setUsername("黄小小");
        userInfo.setAge(18);
        return userInfo;
    }
访问时,要将 id 传参进去

2.2.2 获取多个参数
    //获取多个参数
    @RequestMapping("/login")
    public String login(String username, String password) {
        return "用户名: " + username + " | 密码: " + password;
    }
2.2.3 传递对象
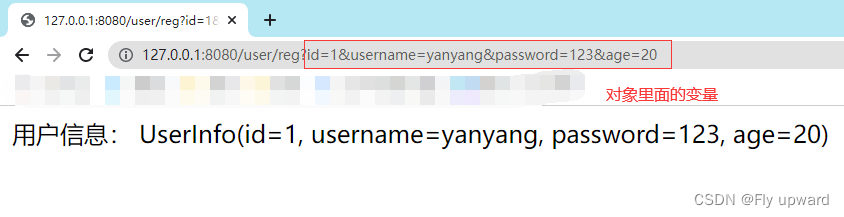
直接将对象的类名传入即可
    //获取对象
    @RequestMapping("/reg")
    public String reg(UserInfo userInfo) {
        return "用户信息: " + userInfo;
    }
2.2.4 后端参数重命名@RequestParam(后端参数映射)
某些特殊的情况下,前端传递的参数 key 和我们后端接收的 key 可以不⼀致,比如前端传递一个 name 给后端,但是后端使用的是 username 来接收,这样就出现参数不统一,而接收不到,修改起来又麻烦。
这时就需要使用 @RequestParam 来重命名前后端的参数值。(此方法支持在参数里,对象里不行)
例如:
    @RequestMapping("/login")
    public String login(String username, String password) {
        return "用户名: " + username + " | 密码: " + password;
    }
后端使用 username来接收,但是前端使用name来进行 获取,这样是获取不到的,如下
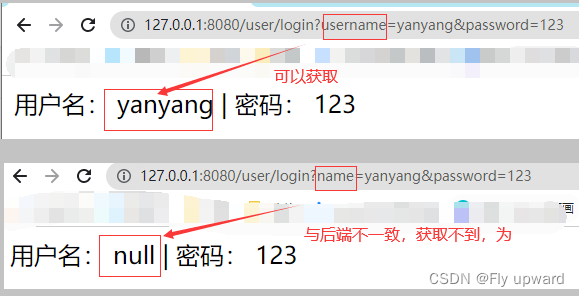
使用 @RequestParam 来重命名前后端的参数值
    @RequestMapping("/login")
    public String login(@RequestParam("name") String username, String password) {
        return "用户名: " + username + " | 密码: " + password;
    }
访问情况 ,可以访问

2.2.5 @RequestParam注意事项
如果在参数中添加 @RequestParam 注解,那么前端一定要传递此参数,否则会报错
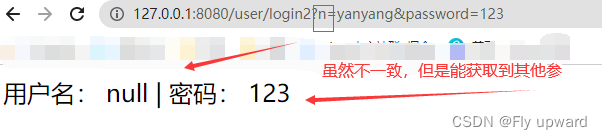
想要解决此问题,可以给@RequestParam里面添加 required = false
例:
    @RequestMapping("/login2")
    public String login2(@RequestParam("name") String username, String password) {
        return "用户名: " + username + " | 密码: " + password;
    }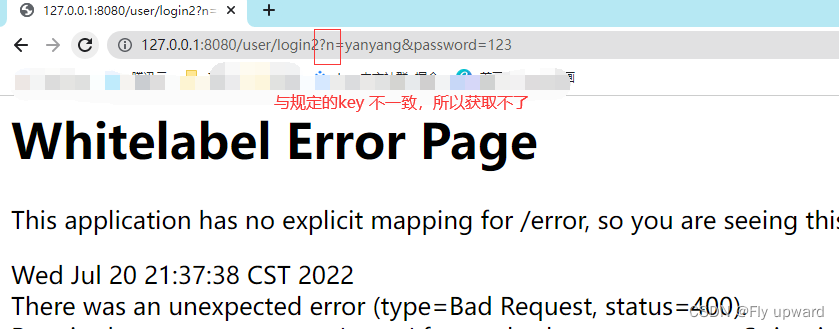
添加 required = false 之后
    @RequestMapping("/login2")
    public String login2(@RequestParam(value = "name",required = false) String username, String password) {
        return "用户名: " + username + " | 密码: " + password;
    }
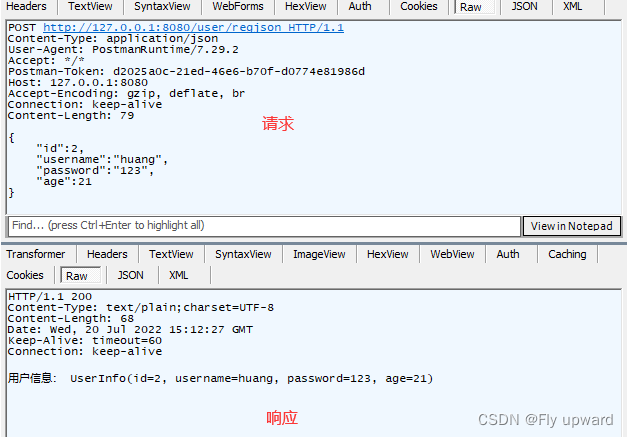
2.2.6 @RequestBody 接收JSON对象
后端代码:
    //获取对象,json 格式
    @RequestMapping("/regjson")
    public String regJson(@RequestBody UserInfo userInfo) {
        return "用户信息: " + userInfo;
    }
通过postman 来模拟后端接收

fiddler 抓包
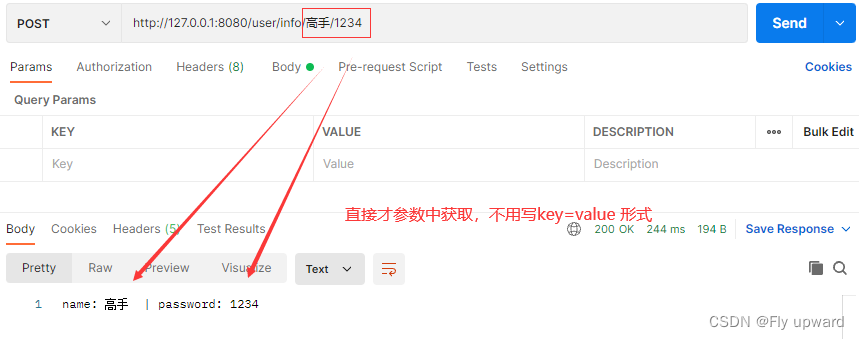
2.2.7 获取URL中的参数@PathVariable
    @PostMapping("/info/{name}/{password}")
    public String getInfo(@PathVariable String name,@PathVariable String password) {
        return "name: " + name + "  | password: " + password;
    }
2.2.8 上传文件@RequestPart
    @RequestMapping("/upimg")
    public boolean unImg(Integer id, @RequestPart("img")MultipartFile file) {
        boolean flg = false;
        //保存图片到本地目录

        try {
            file.transferTo (new File("D:/Img/img.jpg"));
            flg = true;
        } catch (IOException e) {
            log.error("上传图片失败: " + e.getMessage());
        }
        return flg;
    }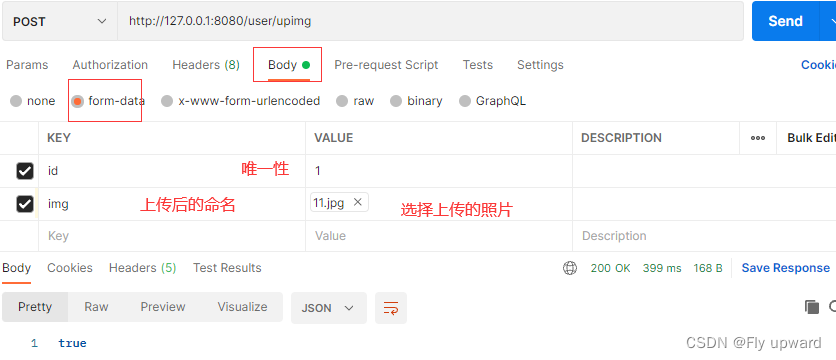

上面的上传代码有缺陷,就是再重新上传的话,会覆盖原来的文件,需要改进,如下
    @RequestMapping("/upimg")
    public boolean upImg(Integer id, @RequestPart("img")MultipartFile file) {
        boolean flg = false;
        //1.保存图片到本地目录 imgPath
        //2.图片名称(图片名不能重复)
        //3.获取原上传图片的格式
        String fileName = file.getOriginalFilename();//文件原名
        fileName = fileName.substring(fileName.lastIndexOf(".")); //得到文件后缀名
        fileName = UUID.randomUUID().toString() + fileName; //随机生成文件名 + 后缀名

        try {
            file.transferTo (new File( imgPath + fileName));
            flg = true;
        } catch (IOException e) {
            log.error("上传图片失败: " + e.getMessage());
        }
        return flg ;
    }
可以上传多个,并且不会覆盖之前上传的,名字也是随机的

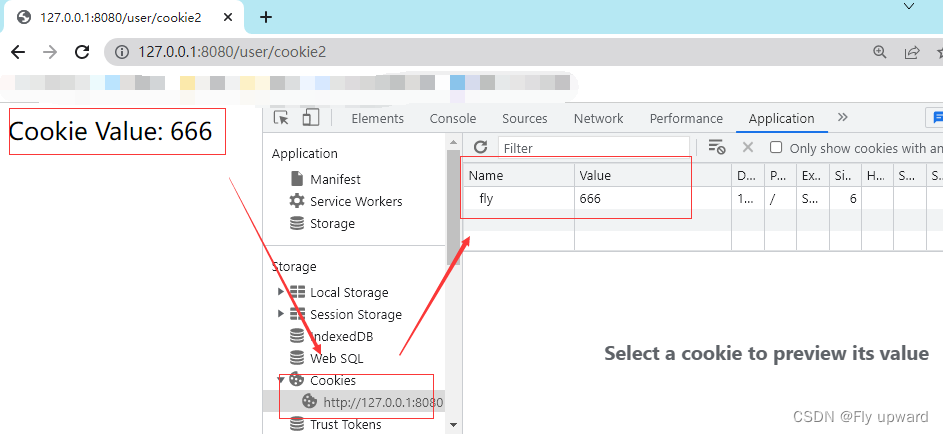
2.2.9 获取Cookie
1)获取Request 对象
    @RequestMapping("/cookie")
    public String getCookie(HttpServletResponse response,HttpServletRequest request) {
        // 得到全部的 Cookie
        String name = request.getParameter("name: ");
        Cookie[] cookies = request.getCookies();
        return name + "hello";
} @RequestMapping("/cookie2")
public String getCookie2(@CookieValue("fly") String cookie) {
return "Cookie Value: " + cookie;
}fly 的value 就是 666
2)获取请求头 Header—@RequestHeader
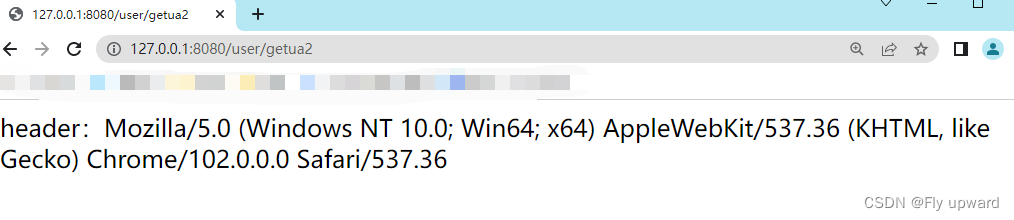
    @RequestMapping("/getua2")
    public String getHead2(@RequestHeader("User-Agent") String userAgent) {
        return "header:" + userAgent;
    }
2.2.10 Session存储和获取
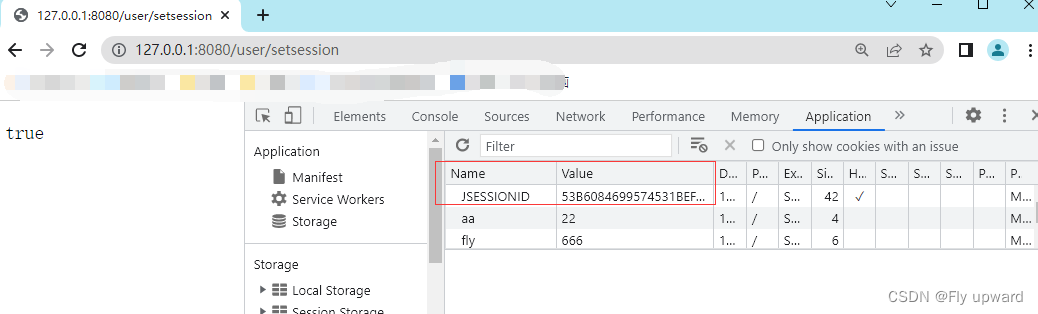
    @RequestMapping("/setsession")
    public boolean setSession(HttpServletRequest request) {
        boolean result = false;
        //1.得到HttpSession
        HttpSession session = request.getSession(true);
        //2.使用setAtt 设置值
        session.setAttribute("userinfo","userinfo");
        result = true;
        return result;

    }
存储成功之后,会有一个默认的JSESSIONID 返回后端

2)Session 获取
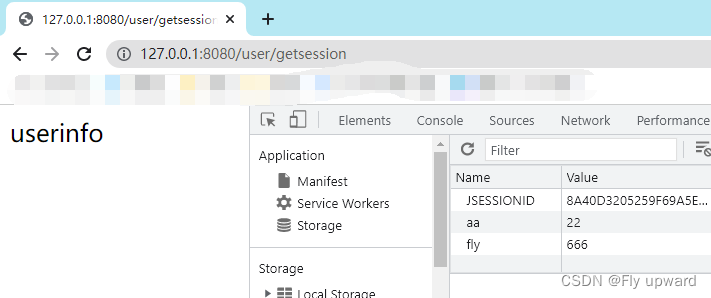
    @RequestMapping("/getsession")
    public String getSession(HttpServletRequest request) {
        String result = null;
        //1.得到 HttpSession 对象
        HttpSession session = request.getSession(false); //false=如果右会话,就会使用会话,如果没有,那么不会新创建会话
        //2.getAtt 得到Session 信息
        if (session != null && session.getAttribute("userinfo") != null) {
            result = (String) session.getAttribute("userinfo");
        }
        return result;
    }
要想获取 session 就先要执行上面的存储,才能获取
如果一开始就想获取的话,是不可以的

简便的 Session 获取
    //简便获取sessio
    @RequestMapping("/getsession2")
    public String getSession2(@SessionAttribute(value = "userinfo",
            required = false) String userinfo) {
        return "会话: " + userinfo;
    }
2.3 返回数据
2.3.1 返回静态页面 (不加@ResponseBody 注解)
<!DOCTYPE html>
<html lang="en">
<head>
    <meta charset="UTF-8">
    <title>Title</title>
</head>
<body>

   <h1 style="color:red">hello.html</h1>
</body>
</html>@Controller
public class TestController {
@RequestMapping("/say")
public String say() {
return "hello.html";
}
}
2.3.2 返回非静态@ResponseBody
实现计算器功能。
前端
<!DOCTYPE html>
<html lang="en">
<head>
    <meta charset="UTF-8">
    <title>计算器</title>
</head>
<body>
<form action="/calc">
    <h1>计算器</h1>
    数字1:<input name="num1" type="text"><br>
    数字2:<input name="num2" type="text"><br>
    <input type="submit" value=" 点击相加 ">
</form>
</body>
</html>@Controller
@ResponseBody
public class CalcController {
@RequestMapping("/calc")
public String calc(Integer num1, Integer num2) {
if (num1 == null || num2 == null) return "<h1> 参数错误</h1><a href='javascript:history.go(-1);'>返回</a>";
return "<h1>结果: " + (num1 + num2) + "</h1><a href='javascript:history.go(-1);'>返回</a>";
}
}
2.3.3 实现登录功能
前端使用 Ajax,后端使用JSON给前端
    @RequestMapping("/login3")
    public HashMap<String,Object> login2(@RequestBody UserInfo userInfo) {
        HashMap<String, Object> result = new HashMap<String, Object>();
        int state = 200;
        int data = -1;//等于 1,登录成功,否则登录失败
        String msg = "未知错误";
        if (StringUtils.hasLength(userInfo.getUsername()) && StringUtils.hasLength(userInfo.getPassword())) {
            if (userInfo.getUsername().equals("fly") && userInfo.getPassword().equals("123")) {
                data = 1;
                msg = "";
            } else {
                msg = "用户名或密码错误";
            }
        } else {
            msg = "非法参数";
        }
        result.put("state",state);
        result.put("data",data);
        result.put("msg",msg);
        return result;
    }
前端
<head>
    <meta charset="UTF-8">
    <script src="js/jquery-1.9.1.min.js"></script>
    <title>登录</title>
</head>
<body>
    <div style="text-align: center;">
        <h1>登录</h1>
        用户:<input id="username">
        <br>
        密码:<input id="password" type="password">
        <br>
        <input type="button" value="提交" onclick="mysub()" style="margin-top: 20px;margin-left: 50px;">
    </div>
</body>

<script>
     // ajax 提交
     function mysub(){
            // 1.判空
            var username = jQuery("#username");
            var password = jQuery("#password");
            if(jQuery.trim(username.val())==""){
                alert("请先输入用户名!");
                username.focus(); // 光标重制到此元素
                return;
            }
            if(jQuery.trim(password.val())==""){
                alert("请先输入密码!");
                password.focus(); // 光标重制到此元素
                return;
            }
            jQuery.ajax({
                url:"/user/login3",
                type:"POST",
                contentType:"application/json",
                data:JSON.stringify({"username":username.val(),
            "password":password.val()}),
                success:function(result){
                    alert(JSON.stringify(result));
                }
            });
        }
</script>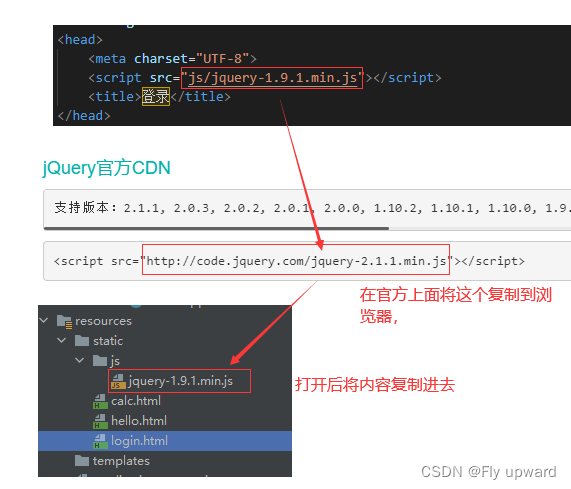
登录效果:

2.3.4 请求转发或请求重定向
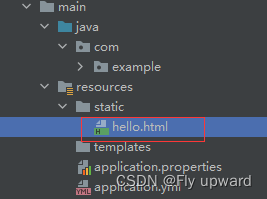
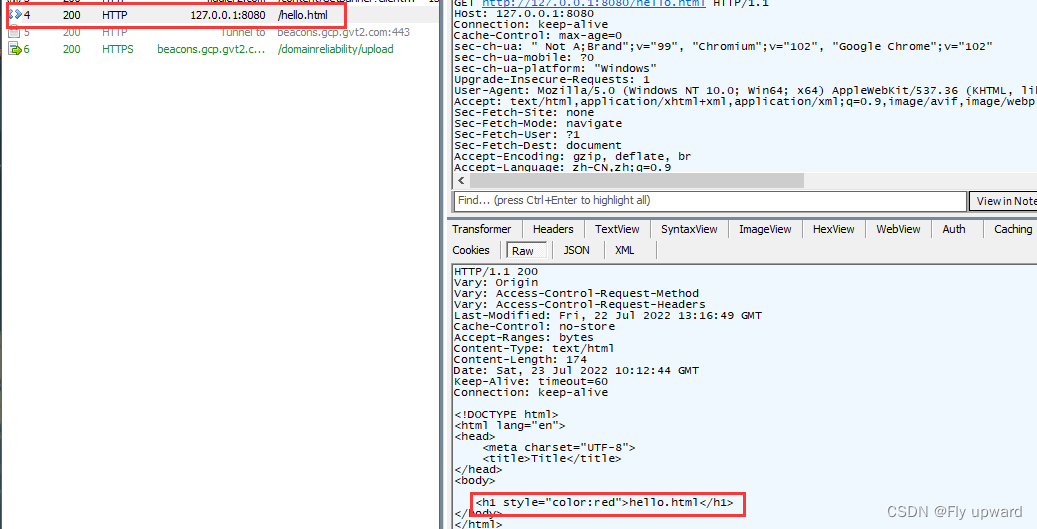
1)请求转发(forward)实现方式 1
服务器帮用户实现
    @RequestMapping("/for")
    public String myForward() {
        return "forward:/hello.html";
    }
1)请求转发(forward)实现方式 2
    @RequestMapping("/for2")
    public void myForward2(HttpServletRequest request, HttpServletResponse response) throws ServletException, IOException {
            request.getRequestDispatcher("/hello.html").forward(request,response);
    }
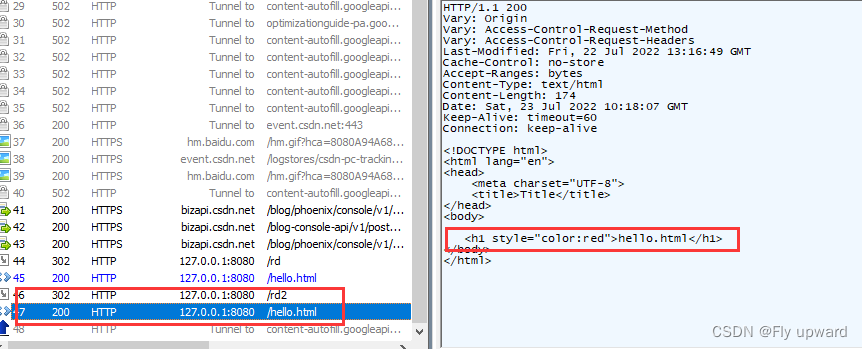
3)请求重定向(redirect) 方式1
    @RequestMapping("/rd")
    public String myRedirect() {
        return "redirect:/hello.html";

    }
重定向的请求发生在客户端(浏览器),服务器端不会提出用户进行请求操作
抓包结果
4)请求重定向(redirect) 方式2
    @RequestMapping("/rd2")
    public void myRedirect2(HttpServletResponse response) throws IOException {
        response.sendRedirect("/hello.html");
    }
抓包结果

2.3.5 forward 和 redirect 的具体区别
1)定义不同
2)跳转方不同
3)数据共享不同
4)最终 URL 地址不同
5)代码实现不同