一,实现支付宝支付功能步骤
1,创建一个springboot项目
2,注册入驻支付宝成为开发人员
地址给你准备好了:https://open.alipay.com/platform/home.htmfrom=wwwalipay
3,进入沙箱应用,获取配置到项目中的配置信息 (重要!!!)
4,下载支付宝开放平台开发助手,生成应用公钥和应用私钥 (重要!!!私钥要配置到项目中)
开发助手下载地址:https://opendocs.alipay.com/common/02kipl
5,springboot中配置支付宝支付信息,编写代码。
6,测试支付功能。
创建springboot项目省略
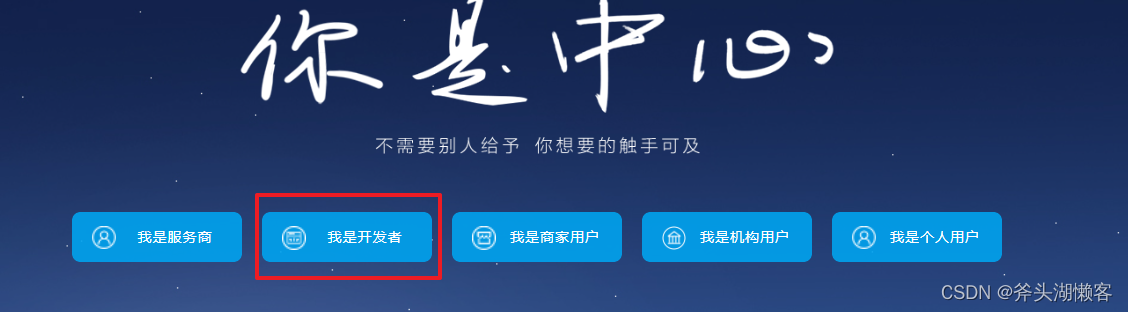
二,入驻支付宝成为开发人员
搜索支付宝,进入支付宝首页—》我是开发者—》注册登录(第一次登录时要求你必须入驻,直接入驻就行了)
地址给你准备好了:https://open.alipay.com/platform/home.htmfrom=wwwalipay
直接登录注册就可以了

三,进入沙箱应用
简单解释下沙箱,就是模拟的支付系统,支付的钱都是假的。
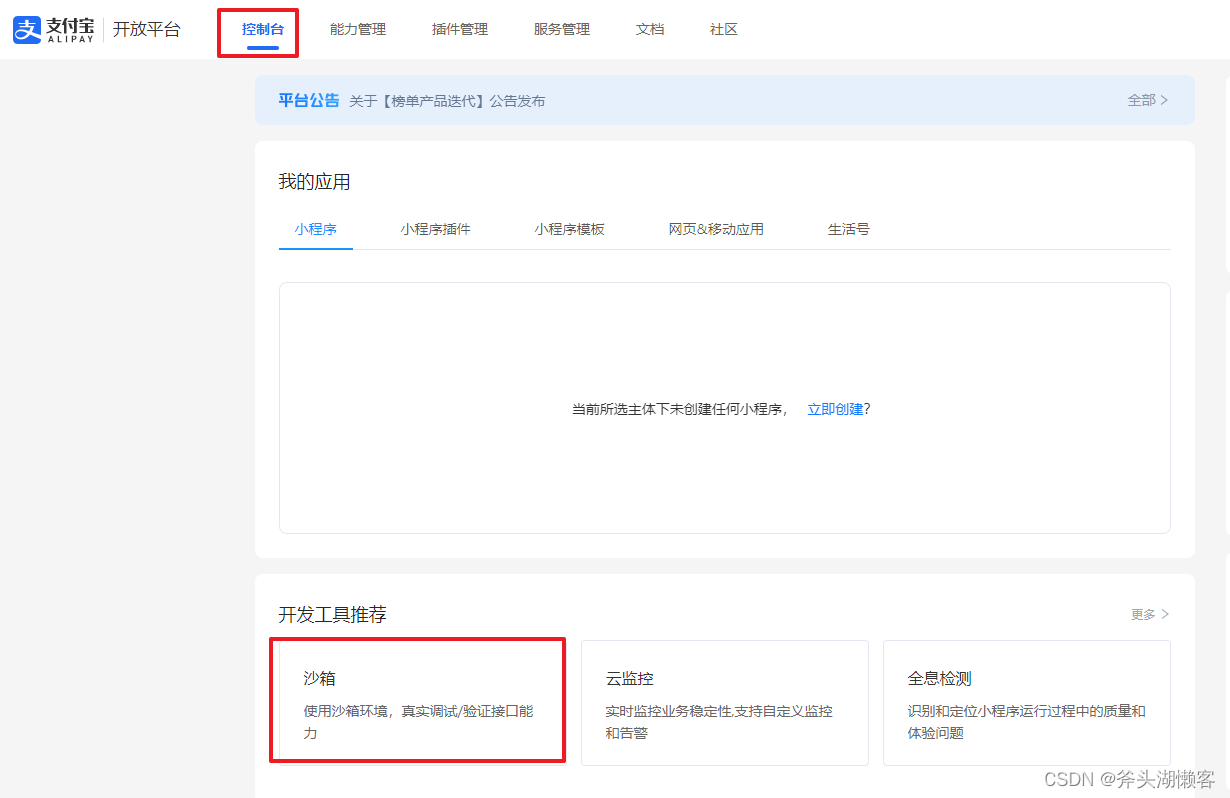
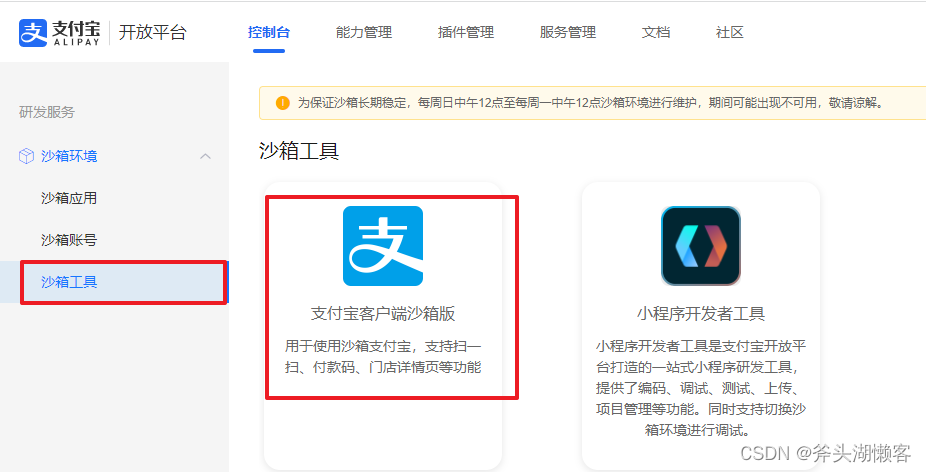
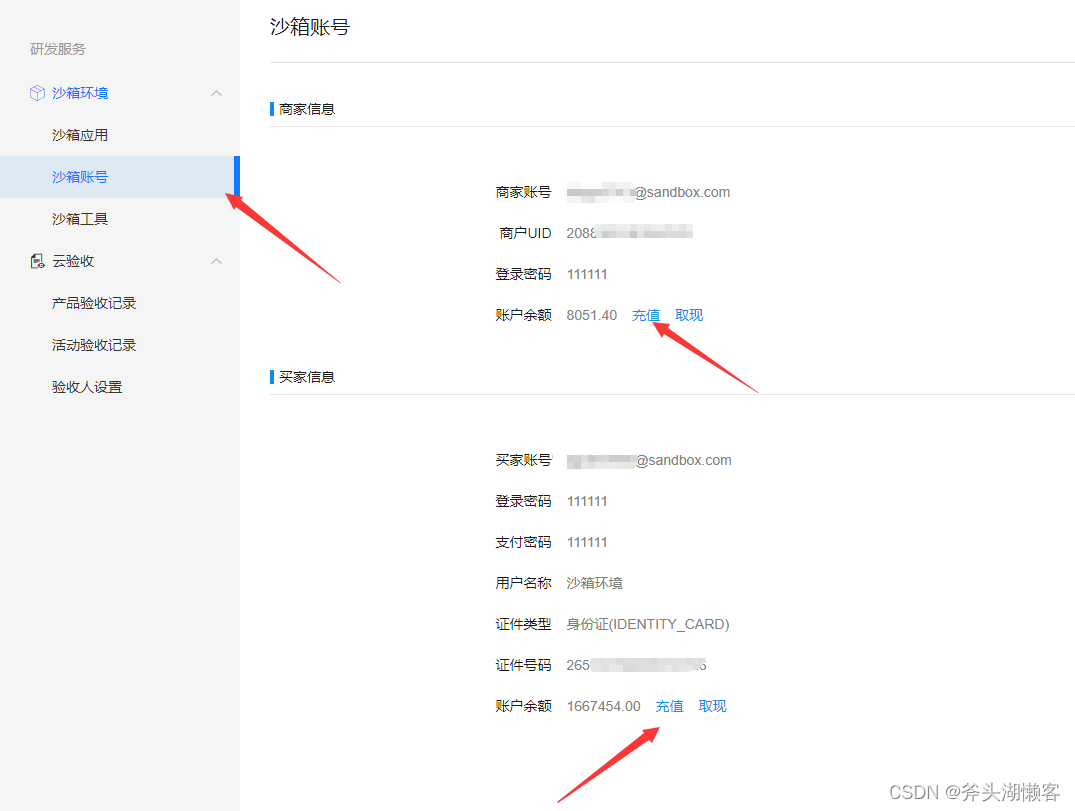
1,沙箱中操作说明
登录—》控制台—》沙箱—》沙箱应用
登录之后,页面是这个样子的
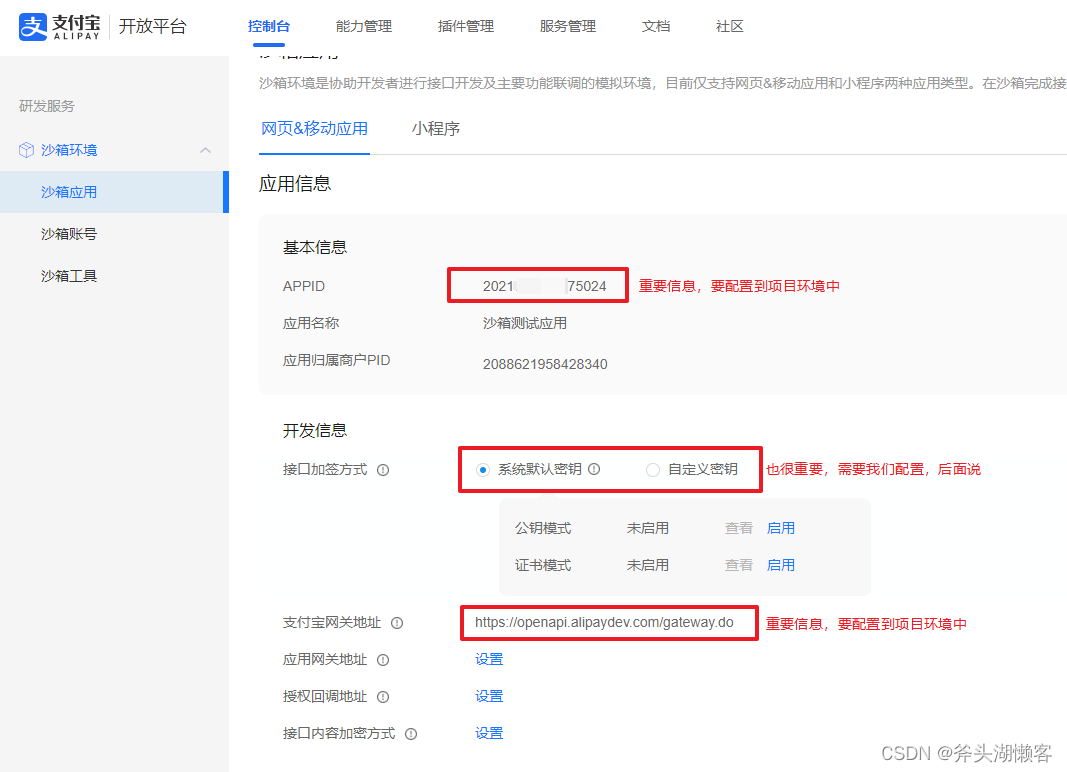
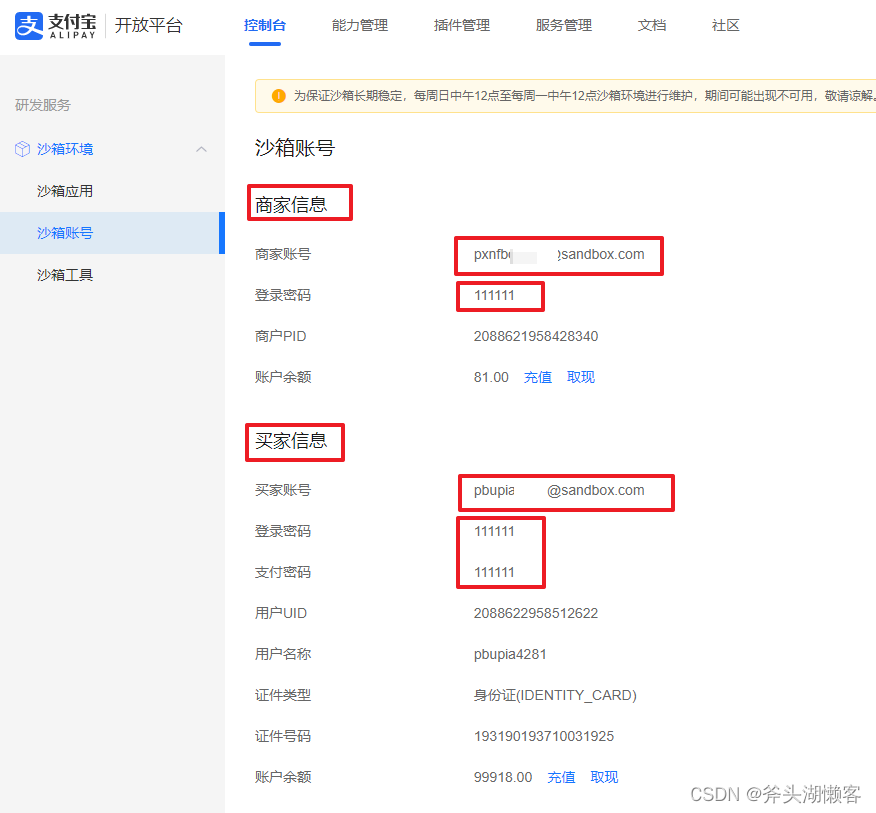
2,沙箱其他信息说明
下面分别是生成的买家和卖家的支付宝账号
支付宝客户端沙箱版,用来模拟扫码支付的,账号是上面的沙箱版买家账号(买家扫码向卖家支付),建议手机扫码下载一个,登录买家账号
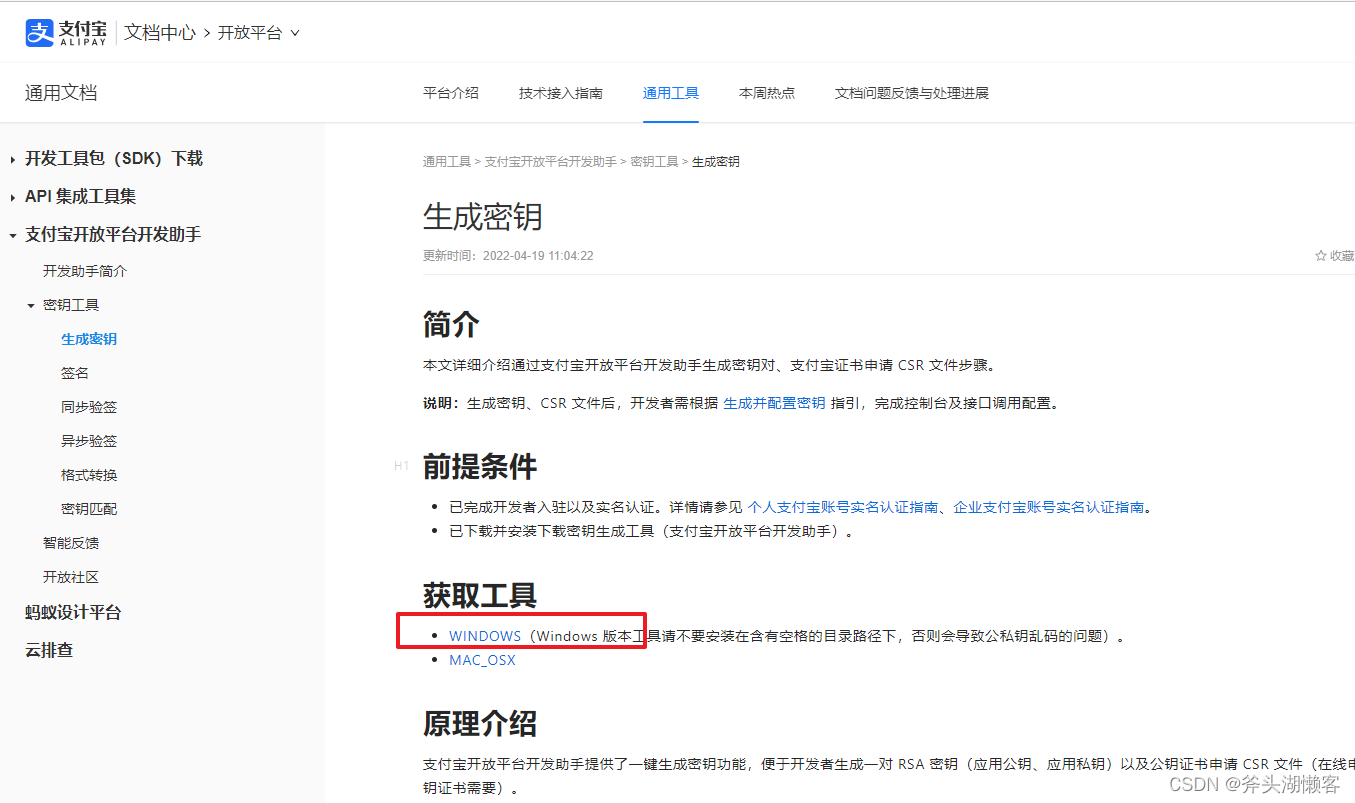
四,下载支付宝开发助手生成秘钥
1,生成秘钥
开发助手下载地址:https://opendocs.alipay.com/common/02kipl
下载后直接安装,打开后直接生成秘钥,生成秘钥后电脑会有两个文件,分别保存有应用公钥和应用私钥
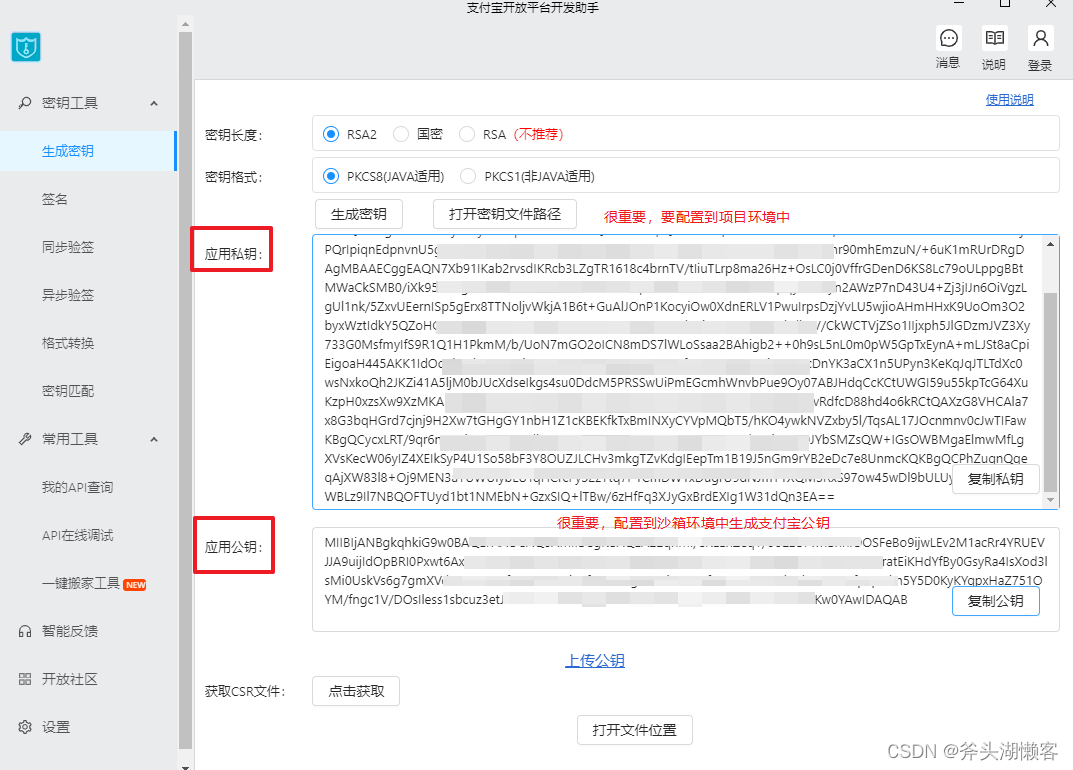
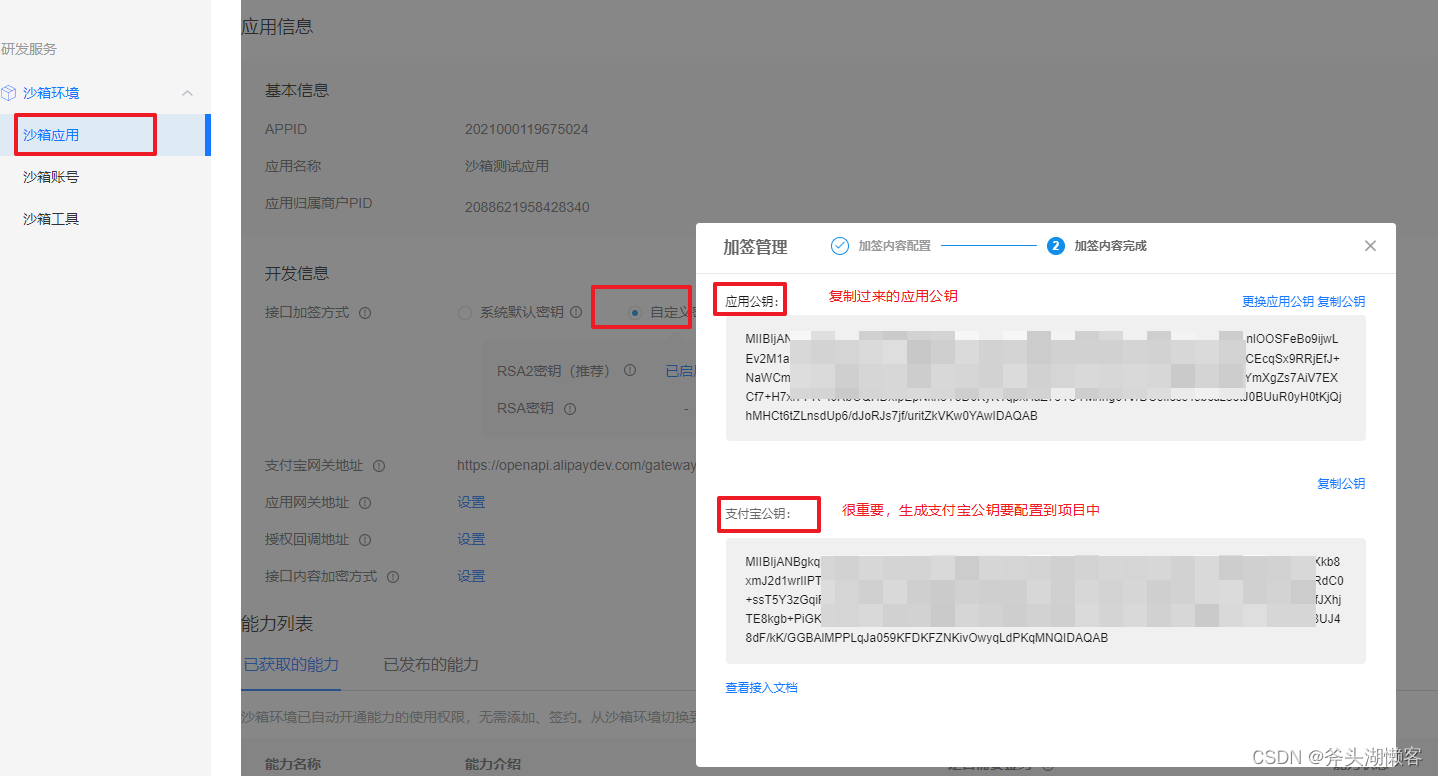
2,配置秘钥
将应用公钥复制下来,然后到沙箱应用中配置生成支付宝公钥
五,springboot中配置环境
1,引入jar包
		<!-- 支付宝支付jar包 -->
        <dependency>
            <groupId>com.alipay.sdk</groupId>
            <artifactId>alipay-sdk-java</artifactId>
            <version>3.1.0</version>
        </dependency>
2,application.properties
# 应用ID,您的APPID,收款账号既是您的APPID对应支付宝账号,在沙箱应用中获取
appId:2021000119675024
# 商户私钥,您的PKCS8格式RSA2私钥,通过开发助手生成的应用私钥
privateKey:
# 支付宝公钥,在沙箱应用获取,通过应用公钥生成支付宝公钥
publicKey:
# 服务器异步通知页面路径需http://格式的完整路径,不能加?id=123这类自定义参数
notifyUrl:http://localhost:8081/alipay/success
# 页面跳转同步通知页面路径 需http://格式的完整路径,不能加?id=123这类自定义参数
returnUrl: http://localhost:8081/alipay/success
# 签名方式
signType: RSA2
# 字符编码格式
charset: utf-8
# 支付宝网关,在沙箱应用中获取
gatewayUrl: https://openapi.alipaydev.com/gateway.do
3,接收请求参数的实体类
实体类总的属性只能是下划线连接,不能使用驼峰命名
@Data
public class AlipayBean implements Serializable {

    /**
     * 商户订单号
     */
    private String out_trade_no;

    /**
     * 订单名称
     */
    private String subject;

    /**
     * 付款金额
     */
    private String total_amount;

    /**
     * 商品描述
     */
    private String body;

    /**
     * 产品编号,支付方式不同,传的数据不同
     */
     //如果是PC网页支付,这个是必传参数
    private String product_code = "FAST_INSTANT_TRADE_PAY";
    //如果是扫码支付,这个是选传参数
    //private String product_code = "FACE_TO_FACE_PAYMENT";
}
4,支付接口
支付宝各种支付接口说明:https://opendocs.alipay.com/open/194/106078
我这里只说PC网页支付和扫码支付,详细的支付需要查看支付宝官方的文档
参数封装类不同,使用AlipayClient就要调用不同的方法,具体可以在支付宝

AlipayTradePagePayRequest	pageExecute 	是PC网页支付,类似使用电脑在淘宝买东西的支付方式
AlipayClient.pageExecute(pagePayRequest)

AlipayTradePrecreateRequest		execute  	扫码支付
AlipayClient.pageExecute(precreateRequest)


PC网页支付还是扫码支付,我们都需要传参,查看支付宝官方文档得知:
扫码支付必传3个参数:out_trade_no、subject、total_amount
而PC支付必传4个参数:out_trade_no、subject、total_amount、product_code
根据支付方式不同对AlipayBean 中的属性进行改造

项目代码写好后,调用支付接口,支付宝返回来的信息可能会出现参数不正确的错误信息,
这个时候就要检查你的传参是否符合支付宝文档的要求,参数是否使用下划线,是否漏了必传参数


@Controller
@RequestMapping("/alipay")
public class AlipayController {

	//获取配置文件中的配置信息
    //应用ID,您的APPID,收款账号既是您的APPID对应支付宝账号
    @Value("${appId}")
    private String appId;

    //商户私钥 您的PKCS8格式RSA2私钥
    @Value("${privateKey}")
    private String privateKey;

    //支付宝公钥
    @Value("${publicKey}")
    private String publicKey;

    //服务器异步通知页面路径
    @Value("${notifyUrl}")
    private String notifyUrl;

    //页面跳转同步通知页面路径
    @Value("${returnUrl}")
    private String returnUrl;

    //签名方式
    @Value("${signType}")
    private String signType;

    //字符编码格式
    @Value("${charset}")
    private String charset;

    //支付宝网关
    @Value("${gatewayUrl}")
    private String gatewayUrl;

    private final String format = "json";

	//PC网页段支付,返回的是支付宝账号的登录页面
    @RequestMapping("/pay")
    @ResponseBody
    public String pay(AlipayBean alipayBean) throws AlipayApiException {
    	//模拟数据
		alipayBean.setOut_trade_no(UUID.randomUUID().toString().replaceAll("-",""));
        alipayBean.setSubject("订单名称");
        alipayBean.setTotal_amount(String.valueOf(new Random().nextInt(100)));
        alipayBean.setBody("商品描述");

        AlipayClient alipayClient = new DefaultAlipayClient(gatewayUrl, appId, privateKey, format, charset, publicKey, signType);
        //PC网页支付使用AlipayTradePagePayRequest传参,下面调用的是pageExecute方法
        AlipayTradePagePayRequest alipayRequest = new AlipayTradePagePayRequest();
        alipayRequest.setReturnUrl(returnUrl);
        alipayRequest.setNotifyUrl(notifyUrl);
        alipayRequest.setBizContent(JSON.toJSONString(alipayBean));
        log.info("封装请求支付宝付款参数为:{}", JSON.toJSONString(alipayRequest));

        // 调用SDK生成表单
        String result = alipayClient.pageExecute(alipayRequest).getBody();
        log.info("请求支付宝付款返回参数为:{}", result);
        return result;
    }

	/**
     * 手机扫码支付
     * @param alipayBean
     * @return
     * @throws Exception
     */
    @RequestMapping("/pay2")
    @ResponseBody
    public Result pay2(AlipayBean alipayBean) throws Exception {
        //接口模拟数据
        alipayBean.setOut_trade_no("20210817010101003");
        alipayBean.setSubject("订单名称");
        alipayBean.setTotal_amount(String.valueOf(new Random().nextInt(100)));
        alipayBean.setBody("商品描述");

        AlipayClient alipayClient = new DefaultAlipayClient(gatewayUrl, appId, privateKey, format, charset, publicKey, signType);
        //扫码支付使用AlipayTradePrecreateRequest传参,下面调用的是execute方法
        AlipayTradePrecreateRequest precreateRequest = new AlipayTradePrecreateRequest();
        precreateRequest.setReturnUrl(returnUrl);
        precreateRequest.setNotifyUrl(notifyUrl);
        precreateRequest.setBizContent(JSON.toJSONString(alipayBean));
        log.info("封装请求支付宝付款参数为:{}", JSON.toJSONString(precreateRequest));

        AlipayTradePrecreateResponse response = null;
        try {
            response = alipayClient.execute(precreateRequest);
        } catch (AlipayApiException e) {
            throw new Exception(String.format("下单失败 错误代码:[%s], 错误信息:[%s]", e.getErrCode(), e.getErrMsg()));
        }
        log.info("AlipayTradePrecreateResponse = {}", response.getBody());

        /*
        {
        "code": "10000",
        "msg": "Success",
        "out_trade_no": "815259610498863104",
        "qr_code": "https://qr.alipay.com/bax09455sq1umiufbxf4503e"
        }
        */
        if (!response.isSuccess()) {
            throw new Exception(String.format("下单失败 错误代码:[%s], 错误信息:[%s]", response.getCode(), response.getMsg()));
        }
        // TODO 下单记录保存入库
        // 返回结果,主要是返回 qr_code,前端根据 qr_code 进行重定向或者生成二维码引导用户支付
        JSONObject jsonObject = new JSONObject();
        //支付宝响应的订单号
        String outTradeNo = response.getOutTradeNo();
        jsonObject.put("outTradeNo",outTradeNo);
        //二维码地址,页面使用二维码工具显示出来就可以了
        jsonObject.put("qrCode",response.getQrCode());
        return Result.ok(jsonObject);
    }

    @RequestMapping("/success")
    @ResponseBody
    public String success(){
        return "交易成功!";
    }

    @RequestMapping(value = "/index")
    public String payCoin(){
        return "index.html";
    }
}
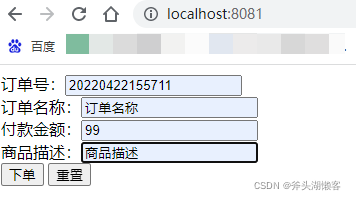
5,写一个简单的页面index.html
不要页面,直接接口工具请求也可以
<!DOCTYPE html>
<html lang="en">
<head>
    <meta charset="UTF-8">
    <title>Title</title>
</head>
<body>
<form action="/alipay/pay" method="post">
    订单号:<input type="text" name="out_trade_no" required><br/>
    订单名称:<input type="text" name="subject" required><br/>
    付款金额:<input type="text" name="total_amount" required><br/>
    商品描述:<input type="text" name="body"><br/>
    <input type="submit" value="下单"> <input type="reset" value="重置">
</form>

</body>
</html>
六,测试
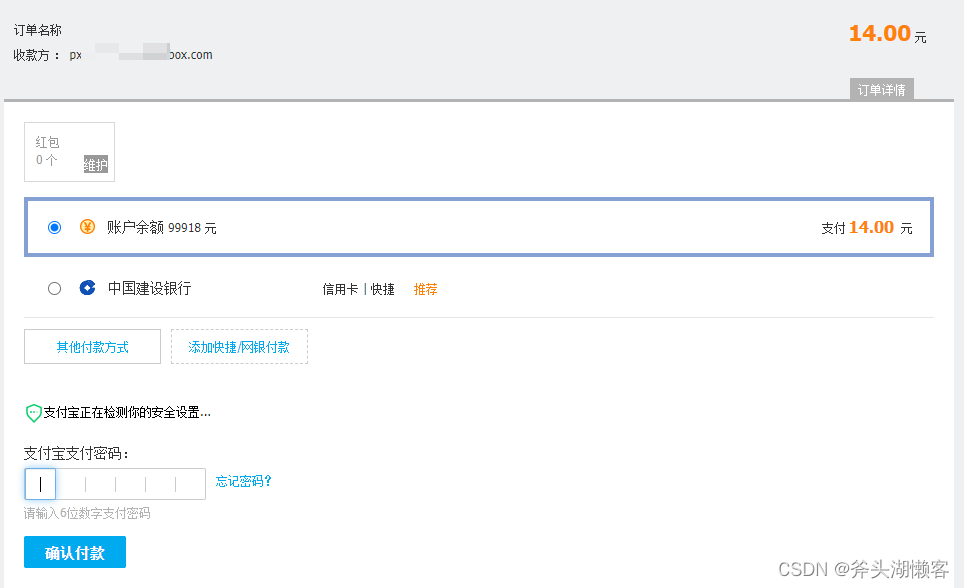
启动springboot项目,地址栏输入localhost:8081,下单后自动跳到登录页面,需要登录买方的账号,就是沙箱应用生成的账号,支付密码111111,有没有支付成功,可以到沙箱应用查看账号的金额是否发生变动。
1,测试PC网页支付

2,测试扫码支付
1,首先手机上先下载沙盒版支付宝,安装到手机上,怎么下载看上面沙箱应用的说明
2,下载后登录沙箱版生成的买方账号。
3,调用扫码支付的接口
4,网上搜一个二维码在线生成器
5,用沙箱版扫码支付


先自我介绍一下,小编13年上师交大毕业,曾经在小公司待过,去过华为OPPO等大厂,18年进入阿里,直到现在。深知大多数初中级java工程师,想要升技能,往往是需要自己摸索成长或是报班学习,但对于培训机构动则近万元的学费,着实压力不小。自己不成体系的自学效率很低又漫长,而且容易碰到天花板技术停止不前。因此我收集了一份《java开发全套学习资料》送给大家,初衷也很简单,就是希望帮助到想自学又不知道该从何学起的朋友,同时减轻大家的负担。添加下方名片,即可获取全套学习资料哦