文章目录
1. ESP32cam通过MQTT协议上传图片数据到阿里云平台
1.1 阿里云物联网平台相关配置
- 进入阿里云物联网平台创建公共实例
阿里云物联网平台网址:https://iot.console.aliyun.com/
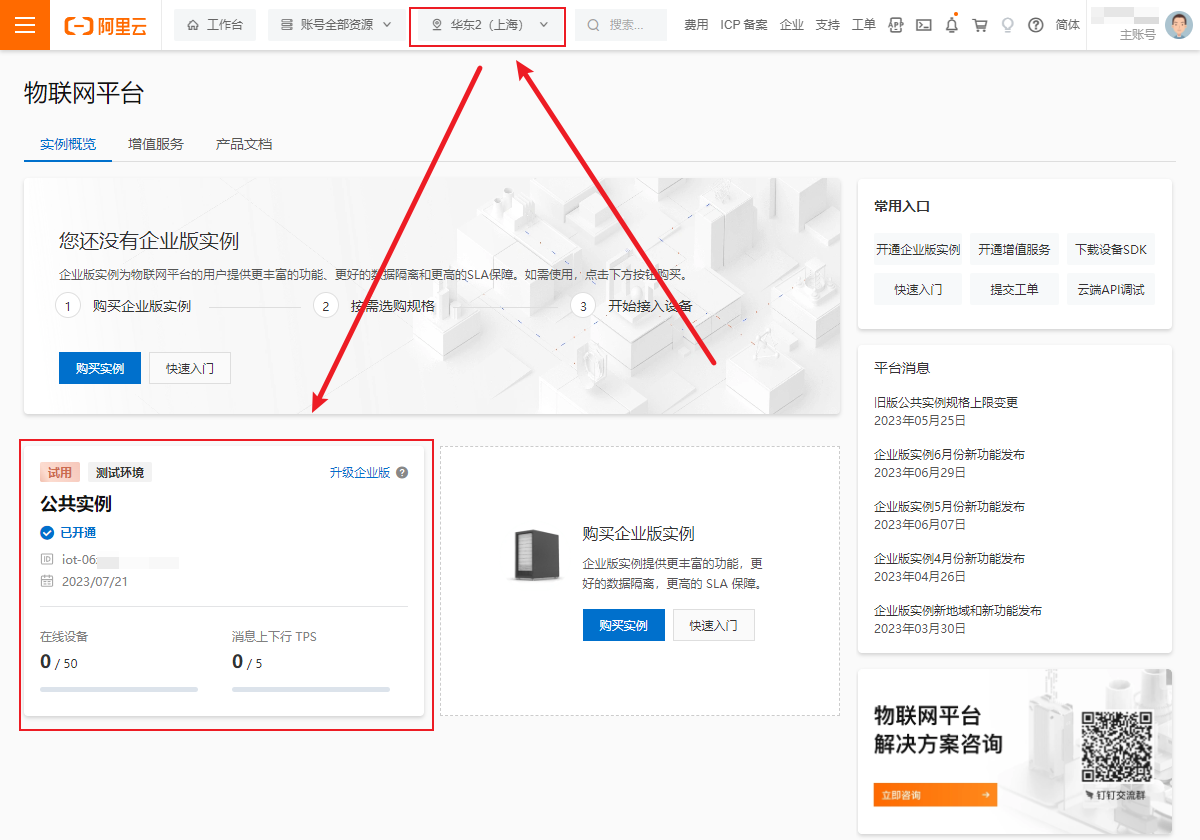
选择 华东2(上海)节点,开通公共实例。
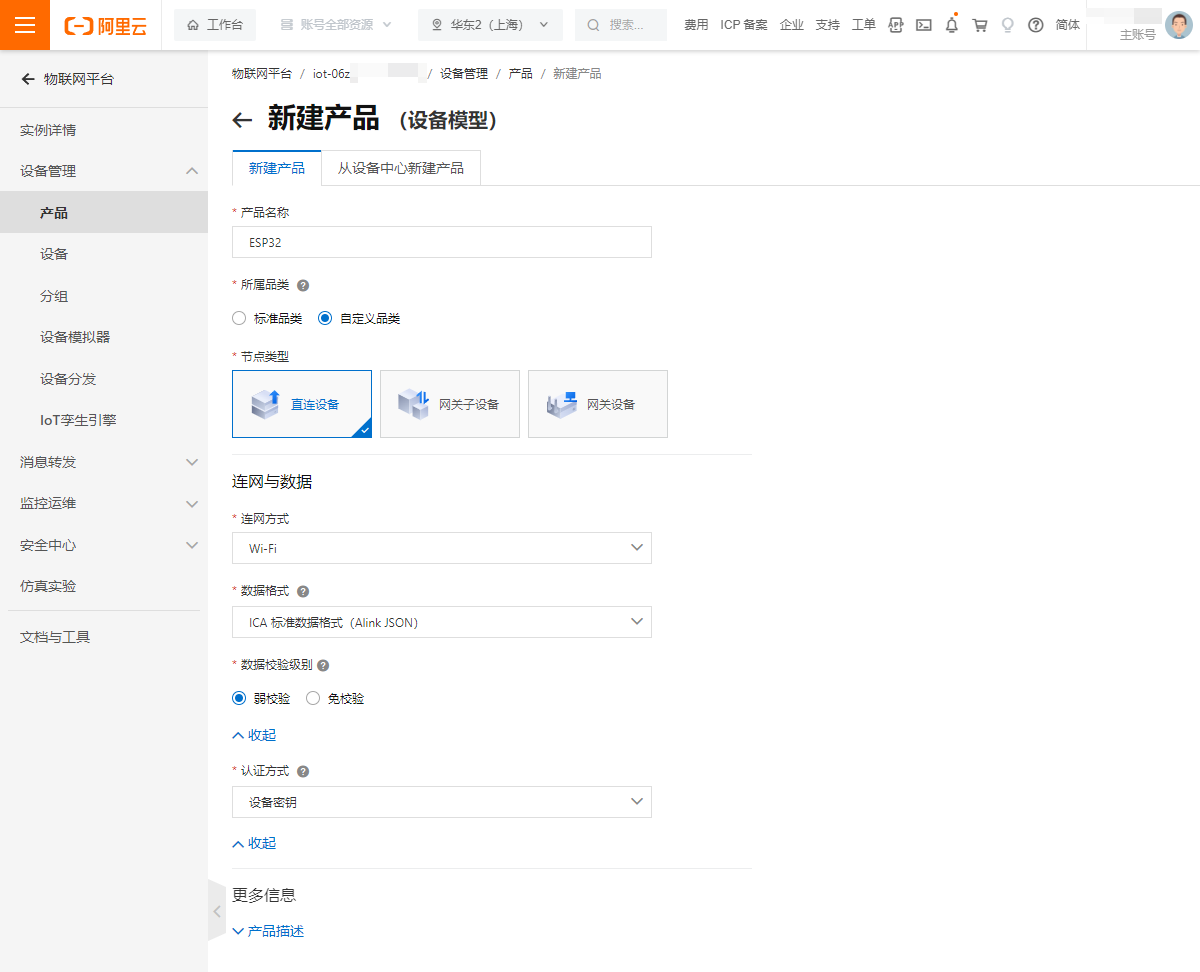
- 创建产品与设备
-
创建产品:
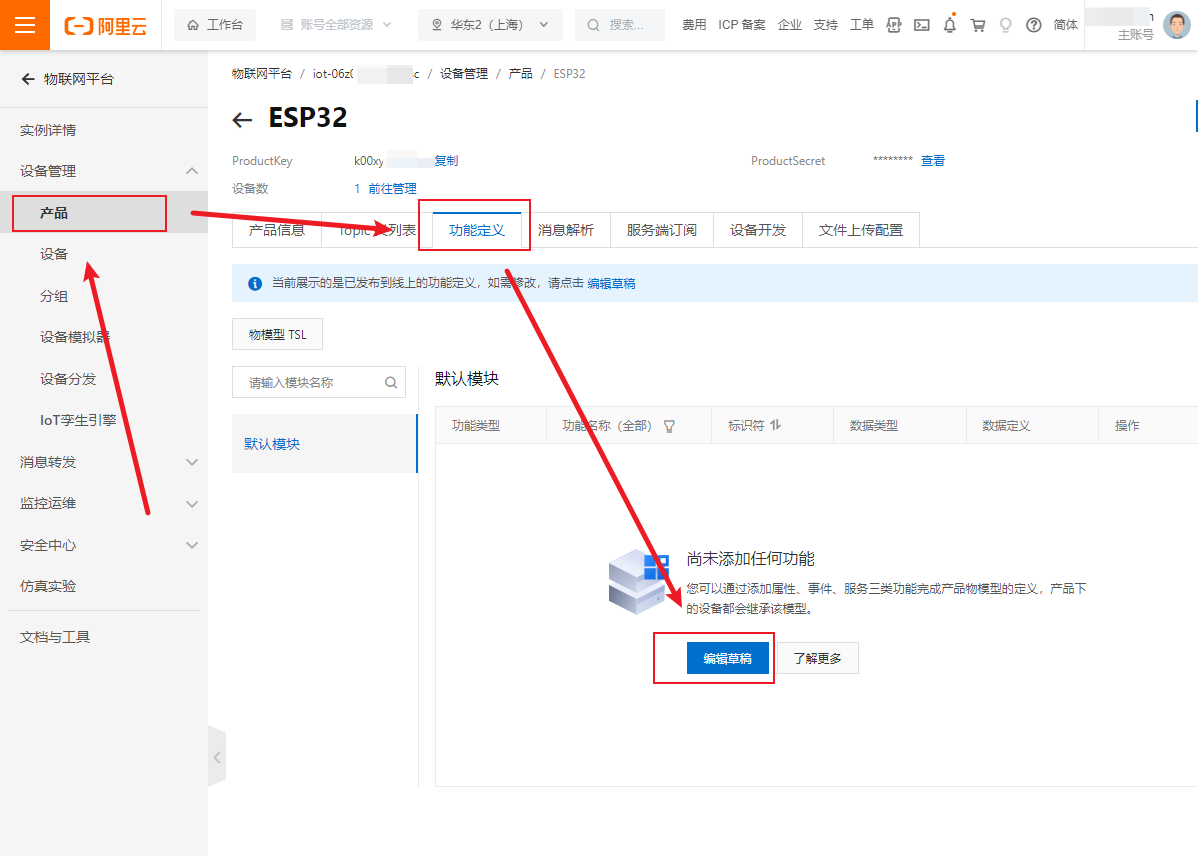
-
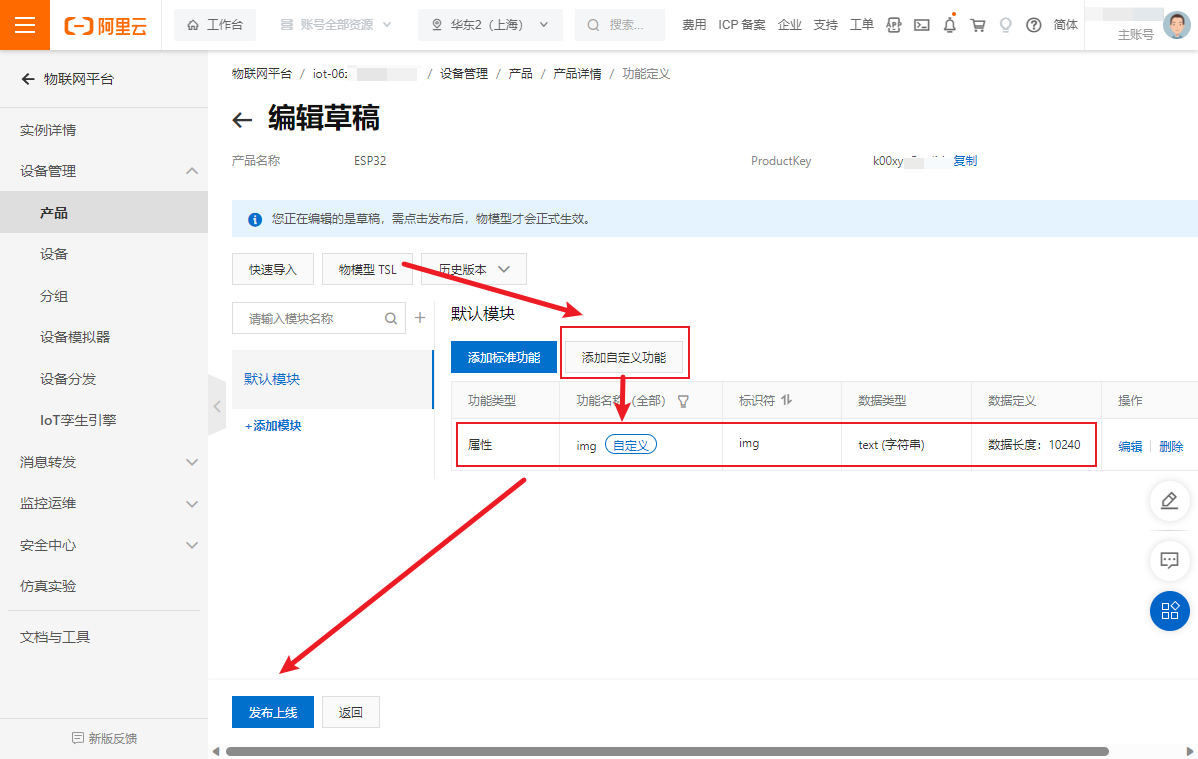
在产品中的功能定义中创建功能模块用来存储图片文本:
-
创建设备:
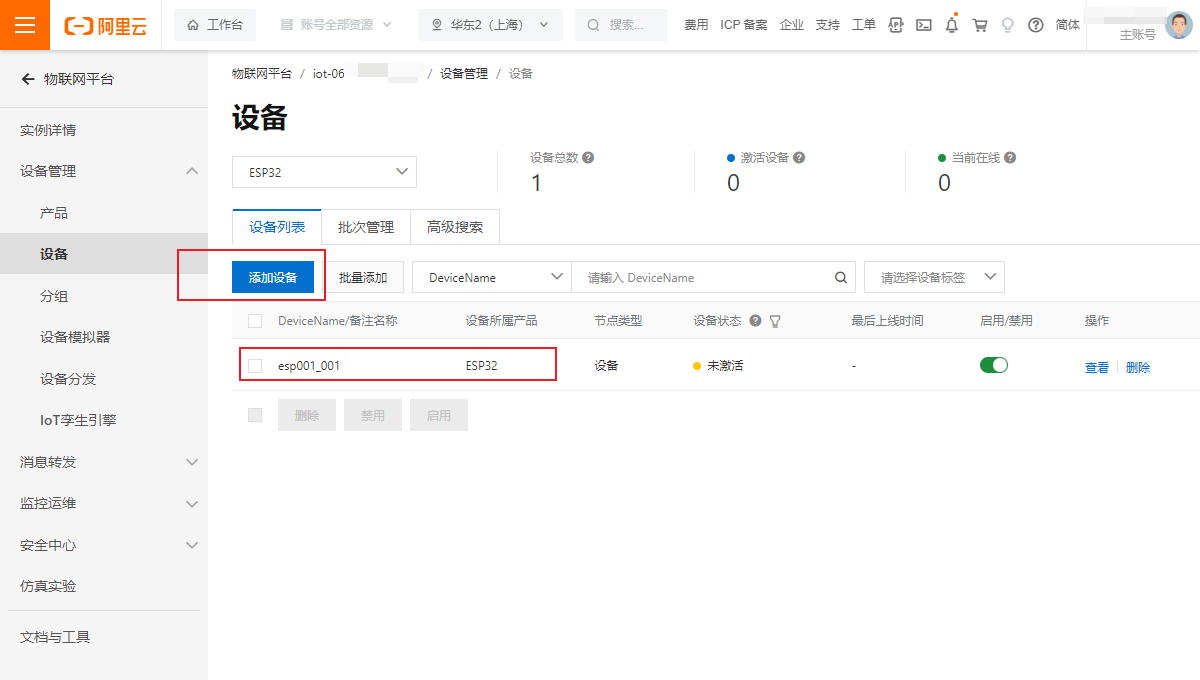
-
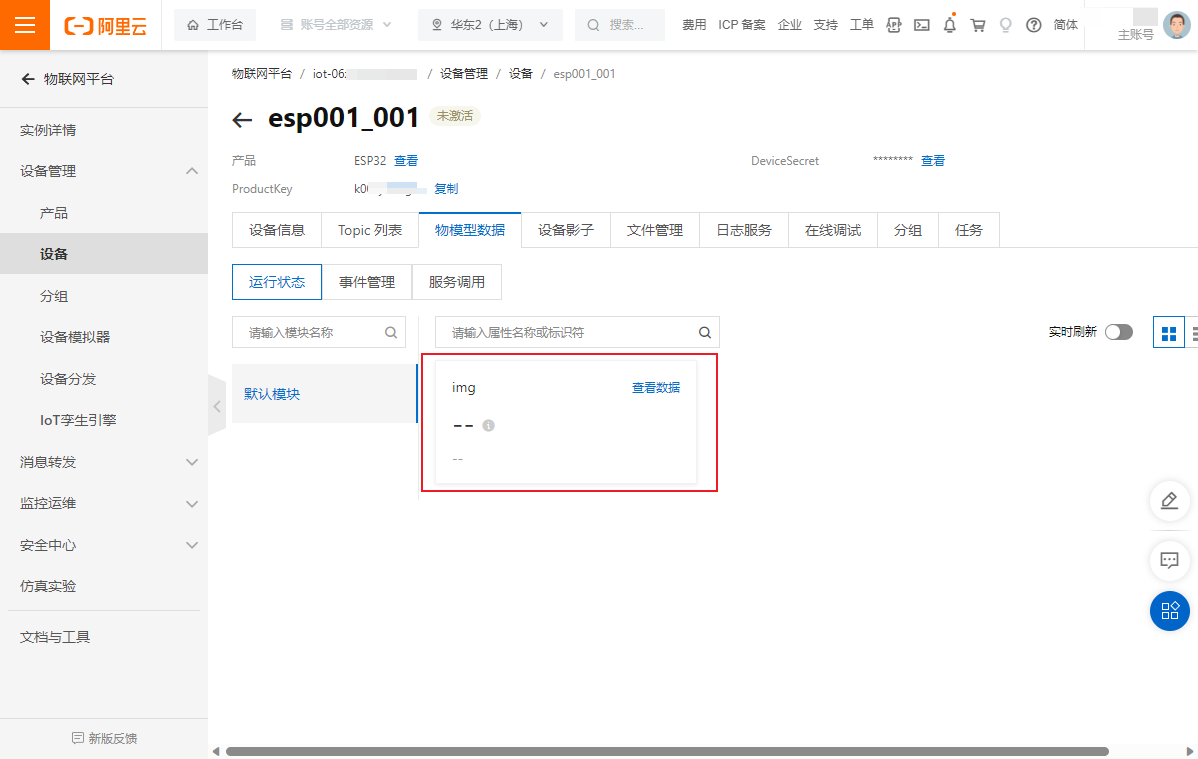
在设备的物模型数据中就有 img 的模块:
自此,阿里云物联网平台的准备工作就已全部完成。
1.2 esp32cam 通过 mqtt 协议上传图片到阿里云IOT平台
注:本人使用 Arduino IDE 开发 ESP32cam 程序,如何使用 Arduino IDE 开发 ESP32 程序请参考本人其他博客。博客:Arduino 配置 ESP32 开发环境
在 Arduino IDE 中新建一个项目,需要有三个文件:
- send_img_aliyun.ino
- aliyunmqtt.cpp
- aliyunmqtt.h
其中send_img_aliyun.ino为上传图片数据到阿里云物联网平台的主程序,aliyunmqtt.cpp与aliyunmqtt.h是连接阿里云物联网平台的校验程序。
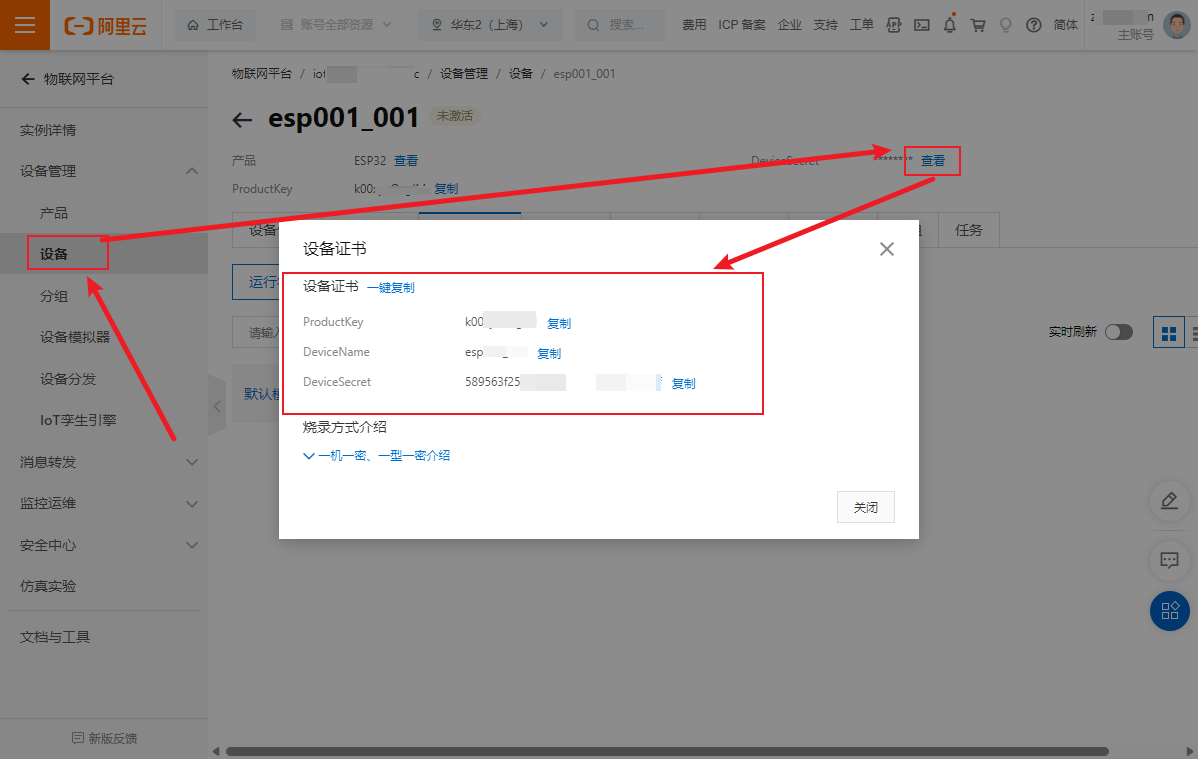
仅需修改 send_img_aliyun.ino 中 WIFI 账号与密码 和 阿里云物联网平台三元组(见下图)即可,aliyunmqtt.cpp 与 aliyunmqtt.h 文件无需修改任何内容。由于 ESP32cam 性能问题, send_img_aliyun.ino 中将一个图片分为多段进行传输,每段为 800,详见代码。
这里直接给出代码:
send_img_aliyun.ino:
// send_img_aliyun.ino

#include <WiFi.h>
#include <Wire.h>
#include <PubSubClient.h>
#include <ArduinoJson.h>

// #include "aliyun_mqtt.h"
#include "aliyunmqtt.h"

#include "esp_camera.h"

#include <SPIFFS.h>
#include "FS.h"                // SD Card ESP32
#include "SD_MMC.h"            // SD Card ESP32
#include "soc/soc.h"           // Disable brownour problems
#include "soc/rtc_cntl_reg.h"  // Disable brownour problems
#include "driver/rtc_io.h"
#include <EEPROM.h>

// 内存存储相关配置
#define EEPROM_SIZE 1
int pictureNumber = 0;
String msg;
int buttonState = 0;
int btnHold = 0;


// #define SENSOR_PIN 10
//以下信息需要自己修改
#define WIFI_SSID "TP-LINK_1760"  //替换自己的WIFI
#define WIFI_PASSWD "987654321"   //替换自己的WIFI密码

// 阿里云物联网 三元组
#define PRODUCT_KEY "k0xxxxxIM"                         //替换自己的PRODUCT_KEY
#define DEVICE_NAME "esp001_001"                       //替换自己的DEVICE_NAME
#define DEVICE_SECRET "589xxxxxxxxxxxxxxxxxxxe0f"  //替换自己的DEVICE_SECRET \


//以下不需修改
#define ALINK_BODY_FORMAT "{\"id\":\"123\",\"version\":\"1.0\",\"method\":\"%s\",\"params\":%s}"
#define ALINK_TOPIC_PROP_POST "/sys/" PRODUCT_KEY "/" DEVICE_NAME "/thing/event/property/post"
#define ALINK_TOPIC_PROP_POSTRSP "/sys/" PRODUCT_KEY "/" DEVICE_NAME "/thing/event/property/post_reply"
#define ALINK_TOPIC_PROP_SET "/sys/" PRODUCT_KEY "/" DEVICE_NAME "/thing/service/property/set"
#define ALINK_METHOD_PROP_POST "thing.event.property.post"
#define ALINK_TOPIC_DEV_INFO "/ota/device/inform/" PRODUCT_KEY "/" DEVICE_NAME ""
#define ALINK_VERSION_FROMA "{\"id\": 123,\"params\": {\"version\": \"%s\"}}"
unsigned long lastMs = 0;
// 测试 初始温度
int i = 15;

WiFiClient espClient;
PubSubClient mqttClient(espClient);

//CAMERA_MODEL_AI_THINKER类型摄像头的引脚定义
#define PWDN_GPIO_NUM 32
#define RESET_GPIO_NUM -1
#define XCLK_GPIO_NUM 0
#define SIOD_GPIO_NUM 26
#define SIOC_GPIO_NUM 27

#define Y9_GPIO_NUM 35
#define Y8_GPIO_NUM 34
#define Y7_GPIO_NUM 39
#define Y6_GPIO_NUM 36
#define Y5_GPIO_NUM 21
#define Y4_GPIO_NUM 19
#define Y3_GPIO_NUM 18
#define Y2_GPIO_NUM 5
#define VSYNC_GPIO_NUM 25
#define HREF_GPIO_NUM 23
#define PCLK_GPIO_NUM 22

static camera_config_t camera_config = {
  .pin_pwdn = PWDN_GPIO_NUM,
  .pin_reset = RESET_GPIO_NUM,
  .pin_xclk = XCLK_GPIO_NUM,
  .pin_sscb_sda = SIOD_GPIO_NUM,
  .pin_sscb_scl = SIOC_GPIO_NUM,

  .pin_d7 = Y9_GPIO_NUM,
  .pin_d6 = Y8_GPIO_NUM,
  .pin_d5 = Y7_GPIO_NUM,
  .pin_d4 = Y6_GPIO_NUM,
  .pin_d3 = Y5_GPIO_NUM,
  .pin_d2 = Y4_GPIO_NUM,
  .pin_d1 = Y3_GPIO_NUM,
  .pin_d0 = Y2_GPIO_NUM,
  .pin_vsync = VSYNC_GPIO_NUM,
  .pin_href = HREF_GPIO_NUM,
  .pin_pclk = PCLK_GPIO_NUM,

  .xclk_freq_hz = 20000000,
  .ledc_timer = LEDC_TIMER_0,
  .ledc_channel = LEDC_CHANNEL_0,

  .pixel_format = PIXFORMAT_JPEG,
  // .frame_size = FRAMESIZE_VGA,
  // FRAMESIZE_UXGA (1600 x 1200)
  // FRAMESIZE_QVGA (320 x 240)
  // FRAMESIZE_CIF (352 x 288)
  // FRAMESIZE_VGA (640 x 480)
  // FRAMESIZE_SVGA (800 x 600)
  // FRAMESIZE_XGA (1024 x 768)
  // FRAMESIZE_SXGA (1280 x 1024)
  .frame_size = FRAMESIZE_QVGA,
  .jpeg_quality = 10,
  // 图像质量(jpeg_quality) 可以是 0 到 63 之间的数字。数字越小意味着质量越高
  .fb_count = 1,
};

void init_wifi(const char *ssid, const char *password) {
  WiFi.mode(WIFI_STA);
  WiFi.begin(ssid, password);
  while (WiFi.status() != WL_CONNECTED) {
    Serial.println("WiFi does not connect, try again ...");
    delay(500);
  }

  Serial.println("Wifi is connected.");
  Serial.println("IP address: ");
  Serial.println(WiFi.localIP());
}

void mqtt_callback(char *topic, byte *payload, unsigned int length) {
  Serial.print("Message arrived [");
  Serial.print(topic);
  Serial.print("] ");
  payload[length] = '\0';
  Serial.println((char *)payload);

  if (strstr(topic, ALINK_TOPIC_PROP_SET)) {
    StaticJsonBuffer<100> jsonBuffer;
    JsonObject &root = jsonBuffer.parseObject(payload);
    if (!root.success()) {
      Serial.println("parseObject() failed");
      return;
    }
  }
}

void mqtt_check_connect() {
  while (!mqttClient.connected())  //
  {
    while (connect_aliyun_mqtt(mqttClient, PRODUCT_KEY, DEVICE_NAME, DEVICE_SECRET)) {
      Serial.println("MQTT connect succeed!");
      //client.subscribe(ALINK_TOPIC_PROP_POSTRSP);
      mqttClient.subscribe(ALINK_TOPIC_PROP_SET);

      Serial.println("subscribe done");
    }
  }
}

void mqtt_interval_post() {
  //  static int i=0;
  char param[512];
  char jsonBuf[1024];
  sprintf(jsonBuf, "{\"id\":\"1189401707\",\"version\":\"1.0.0\",\"method\":\"%s\",\"params\":{\"img\":\"END\"}}");
  Serial.println(jsonBuf);
  mqttClient.publish(ALINK_TOPIC_PROP_POST, jsonBuf);
  Serial.println("发送结束符");
  delay(1000);
}


// 摄像头、SD卡与 SPIFFS 初始化
esp_err_t camera_init() {
  //initialize the camera
  esp_err_t err = esp_camera_init(&camera_config);
  if (err != ESP_OK) {
    Serial.println("Camera Init Failed");
    return err;
  }
  sensor_t *s = esp_camera_sensor_get();
  //initial sensors are flipped vertically and colors are a bit saturated
  if (s->id.PID == OV2640_PID) {
    //        s->set_vflip(s, 1);//flip it back
    //        s->set_brightness(s, 1);//up the blightness just a bit
    //        s->set_contrast(s, 1);
  }
  Serial.println("Camera Init OK!");
  return ESP_OK;
}


void sd_init(void) {
  //SD card init
  if (!SD_MMC.begin()) {
    Serial.println("Card Mount Failed");
    return;
  }
  uint8_t cardType = SD_MMC.cardType();
  if (cardType == CARD_NONE) {
    Serial.println("No SD_MMC card attached");
    return;
  }
}

void SPIFFS_init() {
  //初始化SPIFFS
  if (!SPIFFS.begin(true)) {
    Serial.println("An Error has occurred while mounting SPIFFS");
  } else {
    delay(500);
    Serial.println("SPIFFS mounted successfully");
  }
  //Turn-off the 'brownout detector'
  WRITE_PERI_REG(RTC_CNTL_BROWN_OUT_REG, 0);
}
// 摄像头、SD卡与 SPIFFS 初始化 end


void setup() {
  Serial.begin(115200);
  Serial.println("程序 Start");
  init_wifi(WIFI_SSID, WIFI_PASSWD);

  camera_init();
  sd_init();
  SPIFFS_init();

  mqttClient.setCallback(mqtt_callback);
}

// the loop function runs over and over again forever
void loop() {

  // 程序开始拍照并保存
  Serial.print("进行拍照\n");
  camera_fb_t *fb = esp_camera_fb_get();
  if (!fb) {
    Serial.print("Camera capture failed");
    return;
  } else {
    EEPROM.begin(EEPROM_SIZE);
    pictureNumber = EEPROM.read(0) + 1;
    // Path where new picture will be saved in SD Card
    String path = "/picture" + String(pictureNumber) + ".jpg";

    fs::FS &fs = SD_MMC;
    Serial.printf("文件名字: %s\n", path.c_str());
    File file = fs.open(path.c_str(), FILE_WRITE);
    if (!file) {
      Serial.println("Failed to open file in writing mode");
    } else {
      file.write(fb->buf, fb->len);  // payload (image), payload length
      Serial.println(fb->len);
      Serial.print("抓拍成功并保存\n");
      Serial.printf("保存路径: %s\n\n", path.c_str());
      EEPROM.write(0, pictureNumber);
      EEPROM.commit();
    }


    String a1 = "{\"id\":\"1189401707\",\"version\":\"1.0.0\",\"method\":\"123\",\"params\":{\"img\":\"";
    String a2;
    String a3 = "\"}}";
    char data[4104];
    // 将图片分为不超过 800 通过 MQTT 发送出去
    for (int i = 0; i < fb->len; i++) {
      sprintf(data, "%02X", *(fb->buf + i));
      a2 += data;
      if (a2.length() == 800) {
        String a4 = a1 + a2;
        String a = a4 + a3;
        char jsonBuf[a.length() + 1];
        for (int i = 0; i < a.length(); i++)
          jsonBuf[i] = a[i];
        jsonBuf[a.length()] = '\0';
        Serial.println(jsonBuf);
        mqttClient.publish(ALINK_TOPIC_PROP_POST, jsonBuf);
        a2 = "", a = "", a4 = "";
        // ms
        delay(200);
      }
    }
    if (a2.length() > 0) {
      String a4 = a1 + a2;
      String a = a4 + a3;
      char jsonBuf[a.length() + 1];
      for (int i = 0; i < a.length(); i++)
        jsonBuf[i] = a[i];
      jsonBuf[a.length()] = '\0';
      Serial.println(jsonBuf);
      mqttClient.publish(ALINK_TOPIC_PROP_POST, jsonBuf);
      a2 = "", a = "", a4 = "";
    }
     // 将图片分为不超过 800 通过 MQTT 发送出去  end
    //
    char endBuf[100];
    sprintf(endBuf, "{\"id\":\"1189401707\",\"version\":\"1.0.0\",\"method\":\"123\",\"params\":{\"img\":\"END\"}}");
    Serial.println(endBuf);
    mqttClient.publish(ALINK_TOPIC_PROP_POST, endBuf);
    Serial.println("发送结束符");

  }
  Serial.println("图片发送完成了......");
  delay(1000);
  // 图片发送结束后发送 END


  if (millis() - lastMs >= 10000) {
    lastMs = millis();
    mqtt_check_connect();
    // Post  interval 间隔
    // mqtt_interval_post();
  }

  mqttClient.loop();

  unsigned int WAIT_MS = 2000;
  delay(WAIT_MS);  // ms
  Serial.println(millis() / WAIT_MS);
}
aliyunmqtt.h:
// aliyunmqtt.h

/*
  Aliyun_mqtt.h - Library for connect to Aliyun MQTT server with authentication by
  product key, device name and device secret.
  https://www.alibabacloud.com/help/product/30520.htm
*/

#ifndef _ALIYUN_MATT_H
#define _ALIYUN_MATT_H

#include "Arduino.h"
#include <PubSubClient.h>

/**
 * Connect to Alibaba Cloud MQTT server. In connection process, it will try several times for
 * possible network failure. For authentication issue, it will return false at once.
 *
 * @param mqttClient: Caller provide a valid PubSubClient object (initialized with network client).
 * @param productKey: Product Key, get from Alibaba Cloud Link Platform.
 * @param deviceName: Device Name, get from Alibaba Cloud Link Platform.
 * @param deviceSecret: Device Secret, get from Alibaba Cloud Link Platform.
 *
 * @param region: Optional region, use "cn-shanghai" as default. It can be "us-west-1",
 *                "ap-southeast-1" etc. Refer to Alibaba Cloud Link Platform.
 *
 *
 * @return true if connect succeed, otherwise false.
 */
extern "C" bool connect_aliyun_mqtt(
    PubSubClient &mqttClient,
    const char *productKey,
    const char *deviceName,
    const char *deviceSecret,
    const char *region = "cn-shanghai");

/**
 * Two new added APIs are designed for devices with limited resource like Arduino UNO.
 * Since it is hard to calculate HMAC256 on such devices, the calculation can be done externally.
 *
 * These two APIs should be used together with external HMAC256 calculation tools, e.g.
 * http://tool.oschina.net/encrypt?type=2
 * They can be used together to replace connectAliyunMQTT on resource-limited devices.
 */

/**
 * This API should be called in setup() phase to init all MQTT parameters. Since HMAC256
 * calculation is executed extenrally, a fixed timestamp string should be provided, such
 * as "23668" etc. The same timestamp string is also used to calculate HMAC256 result.
 *
 * Other params are similar to them in connectAliyunMQTT.
 */
extern "C" void mqtt_prepare(
    const char *timestamp,
    const char *productKey,
    const char *deviceName,
    const char *deviceSecret,
    const char *region = "cn-shanghai");

/**
 * Use tools here to calculate HMAC256: http://tool.oschina.net/encrypt?type=2
 * The calculated result should be defined as constants and passed when call this function.
 */
extern "C" bool connect_aliyun_mqtt_With_password(PubSubClient &mqttClient, const char *password);

#endif
aliyunmqtt.cpp
// aliyunmqtt.cpp

/*
  Aliyun_mqtt.h - Library for connect to Aliyun MQTT server.
*/

// #include "aliyun_mqtt.h"
#include "aliyunmqtt.h"

#include <SHA256.h>

#define MQTT_PORT 1883
#define SHA256HMAC_SIZE 32

// Verify tool: http://tool.oschina.net/encrypt?type=2
static String hmac256(const String &signcontent, const String &ds)
{
  byte hashCode[SHA256HMAC_SIZE];
  SHA256 sha256;

  const char *key = ds.c_str();
  size_t keySize = ds.length();

  sha256.resetHMAC(key, keySize);
  sha256.update((const byte *)signcontent.c_str(), signcontent.length());
  sha256.finalizeHMAC(key, keySize, hashCode, sizeof(hashCode));

  String sign = "";
  for (byte i = 0; i < SHA256HMAC_SIZE; ++i)
  {
    sign += "0123456789ABCDEF"[hashCode[i] >> 4];
    sign += "0123456789ABCDEF"[hashCode[i] & 0xf];
  }

  return sign;
}

static String mqttBroker;
static String mqttClientID;
static String mqttUserName;
static String mqttPassword;

// call this function once
void mqtt_prepare(const char *timestamp,const char *productKey, const char *deviceName,const char *deviceSecret,const char *region)
{
  mqttBroker = productKey;
  mqttBroker += ".iot-as-mqtt.";
  mqttBroker += String(region);
  mqttBroker += ".aliyuncs.com";

  // Serial.println(mqttBroker);

  mqttUserName = deviceName;
  mqttUserName += '&';
  mqttUserName += productKey;
   //Serial.println(mqttUserName);

  mqttClientID = deviceName; // device name used as client ID
  mqttClientID += "|securemode=3,signmethod=hmacsha256,timestamp=";
  mqttClientID += timestamp;
  mqttClientID += '|';
   //Serial.println(mqttClientID);
}

bool connect_aliyun_mqtt_With_password(PubSubClient &mqttClient, const char *password)
{
  mqttClient.setServer(mqttBroker.c_str(), MQTT_PORT);

  byte mqttConnectTryCnt = 5;
  while (!mqttClient.connected() && mqttConnectTryCnt > 0)
  {
    //Serial.println("Connecting to MQTT Server ...");
    if (mqttClient.connect(mqttClientID.c_str(), mqttUserName.c_str(), password))
    {

      // Serial.println("MQTT Connected!");
      return true;
    }
    else
    {
      byte errCode = mqttClient.state();
      //Serial.print("MQTT connect failed, error code:");
      //Serial.println(errCode);
      if (errCode == MQTT_CONNECT_BAD_PROTOCOL || errCode == MQTT_CONNECT_BAD_CLIENT_ID || errCode == MQTT_CONNECT_BAD_CREDENTIALS || errCode == MQTT_CONNECT_UNAUTHORIZED)
      {
        //Serial.println("No need to try again.");
        break; // No need to try again for these situation
      }
      delay(3000);
    }
    mqttConnectTryCnt -= 1;
  }

  return false;
}

bool connect_aliyun_mqtt(
    PubSubClient &mqttClient,
    const char *productKey,
    const char *deviceName,
    const char *deviceSecret,
    const char *region)
{
  String timestamp = String(millis());
  mqtt_prepare(timestamp.c_str(), productKey, deviceName, deviceSecret, region);

  // Generate MQTT Password, use deviceName as clientID
  String signcontent = "clientId";
  signcontent += deviceName;
  signcontent += "deviceName";
  signcontent += deviceName;
  signcontent += "productKey";
  signcontent += productKey;
  signcontent += "timestamp";
  signcontent += timestamp;

  String mqttPassword = hmac256(signcontent, deviceSecret);

   //Serial.print("HMAC256 data: ");
   //Serial.println(signcontent);
   //Serial.print("HMAC256 key: ");
  // Serial.println(deviceSecret);
  // Serial.println(mqttPassword);

  return connect_aliyun_mqtt_With_password(mqttClient, mqttPassword.c_str());
}
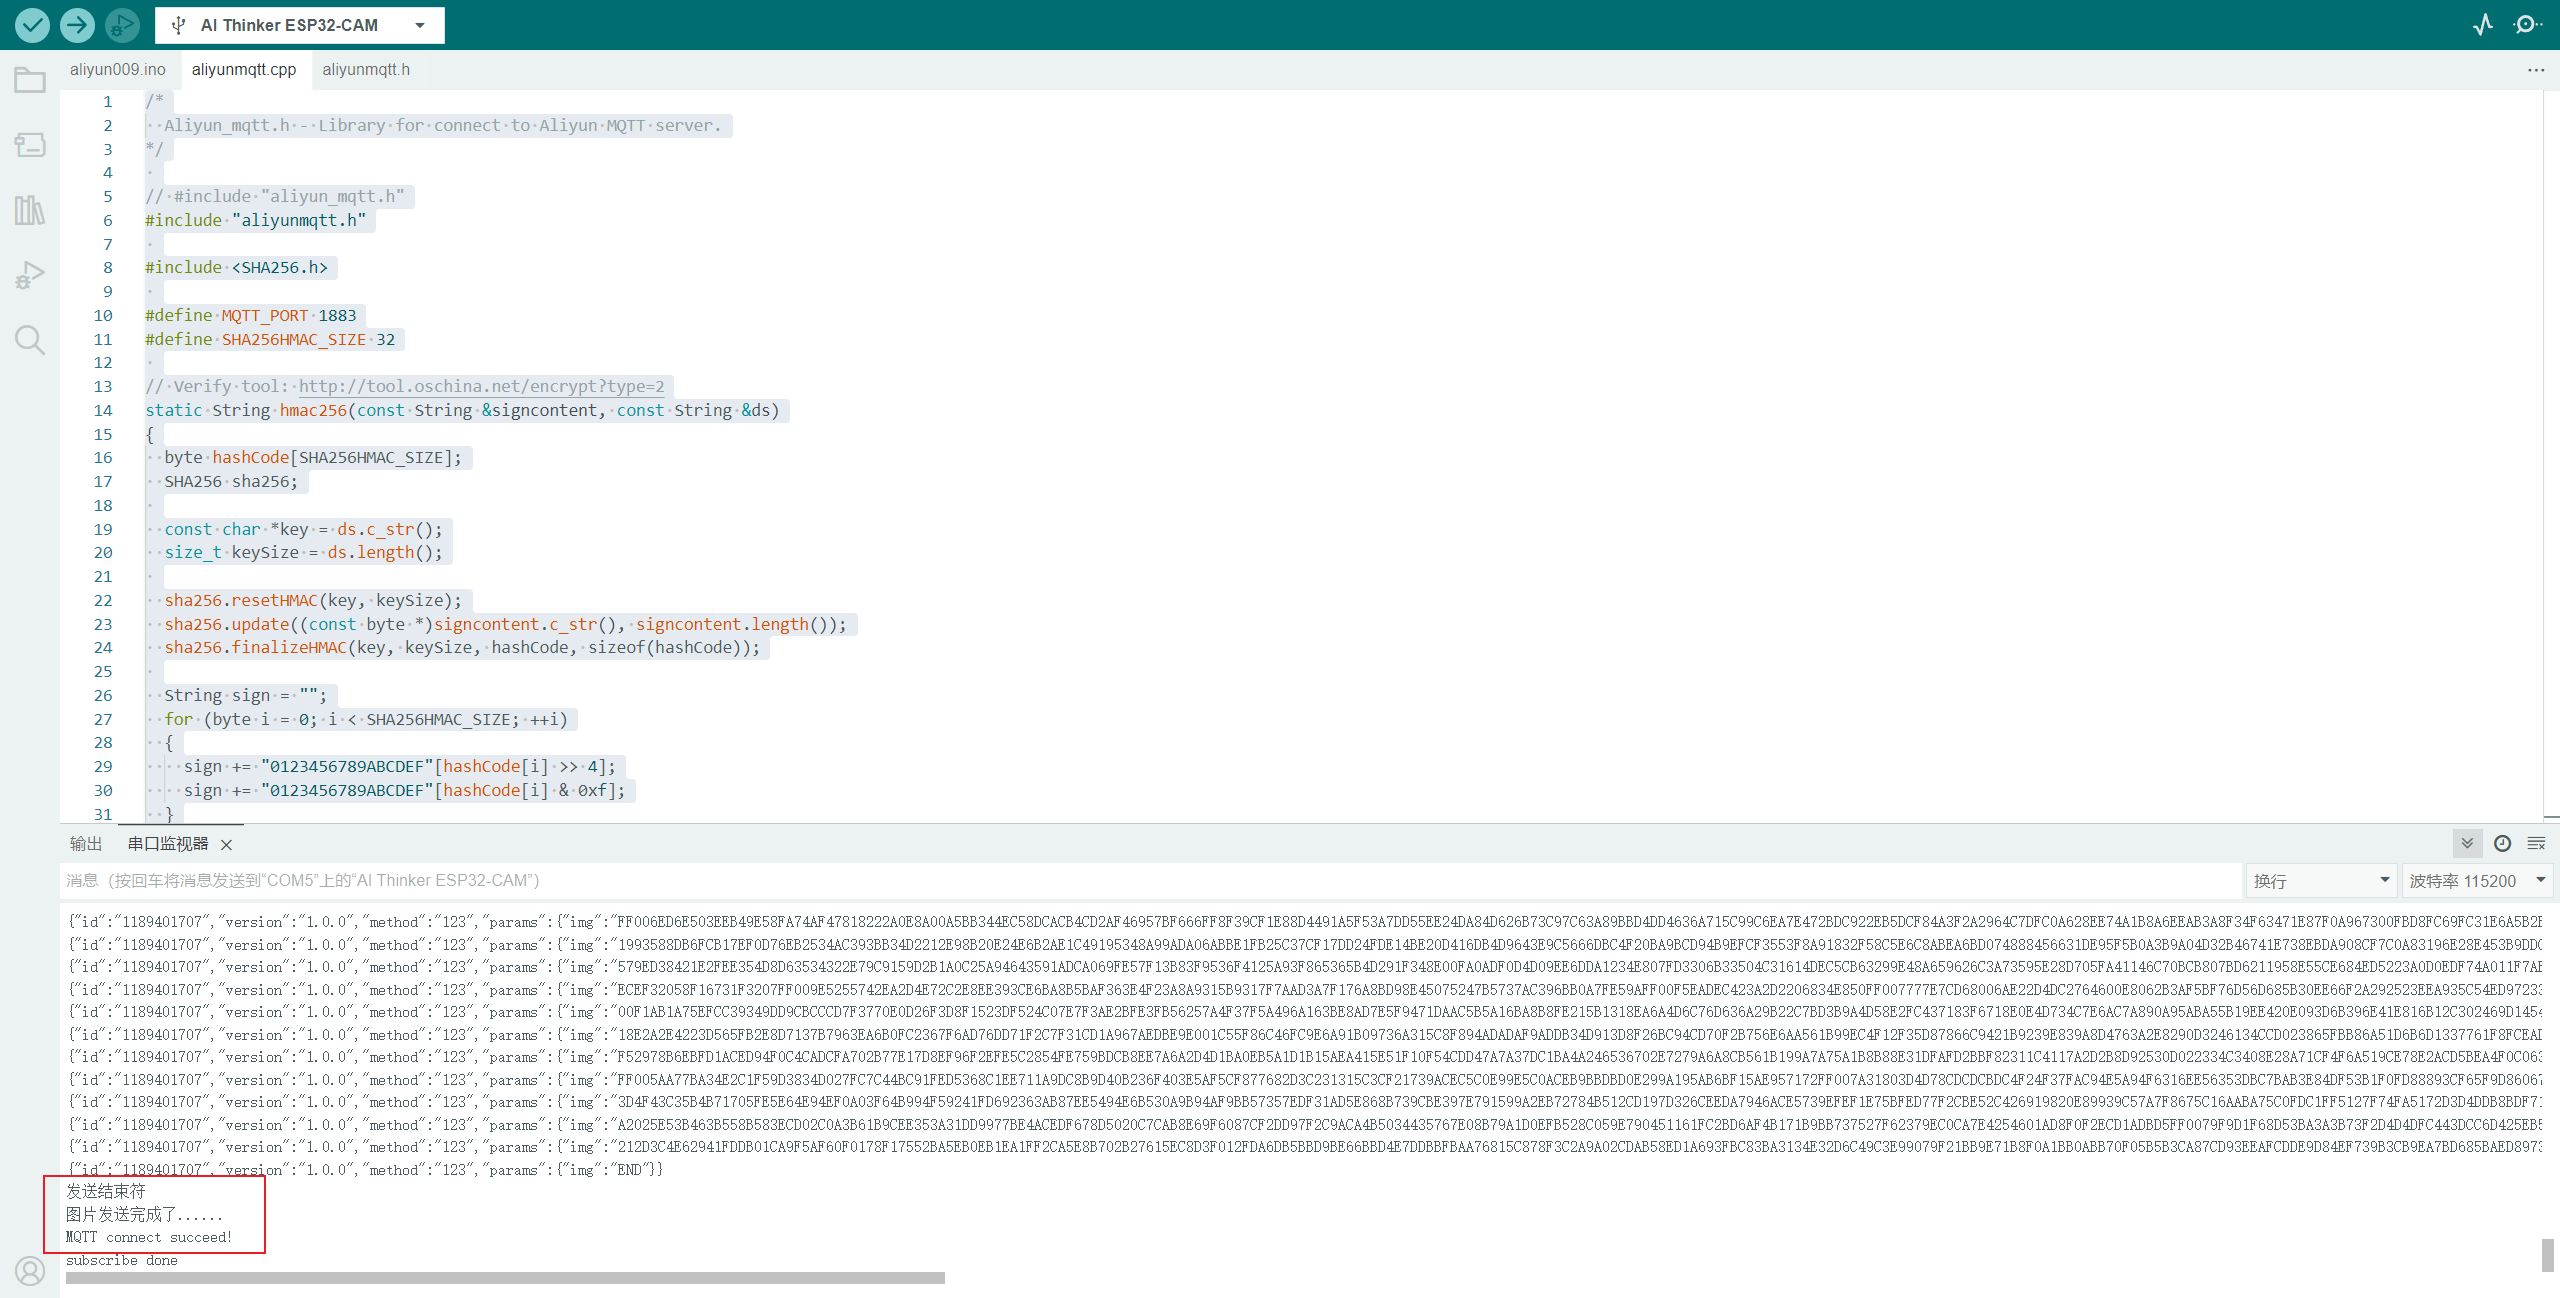
程序烧录运行结果如下图:
-
本地 Arduino IDE 串口显示图:
-
物联网平台物模型已获取数据:

注意:若Arduino IDE 串口显示正常,而物联网平台中没有获取到数据,请查看 阿里云物联网平台左侧>监控运维>日志服务,若日志中出现状态 460 错误,请调整本地 Arduino IDE 中引用的
PubSubClient.h中的两个参数:MQTT_MAX_PACKET_SIZE和MQTT_KEEPLIVE,分别调整为大于1024和大于65,然后重新烧录 ESP32cam 即可解决。
自此,ESP32cam 获取图片数据存本地内存卡并通过 MQTT 协议上传阿里云物联网平台已全部完成。
2. 从阿里云IOT平台获取图片数据并保存到本地
虽然图片数据已经上传到阿里云物联网平台中存储,但平台中存储的只是图片的数据,而非图片,需要将图片数据转换成图片并在其他地方展示出来。
于是需要进行下面操作。
2.1 阿里云物联网平台相关配置
需要配置 消息转发>服务端订阅:
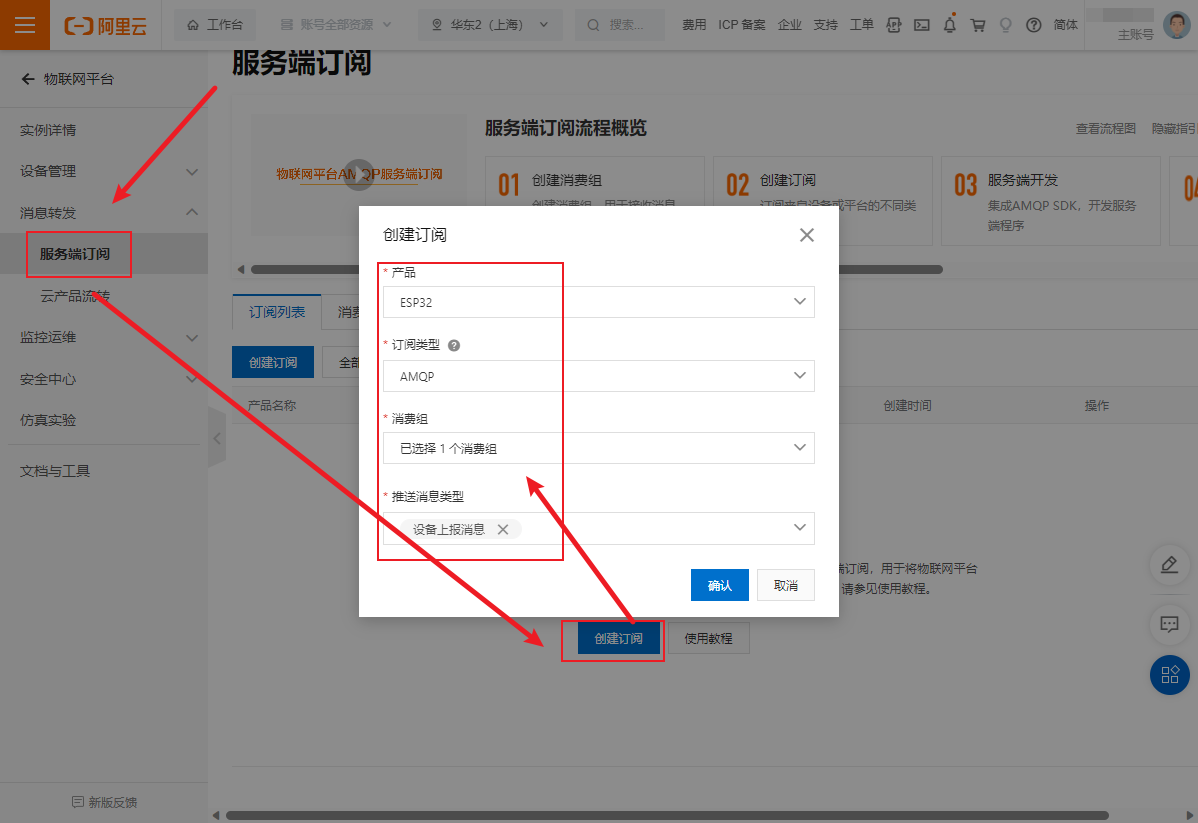
本操作就是将 ESP32cam 上传到阿里云物联网平台中的数据转发一份到处理端,处理端通过 AMQP 获取数据并解析进行下一步操作。
2.2 将阿里云平台中的数据通过AMQP实时拉取到本地
将图片拉取到本地使用 Nodejs 和 Python 两种方式。
- Node.js 程序较为完整,可将图片数据获取到并转化为图片存到本地
- Python 程序仅仅获取到数据并打印出来,仅供参考。
2.2.1 Node.js 获取阿里云物联网平台图片数据
在本地运行 Nodejs 程序,通过 AMQP 实时获取 ESP32cam 上传到阿里云的图片数据组合成图片并保存到本地中。
其中部分参数配置参考:
const container = require('rhea');
const crypto = require('crypto');
const fs = require("fs");
// 请根据实际情况修改下面的参数
// host,在物联网平台首页,查看开发配置中查看
var YourHost="iot-06z00xxxxt6xc.amqp.iothub.aliyuncs.com"
// 客户端ID,可自定义,长度不可超过64个字符
var YourClientId="esp32_001"
// 账号的 AccessKey。将鼠标移至账号头像上,然后单击AccessKey管理,获取AccessKey ID和AccessKey Secret。
var YourAccessKeyId="LTAI5tXXXXXXXXXXxLEMGYL2"
var YourAccessKeySecret="6vi2Txxxw9xxxrwig"
// 在对应实例的消息转发 > 服务端订阅 > 消费组列表查看您的消费组ID。
var YourConsumerGroupId="DEFAULT_GROUP"
// 物联网平台首页实例 ID
var YourIotInstanceId="iot-0600uxtxxsx"
// 存放完整的图片字符串
var imgStr = ""
// 16进制图片转base64
function to_base64(str) {
var digits = "ABCDEFGHIJKLMNOPQRSTUVWXYZabcdefghijklmnopqrstuvwxyz0123456789+/";
var base64_rep = "";
var cnt = 0;
var bit_arr = 0;
var bit_num = 0;
for (var n = 0; n < str.length; ++n) {
if (str[n] >= 'A' && str[n] <= 'Z') {
ascv = str.charCodeAt(n) - 55;
}
else if (str[n] >= 'a' && str[n] <= 'z') {
ascv = str.charCodeAt(n) - 87;
}
else {
ascv = str.charCodeAt(n) - 48;
}
bit_arr = (bit_arr << 4) | ascv;
bit_num += 4;
if (bit_num >= 6) {
bit_num -= 6;
base64_rep += digits[bit_arr >>> bit_num];
bit_arr &= ~(-1 << bit_num);
}
}
if (bit_num > 0) {
bit_arr <<= 6 - bit_num;
base64_rep += digits[bit_arr];
}
var padding = base64_rep.length % 4;
if (padding > 0) {
for (var n = 0; n < 4 - padding; ++n) {
base64_rep += "=";
}
}
return base64_rep;
}
//创建Connection。
var connection = container.connect({
//接入域名,请参见AMQP客户端接入说明文档。
'host': YourHost,
'port': 5671,
'transport':'tls',
'reconnect':true,
'idle_time_out':60000,
//userName组装方法,请参见AMQP客户端接入说明文档。
'username':YourClientId+'|authMode=aksign,signMethod=hmacsha1,timestamp=1573489088171,authId='+YourAccessKeyId+',iotInstanceId='+YourIotInstanceId+',consumerGroupId='+YourConsumerGroupId+'|',
//计算签名,password组装方法,请参见AMQP客户端接入说明文档。
'password': hmacSha1(YourAccessKeySecret, 'authId='+YourAccessKeyId+'×tamp=1573489088171'),
});
//创建Receiver Link
var receiver = connection.open_receiver();
//接收云端推送消息的回调函数。
container.on('message', function (context) {
var msg = context.message;
var messageId = msg.message_id;
var topic = msg.application_properties.topic;
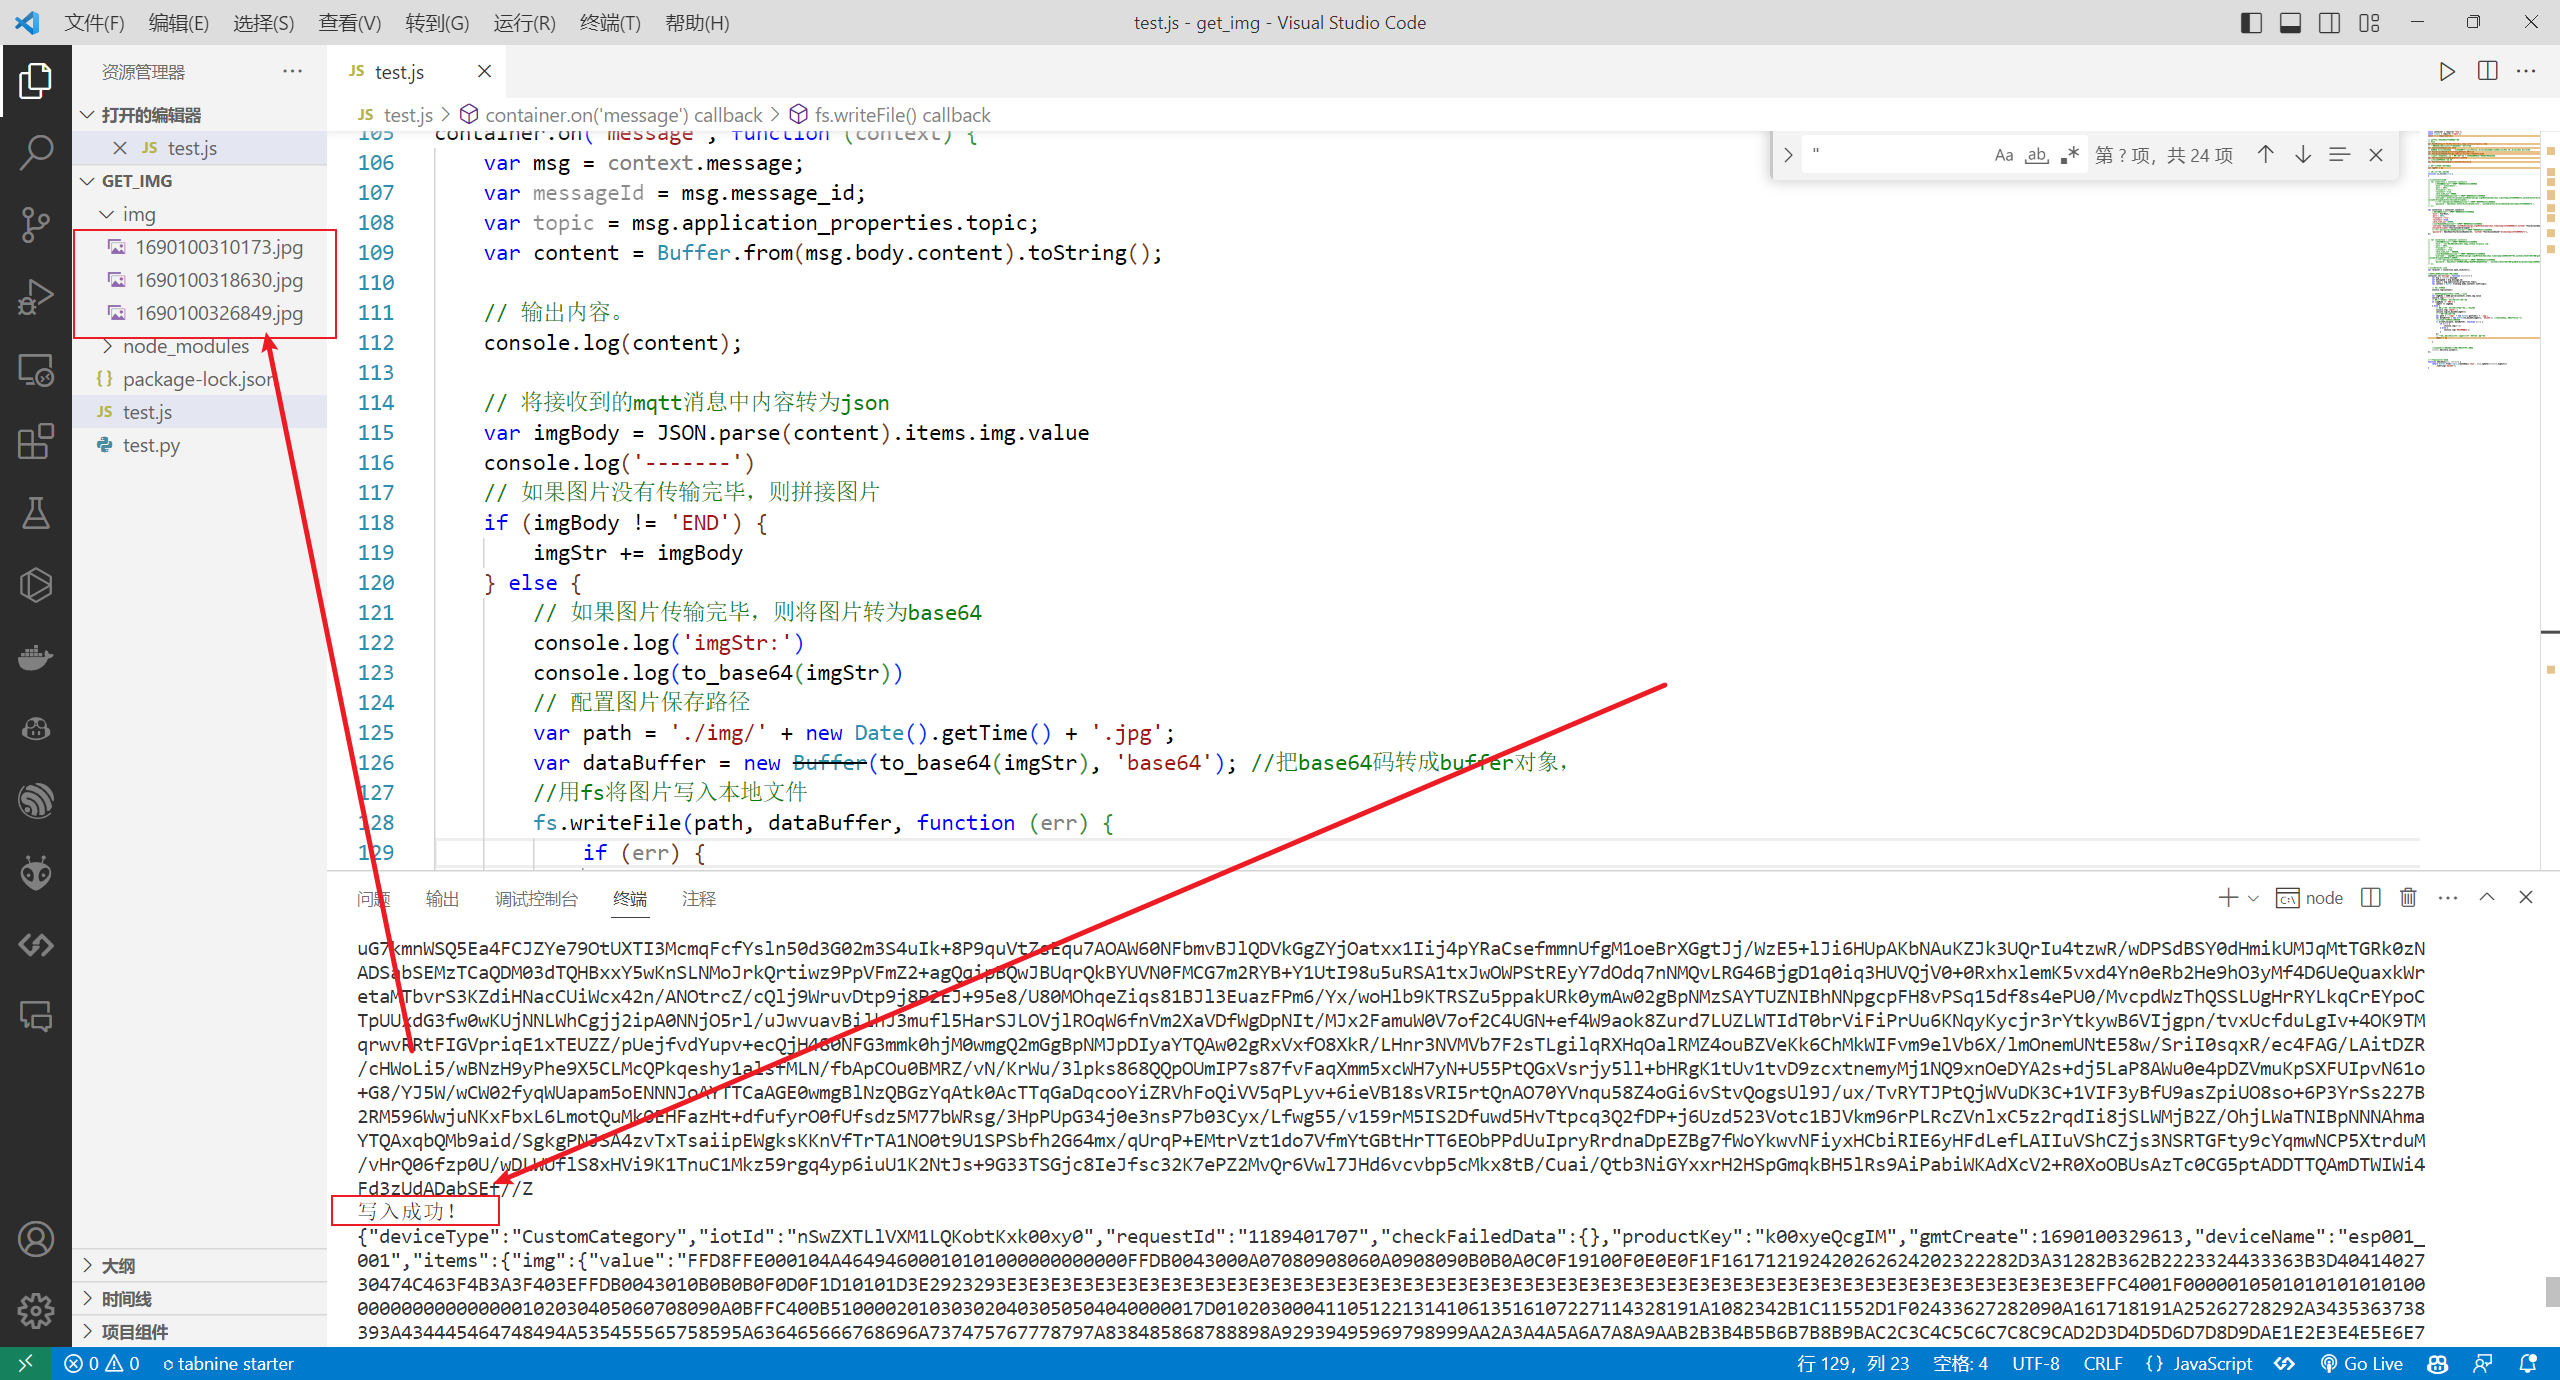
var content = Buffer.from(msg.body.content).toString();
// 输出内容。
console.log(content);
// 将接收到的mqtt消息中内容转为json
var imgBody = JSON.parse(content).items.img.value
console.log('-------')
// 如果图片没有传输完毕,则拼接图片
if (imgBody != 'END') {
imgStr += imgBody
} else {
// 如果图片传输完毕,则将图片转为base64
console.log('imgStr:')
console.log(to_base64(imgStr))
// 配置图片保存路径
var path = './img/' + new Date().getTime() + '.jpg';
var dataBuffer = new Buffer(to_base64(imgStr), 'base64'); //把base64码转成buffer对象,
//用fs将图片写入本地文件
fs.writeFile(path, dataBuffer, function (err) {
if (err) {
console.log(err);
} else {
console.log('写入成功!');
}
});
// 图片转换完毕后,清空imgStr,准备接受下一张图片
imgStr = ""
}
//发送ACK,注意不要在回调函数有耗时逻辑。
context.delivery.accept();
});
//计算password签名。
function hmacSha1(key, context) {
return Buffer.from(crypto.createHmac('sha1', key).update(context).digest())
.toString('base64');
}
Nodejs 本地运行图:
2.2.2 Python 获取阿里云物联网平台图片数据(仅供参考)
# encoding=utf-8
import time
import sys
import hashlib
import hmac
import base64
import stomp
import ssl
import schedule
import threading
# 导入json模块
import json
# 16进制转图片
import binascii
imgStr=""
i=1
def connect_and_subscribe(conn):
accessKey = "LTAxxxxxExxxL2"
accessSecret = "AsJWxxxxxxxxxxxxxR0xxxxxB"
consumerGroupId = "DEFAULT_GROUP"
# iotInstanceId:实例ID。
iotInstanceId = "iot-06z0xxxxxx6xc"
clientId = "esp32_001"
# 签名方法:支持hmacmd5,hmacsha1和hmacsha256。
signMethod = "hmacsha1"
timestamp = current_time_millis()
# userName组装方法,请参见AMQP客户端接入说明文档。
# 若使用二进制传输,则userName需要添加encode=base64参数,服务端会将消息体base64编码后再推送。具体添加方法请参见下一章节“二进制消息体说明”。
username = clientId + "|authMode=aksign" + ",signMethod=" + signMethod \
+ ",timestamp=" + timestamp + ",authId=" + accessKey \
+ ",iotInstanceId=" + iotInstanceId \
+ ",consumerGroupId=" + consumerGroupId + "|"
signContent = "authId=" + accessKey + "×tamp=" + timestamp
# 计算签名,password组装方法,请参见AMQP客户端接入说明文档。
password = do_sign(accessSecret.encode("utf-8"), signContent.encode("utf-8"))
conn.set_listener('', MyListener(conn))
conn.connect(username, password, wait=True)
# 清除历史连接检查任务,新建连接检查任务
schedule.clear('conn-check')
schedule.every(1).seconds.do(do_check,conn).tag('conn-check')
class MyListener(stomp.ConnectionListener):
def __init__(self, conn):
self.conn = conn
def on_error(self, frame):
print('received an error "%s"' % frame.body)
def on_message(self, frame):
print('received a message "%s"' % frame.body)
# print('received a message :' + json.loads(frame.body).items)
time.sleep(5)
def on_heartbeat_timeout(self):
print('on_heartbeat_timeout')
def on_connected(self, headers):
print("successfully connected")
conn.subscribe(destination='/topic/#', id=1, ack='auto')
print("successfully subscribe")
def on_disconnected(self):
print('disconnected')
connect_and_subscribe(self.conn)
def current_time_millis():
return str(int(round(time.time() * 1000)))
def do_sign(secret, sign_content):
m = hmac.new(secret, sign_content, digestmod=hashlib.sha1)
return base64.b64encode(m.digest()).decode("utf-8")
# 检查连接,如果未连接则重新建连
def do_check(conn):
print('check connection, is_connected: %s', conn.is_connected())
if (not conn.is_connected()):
try:
connect_and_subscribe(conn)
except Exception as e:
print('disconnected, ', e)
# 定时任务方法,检查连接状态
def connection_check_timer():
while 1:
schedule.run_pending()
time.sleep(10)
# 接入域名,请参见AMQP客户端接入说明文档。这里直接填入域名,不需要带amqps://前缀
conn = stomp.Connection([('iot-06xxxxxc.amqp.iothub.aliyuncs.com', 61614)], heartbeats=(0,300))
conn.set_ssl(for_hosts=[('iot-06xxxxxc.amqp.iothub.aliyuncs.com', 61614)], ssl_version=ssl.PROTOCOL_TLS)
try:
connect_and_subscribe(conn)
except Exception as e:
print('connecting failed')
raise e
# 异步线程运行定时任务,检查连接状态
thread = threading.Thread(target=connection_check_timer)
thread.start()
其中 Python 中的参数配置同 Nodejs。
参考:
Python 获取图片数据运行图如下:

至此,从阿里云IOT平台获取图片数据并保存到本地的程序已全部完成,程序目前较为简陋,仅供参考使用。
相关参考内容:
- CSDN:ESP32CAM的图片用MQTT也能传?
- CSDN:ESP32CAM连接阿里云物联网平台
- CSDN:ESP32-S2使用Arduino连接阿里云
- CSDN:连接阿里云失败MQTT connect failed
- Gitnote:ESP32cam系列教程001
本文首发于本人博客:https://blog.gitnote.cn/post/esp32cam_mqtt_aliyun_iot
版权信息: CC BY-NC-SA 4.0 (自由转载-非商用-相同方式共享-保持署名)