下载:https://dlcdn.apache.org/dolphinscheduler/3.2.0/apache-dolphinscheduler-3.2.0-bin.tar.gz
解压:tar -xzf  apache-dolphinscheduler-3.2.0-bin.tar.gz
创建用户dolphinscheduler
sudo useradd dolphinscheduler
sudo passwd dolphinscheduler
查看:cat /etc/passwd
创建dolphinscheduler用户home目录:
cd /home
sudo mkdir dolphinscheduler
sudo chown dolphinscheduler.dolphinscheduler dolphinscheduler/
配置sudo免密
# 添加免密 sudo
echo "dolphinscheduler ALL=(ALL) NOPASSWD: ALL" | sudo tee -a /etc/sudoers

# 禁用 requiretty(确保可以匹配)
sudo sed -i 's/^Defaults[[:space:]]\+requiretty/#Defaults requiretty/' /etc/sudoers
查看:sudo cat /etc/sudoers
su dolphinscheduler
ssh-keygen -t rsa -P '' -f ~/.ssh/id_rsa
cat ~/.ssh/id_rsa.pub >> ~/.ssh/authorized_keys
chmod 600 ~/.ssh/authorized_keys
该项目需要启动zookeeper ,自行教程
赋予用户dolphinscheduler文件夹权限
sudo chown -R dolphinscheduler:dolphinscheduler  apache-dolphinscheduler-3.2.0-bin
sudo chmod -R 755  apache-dolphinscheduler-3.2.0-bin
切换到用户dolphinscheduler:su dolphinscheduler
cd apache-dolphinscheduler-3.2.0-bin/bin/env/
cp install_env.sh install_env.sh-bak
vi  install_env.sh文件
#!/bin/bash
# ---------------------------------------------------------
# INSTALL MACHINE CONFIGURATION
# ---------------------------------------------------------

# Due to the master, worker, and API server being deployed on a single node,
# the IP of the server should be set to the machine's IP or localhost.

ips="localhost"

# SSH configuration
sshPort="22"

# Define DolphinScheduler component hosts
masters="localhost"
workers="localhost:default"
alertServer="localhost"
apiServers="localhost"
# DolphinScheduler installation path (will be auto-created if not exists)
installPath=~/dolphinscheduler-3.2

# Deployment user (must have SSH password-free login configured)
deployUser="root"
# ---------------------------------------------------------
# End of configuration
# ---------------------------------------------------------
chmod +x install_env.sh (改回为shell可执行文件)
修改dolphinscheduler_env.sh文件
cp dolphinscheduler_env.sh dolphinscheduler_env.sh-bak
rm dolphinscheduler_env.sh
vim dolphinscheduler_env.sh
# ---------------------------------------------------------

# JAVA_HOME, will use it to start DolphinScheduler server

export JAVA_HOME=/usr/lib/jvm/java-11-openjdk-amd64

# Database related configuration, set database type, username and password

# for PostgreSQL
export DATABASE=postgresql
export SPRING_PROFILES_ACTIVE=${DATABASE}
export SPRING_DATASOURCE_URL="jdbc:postgresql://127.0.0.1:5432/dolphinscheduler"
export SPRING_DATASOURCE_USERNAME=dolphinscheduler
export SPRING_DATASOURCE_PASSWORD=dolphinscheduler
# DolphinScheduler server related configuration
export SPRING_CACHE_TYPE=${SPRING_CACHE_TYPE:-none}
export SPRING_JACKSON_TIME_ZONE=${SPRING_JACKSON_TIME_ZONE:-UTC}
export MASTER_FETCH_COMMAND_NUM=${MASTER_FETCH_COMMAND_NUM:-10}
# Registry center configuration, determines the type and link of the registry center
export REGISTRY_TYPE=${REGISTRY_TYPE:-zookeeper}
export REGISTRY_ZOOKEEPER_CONNECT_STRING=${REGISTRY_ZOOKEEPER_CONNECT_STRING:-localhost:2181}
# Tasks related configurations, need to change the configuration if you use the related tasks.

#export HADOOP_HOME=${HADOOP_HOME:-/opt/soft/hadoop}

#export HADOOP_CONF_DIR=${HADOOP_CONF_DIR:-/opt/soft/hadoop/etc/hadoop}

#export SPARK_HOME=${SPARK_HOME:-/opt/soft/spark}

#export PYTHON_LAUNCHER=${PYTHON_LAUNCHER:-/opt/soft/python}

#export HIVE_HOME=${HIVE_HOME:-/opt/soft/hive}

#export FLINK_HOME=${FLINK_HOME:-/opt/soft/flink}

#export DATAX_LAUNCHER=${DATAX_LAUNCHER:-/opt/soft/datax/bin/python3}

#export PATH=$HADOOP_HOME/bin:$SPARK_HOME/bin:$PYTHON_LAUNCHER:$JAVA_HOME/bin:$HIVE_HOME/bin:$FLINK_HOME/bin:$DATAX_LAUNCHER:$PATH
cd  /home/dolphinscheduler/api-server/conf
vi application.yaml
```bash
server:
  port: 12345 改成自定义端口32000
  servlet:
    session:
      timeout: 120m
    context-path: /dolphinscheduler/
  compression:
    enabled: true
    mime-types: text/html,text/xml,text/plain,text/css,text/javascript,application/javascript,application/json,application/xml
  jetty:
    max-http-form-post-size: 5000000
    accesslog:
      enabled: true
      custom-format: '%{client}a - %u %t "%r" %s %O %{ms}Tms'
部署服务
#注意了:这一步才是真正的部署步骤,会将目录复制到dolphinscheduler用户的家目录内
/home/apache-dolphinscheduler-3.2.0-bin/standalone-server 把ui 移动到上一级目录 否则初始化ui界面找不到
su - dolphinscheduler
cd /home/dolphinscheduler/ && bash ./bin/install.sh
启停服务
一键停止集群所有服务
bash ./bin/stop-all.sh## 一键开启集群所有服务
bash ./bin/start-all.sh
启停 Master
bash ./bin/dolphinscheduler-daemon.sh stop master-server
bash ./bin/dolphinscheduler-daemon.sh start master-server
启停 Worker
bash ./bin/dolphinscheduler-daemon.sh start worker-server
bash ./bin/dolphinscheduler-daemon.sh stop worker-server
启停 Api
bash ./bin/dolphinscheduler-daemon.sh start api-server
bash ./bin/dolphinscheduler-daemon.sh stop api-server
启停 Alert
bash ./bin/dolphinscheduler-daemon.sh start alert-server
bash ./bin/dolphinscheduler-daemon.sh stop alert-server
打开浏览器访问链接http://xxxx:32000/dolphinscheduler/ui/login
输入默认登录用户名密码
用户名:admin
密码:dolphinscheduler123
1.安装Python
mkdir /data/soft
cd /data/soft
wget https://www.python.org/ftp/python/2.7.13/Python-2.7.13.tgz
tar -zvxf Python-2.7.13.tgz
cd Python-2.7.13
./configure --prefix=/usr/local/python2.7 --with-threads --enable-shared
make && make altinstall
2.安装Datax
cd /data/soft
wget http://datax-opensource.oss-cn-hangzhou.aliyuncs.com/datax.tar.gz
tar -zvxf datax.tar.gz
检查一下
python /data/soft/datax/bin/datax.py /data/soft/datax/job/job.json

// 出现上图执行下边文件,下图是执行成功结果
find /data/soft/datax/plugin/reader/ -type f -name "._*er" | xargs rm -rf
find /data/soft/datax/plugin/writer/ -type f -name "._*er" | xargs rm -rf
然后再这里图片位置中配置环境变量
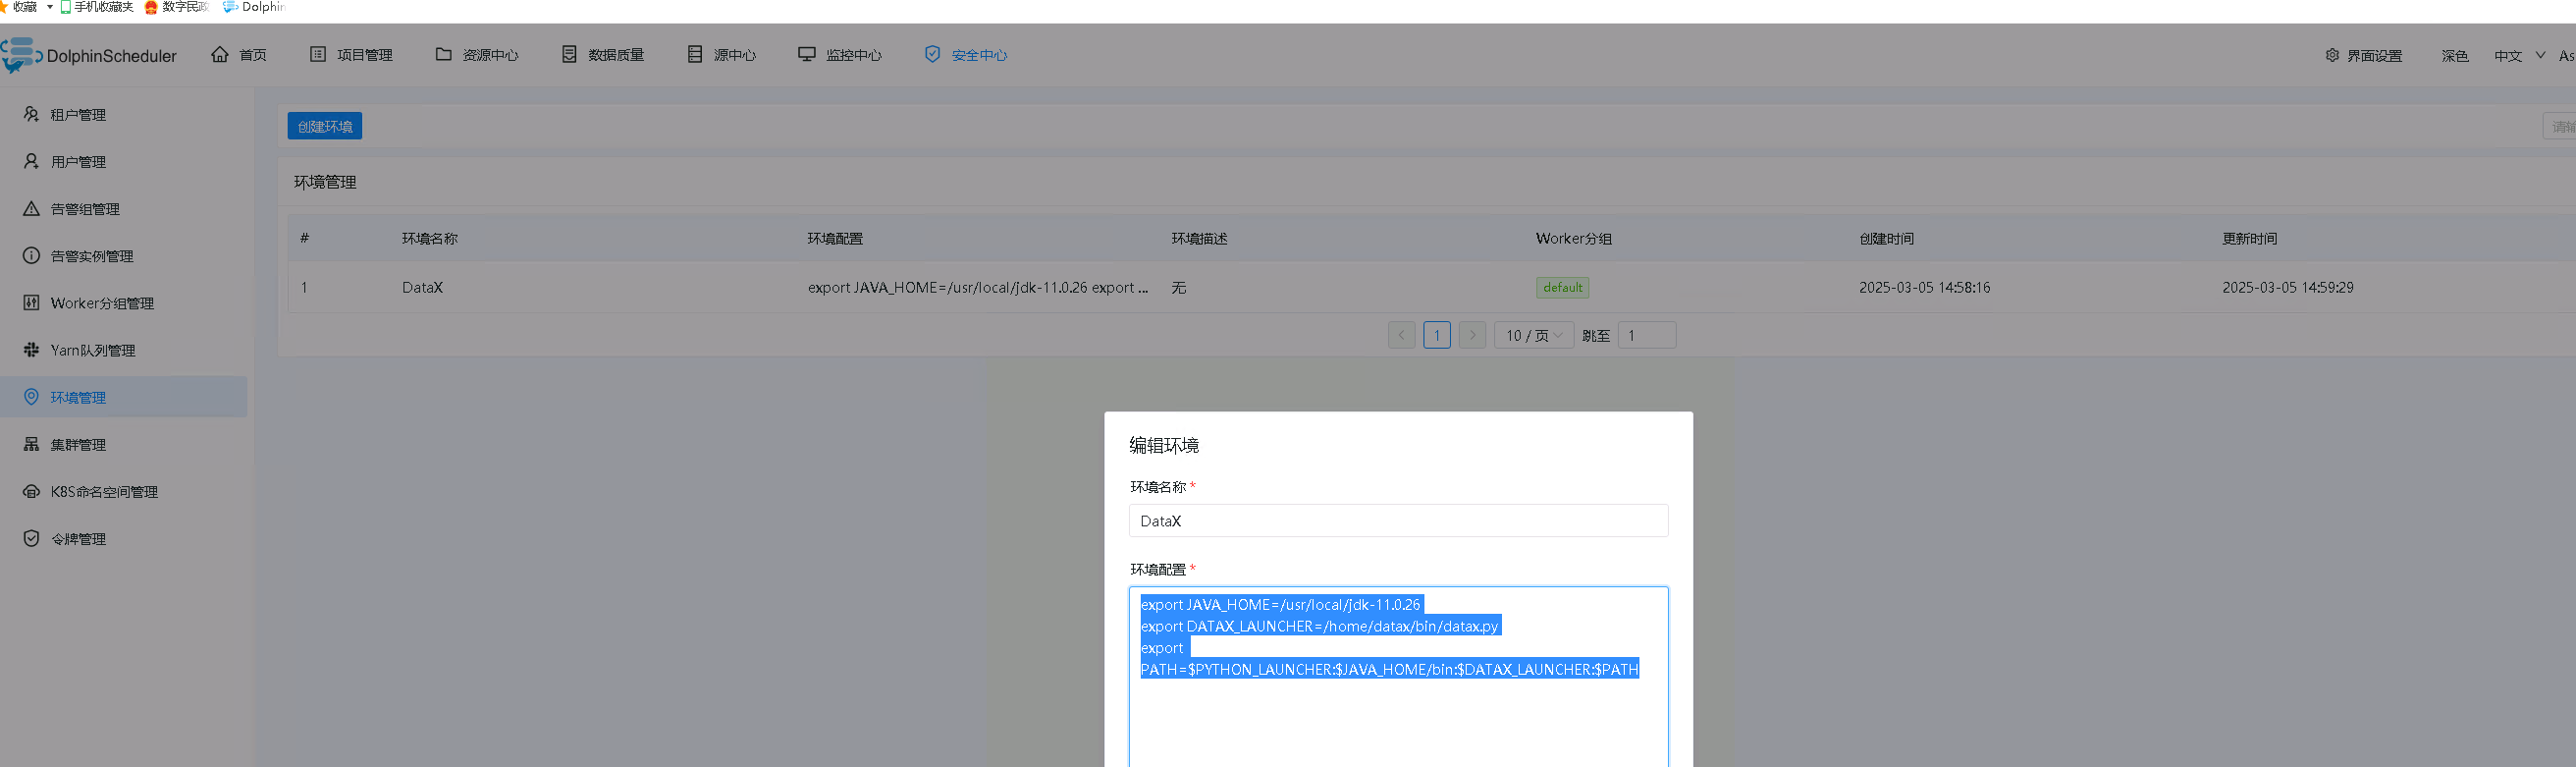
添加如下配置
# export PYTHON_LAUNCHER=/usr/local/python2.7/bin/python2.7
export JAVA_HOME=/usr/local/jdk-11.0.26
export DATAX_LAUNCHER=/home/datax/bin/datax.py
export PATH=$PYTHON_LAUNCHER:$JAVA_HOME/bin:$DATAX_LAUNCHER:$PATH
DATAX_HOME为datax解压地址
修改core.json,位置在:/datax/conf/core.json
core.transport.channel.speed.byte=-1修改为2000000
如果/usr/lib/python2.7文件里面为空的,就需要安装python2.7
sudo apt install python2-minimal
如果找不到python命令,需要在/usr/bin/为python添加快捷方式
sudo ln -s /usr/bin/python3 /usr/bin/python