前言
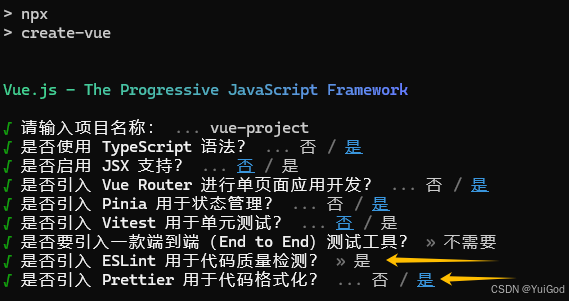
之前一直在用 vue 项目脚手架,使用 npm create vue@latest 创建的vue.js项目,里面已经集成了代码规范与格式化的插件,完全够用,也不需要我们自己动手(大大的赞,想起以前痛苦的配置经历),已经很久没有配置代码规范了。配置如下图:
上周我 vscode 中创建 uniapp vite-ts 项目的时候,发现项目里并没有代码规范与格式化的 modules 。纳尼?又要自己手动配置一次?(痛苦面具)
然后我去 ESlint 官网,发现 ESlint 已经更新到 v9.16.0 版本了(请看更新变化↗),而且 v9.x 是破坏版更新,不仅配置文件名不一样,还是新的默认配置格式。不过配置已经简化了很多很多,后面会讲到需要注意到地方。
注意!在 ESLint v9.x 中,配置文件名改成
eslint.config.js,并且是新的默认配置格式。以前的格式eslintrc已弃用,不能将旧版的配置内容直接复制到新版。
所以想再次详细的记录一下配置 eslint + prettier + stylelint + husky 的过程。
规范目标
在集成代码规范前,我们要明确一下目标:
- 引入
ESlint是为了只做语法错误检查,不做代码格式化(以后 ESlint 将完全废除格式化规则); - 引入
Prettier是为了代码格式化,规范自己的代码;可以格式化 js,ts,vue,json,yaml,html,css/scss/less 文件等,Prettier 有些规则会和 ESlint 冲突,所以需要解决冲突问题; - 引入
Stylelint,是为了扩展 style 语法上的错误检查 和 css 属性自动排序。需要添加扩展插件对vue文件的支持。 - 引入
Husky,git 的钩子,可以增强 git 功能,在提交或推送时自动检查提交的消息、代码并运行测试。如果只使用 husky 每次提交前都会把所有的文件都运行一遍 Lint 检查,时间成本太高。所以为了解决这个问题需要和lint-staged搭配使用。 - 引入
lint-staged,配合husky使用可以在提交代码前,对 git add/update 到在暂存区的文件,运行代码检查和格式化。
如果对 style 语法检查没有很大的要求,格式化方面 Prettier 已经足够胜任了。可以不用安装 Stylelint。
目前安装的插件版本都是最新的版本。
一、创建 uniapp cli 项目,并用 vscode 打开
我项目用的是 uniapp+vue3+vite+ts 版本,首先创建项目:
npx degit dcloudio/uni-preset-vue#vite-ts my-vue3-project
接着用 vscode 打开该项目。
二、引入 ESlint
ESlint更新v9.x版本后,要记住这几个重要的变化:
- 最低支持Node.js 版本(
^18.18.0、^20.9.0或>=21.1.0)注意不支持 v19;- 新的默认配置格式 (eslint.config.js),旧版格式 eslintrc 已弃用;
- 使用扁平化配置文件,不支持旧版写法了,可能需要你去官网了解一下。
是不是一脸懵逼,扁平化是个啥?没关系,下面会告诉你。
1. 安装 ESlint
npm init @eslint/config@latest --save-dev
按照以下选项选择:
@eslint/create-config: v1.4.0

√ How would you like to use ESLint? · problems
√ What type of modules does your project use? · esm
√ Which framework does your project use? · vue
√ Does your project use TypeScript? · typescript
√ Where does your code run? · browser, node
The config that you've selected requires the following dependencies:

eslint, globals, @eslint/js, typescript-eslint, eslint-plugin-vue
√ Would you like to install them now? · No / Yes
√ Which package manager do you want to use? · npm
注意:Where does your code run? 这一步要把 node 也选上(按空格选中)。

完成后,会生成 eslint.config.mjs 文件。没错!
已经不是 .eslintrc.cjs 文件了!!!
已经不是 .eslintrc.cjs 文件了!!!
已经不是 .eslintrc.cjs 文件了!!!
而且记住旧版的内容不能直接复制到新版!
eslint.config.mjs 文件生成的代码如下,如果上面没选择 node,可以在下面找到 languageOptions 选项,在 globals 内加上 ...globals.node。
// eslint.config.mjs

import globals from "globals";
import pluginJs from "@eslint/js";
import tseslint from "typescript-eslint";
import pluginVue from "eslint-plugin-vue";


/** @type {import('eslint').Linter.Config[]} */
export default [
  // 配置对象,全局 files
  {

    files: ["**/*.{js,mjs,cjs,ts,vue}"]},
  {

    languageOptions: {

     globals: {

    ...globals.browser, ...globals.node} }},
  // @eslint/js 扩展插件
  pluginJs.configs.recommended,
  // typescript-eslint 扩展插件
  ...tseslint.configs.recommended,
  // eslint-plugin-vue 扩展插件
  ...pluginVue.configs["flat/essential"],
  // eslint-plugin-vue 配置对象属性
  {

    files: ["**/*.vue"], languageOptions: {

    parserOptions: {

    parser: tseslint.parser}}},
];
拓展知识 1:eslint.config.mjs 扁平化结构(熟悉可跳过)
只需要记住结构如下,并导出一个配置对象数组,这就是官方说的扁平化配置文件:
// eslint.config.mjs

export default [
    {

     配置对象 },
    扩展插件1,
    扩展插件2,
    {

     扩展插件2的配置对象 },
    扩展插件3,
    {

     扩展插件3的配置对象 },
]
看看配置对象属性。重点就看下面这几个:
files: 一个 glob 模式数组,指示配置对象应应用到的文件。如果未指定,则配置对象应用于任何其他配置对象匹配的所有文件。ignores: 一个 glob 模式数组,指示配置对象不应应用到的文件。如果未指定,则配置对象应用于files匹配的所有文件。如果ignores在配置对象中没有任何其他键一起使用,则这些模式充当全局忽略项。plugins: 一个对象,包含插件名称到插件对象的名称-值映射。当指定files时,这些插件仅对匹配的文件可用,不指定则对全局的files生效。rules: 一个对象,包含已配置的规则。当指定files或ignores时,这些规则配置仅对匹配的文件可用,不指定则对全局的files生效。
拓展知识 2:关于ESlint合并的逻辑思路
扁平化结构的配置顺序很重要,首先ESlint会在数组中对象依次执行,对每个配置对象都会先看 files 和 ignores 是否与目标执行文件路径匹配,匹配上的配置对象,会从前往后依次合并,同属性的后面覆盖前面。可参考配置文件 - 级联配置对象,配置文件 - 配置规则,配置文件 - 组合配置。
对于我的理解是,类似于 Object.assign() 的合并规则。
举个栗子,请看下面 eslint.config.mjs 里的代码:
// eslint.config.mjs

/** @type {import('eslint').Linter.Config[]} */
export default [
  // 配置对象 1
  {


    ignores: ['src/uni_modules/', 'src/static/', '.vscode', '.husky'],
    files: ['**/*.{js,mjs,cjs,ts,vue}']
  },

  // 配置对象 2
  {


    languageOptions: {


      sourceType: 'script',
      rules: {


        'no-unused-vars': 'error'
      }
    }
  },

  // 配置对象 3
  {


    files: ['**/*.vue'],
    languageOptions: {

     parserOptions: {

     parser: tseslint.parser } }
  },

  // 配置对象 4
  {


    files: ['**/*.{js,mjs,cjs,jsx,mjsx,ts,tsx,mtsx}'],
    ignores: ['**/a.ts'],
    languageOptions: {


      sourceType: 'module'
    },
    rules: {


      'no-unused-vars': 'off',
      // 加了命名空间 'import-x/',避免与其他扩展插件发生冲突
      'import-x/no-named-as-default-member': 'off',
    }
  },

  // 配置对象 5
  {


    rules: {


      'import-x/no-named-as-default-member': 'error'
    }
  }
]
配置对象2,配置对象5没有 files 和 ignores,所以应用于任何其他配置对象匹配的所有文件。
对 a.ts 文件执行 npx eslint a.ts 时,ESlint 对 eslint.config.mjs 中的数组依次开始执行,对每个配置对象的files 和 ignores与 a.ts 文件匹配。
- 符合能与
a.ts文件匹配上的有配置对象1,配置对象2,配置对象5,所以依次按1,2,5合并,同属性后面覆盖前面,最终'import-x/no-named-as-default-member': 'error'。 - 配置对象4中有
ignores属性,所以匹配不到a.ts文件; - 如果配置对象4中没有
ignores属性,那么a.ts文件匹配上的有配置对象1,配置对象2,配置对象4,配置对象5,然后根据合并的后面覆盖前面原则,最终:
'sourceType': 'module','no-unused-vars': 'off','import-x/no-named-as-default-member': 'error'。
小知识:
假如你想要在
eslint-plugin-import-x扩展插件修改一些默认的规则,点击这个插件看源码可以发现,源码有一行代码用了plugins: ["import-x"],意思是给这个插件加上了规则命名空间,那么在rules对象中加上'import-x/',可以避免与其他插件rules属性发生冲突。
2. 配置 ignore 文件
我在官方文档的忽略文件看了一遍又一遍,发现没有 .eslintignore 文件的配置!!!纳尼?居然弃用了。官方改成了只能在 eslint.config.js 配置文件里配置了。
方式1(推荐):在配置对象里添加 ignores 数组:
ESlint 默认已经存在 ["**/node_modules/", ".git/"]了,所以不需要再专门配置。
建议 ignores 单独一个对象变成全局忽略,只含有一个 ignores 属性,这样 Eslint 会将这个全局忽略数组自动添加到 ["**/node_modules/", ".git/"] 的后面。不放心可以放到末尾,如下:
// eslint.config.js

export default [
  {


    ignores: ['src/uni_modules/', 'src/static/', '.vscode', '.husky']
  }
  ...
]
方式2:就想要创建一个 .eslintignore 文件
ESlint 也做了这个兼容,但是不建议这么做,后续版本可能不兼容了,而且这样配也挺麻烦的。
安装兼容包插件,并在 eslint.config.js 配置:
npm install --save-dev @eslint/compat
// eslint.config.js

import {

     includeIgnoreFile } from '@eslint/compat'
import path from 'node:path'
import {

     fileURLToPath } from 'node:url'

const __filename = fileURLToPath(import.meta.url)
const __dirname = path.dirname(__filename)
const eslintignorePath = path.resolve(__dirname, '.eslintignore')

export default [
  // ignores glob 模式
  // {


  //   ignores: ['src/uni_modules/', 'src/static/', '.vscode', '.husky']
  // },
  // 使用包含 .eslintignorePath 文件模式
  includeIgnoreFile(eslintignorePath)
]
接着在项目根目录下创建 .eslintignore 文件并添加:
# uniapp
src/uni_modules/
src/static/
.vscode
.husky
3. 安装必要的 ESlint 扩展插件
扩展插件说明:
- @eslint/js: 附带ESLint 团队推荐的规则,用于给下面其他扩展插件自定义配置扩展对象时,提供一个默认推荐规则。
- typescript-eslint:能够支持typescript 语法检查。
- eslint-plugin-vue:能够支持 vue.js 语法检查,并且能够识别
.vue文件。
如果使用 ESlint 的时候选择了支持 vue 和 typescript ,那么生成的 eslint.config.mjs 中已经引入了 typescript-eslint 插件和 eslint-plugin-vue 插件,无需再配置了。
如果没有请安装:
npm install --save-dev typescript-eslint eslint-plugin-vue
安装好后在 eslint.config.mjs 配置如下:
// eslint.config.mjs

import pluginJs from "@eslint/js";
import tseslint from "typescript-eslint";
import pluginVue from "eslint-plugin-vue";

/** @type {import('eslint').Linter.Config[]} */
export default [
  // @eslint/js 扩展插件
  pluginJs.configs.recommended,
  // typescript-eslint 扩展插件
  ...tseslint.configs.recommended,
  // eslint-plugin-vue 扩展插件
  ...pluginVue.configs["flat/essential"],
  // eslint-plugin-vue 配置对象属性
  {

    files: ["**/*.vue"], languageOptions: {

    parserOptions: {

    parser: tseslint.parser}}},
];
4. 安装非必要的 ESlint 扩展插件
扩展插件说明:
- eslint-plugin-import-x: 这是 eslint-plugin-import 插件的升级版,对模块化的 js 文件能够标记出模块语法中的问题,且防止文件路径和导入名称拼写错误的问题,还可以优化 import 导包顺序。例如:禁止使用导出名称作为默认导出的属性,确保所有导出都出现在其他语句之后等。
- eslint-import-resolver-typescript: 让 eslint-plugin-import-x 能够支持 typescript 版本。
npm install --save-dev eslint-plugin-import-x eslint-import-resolver-typescript
在 eslint.config.mjs 中配置:
// eslint.config.mjs

import pluginJs from '@eslint/js'
import eslintPluginImportX from 'eslint-plugin-import-x'
import tsParser from '@typescript-eslint/parser'

export default [
  // 其它配置
  ...

  pluginJs.configs.recommended,
  eslintPluginImportX.flatConfigs.recommended,
  eslintPluginImportX.flatConfigs.typescript,
  {


    files: ['**/*.{js,mjs,cjs,jsx,mjsx,ts,tsx,mtsx}'],
    ignores: ['eslint.config.mjs'],
    languageOptions: {


      parser: tsParser,
      ecmaVersion: 'latest',
      sourceType: 'module'
    },
    rules: {


      'no-unused-vars': 'off',
      'import-x/no-dynamic-require': 'warn',
      'import-x/no-nodejs-modules': 'warn'
    }
  }
]
三、引入 Prettier
1. 安装 Prettier
引入 Prettier,--save-exact 的作用是锁定版本,也就是版本号前面没有那个 ^。不加 --save-exact 也可以。
npm install --save-dev --save-exact prettier
2. 创建 prettier.config.mjs 文件
因为 ESlint 生成的文件为 eslint.config.mjs,我推荐 Prettier 命名规则也相同,并且还可以提供代码提示。推荐配置如下:
// prettier.config.mjs

/**
 * @see https://prettier.io/docs/en/configuration.html
 * @type {import("prettier").Config}
 */
const config = {


  // 不尾随分号
  semi: false,
  // 使用单引号
  singleQuote: true,
  // 多行逗号分割的语法中,最后一行不加逗号
  trailingComma: 'none',
  // 行尾风格,设置为auto
  endOfLine: 'auto',
  // 一行最多 100 字符
  printWidth: 120,
  // 使用 2 个空格缩进
  tabWidth: 2,
  // 不使用缩进符,而使用空格
  useTabs: false,
  // 单个参数的箭头函数不加括号 x => x
  arrowParens: 'avoid',
  // 对象大括号内两边是否加空格 { a:0 }
  bracketSpacing: true
}

export default config
3. 创建 .prettierignore 文件
这里复制了 .gitignore 文件的内容,并在末尾添加想要忽略的文件。
# Logs
logs
*.log

# Editor directories and files
.vscode
.idea
**/*.svg

# projects
.husky
node_modules
src/uni_modules/
src/static/
dist/

# uniapp 插件生成的文件
src/pages.json
src/manifest.json
4. 安装必要的 Prettier 扩展插件
在 Prettier 官方文档-Integrating with Linters 里,已经提到如何通过安装扩展插件来解决 ESlint 与 Prettier 冲突或不必要的规则问题:
扩展插件说明:
- eslint-config-prettier: 关闭所有不必要或可能与Prettier冲突的规则。注意这个插件仅关闭规则,需要搭配下面的 eslint-plugin-prettier 来使用。
- eslint-plugin-prettier: 将 Prettier 作为 ESlint 的扩展插件,成为 ESlint 语法检查规则的扩展部分。
安装步骤:
npm install --save-dev eslint-plugin-prettier eslint-config-prettier
在 eslint.config.js 文件中配置数组的末尾添加如下:
// eslint.config.js

// 导入这个可以一次性设置 `eslint-plugin-prettier` 和 `eslint-config-prettier`
import eslintPluginPrettierRecommended from 'eslint-plugin-prettier/recommended'

module.exports = [
  // 其它配置
  ...
  // Prettier 扩展插件
  ...eslintPluginPrettierRecommended
]
四、引入 Stylelint
从 Stylelint v15 开始, Stylelint 弃用了所有与 prettier 冲突的风格规则,并在 Stylelint v16 中删除了这些规则,引入 Stylelint 完全不与 Prettier 冲突了。
1. 安装 Stylelint
npm init stylelint
安装 stylelint 的同时,会附带安装 stylelint-config-standard。
2. 创建 stylelint.config.mjs 文件
安装完成后会自动创建一个 .stylelintrc.json 配置文件,我推荐把名字改成 prettier.config.mjs 与 ESlint 命名风格相同,并且还可以提供代码提示,修改配置如下:
// stylelint.config.mjs

/** @type {import('stylelint').Config} */
export default {


  extends: ['stylelint-config-standard']
}
3. 创建 .stylelintignore 文件
创建 .stylelintignore 文件,并添加想要忽略的文件:
node_modules
src/uni_modules/
src/static/
dist/

**/*.svg
4. 安装必要的 Stylelint 插件
扩展插件说明:
- stylelint-config-standard: Stylelint 社区推荐的标准可共享规则,规范会比较严格。有规则规范更宽松的 stylelint-config-recommended ,安装二选一;
- sass-embedded: Vite 更推荐使用这个插件来代替 Sass,编译速度更快,请看原文。并且 Vite 已经内置了 CSS 预处理器,无需再安装 postcss,postcss-html 和 postcss-scss,如果编译后样式有问题,那就添加上吧;
- stylelint-config-standard-scss: Stylelint 社区推荐的标准可共享 SCSS 规则,规范会比较严格。有规则规范更宽松的 stylelint-config-recommended-scss,安装二选一;
- stylelint-config-standard-vue: 针对 vue 文件扩展解析和规则,解决例如 vue 插值语法产生的
Unknown word (CssSyntaxError)错误。有规则更宽松的 stylelint-config-recommended-vue,安装二选一;
npm install --save-dev stylelint-config-standard sass-embedded stylelint-config-standard-scss stylelint-config-standard-vue
在 stylelint.config.mjs 文件里配置扩展插件,注意 extends 的顺序:
// stylelint.config.mjs

/** @type {import('stylelint').Config} */
export default {


  extends: [
    'stylelint-config-standard',
    'stylelint-config-standard-scss',
    'stylelint-config-standard-vue'
  ]
}
5. 安装非必要的 Stylelint 插件
扩展插件说明:
- stylelint-config-recess-order: css 属性按照 Recess 和 Bootstrap 的方式进行排序。
npm install --save-dev stylelint-config-recess-order
在 prettier.config.mjs 文件里配置扩展插件,注意 extends 的顺序:
// stylelint.config.mjs

/** @type {import('stylelint').Config} */
export default {


  extends: [ 'stylelint-config-recess-order']
}
五、项目中的完整代码
如果按照文章安装了上面的插件,可以直接复制使用。
安装插件的版本:
1. eslint.config.mjs 文件
// eslint.config.mjs

import globals from 'globals'
import pluginJs from '@eslint/js'
import {

     configs, parser } from 'typescript-eslint'
import pluginVue from 'eslint-plugin-vue'
import eslintPluginImportX from 'eslint-plugin-import-x'
import tsParser from '@typescript-eslint/parser'
import eslintPluginPrettierRecommended from 'eslint-plugin-prettier/recommended'

/** @type {import('eslint').Linter.Config[]} */
export default [
  // ignores 提升为全局忽略项
  {


    ignores: ['src/uni_modules/', 'src/static/', '.vscode', '.husky']
  },
  // 全局 files 指定 ESlint 匹配的文件
  {


    files: ['**/*.{js,mjs,cjs,jsx,mjsx,ts,tsx,mtsx,vue}']
  },
  // 基础配置
  {


    languageOptions: {


      globals: {

     ...globals.browser, ...globals.node },
      parser: tsParser,
      ecmaVersion: 'latest',
      sourceType: 'module'
    }
  },
  pluginJs.configs.recommended,
  ...configs.recommended,
  ...pluginVue.configs['flat/essential'],
  // eslint-plugin-import-x 扩展插件
  eslintPluginImportX.flatConfigs.recommended,
  eslintPluginImportX.flatConfigs.typescript,
  // prettier 扩展插件
  eslintPluginPrettierRecommended,
  // 仅对所有 vue 文件的自定义配置
  {


    files: ['**/*.vue'],
    languageOptions: {

     parserOptions: {

     parser: parser } }
  },
  // 自定义 rules
  {


    rules: {


      // 不允许存在未使用的变量
      '@typescript-eslint/no-unused-vars': 'warn',
      // vue 组件必须多单词驼峰命名,关闭它
      'vue/multi-word-component-names': 'off',
      // 禁止变量重新声明
      '@typescript-eslint/no-redeclare': 'error',
      // 禁止变量重新声明,与 @typescript-eslint 重复提示了,关闭它
      'no-redeclare': 'off'
    }
  }
]
2. prettier.config.mjs 文件
// prettier.config.mjs

/**
 * @see https://prettier.io/docs/en/configuration.html
 * @type {import("prettier").Config}
 */
const config = {


  // 不尾随分号
  semi: false,
  // 使用单引号
  singleQuote: true,
  // 多行逗号分割的语法中,最后一行不加逗号
  trailingComma: 'none',
  // 行尾风格,设置为auto
  endOfLine: 'auto',
  // 一行最多 100 字符
  printWidth: 120,
  // 使用 2 个空格缩进
  tabWidth: 2,
  // 不使用缩进符,而使用空格
  useTabs: false,
  // 单个参数的箭头函数不加括号 x => x
  arrowParens: 'avoid',
  // 对象大括号内两边是否加空格 { a:0 }
  bracketSpacing: true
}

export default config
3. stylelint.config.mjs 文件
注意 extends 的顺序:
// stylelint.config.mjs

/** @type {import('stylelint').Config} */
export default {


  extends: [
    'stylelint-config-standard',
    'stylelint-config-standard-scss',
    'stylelint-config-standard-vue/scss',
    'stylelint-config-recess-order'
  ],
  overrides: [
    // 扫描 .vue/html 文件中的<style>标签内的样式
    {


      files: ['**/*.{vue,html}'],
      customSyntax: 'postcss-html'
    },
    {


      files: ['**/*.{css,scss}'],
      customSyntax: 'postcss-scss'
    }
  ],
  rules: {


    'no-empty-source': null,
    // 处理不认识 rpx 问题
    'unit-no-unknown': [
      true,
      {


        ignoreUnits: ['rpx']
      }
    ],
    // 处理小程序page标签不认识的问题
    'selector-type-no-unknown': [
      true,
      {


        ignoreTypes: ['page']
      }
    ]
  }
}
4. .prettierignore 文件
# Logs
logs
*.log

# Editor directories and files
.vscode
.idea
**/*.svg

# projects
.husky
node_modules
src/uni_modules/
src/static/
dist/

# uniapp 插件生成的文件
src/pages.json
src/manifest.json
5. .stylelintignore 文件
node_modules
src/uni_modules/
src/static/
dist/

**/*.svg
6. package.json 文件
设置可以一个命令行执行整个项目的代码校验和格式化。
// package.json
{


  "scripts": {


    // 其它
    ...

    "lint": "eslint . --ext \"./**/*.{vue,js,ts,jsx,tsx,mjs,cjs}\" --fix",
    "lint:prettier": "prettier \"./**/*.{vue,js,ts,jsx,tsx,mjs,cjs,html,json,md}\" --write",
    "lint:stylelint": "stylelint \"./**/*.{vue,css,scss,html}\" --fix",
  }
}
7. 重启vscode
安装好插件并配置好文件后,需要重启 vscode 生效。
六、 引入 lint-staged + Husky
1. 安装 lint-staged 与 Husky
npm install --save-dev lint-staged husky
2. 在 package.json 中配置
// package.json
{


  "scripts": {


    // 其它配置
    ...
  },
  "lint-staged": {


    "**/*.{vue,js,ts,jsx,tsx,mjs,cjs,html,json,md}": [
      "prettier --write"
    ],
    "**/*.{vue,js,ts,jsx,tsx,mjs,cjs}": [
      "eslint --cache --fix"
    ],
    "**/*.{vue,css,scss,html}": [
      "stylelint --fix"
    ]
  },
}
3. 配置 Husky
接着执行以下命令:
npx husky init
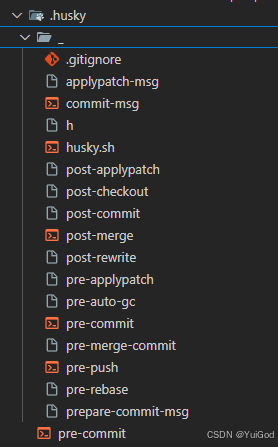
运行后,会在项目的根目录生成一个 .husky 包,里面包含有 pre-commit 文件。
并且会在 package.json 文件中会在 "scripts" 中自动添加 "prepare": "husky"。
4. 在 pre-commit 文件中添加 lint-staged
覆盖粘贴以下内容:
# pre-commit

#!/usr/bin/env sh
. "$(dirname -- "$0")/_/husky.sh"

# Run the pre-commit hook
npx --no-install -- lint-staged
5. 测试 Husky
想要成功执行 lint-staged + Husky 插件,需要先将项目变成 git 项目。
当项目中有 .git 文件时,打开控制台,重新运行以下命令:
npm run prepare
如果在 .husky 包里自动生成了 _ 包,说明已经激活了 husky。
这样,向 git 提交代码前就会自动执行 lint-staged 了。
七、安装 vscode 插件
已经安装了 vscode 插件的彦祖们,可以跳过本节。
仅对 vscode 编辑器优化代的插件,可以实现按 Ctrl + S 保存的时候对当前文件自动执行 lint 检查和格式化。
1. 在 vscode 应用市场搜索安装插件
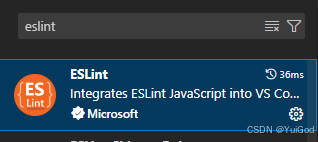
在vscode 左下角的应用市场,搜索这三个插件并安装:
2. 配置 settings.json 文件
在项目的根目录创建 .vscode/settings.json 文件,覆盖 vscode 的设置。
接着添加以下内容:
{


  "editor.formatOnPaste": false,
  // 保存时执行格式化
  "editor.formatOnSave": true,
  // 保存时指定插件操作
  "editor.codeActionsOnSave": {


    "source.fixAll": "never",
    "source.fixAll.eslint": "explicit",
    "source.fixAll.stylelint": "explicit"
  },
  // 设置默认用prettier插件进行代码格式化
  "editor.defaultFormatter": "esbenp.prettier-vscode",
  // stylelint 校验的文件格式
  "stylelint.validate": ["css", "less", "postcss", "scss", "vue", "sass", "vue", "html"]
}
设置好后,在任意文件里按 Ctrl + S 保存,即可自动执行格式化操作了。
如果想要对所有项目都生效,可以把上面的内容添加到 vscode 的全局设置里。
八、vscode 文件折叠
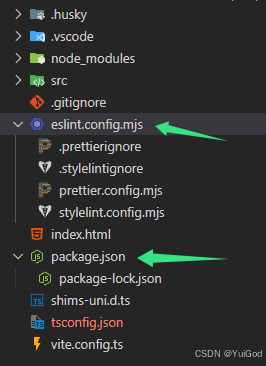
如果觉得根目录的文件太多,vscode 有一个独门绝活,可以折叠文件!如下图可以发现,eslint.config.mjs 就像文件夹一样可以折叠起来。
实现的方法也很简单,在根目录创建 .vscode/settings.json 文件。
在 settings.json 文件里添加如下内容:
{


  "explorer.fileNesting.enabled": true,
  "explorer.fileNesting.expand": false,
  "explorer.fileNesting.patterns": {


    "eslint.config.mjs": "prettier.config.mjs, .prettierignore, stylelint.config.mjs, .stylelintignore"
  }
}
结尾
全部配置好后,就可以愉快的使用项目了。