树莓派上的hailo检测是将检测,可视化一体化的,不少小伙伴说想提取它的结果做自定义的可视化。这点我之前已经探索过,需要将其自带的sink模式屏蔽,然后运行命令中加入-u参数,然后对detection程序进行修改即可。
模型训练与部署参考我的另一篇博客:树莓派5B+AI_KIT基于hailo模块转换重新训练的YOLO模型_hailo8 yolo-CSDN博客
自定义可视化可以参考我的项目:
以下进行案例演示。
一、sink模式屏蔽
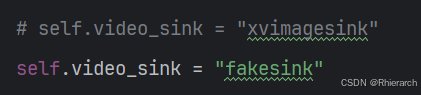
树莓派上hailo默认使用gst和用C语言写好并预编好的程序进行可视化,先将其默认的可视化方式进行屏蔽,在hailo-rpi5-examples\basic_pipelines下的hailo_rpi_common.py程序中搜索xvimagesink,将这一行修改如下:
二、结果获取与自定义可视化
修改hailo-rpi5-examples\basic_pipelines下的相应程序即可。
以检测为例,修改detection.py程序前半部分如下,这里使用tcp对后处理的程序进行传输。
其中的HOST需要根据树莓派自身所在的网络ip进行修改
import gi

gi.require_version('Gst', '1.0')
from gi.repository import Gst, GLib
import os
import argparse
import multiprocessing
import numpy as np
import setproctitle
import cv2
import time
import hailo
import socket
from hailo_rpi_common import (
    get_default_parser,
    QUEUE,
    get_caps_from_pad,
    get_numpy_from_buffer,
    GStreamerApp,
    app_callback_class,
)


# -----------------------------------------------------------------------------------------------
# User-defined class to be used in the callback function
# -----------------------------------------------------------------------------------------------
# Inheritance from the app_callback_class
class user_app_callback_class(app_callback_class):
    def __init__(self):
        super().__init__()
        self.new_variable = 42  # New variable example
        # 设置服务端的ip和端口号,ip需根据树莓派自身所在的网络ip进行修改
        HOST = '192.168.3.105'
        PORT = 12345
        ADDRESS = (HOST, PORT)
        tcpServer = socket.socket(socket.AF_INET, socket.SOCK_STREAM)
        tcpServer.bind(ADDRESS)

        print(f'port{ADDRESS} is waiting for connection')
        tcpServer.listen(1)
        self.conn, addr = tcpServer.accept()

    def send_img(self, cv_image):
        img_encode = cv2.imencode('.jpg', cv_image, [cv2.IMWRITE_JPEG_QUALITY, 99])[1]
        bytedata = img_encode.tobytes()

        flag_data = (str(len(bytedata))).encode() + ",".encode() + " ".encode()
        self.conn.send(flag_data)

        data = self.conn.recv(1024)
        if ("ok" == data.decode()):
            self.conn.send(bytedata)

        data = self.conn.recv(1024)
        if ("ok" == data.decode()):
            pass

# -----------------------------------------------------------------------------------------------
# User-defined callback function
# -----------------------------------------------------------------------------------------------

# This is the callback function that will be called when data is available from the pipeline
def app_callback(pad, info, user_data):
    # Get the GstBuffer from the probe info
    buffer = info.get_buffer()
    # Check if the buffer is valid
    if buffer is None:
        return Gst.PadProbeReturn.OK

    # Using the user_data to count the number of frames
    user_data.increment()

    # Get the caps from the pad
    format, width, height = get_caps_from_pad(pad)

    # If the user_data.use_frame is set to True, we can get the video frame from the buffer
    frame = None
    if user_data.use_frame and format is not None and width is not None and height is not None:
        # Get video frame
        frame = get_numpy_from_buffer(buffer, format, width, height)

    # Get the detections from the buffer
    roi = hailo.get_roi_from_buffer(buffer)
    detections = roi.get_objects_typed(hailo.HAILO_DETECTION)

    # 获取检测结果
    lb = []
    for detection in detections:
        label = detection.get_label()
        bbox = detection.get_bbox()
        confidence = detection.get_confidence()
        lb.append((label, confidence, bbox.xmin(), bbox.ymin(), bbox.xmax(), bbox.ymax()))

    if user_data.use_frame:
        # 自定义的处理逻辑,将检测结果画在图像上,可以参照这个例子自定义自己的处理逻辑
        for (label, confidence, xmin, ymin, xmax, ymax) in lb:
            xmin, ymin, xmax, ymax = int(xmin * width), int(ymin * height), int(xmax * width), int(ymax * height)

            cv2.rectangle(frame, (xmin, ymin), (xmax, ymax), (0, 255, 0), 2)
            cv2.putText(frame, f"{label}:{confidence * 100:.2f}%", (xmin, ymin - 10), cv2.FONT_HERSHEY_SIMPLEX, 0.5,
                        (0, 255, 0), 1)
        user_data.send_img(frame)
    return Gst.PadProbeReturn.OK


# -----------------------------------------------------------------------------------------------
# User Gstreamer Application
# -----------------------------------------------------------------------------------------------

# ......
三、运行检测程序
修改好后,在树莓派上,检测命令需要输入-u参数:
source setup_env.sh
python basic_pipelines/detection.py --input /dev/video0 --labels-json class.json --hef yolov8n.hef -u-
--input /dev/video0:输入源。可以是文件,USB或RPi相机(CSI相机模块)。/dev/video0为USB相机。对于RPi相机,使用--input rpi。默认为示例视频resources/detection0.mp4
-
--labels-json class.json:标签文件路径
-
--hef-path yolov8n.hef:hef文件的路径
-
-u:使用自定义的代码段
tcp接收端,可以是与树莓派连接同一网络的pc,可以运行以下程序获取检测后的图像进行显示:
import socket
import cv2
import numpy as np


def get_tcp_data(conn):
    while True:
        # 接收标志数据
        # try:
        data = conn.recv(1024)
        if data:
            # 通知客户端“已收到标志数据,可以发送图像数据”
            conn.send(b"ok")
            # 处理标志数据
            flag = data.decode().split(",")
            # 图像字节流数据的总长度
            total = int(flag[0])
            # 接收到的数据计数
            cnt = 0
            # 存放接收到的数据
            img_bytes = b""
            while cnt < total:
                # 当接收到的数据少于数据总长度时,则循环接收图像数据,直到接收完毕
                data = conn.recv(256000)
                img_bytes += data
                cnt += len(data)
                # print("receive:" + str(cnt) + "/" + flag[0])

            conn.send(b"ok")
            img = np.asarray(bytearray(img_bytes), dtype="uint8")
            img = cv2.imdecode(img, cv2.IMREAD_COLOR)
            img_BGR = cv2.cvtColor(img, cv2.COLOR_RGB2BGR)
            cv2.imshow("img", img_BGR)
            cv2.waitKey(1)
            if cv2.getWindowProperty('img', cv2.WND_PROP_AUTOSIZE) < 1:
                conn.close()
                cv2.destroyAllWindows()
                break

if __name__ == '__main__':
    HOST = '192.168.3.105'
    # 服务端端口号
    PORT = 12345
    ADDRESS = (HOST, PORT)
    # 创建一个套接字
    conn = socket.socket(socket.AF_INET, socket.SOCK_STREAM)
    # 连接远程ip
    conn.connect(ADDRESS)
    print(f"{ADDRESS} 已连接")
    get_tcp_data(conn)