概述
本篇只要介绍这么使用STM32CubeMx工具添加RT-Thread操作系统组件,码代码的IDE是keil。介绍单线程SRAM静态内存使用。如果还不知道,这么使用STM32CubeMx工具添加RT-Thread操作系统组件,请移步到《基于 STM32CubeMX 添加 RT-Thread 操作系统组件(一)- 详细介绍操作步骤》文章阅读。好了,喝杯茶先^_^,继续前行。上一篇介绍关于《中断管理》
一、STM32CubeMx配置
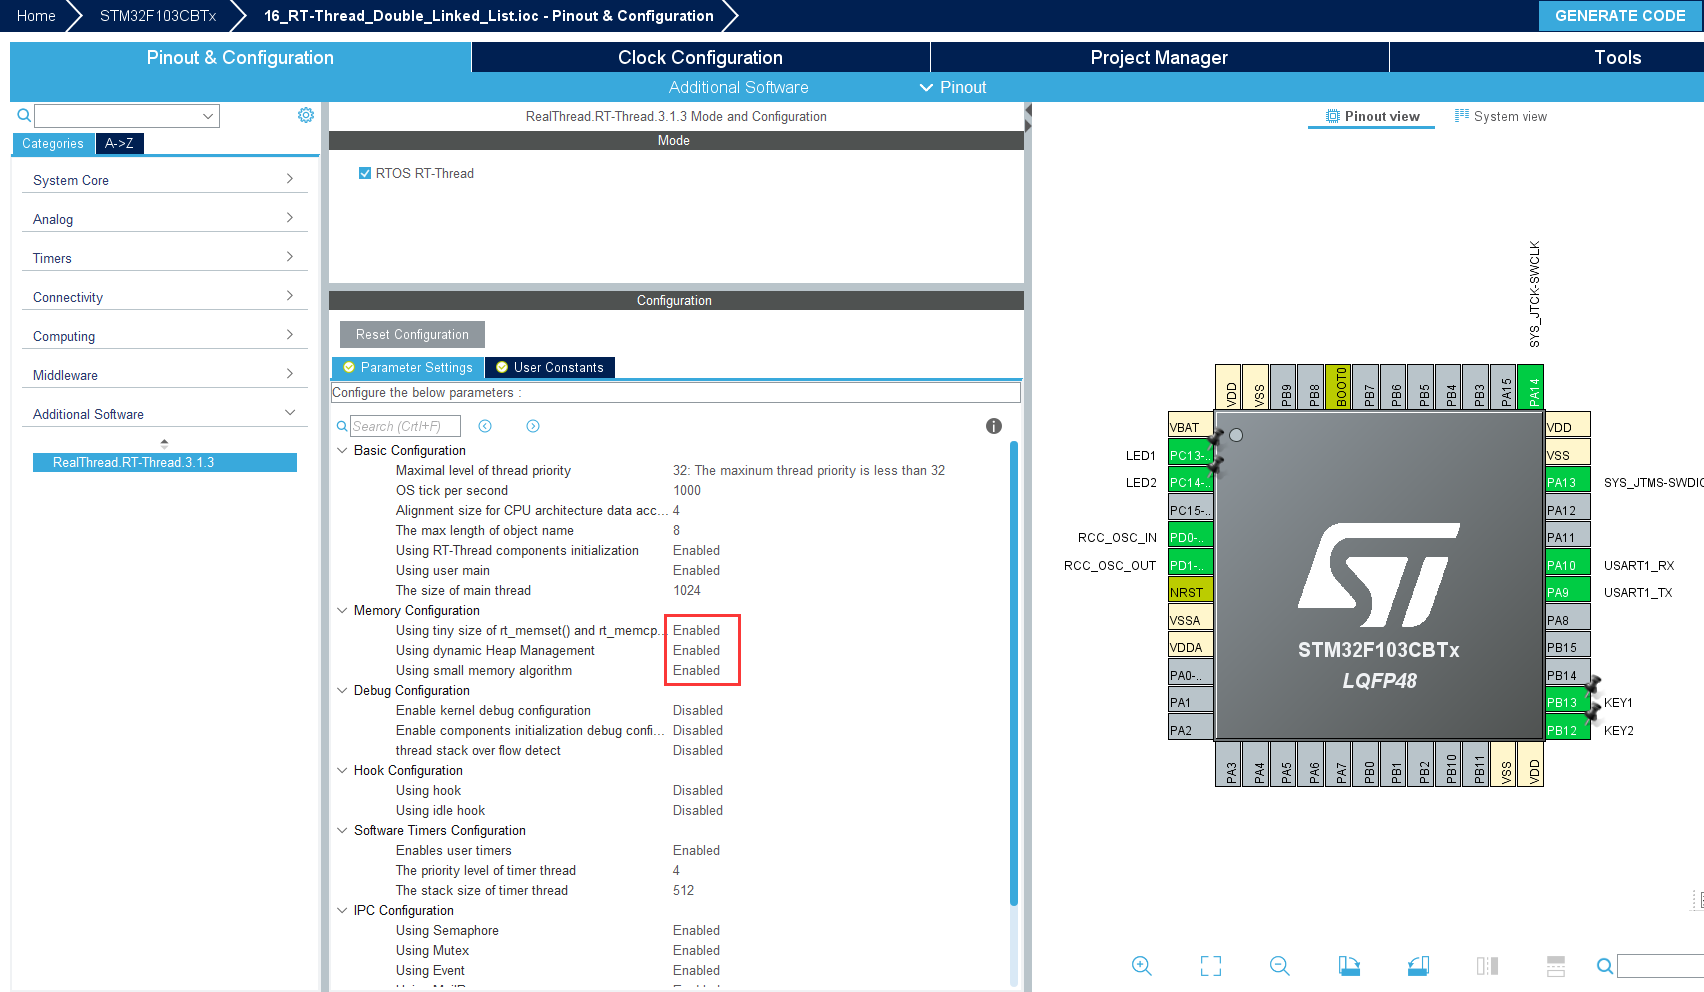
CubeMx参照上一篇文章介绍来配置即可,这里就不再做讲解了。
二、KEIL IDE
- 在Application/User文件夹,新建app_rt_thread.c文件,并添加如下代码:
#include "rtthread.h" #include "main.h" #include "stdio.h" #include <string.h> /* 定义线程控制块 */ static rt_thread_t test1_thread = RT_NULL; static rt_thread_t test2_thread = RT_NULL; /* 函数声明 */ static void test1_thread_entry(void* parameter); static void test2_thread_entry(void* parameter); int MX_RT_Thread_Init(void) { rt_kprintf("This is an RTT bidirectional linked list operation experiment!\n"); test1_thread = /* 线程控制块指针 */ rt_thread_create( "test1", /* 线程名字 */ test1_thread_entry, /* 线程入口函数 */ RT_NULL, /* 线程入口函数参数 */ 512, /* 线程栈大小 */ 2, /* 线程的优先级 */ 20); /* 线程时间片 */ /* 启动线程,开启调度 */ if (test1_thread != RT_NULL) rt_thread_startup(test1_thread); else return -1; test2_thread = /* 线程控制块指针 */ rt_thread_create( "test2", /* 线程名字 */ test2_thread_entry, /* 线程入口函数 */ RT_NULL, /* 线程入口函数参数 */ 512, /* 线程栈大小 */ 3, /* 线程的优先级 */ 20); /* 线程时间片 */ /* 启动线程,开启调度 */ if (test2_thread != RT_NULL) rt_thread_startup(test2_thread); else return -1; } /* ************************************************************ * 线程定义 ********************************************************* */ static void test1_thread_entry(void* parameter) { rt_list_t *head; /* 定义一个双向链表的头节点 */ rt_list_t *node1; /* 定义一个双向链表的头节点 */ rt_list_t *node2; /* 定义一个双向链表的头节点 */ head = rt_malloc(sizeof(rt_list_t));/* 申请动态内存 */ if (RT_NULL == head) /* 没有申请成功 */ rt_kprintf("Dynamic memory application failed!\n"); else rt_kprintf("Dynamic memory application is successful, the address of the head node is %d!\n",head); rt_kprintf("\n Bidirectional linked list initialization......\n"); rt_list_init(head); if (rt_list_isempty(head)) rt_kprintf("Bidirectional linked list initialization succeeded!\n\n"); /* 插入节点:顺序插入与从末尾插入 */ rt_kprintf("Add node and tail node additions......\n"); /* 动态申请第一个结点的内存 */ node1 = rt_malloc(sizeof(rt_list_t)); /* 动态申请第二个结点的内存 */ node2 = rt_malloc(sizeof(rt_list_t)); rt_kprintf("Add the first and second nodes.....\n"); /* 因为这是在某个节点后面添加一个节点函数 为后面的 rt_list_insert_before(某个节点之前) 添加节点做铺垫,两个函数添加完之后的顺序是 head -> node1 -> node2 */ rt_list_insert_after(head,node2); rt_list_insert_before(node2,node1); if ((node1->prev == head) && (node2->prev == node1)) rt_kprintf("Add node successfully!\n\n"); else rt_kprintf("Add node failed!\n\n"); rt_kprintf("Remove nodes......\n"); /* 删除已有节点 */ rt_list_remove(node1); rt_free(node1);/* 释放第一个节点的内存 */ if (node2->prev == head) rt_kprintf("Node removal successful\n\n"); /* 线程都是一个无限循环,不能返回 */ while (1) { HAL_GPIO_TogglePin(LED1_GPIO_Port, LED1_Pin); rt_thread_delay(500); //每 500ms 扫描一次 } } static void test2_thread_entry(void* parameter) { /* 线程都是一个无限循环,不能返回 */ while (1) { rt_kprintf("Thread running!\n"); HAL_GPIO_TogglePin(LED2_GPIO_Port, LED2_Pin); rt_thread_delay(1000); //每 1000ms 扫描一次 } } - 在main.c文件添加如下代码:
/* USER CODE END Header */ /* Includes ------------------------------------------------------------------*/ #include "main.h" #include "usart.h" #include "gpio.h" /* Private includes ----------------------------------------------------------*/ /* USER CODE BEGIN Includes */ /* USER CODE END Includes */ /* Private typedef -----------------------------------------------------------*/ /* USER CODE BEGIN PTD */ extern int MX_RT_Thread_Init(void); /* USER CODE END PTD */ /* Private define ------------------------------------------------------------*/ /* USER CODE BEGIN PD */ /* USER CODE END PD */ /* Private macro -------------------------------------------------------------*/ /* USER CODE BEGIN PM */ /* USER CODE END PM */ /* Private variables ---------------------------------------------------------*/ /* USER CODE BEGIN PV */ /* USER CODE END PV */ /* Private function prototypes -----------------------------------------------*/ void SystemClock_Config(void); /* USER CODE BEGIN PFP */ /* USER CODE END PFP */ /* Private user code ---------------------------------------------------------*/ /* USER CODE BEGIN 0 */ /* USER CODE END 0 */ /** * @brief The application entry point. * @retval int */ int main(void) { /* USER CODE BEGIN 1 */ /* USER CODE END 1 */ /* MCU Configuration--------------------------------------------------------*/ /* Reset of all peripherals, Initializes the Flash interface and the Systick. */ HAL_Init(); /* USER CODE BEGIN Init */ /* USER CODE END Init */ /* Configure the system clock */ SystemClock_Config(); /* USER CODE BEGIN SysInit */ /* USER CODE END SysInit */ /* Initialize all configured peripherals */ MX_GPIO_Init(); MX_USART1_UART_Init(); /* USER CODE BEGIN 2 */ MX_RT_Thread_Init(); /* USER CODE END 2 */ /* Infinite loop */ /* USER CODE BEGIN WHILE */ while (1) { /* USER CODE END WHILE */ /* USER CODE BEGIN 3 */ } /* USER CODE END 3 */ } - 自定义rt_hw_console_output()函数,在kservice.c文件添加中(重映射串口控制台到 rt_kprintf 函数)代码:
#include "usart.h"
.
.
.

RT_WEAK void rt_hw_console_output(const char *str)
{
    /* empty console output */
	/* 进入临界段 */
	rt_enter_critical();
	/* 直到字符串结束 */
	while (*str!='\0') {
	/* 换行 */
	if (*str=='\n') {
		HAL_UART_Transmit(&huart1,(uint8_t *)'\r',1,1000);
	}
		HAL_UART_Transmit(&huart1,(uint8_t *)(str++),1,1000);
	}
	/* 退出临界段 */
	rt_exit_critical();
}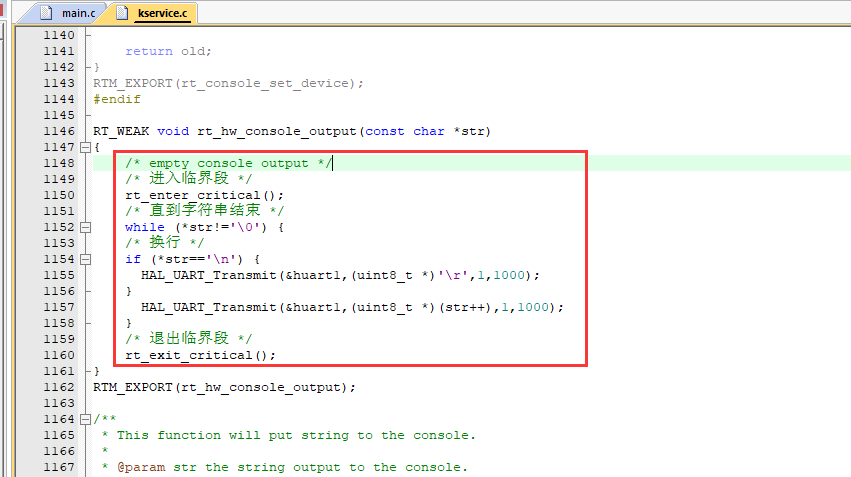
- 运行结果

源码:git